Raspberry Pi Button Debounce (Chống Nhiễu Nút Nhấn)
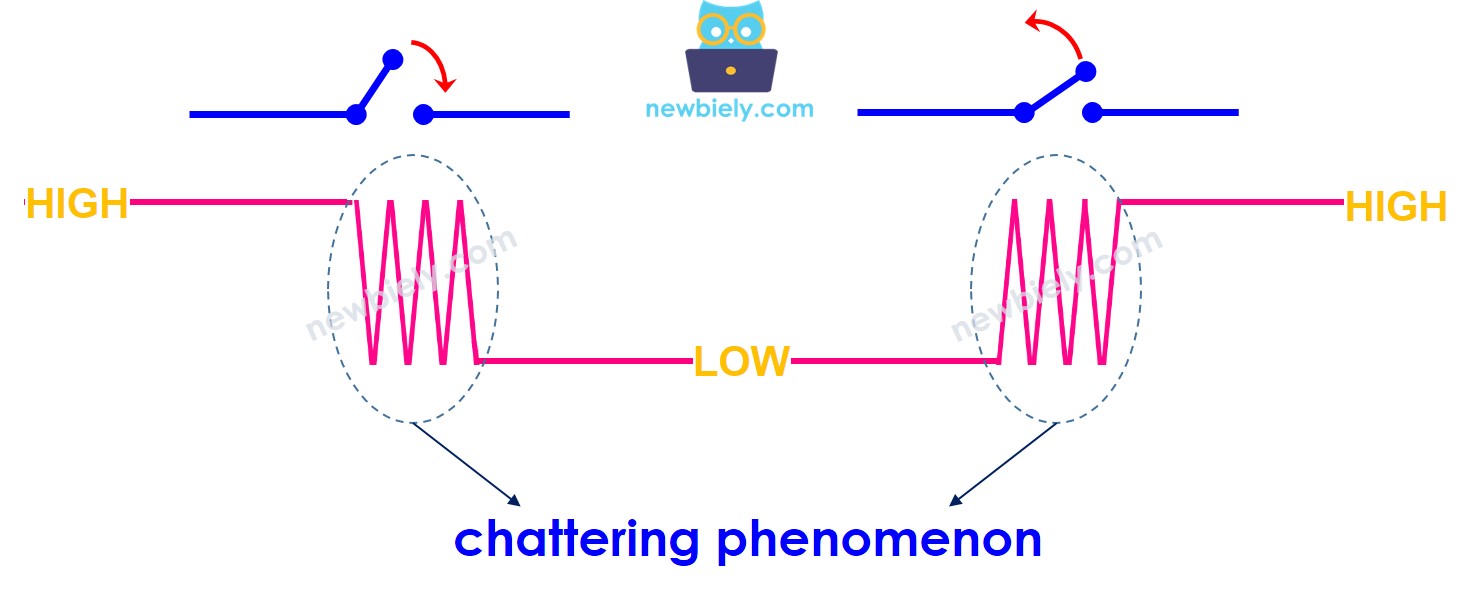
Khi một nút nhấn được bấm hoặc thả ra, hoặc khi một công tắc được chuyển đổi, người mới bắt đầu thường cho rằng trạng thái của nó đơn giản chỉ thay đổi từ LOW sang HIGH hoặc HIGH sang LOW. Trên thực tế, điều này không phải như vậy. Do các đặc tính cơ học và vật lý, trạng thái của nút nhấn (hoặc công tắc) có thể được chuyển đổi giữa LOW và HIGH nhiều lần. Hiện tượng này được gọi là chattering (nhiễu tiếp xúc). Chattering có thể khiến một lần nhấn được đọc thành nhiều lần nhấn, dẫn đến trục trặc trong một số ứng dụng.
Phương pháp để ngăn ngừa vấn đề này được gọi là debouncing hoặc debounce (chống nhiễu). Hướng dẫn này sẽ chỉ bạn cách thực hiện khi sử dụng nút nhấn với Raspberry Pi. Chúng ta sẽ học qua các bước sau:
Tiết lộ: Một số liên kết trong bài viết này là liên kết tiếp thị Amazon và có thể nhận hoa hồng theo chính sách của chương trình.
Về Nút Nhấn (Button)
Nếu bạn chưa quen thuộc với nút nhấn, bao gồm sơ đồ chân, cách hoạt động và cách lập trình chúng, các hướng dẫn sau có thể cung cấp cho bạn thêm thông tin:
Tạo file script Python button_without_debounce.py và thêm đoạn mã sau:
# Mã Raspberry Pi này được phát triển bởi newbiely.vn# Mã Raspberry Pi này được cung cấp để sử dụng công khai, không có ràng buộc.# Để xem hướng dẫn chi tiết và sơ đồ kết nối, vui lòng truy cập:# https://newbiely.vn/tutorials/raspberry-pi/raspberry-pi-button-debounceimport RPi.GPIOasGPIOimport time# Set the GPIO mode to BCMGPIO.setmode(GPIO.BCM)# Define the GPIO pin for your buttonBUTTON_PIN = 16# Set the initial state and pull-up resistor for the buttonGPIO.setup(BUTTON_PIN, GPIO.IN, pull_up_down=GPIO.PUD_UP)# Initialize the button statebutton_state = GPIO.input(BUTTON_PIN)try:# Main loopwhileTrue:# Read the current button state current_state = GPIO.input(BUTTON_PIN)# Check if the button state has changed and print when it doesif current_state != button_state:if current_state == GPIO.HIGH:print("Button released")else:print("Button pressed") button_state = current_state time.sleep(0.1) # Adjust the sleep time as neededexceptKeyboardInterrupt:# Clean up GPIO on exitGPIO.cleanup()
Lưu file và chạy script Python bằng cách thực hiện lệnh sau trong terminal:
python3 button_without_debounce.py
Script chạy trong vòng lặp vô hạn liên tục cho đến khi bạn nhấn Ctrl + C trong terminal.
Nhấn và giữ nút nhấn trong vài giây, sau đó thả ra.
Kiểm tra kết quả trong Terminal.
PuTTY - Raspberry Pi
Button pressed
Button pressed
Button pressed
Button released
Button released
Đôi khi, bạn chỉ nhấn và thả nút một lần. Tuy nhiên, Raspberry Pi nhận ra nó như nhiều lần nhấn và thả. Đây là hiện tượng chattering được đề cập ở đầu hướng dẫn. Hãy xem cách khắc phục điều này trong phần tiếp theo.
Đọc Button Có Debounce
Các Bước Thực Hiện
Tạo file script Python button_debounce.py và thêm đoạn mã sau:
# Mã Raspberry Pi này được phát triển bởi newbiely.vn# Mã Raspberry Pi này được cung cấp để sử dụng công khai, không có ràng buộc.# Để xem hướng dẫn chi tiết và sơ đồ kết nối, vui lòng truy cập:# https://newbiely.vn/tutorials/raspberry-pi/raspberry-pi-button-debounceimport RPi.GPIOasGPIO# Set the GPIO mode to BCMGPIO.setmode(GPIO.BCM)# Define the GPIO pin for your buttonBUTTON_PIN = 16# Define debounce time in millisecondsDEBOUNCE_TIME_MS = 200 # 200 milliseconds# Set the initial state and pull-up resistor for the buttonGPIO.setup(BUTTON_PIN, GPIO.IN, pull_up_down=GPIO.PUD_UP)# Initialize the button state and previous statebutton_state = GPIO.input(BUTTON_PIN)prev_button_state = button_state# Define a function to handle button pressesdef button_callback(channel):global button_state button_state = GPIO.input(BUTTON_PIN)# Add an event listener for the button pressGPIO.add_event_detect(BUTTON_PIN, GPIO.BOTH, callback=button_callback, bouncetime=DEBOUNCE_TIME_MS)try:# Main loopwhileTrue:# Check if the button state has changedif button_state != prev_button_state:if button_state == GPIO.HIGH:print("Button released")else:print("Button pressed") prev_button_state = button_stateexceptKeyboardInterrupt:# Clean up GPIO on exitGPIO.cleanup()
Lưu file và chạy script Python bằng cách thực hiện lệnh sau trong terminal:
python3 button_debounce.py
Nhấn và giữ nút nhấn trong vài giây, sau đó thả ra.
Kiểm tra kết quả trong terminal.
PuTTY - Raspberry Pi
Button pressed
Button released
Như bạn có thể quan sát thấy, bạn chỉ nhấn và thả nút một lần. Raspberry Pi phát hiện nó như một lần nhấn và thả duy nhất, do đó loại bỏ mọi nhiễu không cần thiết.
Raspberry Pi Button Debounce Cho Nhiều Nút Nhấn
# Mã Raspberry Pi này được phát triển bởi newbiely.vn# Mã Raspberry Pi này được cung cấp để sử dụng công khai, không có ràng buộc.# Để xem hướng dẫn chi tiết và sơ đồ kết nối, vui lòng truy cập:# https://newbiely.vn/tutorials/raspberry-pi/raspberry-pi-button-debounceimport RPi.GPIOasGPIO# Set the GPIO mode to BCMGPIO.setmode(GPIO.BCM)# Define the GPIO pins for your buttonsBUTTON_PIN_1 = 14BUTTON_PIN_2 = 15BUTTON_PIN_3 = 18# Define debounce time in millisecondsDEBOUNCE_TIME_MS = 200 # 200 milliseconds# Set the initial state and pull-up resistor for the buttonsGPIO.setup(BUTTON_PIN_1, GPIO.IN, pull_up_down=GPIO.PUD_UP)GPIO.setup(BUTTON_PIN_2, GPIO.IN, pull_up_down=GPIO.PUD_UP)GPIO.setup(BUTTON_PIN_3, GPIO.IN, pull_up_down=GPIO.PUD_UP)# Initialize the button states and previous states for all buttonsbutton_state_1 = GPIO.input(BUTTON_PIN_1)button_state_2 = GPIO.input(BUTTON_PIN_2)button_state_3 = GPIO.input(BUTTON_PIN_3)prev_button_state_1 = button_state_1prev_button_state_2 = button_state_2prev_button_state_3 = button_state_3# Define a function to handle button pressesdef button_callback_1(channel):global button_state_1 button_state_1 = GPIO.input(BUTTON_PIN_1)def button_callback_2(channel):global button_state_2 button_state_2 = GPIO.input(BUTTON_PIN_2)def button_callback_3(channel):global button_state_3 button_state_3 = GPIO.input(BUTTON_PIN_3)# Add event listeners for the buttonsGPIO.add_event_detect(BUTTON_PIN_1, GPIO.BOTH, callback=button_callback_1, bouncetime=DEBOUNCE_TIME_MS)GPIO.add_event_detect(BUTTON_PIN_2, GPIO.BOTH, callback=button_callback_2, bouncetime=DEBOUNCE_TIME_MS)GPIO.add_event_detect(BUTTON_PIN_3, GPIO.BOTH, callback=button_callback_3, bouncetime=DEBOUNCE_TIME_MS)try:# Main loopwhileTrue:# Check if the button states have changed and print when they doif button_state_1 != prev_button_state_1:if button_state_1 == GPIO.HIGH:print("Button 1 released")else:print("Button 1 pressed") prev_button_state_1 = button_state_1if button_state_2 != prev_button_state_2:if button_state_2 == GPIO.HIGH:print("Button 2 released")else:print("Button 2 pressed") prev_button_state_2 = button_state_2if button_state_3 != prev_button_state_3:if button_state_3 == GPIO.HIGH:print("Button 3 released")else:print("Button 3 pressed") prev_button_state_3 = button_state_3exceptKeyboardInterrupt:# Clean up GPIO on exitGPIO.cleanup()
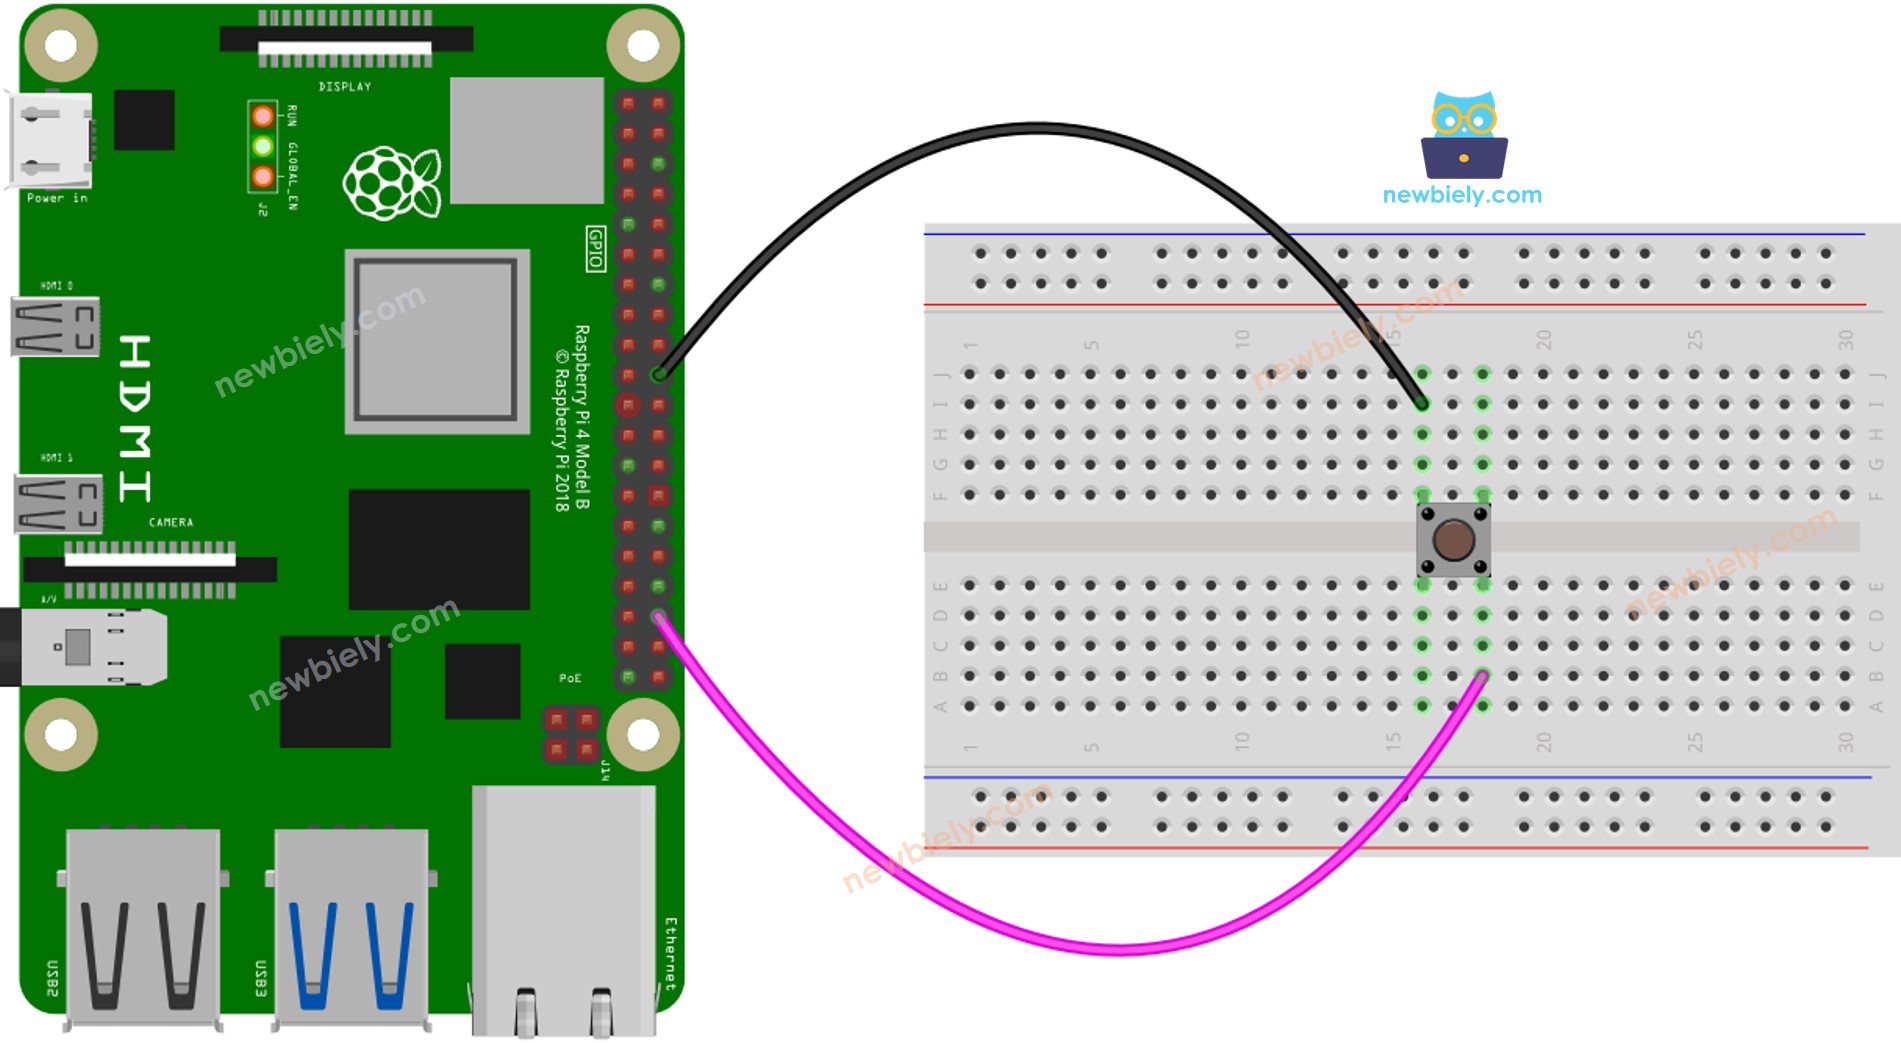
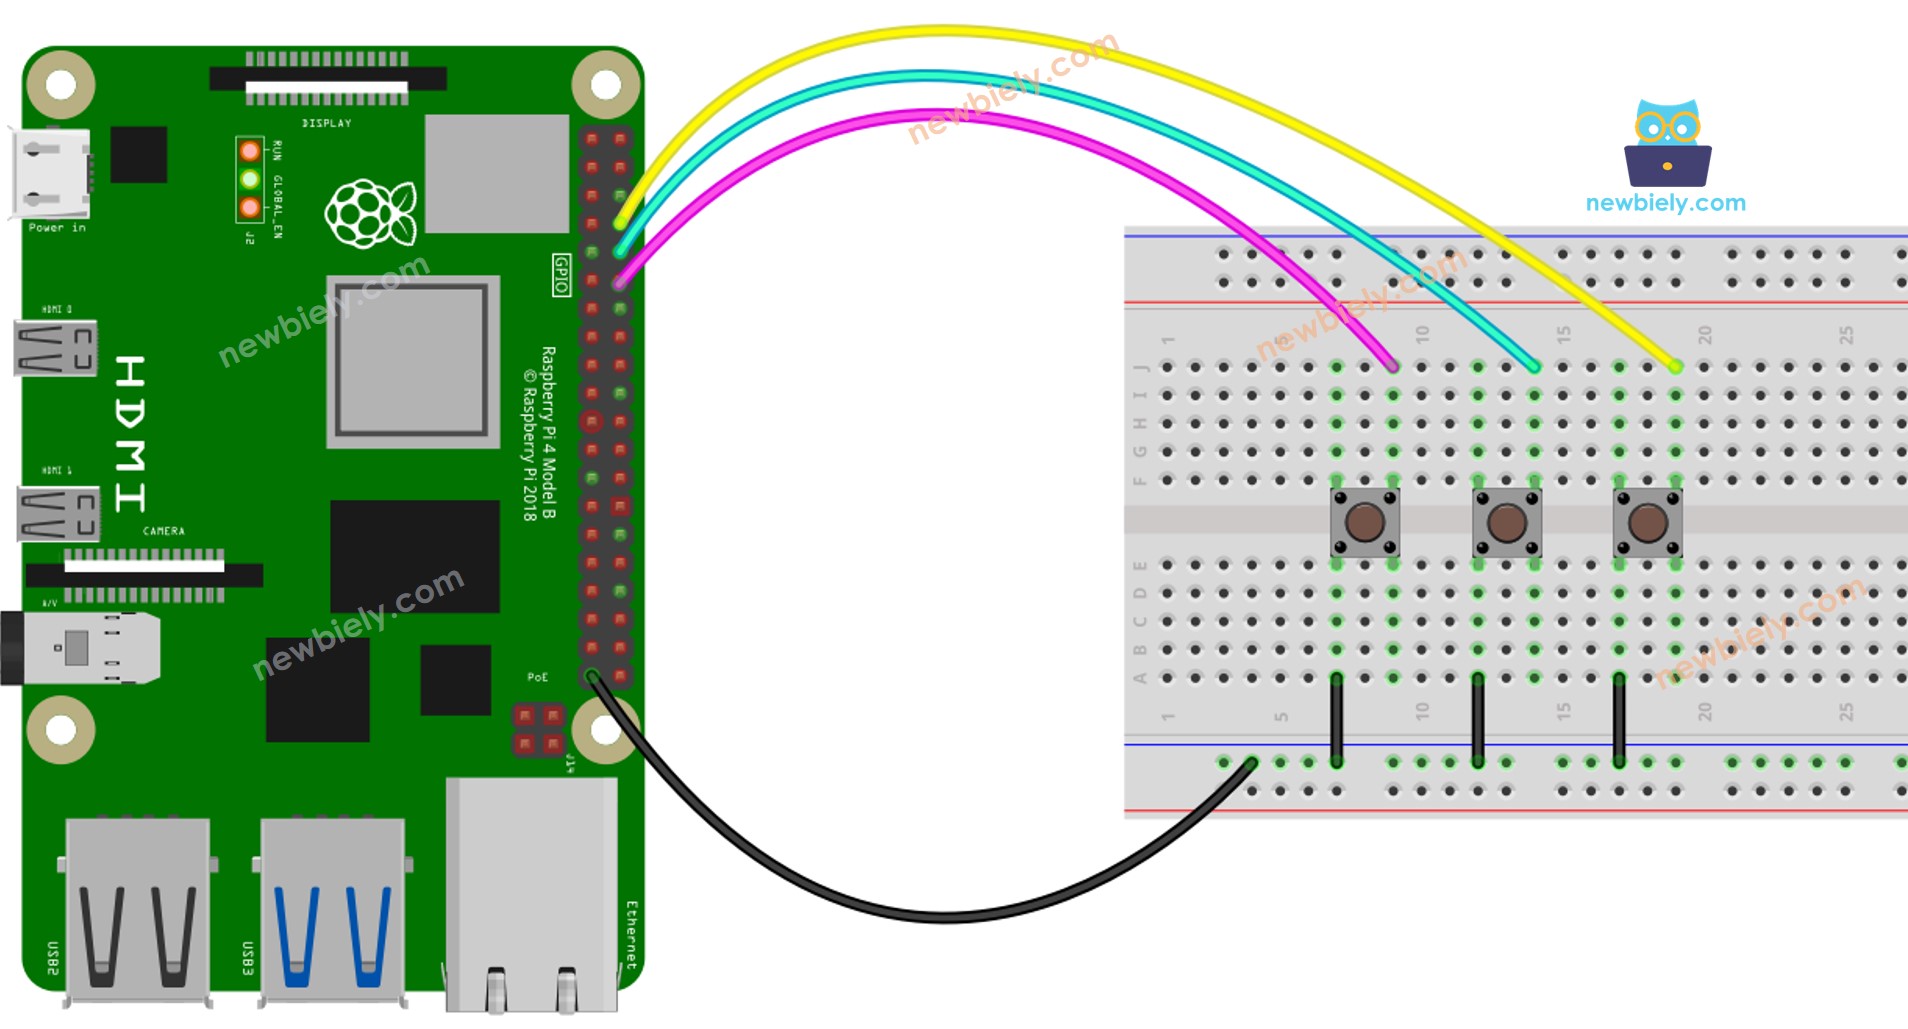
Sơ đồ minh họa kết nối dây cho đoạn mã được đề cập:
This image is created using Fritzing. Click to enlarge image
Video Tutorial
Việc sản xuất video tốn rất nhiều thời gian. Nếu video hướng dẫn hữu ích cho việc học của bạn, hãy đăng ký kênh YouTube để ủng hộ. Nếu nhu cầu đủ cao, chúng tôi sẽ cố gắng làm thêm nhiều video.

 English for KidsHọc tiếng Anh vui nhộn cho trẻ nhỏ.Tải về trênGoogle PlayTải về trênApp Store
 Bubble NoteGhi chú tự xóa — viết như nhắn tin.Tải về trênGoogle PlayTải về trênApp Store
 Tôi Không MuaĐánh bại mua sắm bốc đồng, tiết kiệm hơn.Tải về trênGoogle PlayTải về trênApp Store
 Con Đường Tri ThứcBài thi thử để học mọi thứ.Tải về trênGoogle PlayTải về trênApp Store