Raspberry Pi Cảm Biến Nhiệt Độ Độ Ẩm OLED
Hướng dẫn này sẽ chỉ bạn cách sử dụng Raspberry Pi để đọc nhiệt độ và độ ẩm từ cảm biến DHT11/DHT22 và hiển thị trên màn hình OLED.
Phần Cứng Cần Thiết
| 1 | × | Raspberry Pi 5 | Amazon | |
| 1 | × | SSD1306 I2C OLED Display 128x64 | Amazon | |
| 1 | × | SSD1306 I2C OLED Display 128x32 | Amazon | |
| 1 | × | cảm biến nhiệt độ và độ ẩm DHT11 | Amazon | |
| 1 | × | Alternatively, DHT11 Sensor | Amazon | |
| 1 | × | dây jumper (Dây nối) | Amazon |
Bạn có thể sử dụng cảm biến DHT22 thay cho cảm biến DHT11.
| 1 | × | (Khuyến nghị) Screw Terminal Block Shield for Raspberry Pi | Amazon | |
| 1 | × | (Khuyến nghị) Raspberry Pi Prototyping Base Plate & Breadboard Kit | Amazon | |
| 1 | × | (Khuyến nghị) HDMI Touch Screen Monitor for Raspberry Pi | Amazon |
Or you can buy the following kits:
| 1 | × | DIYables Sensor Kit (18 sensors/displays) | Amazon |
Tiết lộ: Một số liên kết trong bài viết này là liên kết tiếp thị Amazon và có thể nhận hoa hồng theo chính sách của chương trình.
Về Màn Hình OLED, Cảm Biến Nhiệt Độ Độ Ẩm DHT11 và DHT22
Nếu bạn chưa quen thuộc với màn hình OLED, cảm biến nhiệt độ độ ẩm DHT11 và DHT22 (bao gồm sơ đồ chân, chức năng, lập trình, v.v.), các hướng dẫn sau có thể giúp bạn:
- Hướng dẫn Raspberry Pi - OLED
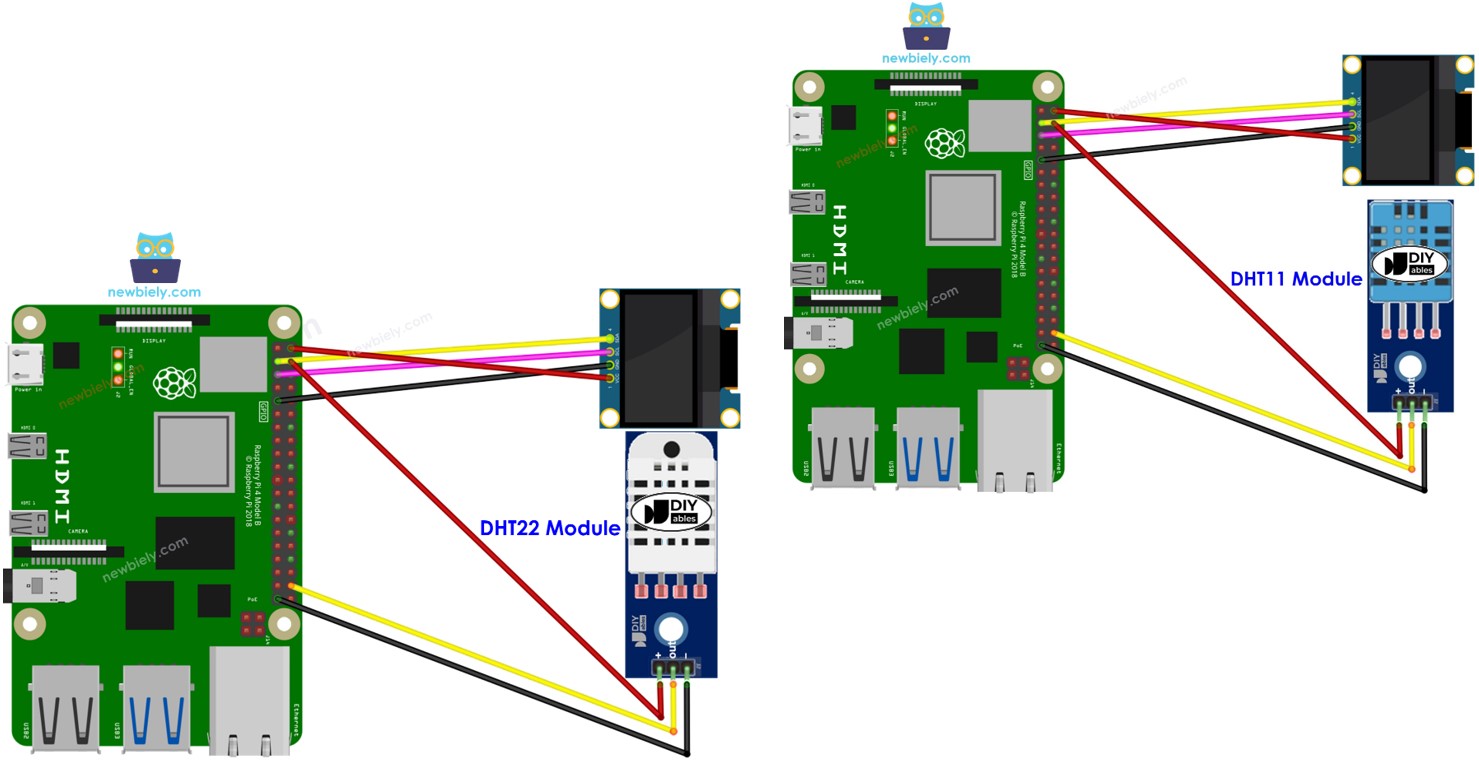
Sơ Đồ Đấu Nối
Đấu Nối Raspberry Pi - DHT11 Module OLED
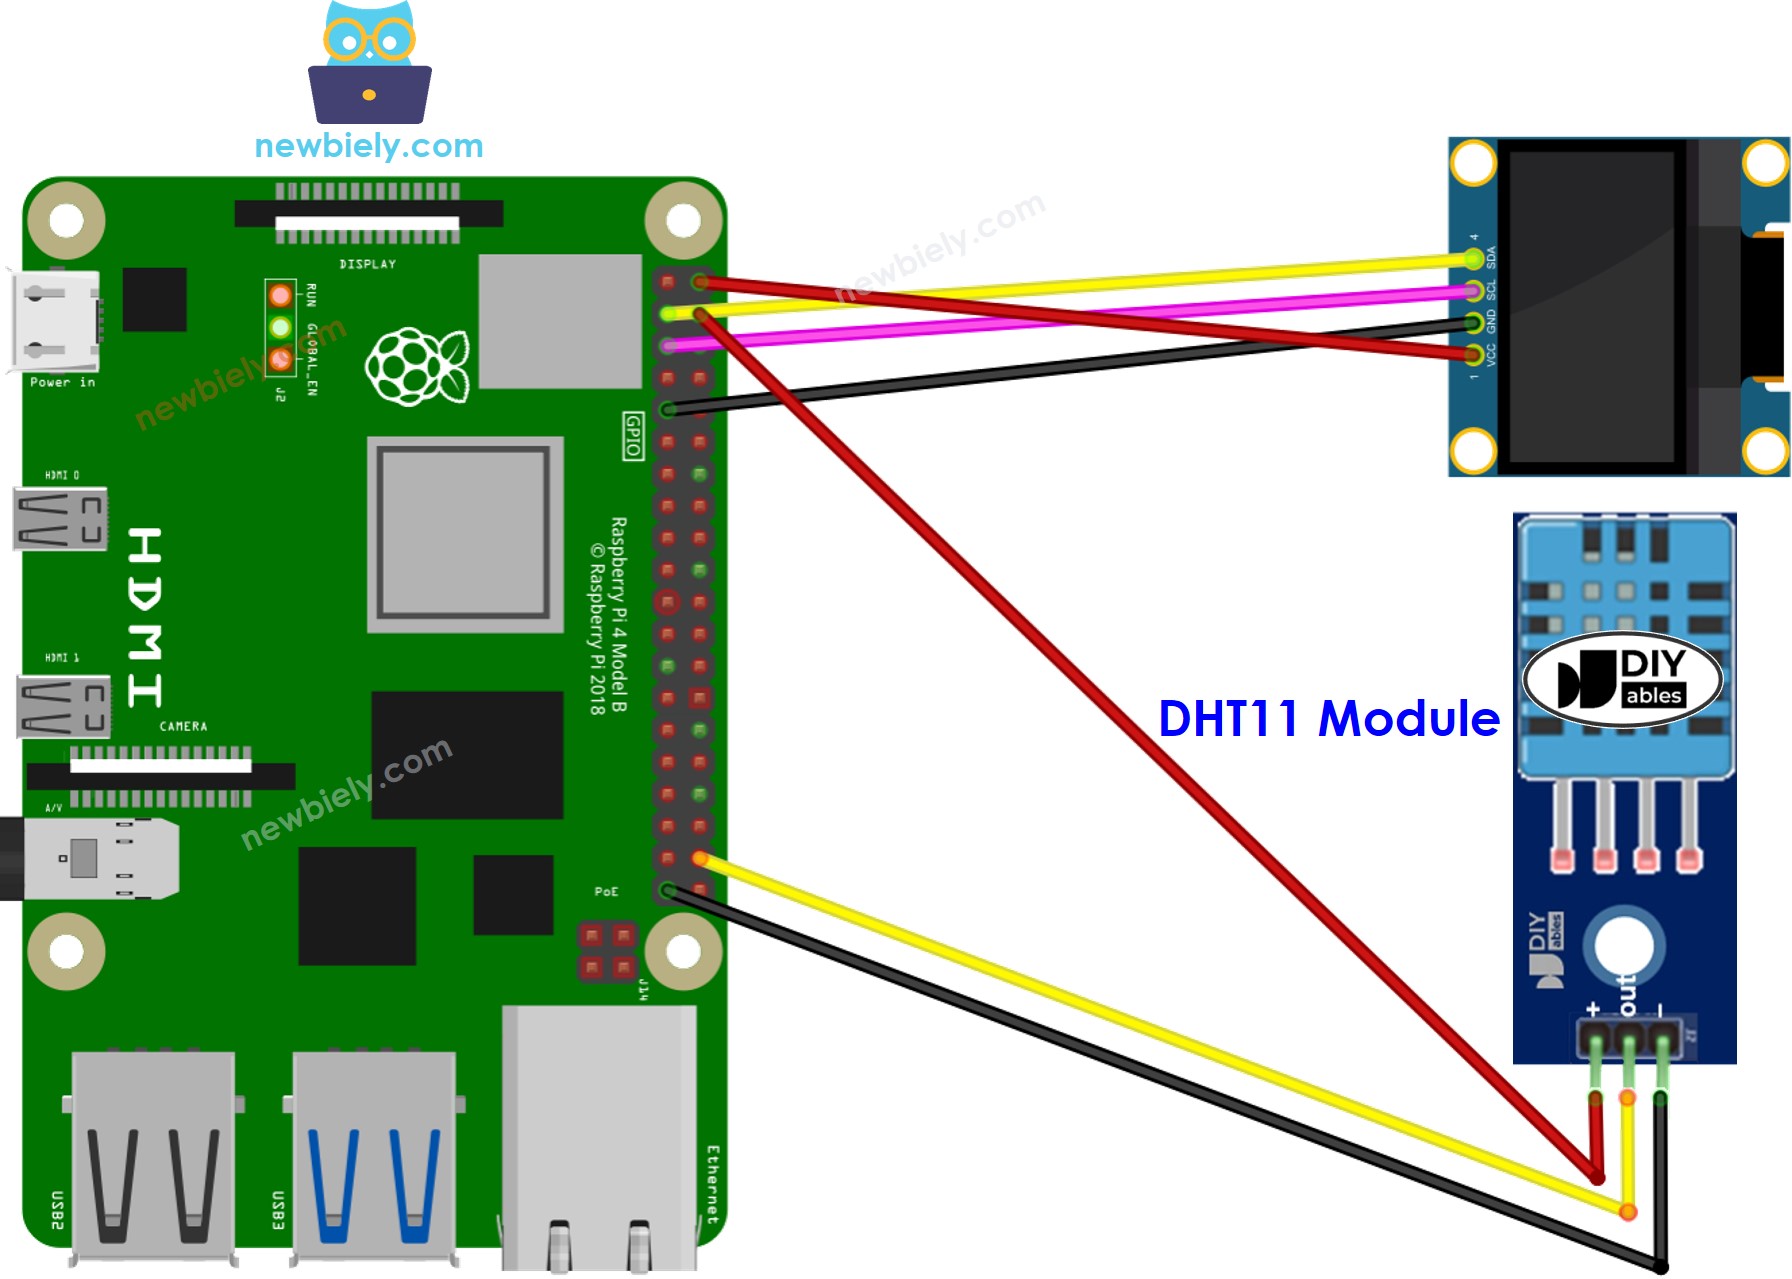
This image is created using Fritzing. Click to enlarge image
Đấu Nối Raspberry Pi - DHT22 Module OLED
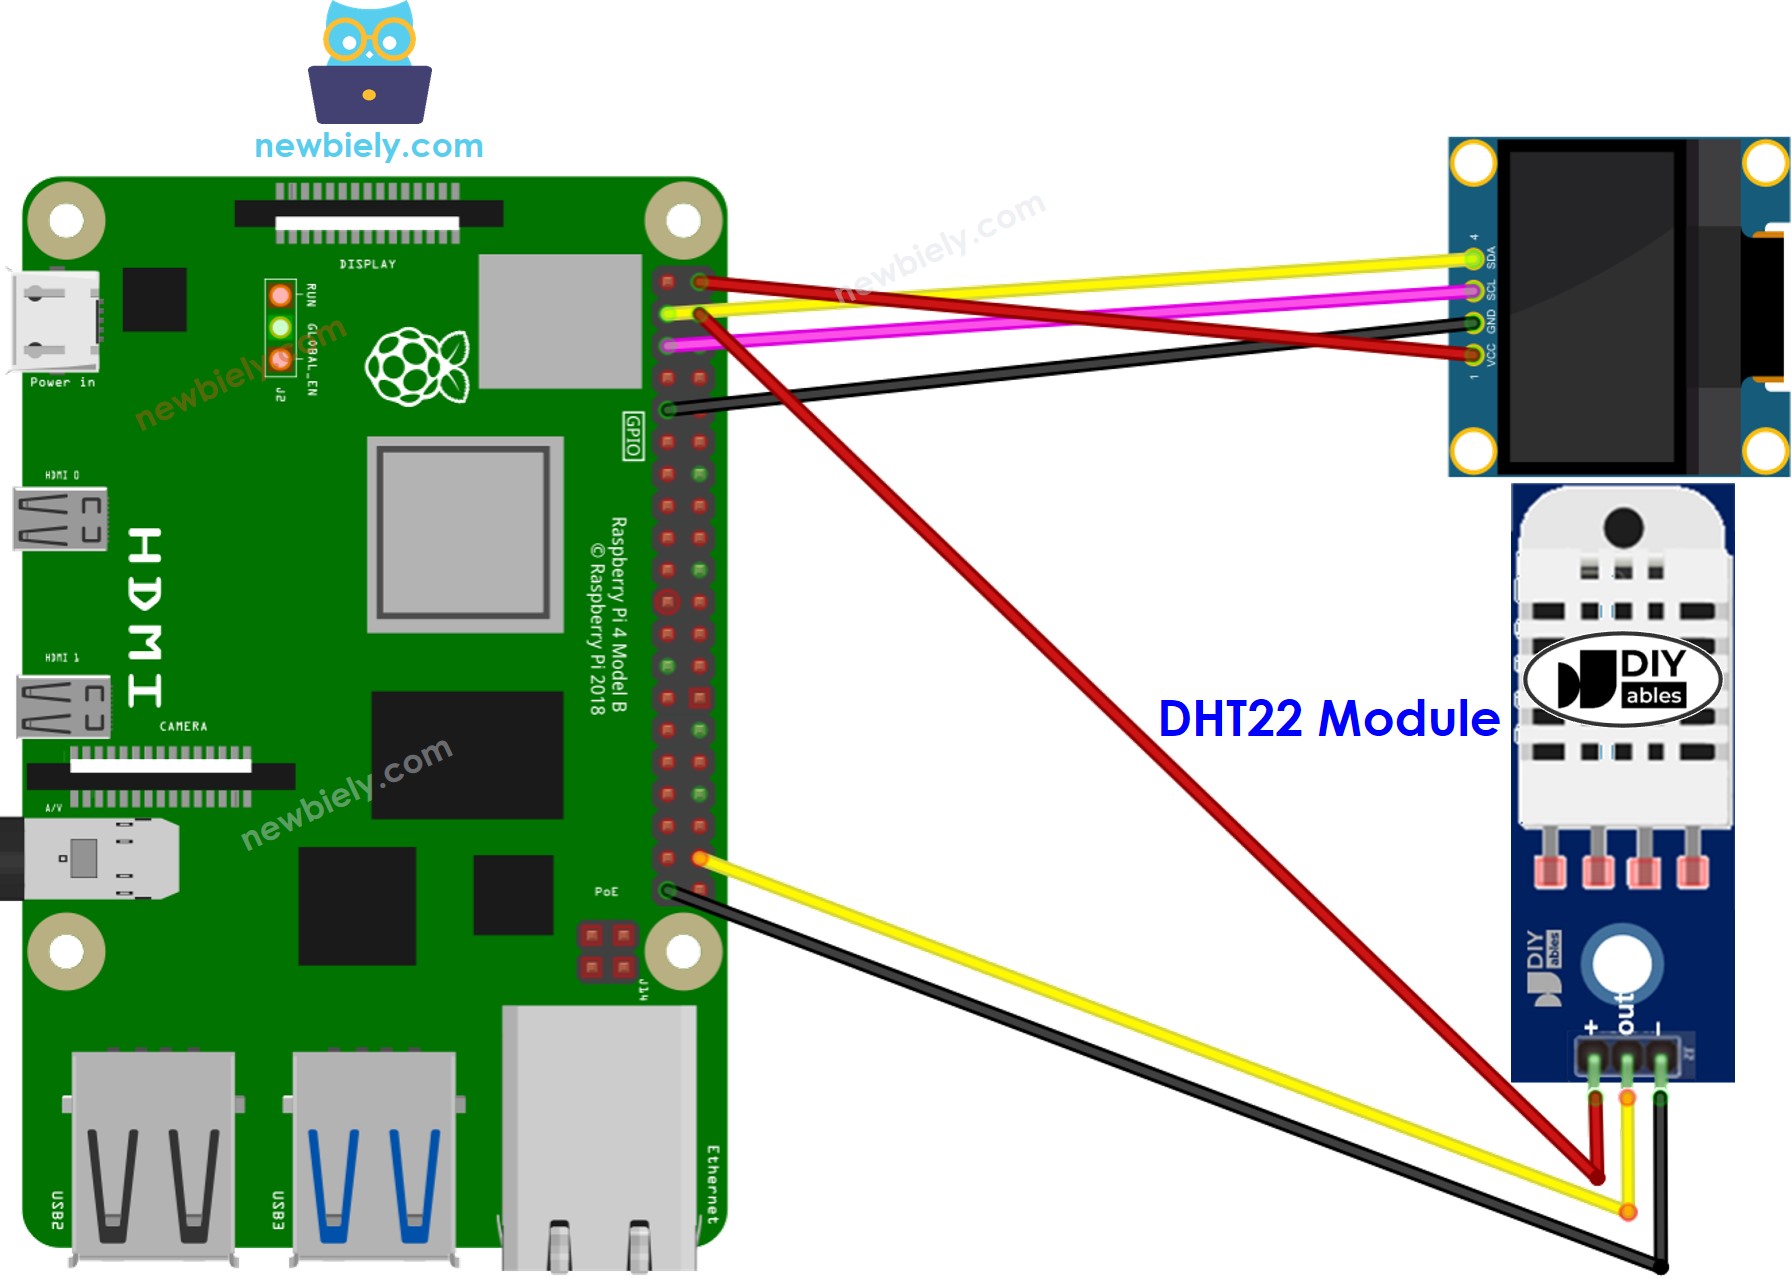
This image is created using Fritzing. Click to enlarge image
Code Raspberry Pi - Cảm Biến DHT11 - OLED
Các Bước Nhanh
- Đảm bảo bạn đã cài đặt Raspbian hoặc bất kỳ hệ điều hành nào khác tương thích với Raspberry Pi trên Pi của bạn.
- Đảm bảo Raspberry Pi của bạn được kết nối với cùng mạng cục bộ với PC của bạn.
- Đảm bảo Raspberry Pi của bạn được kết nối internet nếu bạn cần cài đặt một số thư viện.
- Nếu đây là lần đầu tiên bạn sử dụng Raspberry Pi, hãy xem Raspberry Pi - Cài Đặt Phần Mềm
- Kết nối PC của bạn với Raspberry Pi qua SSH sử dụng SSH client tích hợp trên Linux và macOS hoặc PuTTY trên Windows. Xem cách kết nối PC với Raspberry Pi qua SSH.
- Đảm bảo bạn đã cài đặt thư viện RPi.GPIO. Nếu chưa, hãy cài đặt bằng lệnh sau:
sudo apt-get update
sudo apt-get install python3-rpi.gpio
- Trước khi sử dụng màn hình OLED với Raspberry Pi, chúng ta cần kích hoạt giao diện I2C trên Raspberry Pi. Xem Cách kích hoạt giao diện I2C trên Raspberry Pi
- Cài đặt thư viện OLED bằng cách chạy lệnh sau:
pip install Adafruit-SSD1306
- Cài đặt thư viện cho cảm biến nhiệt độ và độ ẩm DHT11 bằng cách chạy lệnh sau:
sudo pip3 install Adafruit_DHT
- Tạo file script Python dht11_oled.py và thêm code sau:
# Mã Raspberry Pi này được phát triển bởi newbiely.vn
# Mã Raspberry Pi này được cung cấp để sử dụng công khai, không có ràng buộc.
# Để xem hướng dẫn chi tiết và sơ đồ kết nối, vui lòng truy cập:
# https://newbiely.vn/tutorials/raspberry-pi/raspberry-pi-temperature-humidity-sensor-oled
import Adafruit_DHT
import Adafruit_SSD1306
from PIL import Image, ImageDraw, ImageFont
import time
# Set up the DHT11 sensor
DHT_SENSOR = Adafruit_DHT.DHT11
DHT_PIN = 20 # GPIO pin where the DHT11 sensor is connected
# Set up the SSD1306 OLED display
RST = None
OLED = Adafruit_SSD1306.SSD1306_128_64(rst=RST)
OLED.begin()
OLED.clear()
OLED.display()
# Set up fonts
font = ImageFont.load_default()
while True:
# Read temperature and humidity from DHT11 sensor
humidity, temperature = Adafruit_DHT.read_retry(DHT_SENSOR, DHT_PIN)
# Clear the OLED display
OLED.clear()
# Display temperature and humidity on OLED
OLED.draw.text((5, 5), f'Temp: {temperature:.1f} C', font=font, fill=255)
OLED.draw.text((5, 20), f'Humidity: {humidity:.1f}%', font=font, fill=255)
# Update the OLED display
OLED.display()
# Wait for a moment before reading again
time.sleep(2)
except KeyboardInterrupt:
# Clean up code before exiting the script
OLED.clear()
OLED.display()
print("\nExiting the script.")
- Lưu file và chạy script Python bằng cách thực hiện lệnh sau trong terminal:
python3 dht11_oled.py
Script sẽ chạy trong vòng lặp vô hạn liên tục cho đến khi bạn nhấn Ctrl + C trong terminal.
- Làm cho môi trường xung quanh cảm biến nhiệt độ nóng lên, hoặc cầm cảm biến trong tay.
- Kiểm tra kết quả trên màn hình OLED.
Code Raspberry Pi - Cảm Biến DHT22 - OLED
# Mã Raspberry Pi này được phát triển bởi newbiely.vn
# Mã Raspberry Pi này được cung cấp để sử dụng công khai, không có ràng buộc.
# Để xem hướng dẫn chi tiết và sơ đồ kết nối, vui lòng truy cập:
# https://newbiely.vn/tutorials/raspberry-pi/raspberry-pi-temperature-humidity-sensor-oled
import Adafruit_DHT
import Adafruit_SSD1306
from PIL import Image, ImageDraw, ImageFont
import time
# Set up the DHT22 sensor
DHT_SENSOR = Adafruit_DHT.DHT22
DHT_PIN = 20 # GPIO pin where the DHT22 sensor is connected
# Set up the SSD1306 OLED display
RST = None
OLED = Adafruit_SSD1306.SSD1306_128_64(rst=RST)
OLED.begin()
OLED.clear()
OLED.display()
# Set up fonts
font = ImageFont.load_default()
while True:
# Read temperature and humidity from DHT22 sensor
humidity, temperature = Adafruit_DHT.read_retry(DHT_SENSOR, DHT_PIN)
# Clear the OLED display
OLED.clear()
# Display temperature and humidity on OLED
OLED.draw.text((5, 5), f'Temp: {temperature:.1f} C', font=font, fill=255)
OLED.draw.text((5, 20), f'Humidity: {humidity:.1f}%', font=font, fill=255)
# Update the OLED display
OLED.display()
# Wait for a moment before reading again
time.sleep(2)
except KeyboardInterrupt:
# Clean up code before exiting the script
OLED.clear()
OLED.display()
print("\nExiting the script.")
Bài hướng dẫn liên quan
📱 Ứng dụng đề xuất
 English for KidsHọc tiếng Anh vui nhộn cho trẻ nhỏ.Tải về trênGoogle PlayTải về trênApp Store
 Bubble NoteGhi chú tự xóa — viết như nhắn tin.Tải về trênGoogle PlayTải về trênApp Store
 Tôi Không MuaĐánh bại mua sắm bốc đồng, tiết kiệm hơn.Tải về trênGoogle PlayTải về trênApp Store
 Con Đường Tri ThứcBài thi thử để học mọi thứ.Tải về trênGoogle PlayTải về trênApp Store