Raspberry Pi Điều Khiển Servo Motor bằng Potentiometer
Hướng dẫn này sẽ chỉ cho bạn cách sử dụng Raspberry Pi để điều khiển góc quay của servo motor dựa trên giá trị đầu vào từ potentiometer. Cụ thể, chúng ta sẽ học:
- Cách kết nối potentiometer và servo motor với Raspberry Pi
- Cách lập trình Raspberry Pi để đọc giá trị từ potentiometer và điều khiển servo motor tương ứng.
Linh Kiện Cần Thiết
| 1 | × | Raspberry Pi 5 | Amazon | |
| 1 | × | động cơ servo | Amazon | |
| 1 | × | Chiết áp | Amazon | |
| 1 | × | Alternatively, 10k Ohm Trimmer Potentiometer | Amazon | |
| 1 | × | Mô-đun chiết áp có núm xoay | Amazon | |
| 1 | × | (Tùy chọn) Potentiometer Kit | Amazon | |
| 1 | × | (Tùy chọn) Potentiometer Module với Núm Xoay | Amazon | |
| 1 | × | mô-đun ADC ADS1115 | Amazon | |
| 1 | × | breadboard | Amazon | |
| 1 | × | Dây Jumper | Amazon | |
| 1 | × | (Khuyến nghị) Screw Terminal Block Shield for Raspberry Pi | Amazon | |
| 1 | × | (Khuyến nghị) Raspberry Pi Prototyping Base Plate & Breadboard Kit | Amazon | |
| 1 | × | (Khuyến nghị) HDMI Touch Screen Monitor for Raspberry Pi | Amazon |
Or you can buy the following kits:
| 1 | × | DIYables Sensor Kit (18 sensors/displays) | Amazon |
Giới Thiệu Servo Motor và Potentiometer
Nếu bạn chưa quen thuộc với servo motor và potentiometer (sơ đồ chân, cách hoạt động, cách lập trình, v.v.), các hướng dẫn sau có thể hữu ích:
Sơ Đồ Đấu Nối
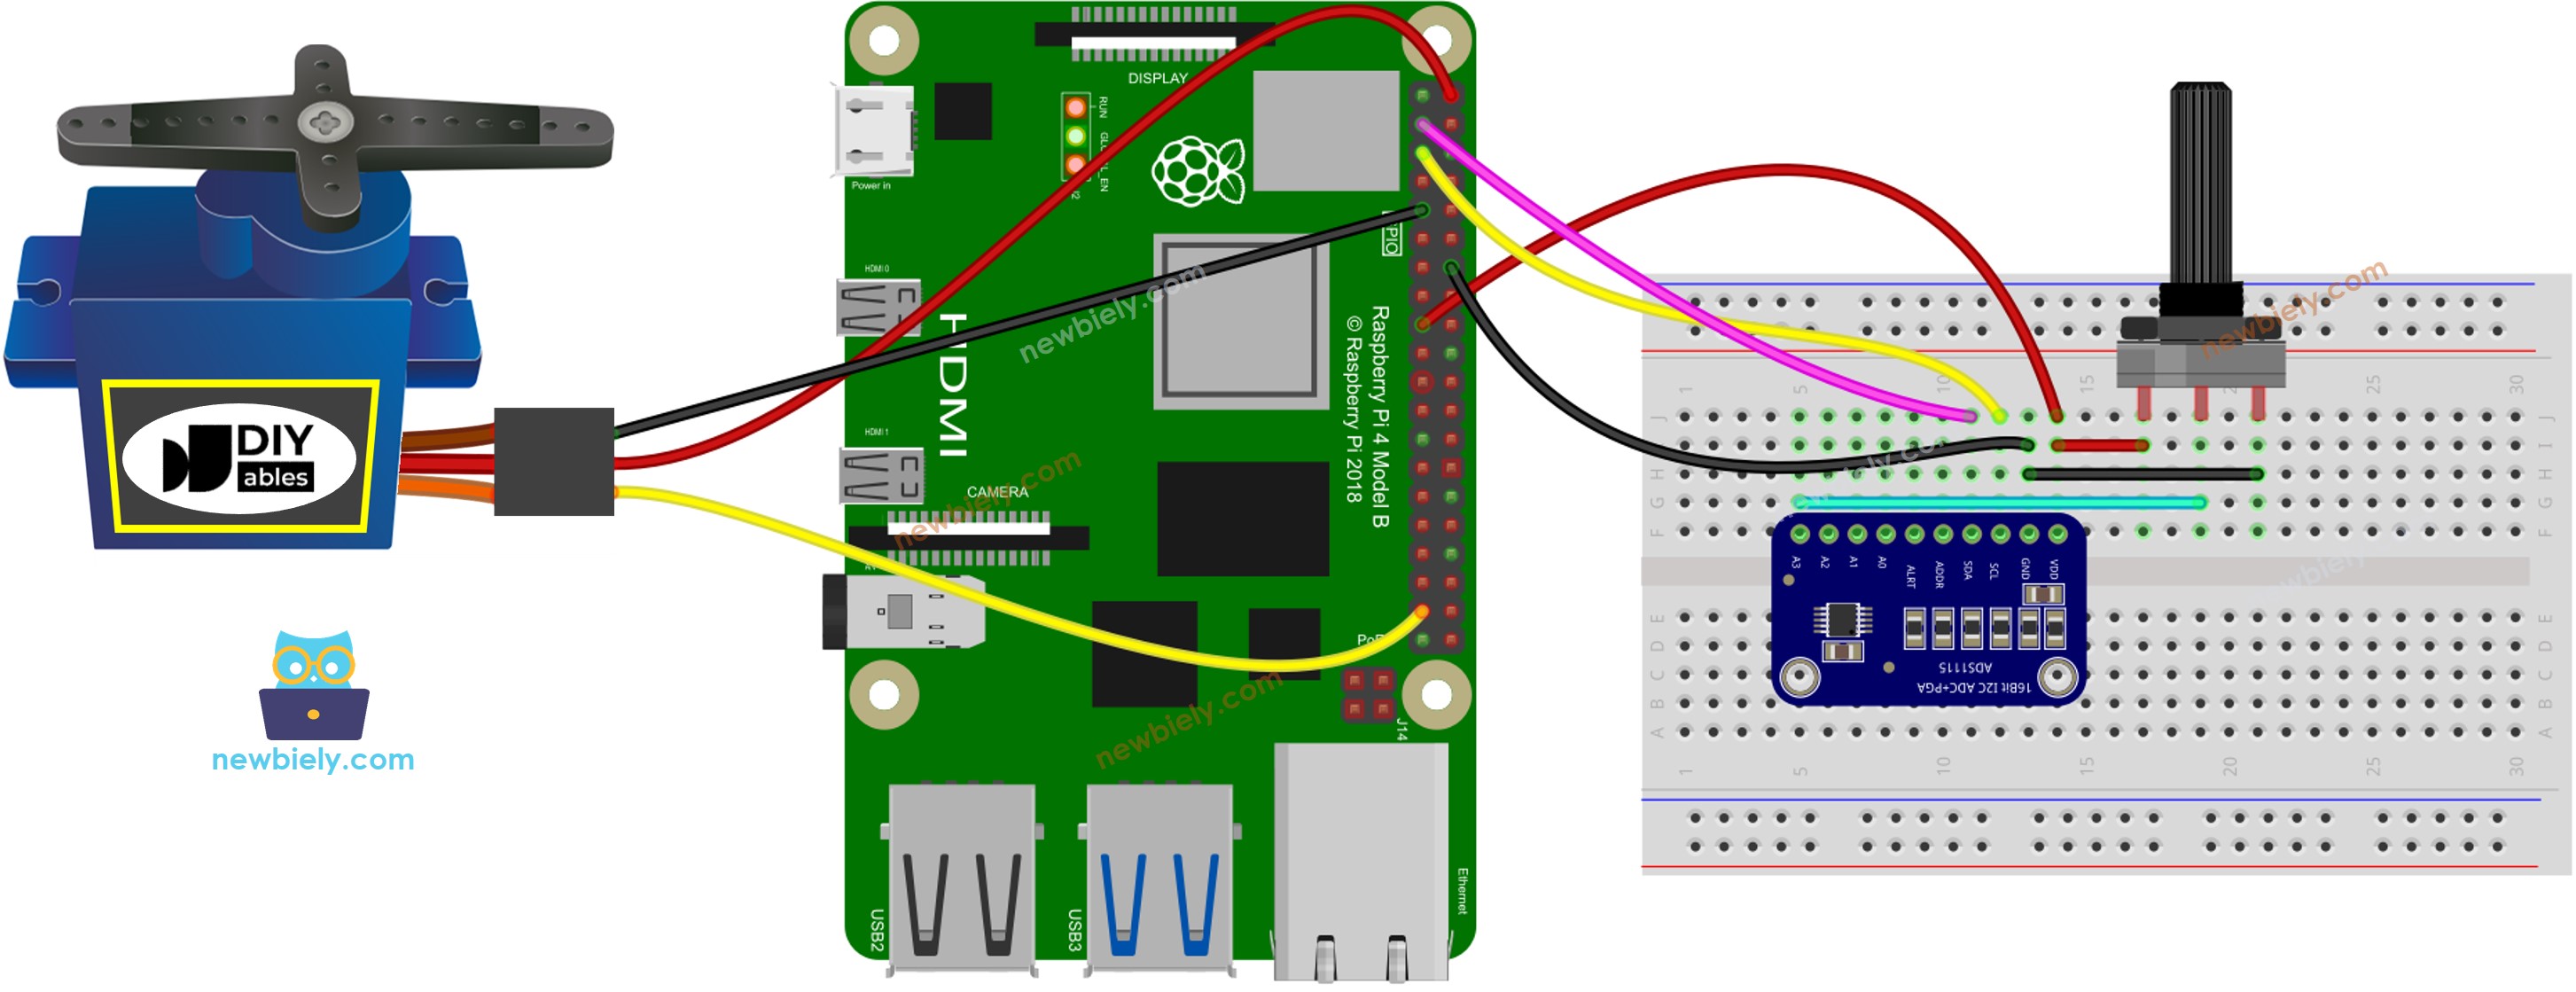
This image is created using Fritzing. Click to enlarge image
Code Raspberry Pi
Các Bước Nhanh
- Đảm bảo bạn đã cài đặt Raspbian hoặc hệ điều hành tương thích khác trên Raspberry Pi.
- Đảm bảo Raspberry Pi của bạn được kết nối với cùng mạng cục bộ với PC.
- Đảm bảo Raspberry Pi của bạn có kết nối internet nếu cần cài đặt thư viện.
- Nếu đây là lần đầu tiên bạn sử dụng Raspberry Pi, hãy xem Raspberry Pi - Cài Đặt Phần Mềm
- Kết nối PC của bạn với Raspberry Pi qua SSH bằng SSH client tích hợp sẵn trên Linux và macOS hoặc PuTTY trên Windows. Xem cách kết nối PC với Raspberry Pi qua SSH.
- Đảm bảo bạn đã cài đặt thư viện RPi.GPIO. Nếu chưa, hãy cài đặt bằng lệnh sau:
- Cài đặt thư viện Adafruit_ADS1x15 bằng cách chạy các lệnh sau trên terminal Raspberry Pi:
- Tạo file script Python potentiometer_servo.py và thêm code sau:
- Lưu file và chạy script Python bằng cách thực hiện lệnh sau trong terminal:
Script chạy trong vòng lặp vô hạn liên tục cho đến khi bạn nhấn Ctrl + C trong terminal.
- Xoay potentiometer
- Quan sát sự quay của servo motor
- Xem kết quả trong Serial Monitor
Giải Thích Code
Hãy xem phần giải thích từng dòng được chứa trong các comment của source code!
Video Tutorial
Việc sản xuất video tốn rất nhiều thời gian. Nếu video hướng dẫn hữu ích cho việc học của bạn, hãy đăng ký kênh YouTube để ủng hộ. Nếu nhu cầu đủ cao, chúng tôi sẽ cố gắng làm thêm nhiều video.
Bài hướng dẫn liên quan
📱 Ứng dụng đề xuất
 English for KidsHọc tiếng Anh vui nhộn cho trẻ nhỏ.Tải về trênGoogle PlayTải về trênApp Store
 Bubble NoteGhi chú tự xóa — viết như nhắn tin.Tải về trênGoogle PlayTải về trênApp Store
 Tôi Không MuaĐánh bại mua sắm bốc đồng, tiết kiệm hơn.Tải về trênGoogle PlayTải về trênApp Store
 Con Đường Tri ThứcBài thi thử để học mọi thứ.Tải về trênGoogle PlayTải về trênApp Store