
ESP8266 Mạng Ethernet
Hướng dẫn này cho bạn biết cách kết nối ESP8266 với Internet hoặc mạng cục bộ của bạn bằng mô-đun Ethernet W5500. Dưới đây là những gì chúng ta sẽ thảo luận:
- Kết nối ESP8266 với mô-đun Ethernet W5500
- Lập trình ESP8266 cho các yêu cầu web qua Ethernet
- Xây dựng một máy chủ web cơ bản trên ESP8266 với Ethernet
Phần cứng cần chuẩn bị
| 1 | × | ESP8266 NodeMCU ESP-12F | Amazon | |
| 1 | × | Alternatively, ESP8266 D1 Mini NodeMCU ESP-12F | Amazon | |
| 1 | × | Micro USB Cable | Amazon | |
| 1 | × | Alternatively, ESP8266 NodeMCU ESP-12E (Uno-form) | Amazon | |
| 1 | × | USB Cable Type-A to Type-C (for USB-A PC) | Amazon | |
| 1 | × | USB Cable Type-C to Type-C (for USB-C PC) | Amazon | |
| 1 | × | W5500 Ethernet Module | Amazon | |
| 1 | × | Ethernet Cable | Amazon | |
| 1 | × | dây jumper | Amazon | |
| 1 | × | breadboard | Amazon | |
| 1 | × | (Khuyến nghị) Screw Terminal Expansion Board for ESP8266 | Amazon |
Or you can buy the following kits:
| 1 | × | DIYables Sensor Kit (18 sensors/displays) | Amazon |
Về mô-đun Ethernet W5500
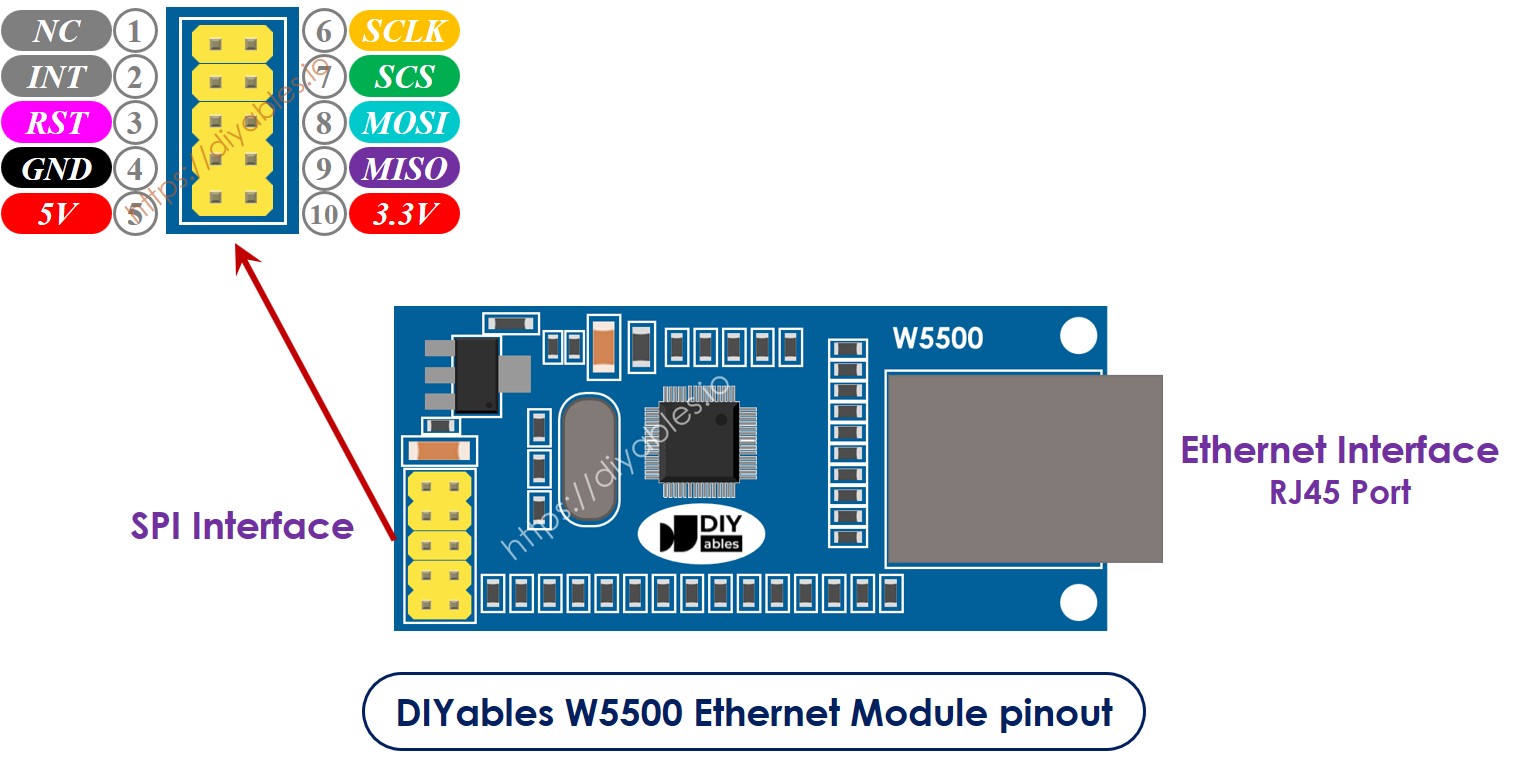
Mô-đun Ethernet W5500 có hai loại kết nối:
- Giao diện RJ45: Kết nối RJ45 này với một thiết bị mạng như router hoặc switch bằng cáp Ethernet.
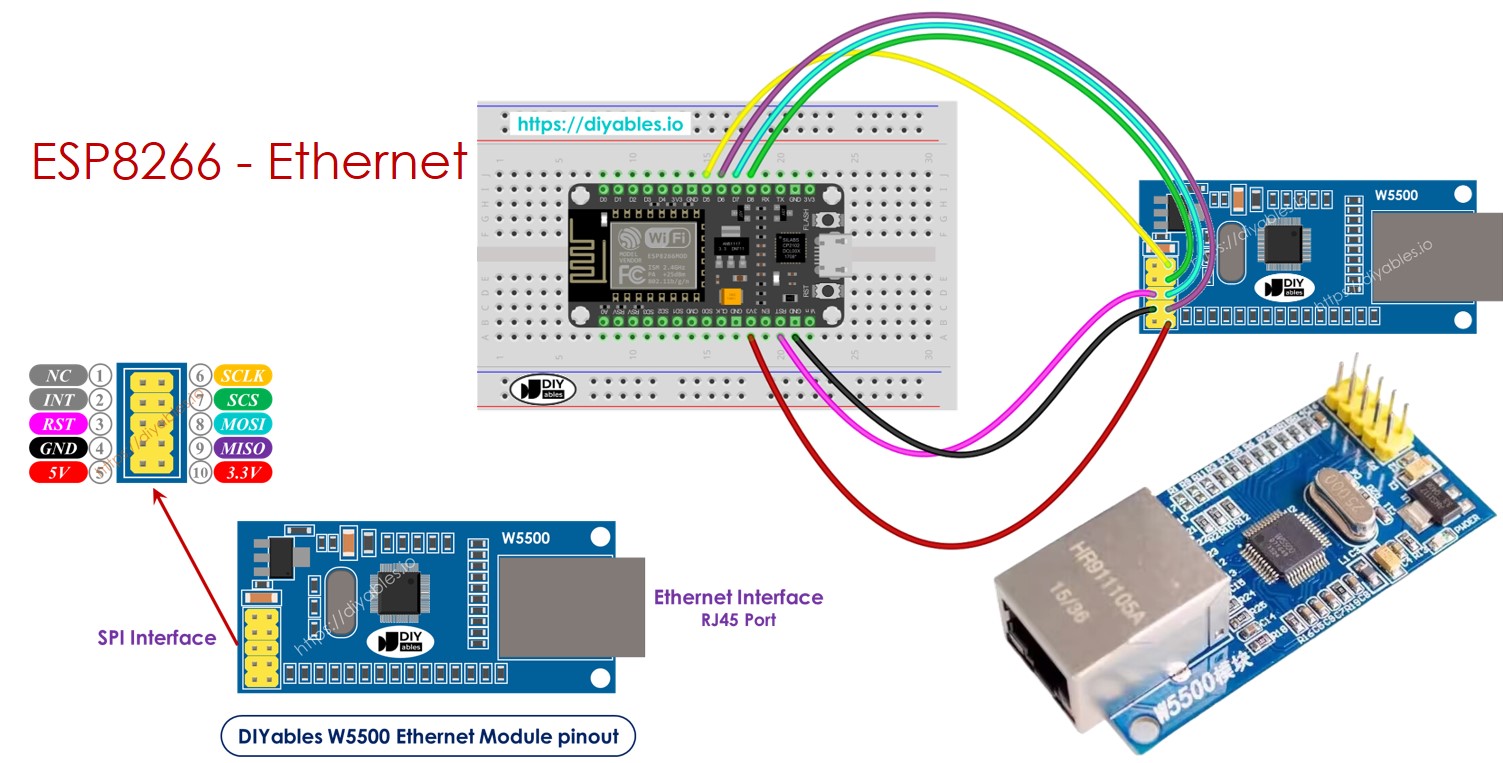
- SPI interface: Kết nối nó tới một bo mạch ESP8266 bằng các kết nối sau cho 10 chân của nó:
- NC pin: Để chân này không được kết nối.
- INT pin: Để chân này không được kết nối.
- RST pin: Kết nối chân này với chân reset (EN) trên ESP8266.
- GND pin: Kết nối chân này với chân đất (GND) trên ESP8266.
- 5V pin: Không kết nối chân này.
- 3.3V pin: Kết nối chân này với chân 3.3V trên ESP8266.
- MISO pin: Kết nối chân này với chân SPI MISO trên ESP8266.
- MOSFi pin: Kết nối chân này với chân SPI MOSI trên ESP8266.
- SCS pin: Kết nối chân này với chân SPI CS (Chip Select) trên ESP8266.
- SCLK pin: Kết nối chân SPI SCK (Clock) trên Arauthenticated.
Sơ đồ nối giữa ESP8266 và mô-đun Ethernet W5500
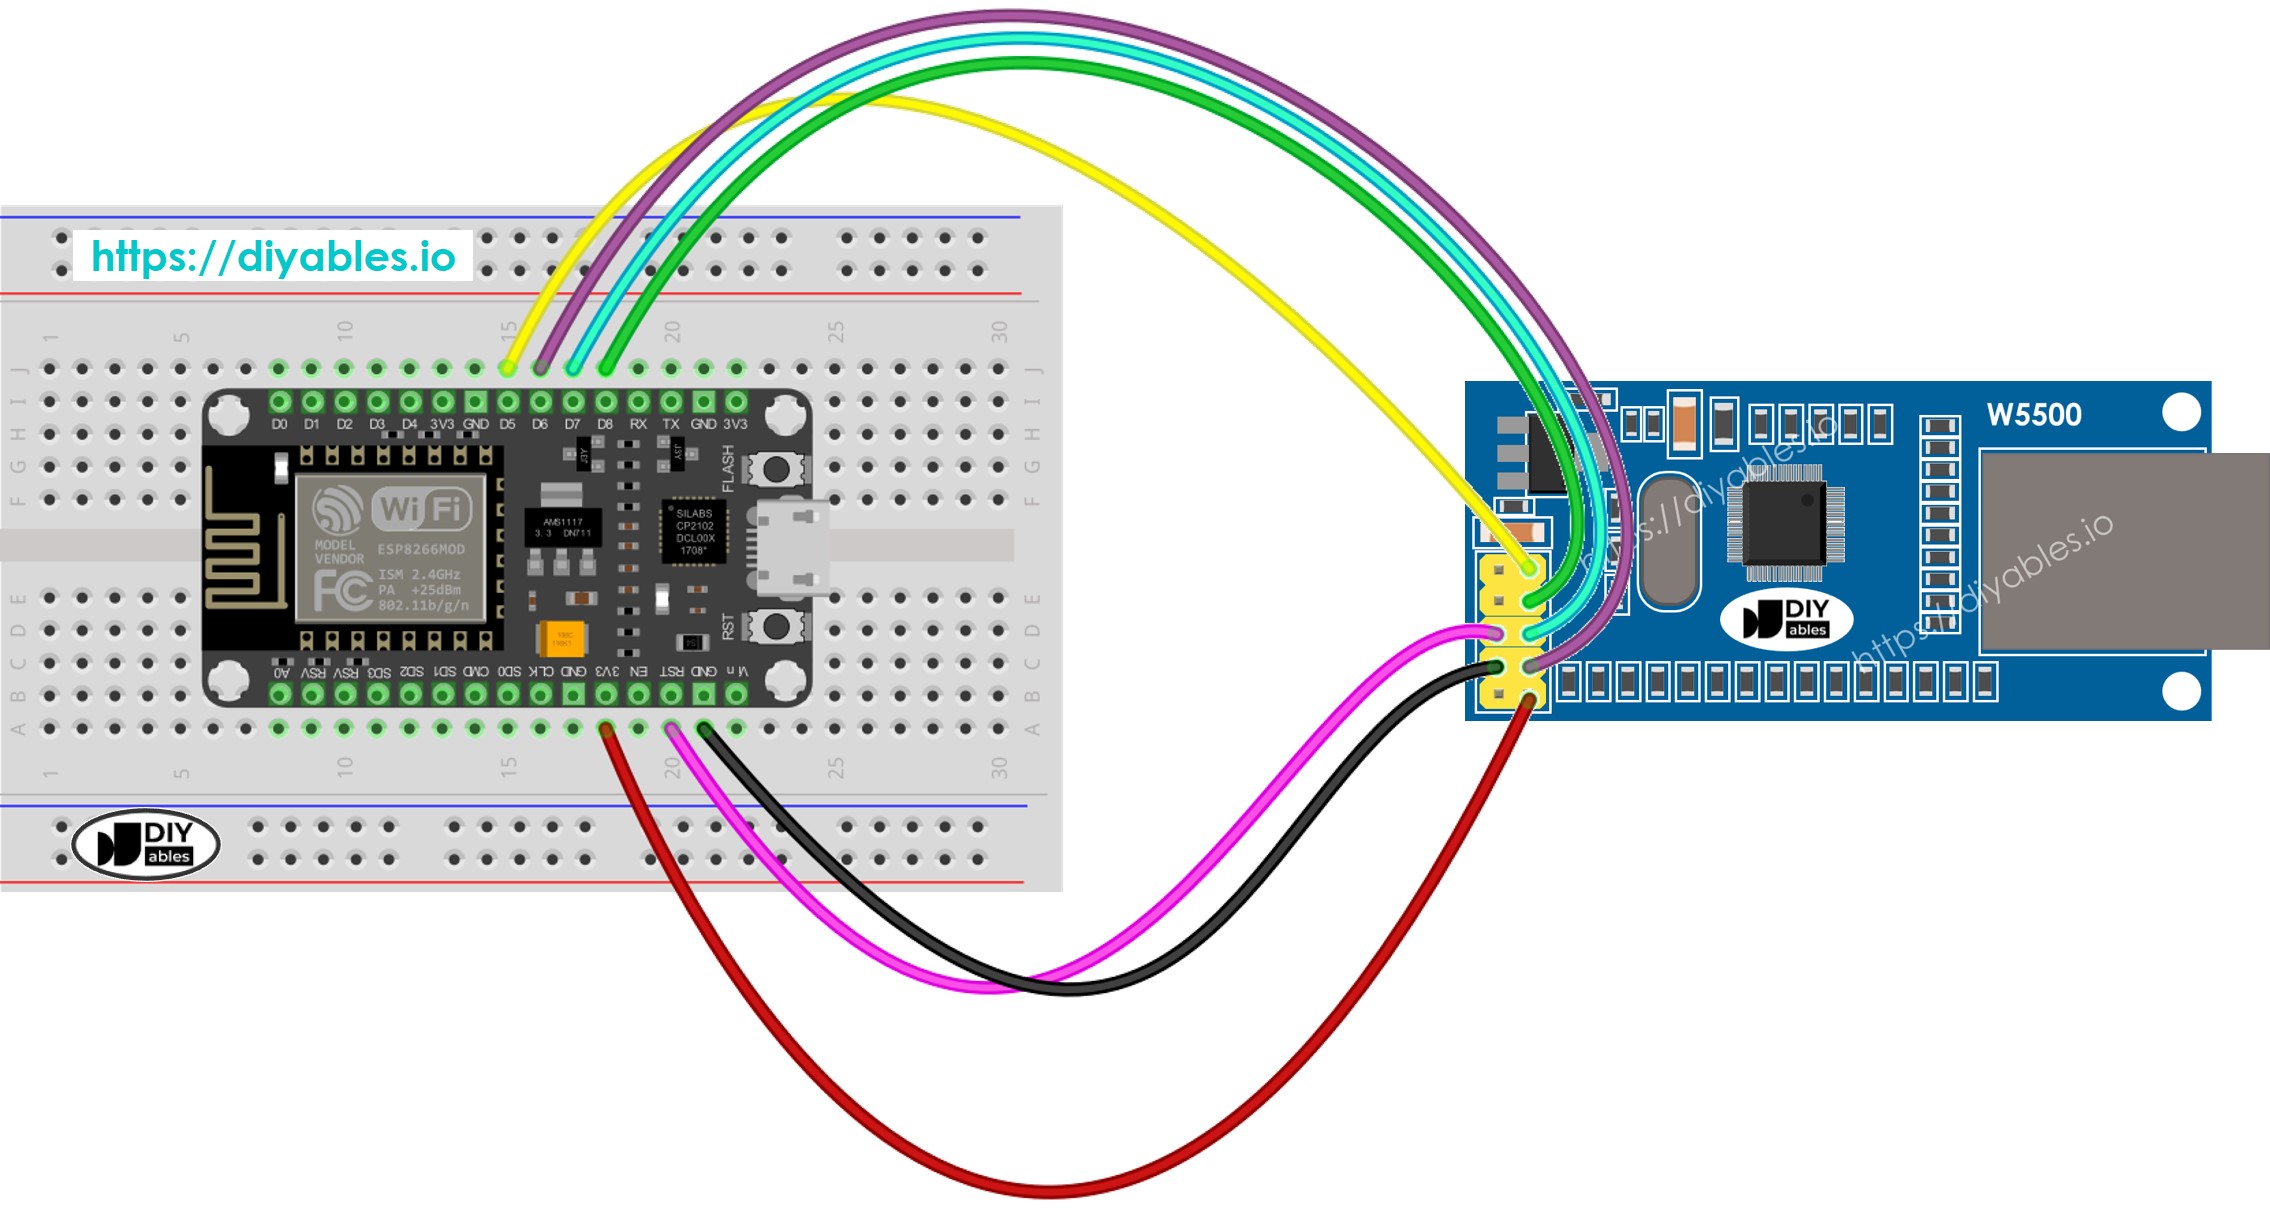
This image is created using Fritzing. Click to enlarge image
Xem thêm Sơ đồ chân ESP8266 và Cách cấp nguồn cho ESP8266.
Mã ESP8266 cho mô-đun Ethernet - Thực hiện yêu cầu HTTP qua Ethernet
Đoạn mã này hoạt động như một khách hàng web. Nó gửi các yêu cầu HTTP đến máy chủ web tại http://example.com/.
Hướng dẫn từng bước
Để bắt đầu với ESP8266 trên Arduino IDE, hãy làm theo các bước sau:
- Xem ESP8266 - Cài đặt phần mềm nếu đây là lần đầu tiên bạn sử dụng ESP8266.
- Kết nối module Ethernet với bảng ESP8266 như hiển thị trong sơ đồ nối.
- Sử dụng cáp Ethernet để kết nối module Ethernet với bộ định tuyến hoặc switch của bạn.
- Kết nối bảng ESP8266 với máy tính của bạn bằng cáp USB.
- Mở Arduino IDE trên máy tính của bạn.
- Chọn bảng ESP8266 phù hợp, ví dụ NodeMCU 1.0 (ESP-12E Module), và cổng COM tương ứng của nó.
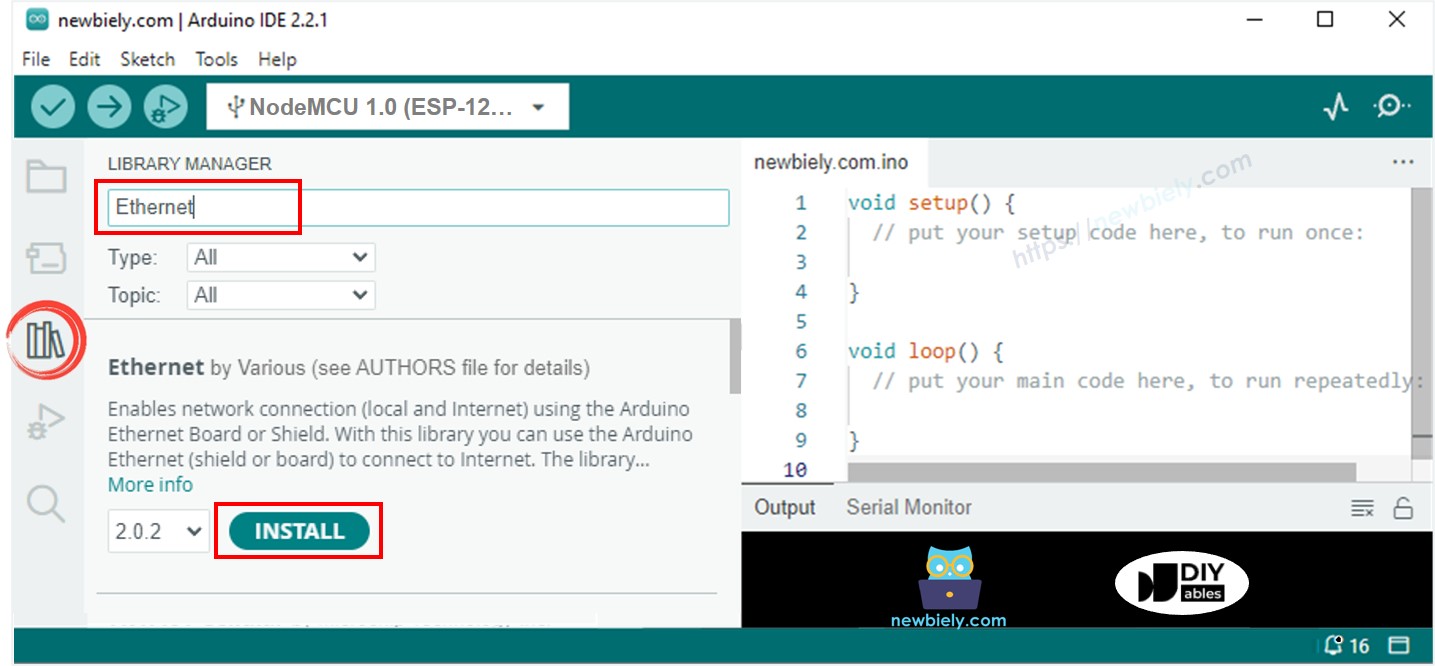
- Nhấp vào biểu tượng Libraries ở thanh bên trái của Arduino IDE.
- Tìm kiếm Ethernet, sau đó tìm thư viện Ethernet của Various.
- Nhấp nút Install để cài đặt thư viện Ethernet.
- Mở Serial Monitor trong Arduino IDE.
- Sao chép mã được cung cấp và dán vào Arduino IDE.
- Nhấn nút Upload trong Arduino IDE để gửi mã tới ESP25.
- Kiểm tra kết quả trên Serial Monitor; kết quả sẽ hiển thị như dưới đây.
※ Lưu ý:
Nếu một thiết bị khác trên cùng một mạng có cùng địa chỉ MAC, nó có thể hoạt động không đúng cách.
Mã ESP8266 cho mô-đun Ethernet - Máy chủ Web
Đoạn mã dưới đây biến ESP8266 thành một máy chủ web. Máy chủ này phục vụ một trang web cơ bản cho các trình duyệt web.
Hướng dẫn từng bước
- Sao chép mã ở trên và dán vào Arduino IDE.
- Nhấp vào nút Tải lên trong Arduino IDE để chuyển mã sang ESP8266.
- Kiểm tra kết quả trên Serial Monitor; các kết quả sẽ hiển thị như đã mô tả.
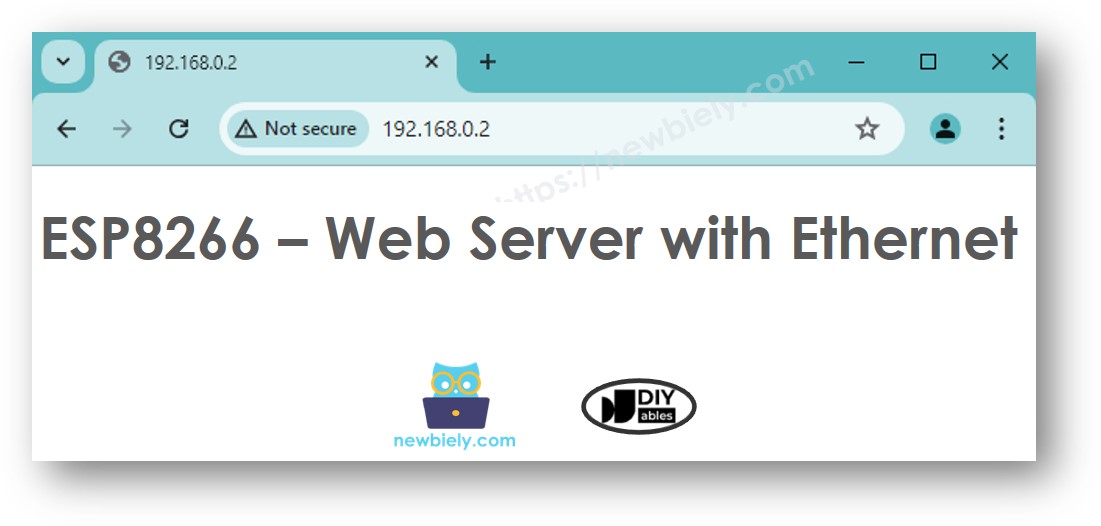
- Sao chép địa chỉ IP được cung cấp ở trên và nhập nó vào thanh địa chỉ của trình duyệt web của bạn. Bạn sẽ thấy một trang web đơn giản được ESP8266 hiển thị.
Bài hướng dẫn liên quan
📱 Ứng dụng đề xuất
 English for KidsHọc tiếng Anh vui nhộn cho trẻ nhỏ.Tải về trênGoogle PlayTải về trênApp Store
 Bubble NoteGhi chú tự xóa — viết như nhắn tin.Tải về trênGoogle PlayTải về trênApp Store
 Tôi Không MuaĐánh bại mua sắm bốc đồng, tiết kiệm hơn.Tải về trênGoogle PlayTải về trênApp Store
 Con Đường Tri ThứcBài thi thử để học mọi thứ.Tải về trênGoogle PlayTải về trênApp Store