ESP8266 Nhiệt độ qua Web

Hướng dẫn này chỉ cho bạn cách lập trình ESP8266 để trở thành một máy chủ web, cho phép bạn truy cập dữ liệu nhiệt độ thông qua giao diện web. Sử dụng cảm biến nhiệt DS18B20 được gắn, bạn có thể dễ dàng kiểm tra nhiệt độ hiện tại bằng cách dùng điện thoại thông minh hoặc máy tính để truy cập trang web được ESP8266 phục vụ. Dưới đây là một cái nhìn tổng quan ngắn gọn về cách nó hoạt động:

máy chủ web cảm biến nhiệt độ ds18b20 trên ESP8266 NodeMCU

Chúng ta sẽ xem qua hai mã ví dụ:

Phần cứng cần chuẩn bị

1×ESP8266 NodeMCU ESP-12E
1×Recommended: ESP8266 NodeMCU ESP-12E (Uno-form)
1×USB Cable Type-A to Type-C (for USB-A PC)
1×USB Cable Type-C to Type-C (for USB-C PC)
1×DS18B20 Temperature Sensor (WITH Adapter)
1×DS18B20 Temperature Sensor (WITHOUT Adapter)
1×dây jumper
1×(Khuyến nghị) Screw Terminal Expansion Board for ESP8266
1×(Khuyến nghị) Power Splitter for ESP8266 Type-C

Or you can buy the following kits:

1×DIYables Sensor Kit (30 sensors/displays)
1×DIYables Sensor Kit (18 sensors/displays)

Về máy chủ web ESP8266 và cảm biến nhiệt DS18B20

Nếu bạn chưa biết về ESP8266 Web Server và cảm biến nhiệt DS18B20 (sơ đồ chân, cách hoạt động, cách lập trình ...), hãy tìm hiểu về chúng trong các bài hướng dẫn sau:

Sơ đồ đấu dây

sơ đồ nối dây cảm biến nhiệt ds18b20 cho máy chủ web ESP8266 NodeMCU

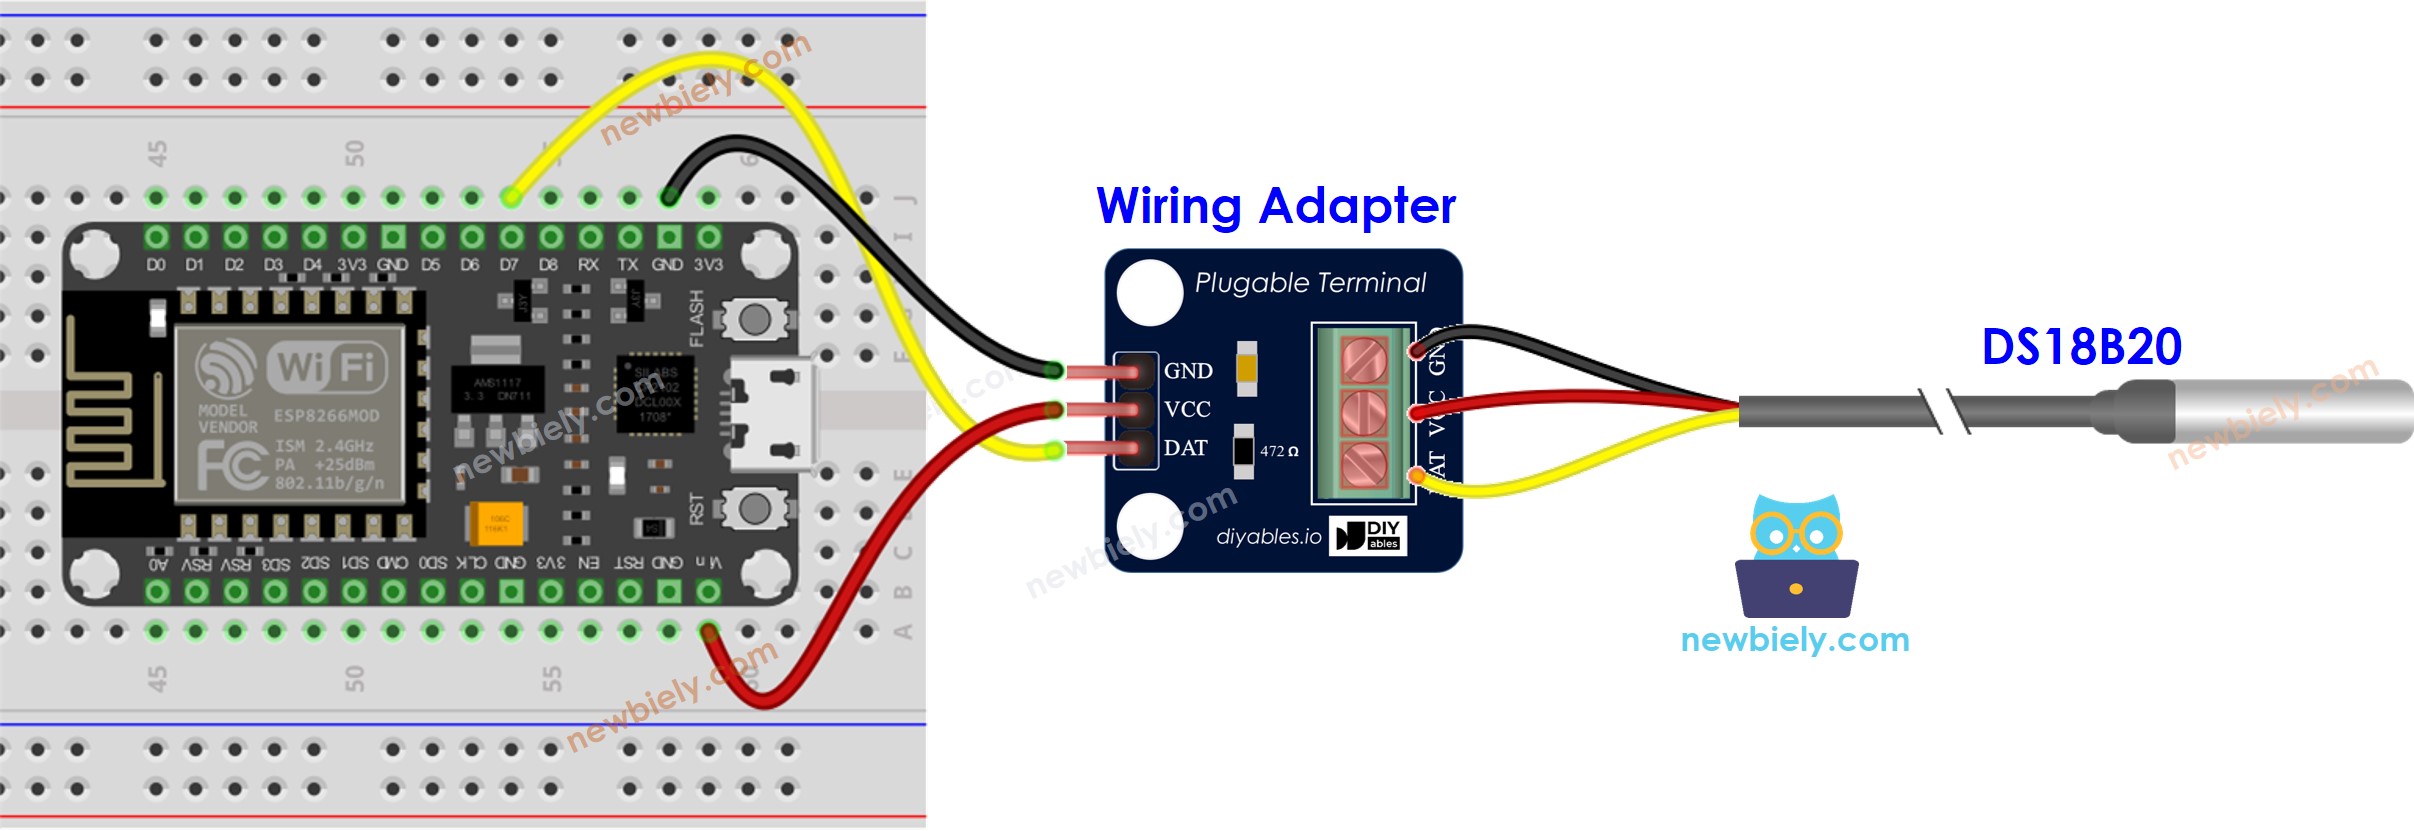
This image is created using Fritzing. Click to enlarge image

Xem thêm Sơ đồ chân ESP8266Cách cấp nguồn cho ESP8266.

Mã ESP8266 - Trang web đơn giản

/* * Mã ESP8266 NodeMCU này được phát triển bởi newbiely.vn * Mã ESP8266 NodeMCU này được cung cấp để sử dụng công khai, không có ràng buộc. * Để xem hướng dẫn chi tiết và sơ đồ kết nối, vui lòng truy cập: * https://newbiely.vn/tutorials/esp8266/esp8266-temperature-via-web */ #include <ESP8266WiFi.h> #include <ESP8266WebServer.h> #include <OneWire.h> #include <DallasTemperature.h> #define SENSOR_PIN D7 // The ESP8266 pin connected to DS18B20 sensor's DATA pin const char* ssid = "YOUR_WIFI_SSID"; // CHANGE IT const char* password = "YOUR_WIFI_PASSWORD"; // CHANGE IT OneWire oneWire(SENSOR_PIN); // setup a oneWire instance DallasTemperature DS18B20(&oneWire); // pass oneWire to DallasTemperature library ESP8266WebServer server(80); // Web server on port 80 float getTemperature() { DS18B20.requestTemperatures(); // send the command to get temperatures float temperature_C = DS18B20.getTempCByIndex(0); // read temperature in °C return temperature_C; } void setup() { Serial.begin(9600); DS18B20.begin(); // initialize the DS18B20 sensor // Connect to Wi-Fi WiFi.begin(ssid, password); while (WiFi.status() != WL_CONNECTED) { delay(1000); Serial.println("Connecting to WiFi..."); } Serial.println("Connected to WiFi"); // Print the ESP8266's IP address Serial.print("ESP8266 Web Server's IP address: "); Serial.println(WiFi.localIP()); // Define a route to serve the HTML page server.on("/", HTTP_GET, []() { Serial.println("ESP8266 Web Server: New request received:"); // for debugging Serial.println("GET /"); // for debugging // get temperature from sensor float temperature = getTemperature(); // Format the temperature with two decimal places String temperatureStr = String(temperature, 2); String html = "<!DOCTYPE HTML>"; html += "<html>"; html += "<head>"; html += "<link rel=\"icon\" href=\"data:,\">"; html += "</head>"; html += "<p>"; html += "Temperature: <span style=\"color: red;\">"; html += temperature; html += "&deg;C</span>"; html += "</p>"; html += "</html>"; server.send(200, "text/html", html); }); // Start the server server.begin(); } void loop() { // Handle client requests server.handleClient(); // Your code here }

Hướng dẫn từng bước

Để bắt đầu với ESP8266 trên Arduino IDE, hãy làm theo các bước sau:

  • Xem bài hướng dẫn ESP8266 - Cài đặt phần mềm nếu đây là lần đầu bạn sử dụng ESP8266.
  • Nối các thành phần như được hiển thị trong sơ đồ.
  • Kết nối bo mạch ESP8266 với máy tính của bạn bằng cáp USB.
  • Mở Arduino IDE trên máy tính của bạn.
  • Chọn bo mạch ESP8266 phù hợp, ví dụ như NodeMCU 1.0 (ESP-12E Module), và cổng COM tương ứng của nó.
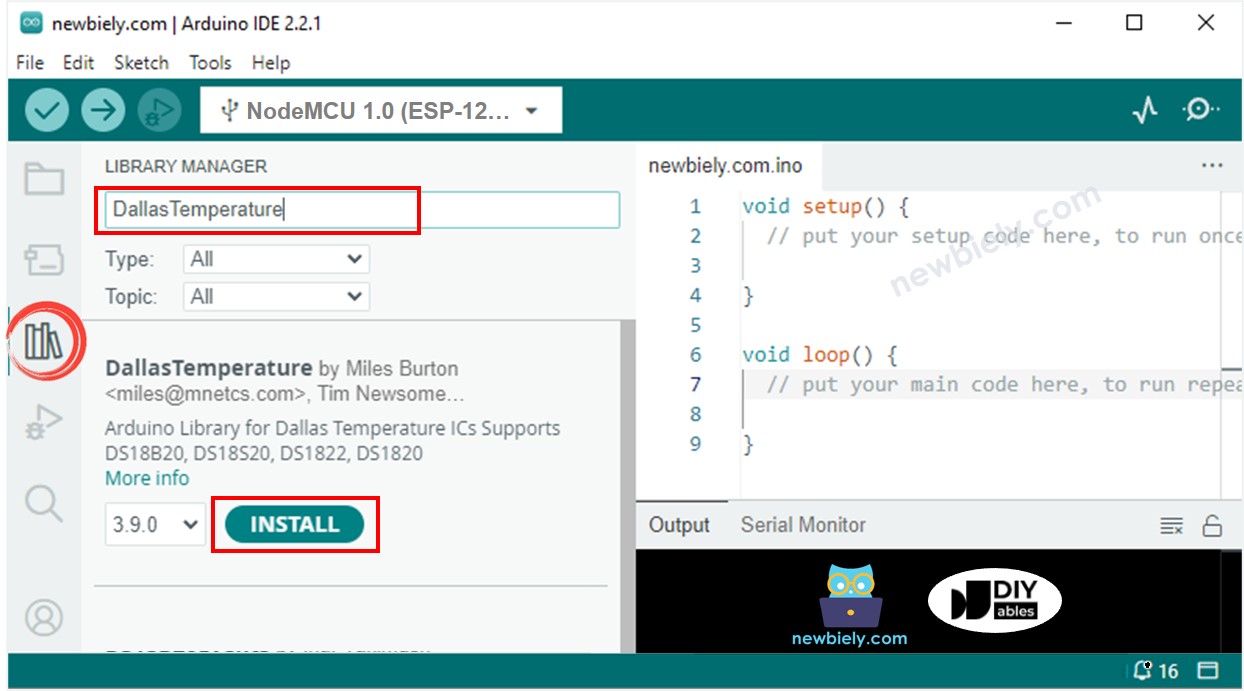
  • Nhấp vào biểu tượng Libraries ở thanh bên trái của Arduino IDE.
  • “Dallas” vào hộp tìm kiếm, sau đó tìm thư viện DallasTemperature của Miles Burton.
  • Nhấp nút Install để cài đặt thư viện DallasTemperature.
thư viện dallas temperature cho ESP8266 NodeMCU
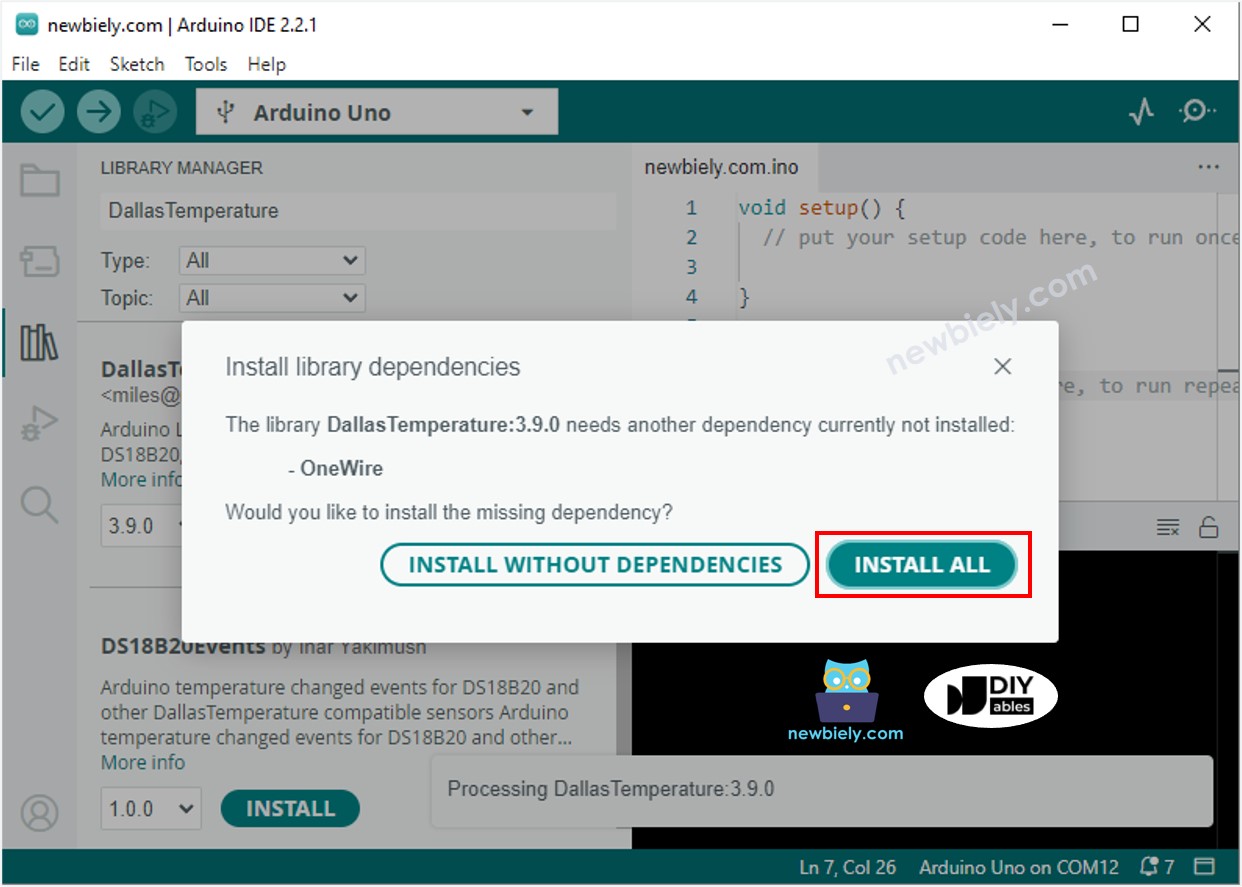
  • Bạn sẽ được yêu cầu cài đặt phụ thuộc. Nhấp vào Cài đặt Tất cả để cài đặt thư viện OneWire.
thư viện onewire cho ESP8266 NodeMCU
  • Sao chép mã ở trên và mở bằng Arduino IDE
  • Thay đổi thông tin WiFi (SSID và mật khẩu) trong mã cho phù hợp với bạn
  • Nhấn nút Tải lên trên Arduino IDE để tải mã lên ESP8266
  • Mở Serial Monitor
  • Xem kết quả trên Serial Monitor.
COM6
Send
Connecting to WiFi... Connected to WiFi ESP8266 Web Server's IP address: 192.168.0.5
Autoscroll Show timestamp
Clear output
9600 baud  
Newline  
  • Bạn sẽ tìm thấy một địa chỉ IP. Gõ địa chỉ IP này vào thanh địa chỉ của trình duyệt web trên điện thoại thông minh hoặc máy tính của bạn.
  • Bạn sẽ thấy đầu ra sau đây trên Serial Monitor.
COM6
Send
Connecting to WiFi... Connected to WiFi ESP8266 Web Server's IP address: 192.168.0.5 ESP8266 Web Server: New request received: GET /
Autoscroll Show timestamp
Clear output
9600 baud  
Newline  
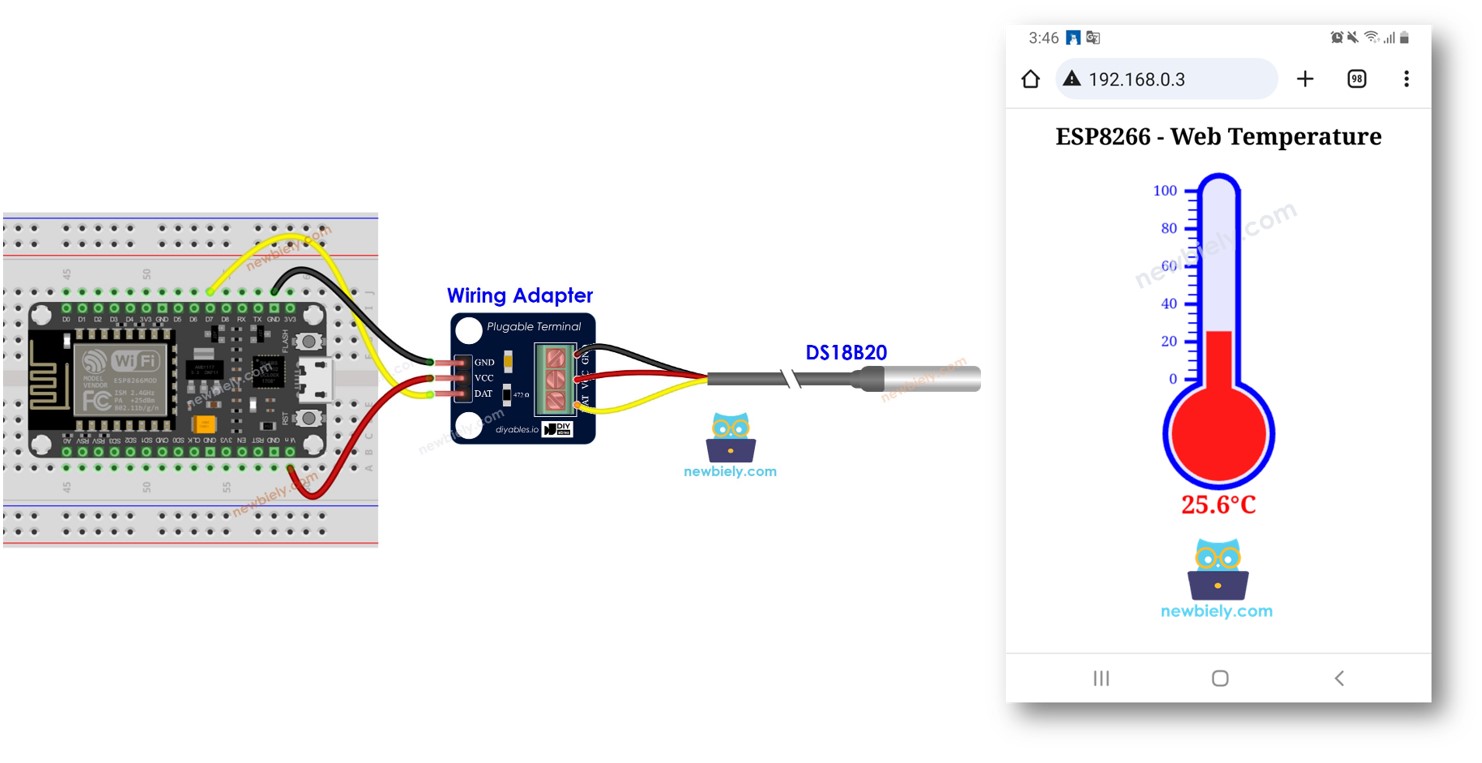
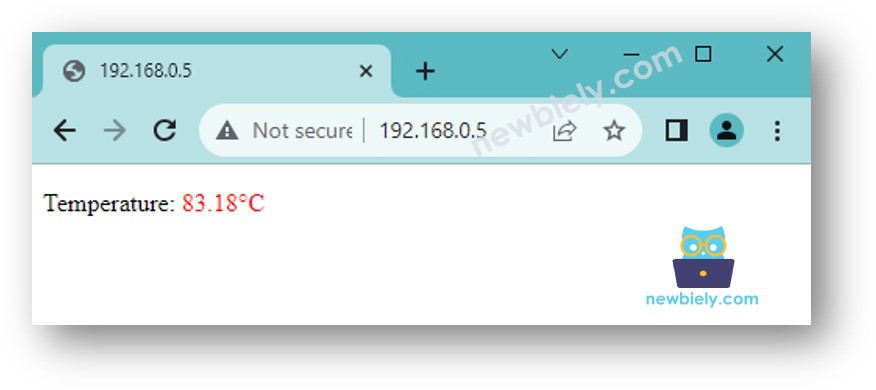
  • Bạn sẽ thấy một trang web rất đơn giản cho mạch ESP8266 trên trình duyệt web như dưới đây:
máy chủ web nhiệt độ ESP8266 NodeMCU

※ Lưu ý:

Với đoạn mã được cung cấp ở trên, để nhận được cập nhật nhiệt độ, bạn phải làm mới trang trên trình duyệt web. Ở phần tiếp theo, chúng ta sẽ học cách làm cho trang web tự động cập nhật giá trị nhiệt độ ở chế độ nền mà không tải lại trang.

ESP8266 Mã - Trang web đồ họa

Vì một trang web đồ họa chứa một lượng lớn nội dung HTML, việc nhúng nó vào mã ESP8266 như trước đây trở nên bất tiện. Để khắc phục điều này, chúng ta cần tách mã ESP8266 và mã HTML thành các tệp riêng biệt:

  • Mã ESP8266 sẽ được đặt trong tệp .ino.
  • Mã HTML (bao gồm HTML, CSS và JavaScript) sẽ được đặt trong tệp .h.

Để biết chi tiết về cách tách mã HTML khỏi mã ESP8266, vui lòng tham khảo hướng dẫn ESP8266 - Máy chủ Web.

Hướng dẫn từng bước

  • Mở Arduino IDE và tạo sketch mới, đặt cho nó một tên, ví dụ, newbiely.com.ino
  • Sao chép mã dưới đây và mở bằng Arduino IDE
/* * Mã ESP8266 NodeMCU này được phát triển bởi newbiely.vn * Mã ESP8266 NodeMCU này được cung cấp để sử dụng công khai, không có ràng buộc. * Để xem hướng dẫn chi tiết và sơ đồ kết nối, vui lòng truy cập: * https://newbiely.vn/tutorials/esp8266/esp8266-temperature-via-web */ #include <ESP8266WiFi.h> #include <ESP8266WebServer.h> #include "index.h" // Include the index.h file #include <OneWire.h> #include <DallasTemperature.h> #define SENSOR_PIN D7 // The ESP8266 pin connected to DS18B20 sensor's DATA pin const char* ssid = "YOUR_WIFI_SSID"; // CHANGE IT const char* password = "YOUR_WIFI_PASSWORD"; // CHANGE IT OneWire oneWire(SENSOR_PIN); // setup a oneWire instance DallasTemperature DS18B20(&oneWire); // pass oneWire to DallasTemperature library ESP8266WebServer server(80); // Web server on port 80 float getTemperature() { DS18B20.requestTemperatures(); // send the command to get temperatures float temperature_C = DS18B20.getTempCByIndex(0); // read temperature in °C return temperature_C; } void setup() { Serial.begin(9600); DS18B20.begin(); // initialize the DS18B20 sensor // Connect to Wi-Fi WiFi.begin(ssid, password); while (WiFi.status() != WL_CONNECTED) { delay(1000); Serial.println("Connecting to WiFi..."); } Serial.println("Connected to WiFi"); // Print the ESP8266's IP address Serial.print("ESP8266 Web Server's IP address: "); Serial.println(WiFi.localIP()); // Serve the HTML page from the file server.on("/", HTTP_GET, []() { Serial.println("ESP8266 Web Server: New request received:"); // for debugging Serial.println("GET /"); // for debugging server.send(200, "text/html", webpage); // webpage is from index.h file }); // Define a route to get the temperature data server.on("/temperature", HTTP_GET, []() { Serial.println("ESP8266 Web Server: New request received:"); // for debugging Serial.println("GET /temperature"); // for debugging float temperature = getTemperature(); // Format the temperature with two decimal places String temperatureStr = String(temperature, 2); server.send(200, "text/plain", temperatureStr); }); // Start the server server.begin(); } void loop() { // Handle client requests server.handleClient(); // Your code here }
  • Thay thông tin WiFi (SSID và mật khẩu) trong mã nguồn bằng của bạn
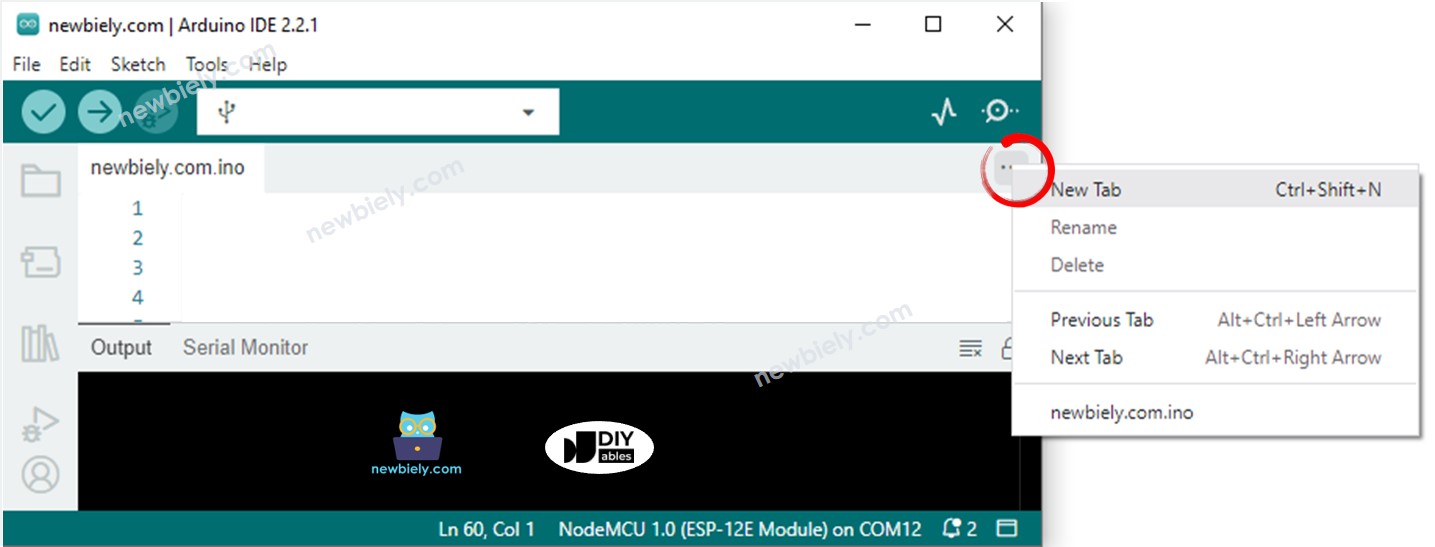
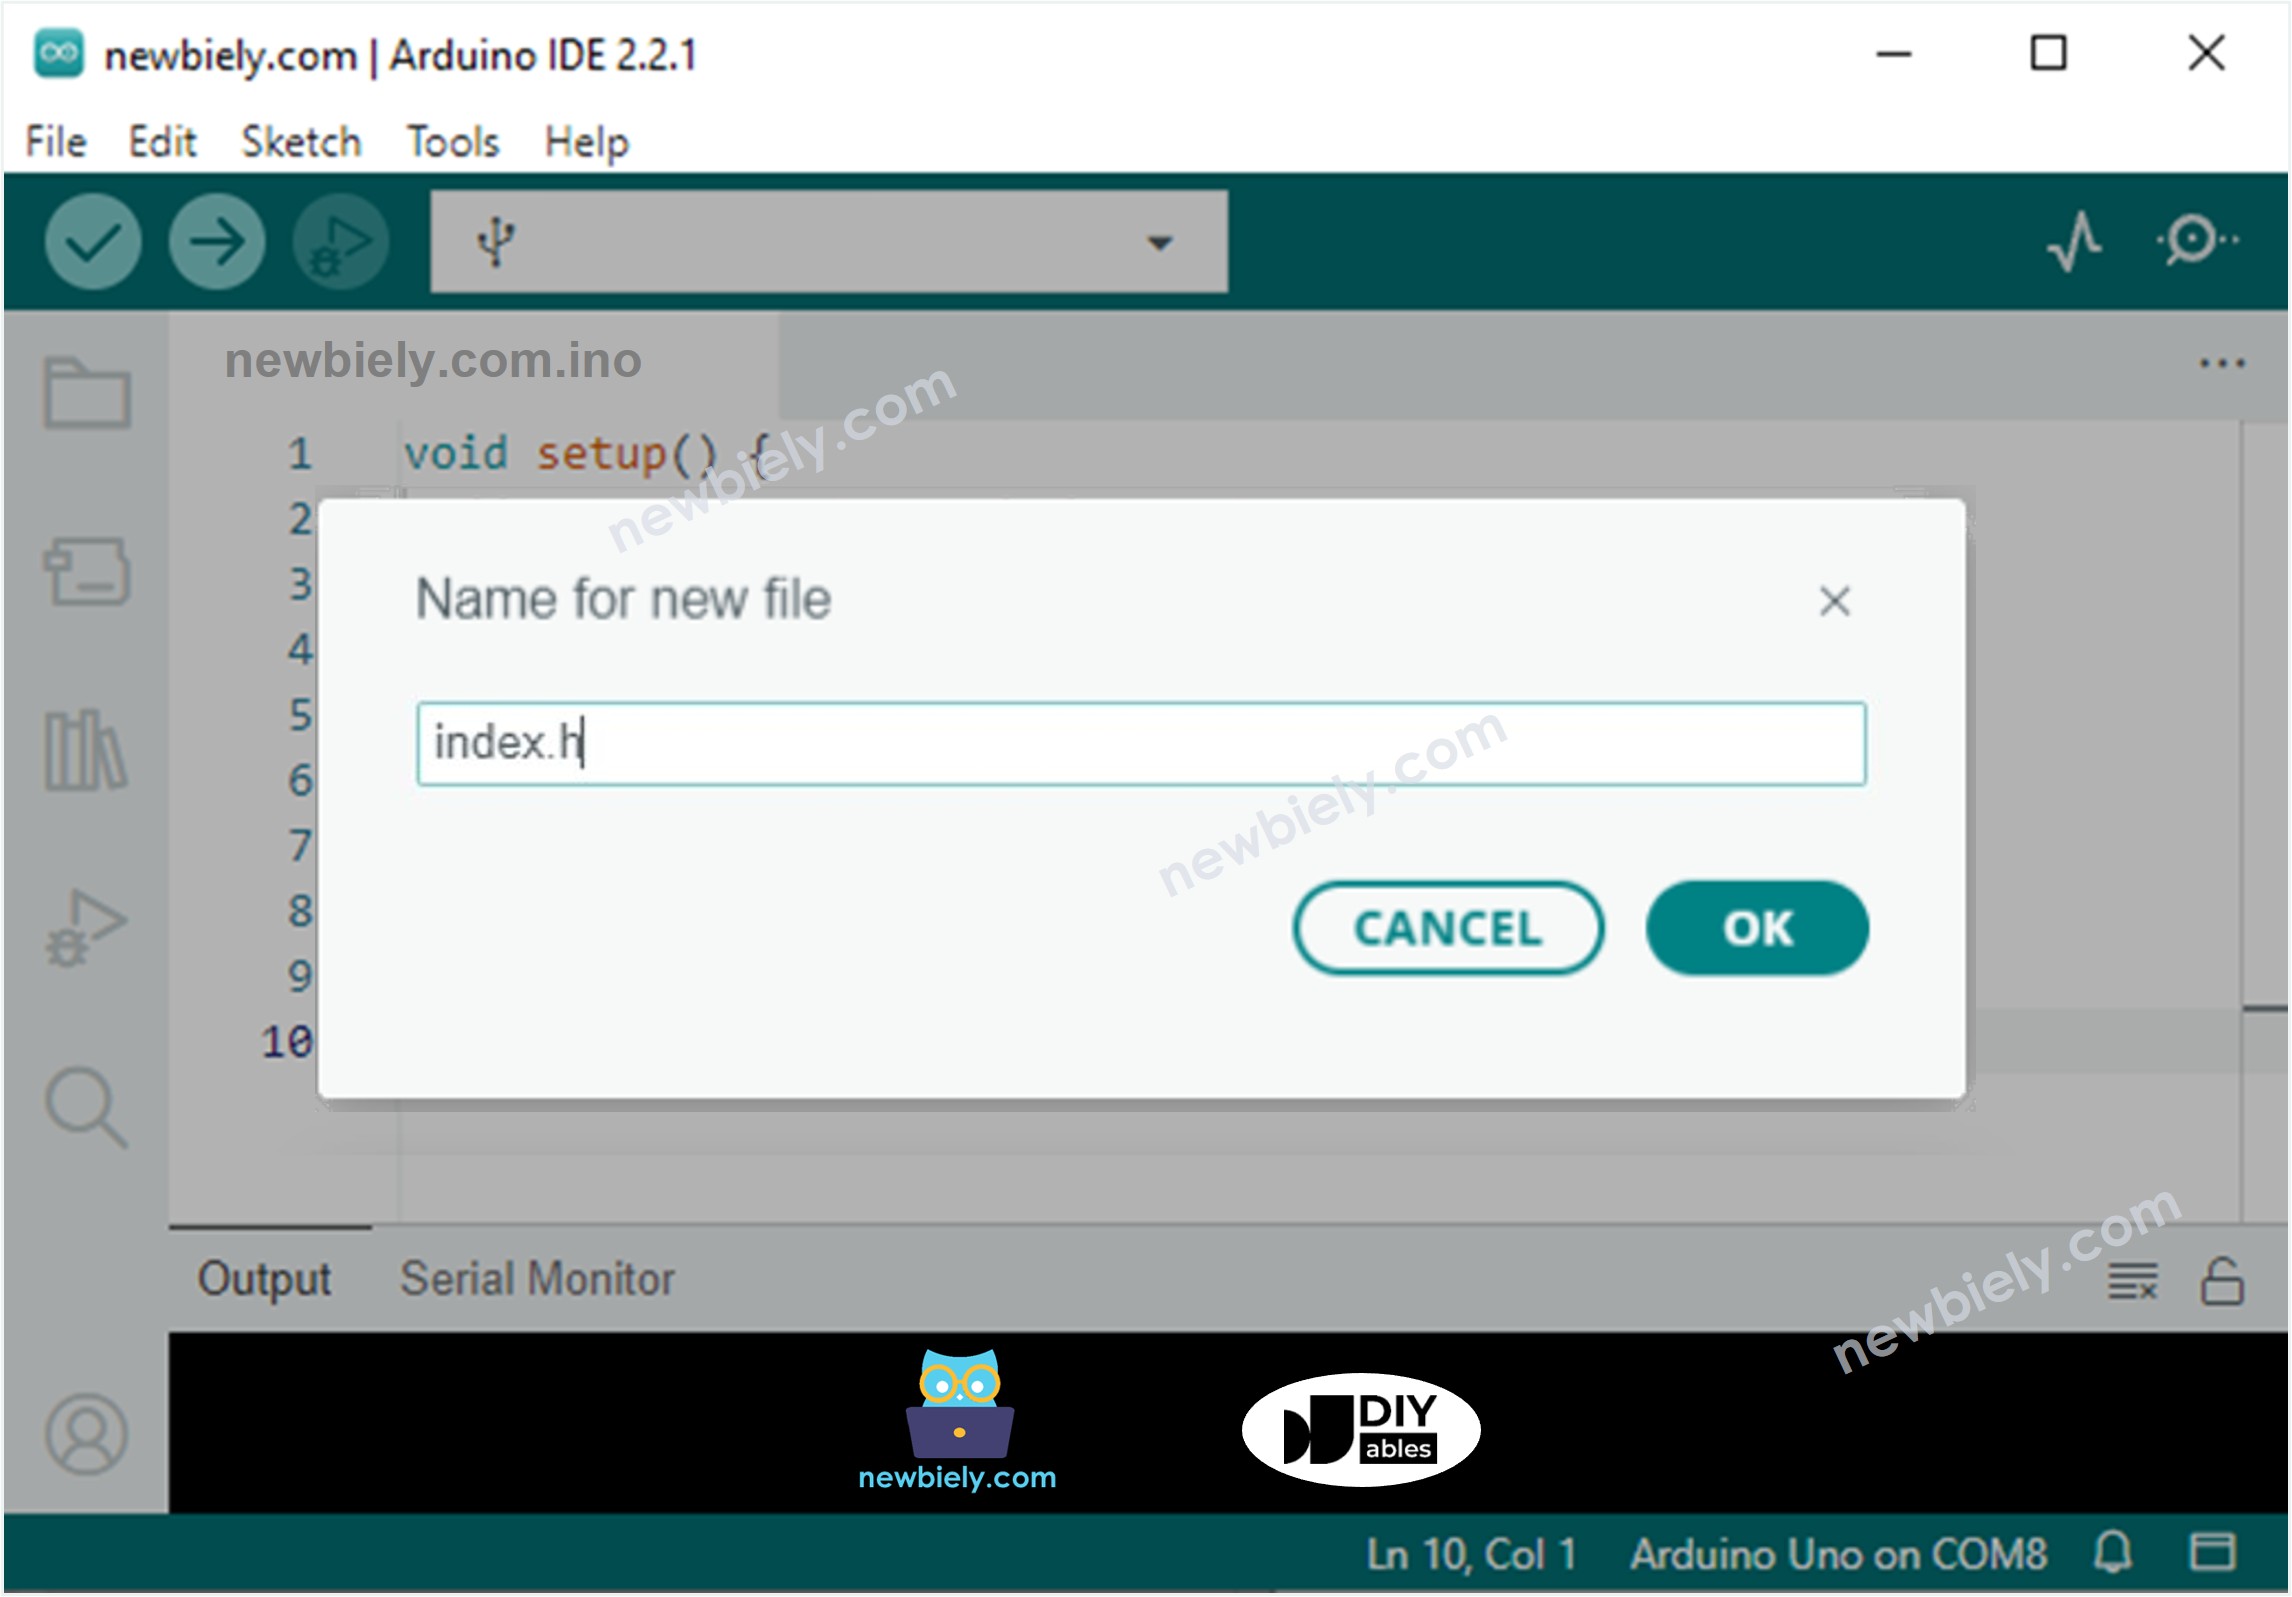
  • Tạo tệp index.h bằng Arduino IDE bằng cách:
    • Nhấp vào nút ngay bên dưới biểu tượng Serial Monitor và chọn New Tab, hoặc sử dụng phím Ctrl+Shift+N dùng.
    Arduino ide 2 thêm tệp tin
    • Đặt tên cho file là index.h và nhấn nút OK
    Arduino ide 2 thêm tệp index.h
    • Sao chép đoạn mã dưới đây và dán vào index.h.
    /* * Mã ESP8266 NodeMCU này được phát triển bởi newbiely.vn * Mã ESP8266 NodeMCU này được cung cấp để sử dụng công khai, không có ràng buộc. * Để xem hướng dẫn chi tiết và sơ đồ kết nối, vui lòng truy cập: * https://newbiely.vn/tutorials/esp8266/esp8266-temperature-via-web */ #ifndef WEBPAGE_H #define WEBPAGE_H const char* webpage = R"=====( <!DOCTYPE html> <html> <head> <title>ESP8266 - Web Temperature</title> <meta name="viewport" content="width=device-width, initial-scale=0.7, maximum-scale=0.7"> <meta charset="utf-8"> <link rel="icon" href="https://diyables.io/images/page/diyables.svg"> <style> body { font-family: "Georgia"; text-align: center; font-size: width/2pt;} h1 { font-weight: bold; font-size: width/2pt;} h2 { font-weight: bold; font-size: width/2pt;} button { font-weight: bold; font-size: width/2pt;} </style> <script> var cvs_width = 200, cvs_height = 450; function init() { var canvas = document.getElementById("cvs"); canvas.width = cvs_width; canvas.height = cvs_height + 50; var ctx = canvas.getContext("2d"); ctx.translate(cvs_width/2, cvs_height - 80); fetchTemperature(); setInterval(fetchTemperature, 4000); // Update temperature every 4 seconds } function fetchTemperature() { fetch("/temperature") .then(response => response.text()) .then(data => {update_view(data);}); } function update_view(temp) { var canvas = document.getElementById("cvs"); var ctx = canvas.getContext("2d"); var radius = 70; var offset = 5; var width = 45; var height = 330; ctx.clearRect(-cvs_width/2, -cvs_height + 80, cvs_width, cvs_height + 50); ctx.strokeStyle="blue"; ctx.fillStyle="blue"; //5-step Degree var x = -width/2; ctx.lineWidth=2; for (var i = 0; i <= 100; i+=5) { var y = -(height - radius)*i/100 - radius - 5; ctx.beginPath(); ctx.lineTo(x, y); ctx.lineTo(x - 20, y); ctx.stroke(); } //20-step Degree ctx.lineWidth=5; for (var i = 0; i <= 100; i+=20) { var y = -(height - radius)*i/100 - radius - 5; ctx.beginPath(); ctx.lineTo(x, y); ctx.lineTo(x - 25, y); ctx.stroke(); ctx.font="20px Georgia"; ctx.textBaseline="middle"; ctx.textAlign="right"; ctx.fillText(i.toString(), x - 35, y); } // shape ctx.lineWidth=16; ctx.beginPath(); ctx.arc(0, 0, radius, 0, 2 * Math.PI); ctx.stroke(); ctx.beginPath(); ctx.rect(-width/2, -height, width, height); ctx.stroke(); ctx.beginPath(); ctx.arc(0, -height, width/2, 0, 2 * Math.PI); ctx.stroke(); ctx.fillStyle="#e6e6ff"; ctx.beginPath(); ctx.arc(0, 0, radius, 0, 2 * Math.PI); ctx.fill(); ctx.beginPath(); ctx.rect(-width/2, -height, width, height); ctx.fill(); ctx.beginPath(); ctx.arc(0, -height, width/2, 0, 2 * Math.PI); ctx.fill(); ctx.fillStyle="#ff1a1a"; ctx.beginPath(); ctx.arc(0, 0, radius - offset, 0, 2 * Math.PI); ctx.fill(); temp = Math.round(temp * 100) / 100; var y = (height - radius)*temp/100.0 + radius + 5; ctx.beginPath(); ctx.rect(-width/2 + offset, -y, width - 2*offset, y); ctx.fill(); ctx.fillStyle="red"; ctx.font="bold 34px Georgia"; ctx.textBaseline="middle"; ctx.textAlign="center"; ctx.fillText(temp.toString() + "°C", 0, 100); } window.onload = init; </script> </head> <body> <h1>ESP8266 - Web Temperature</h1> <canvas id="cvs"></canvas> </body> </html> )====="; #endif
    • Bây giờ bạn có mã trong hai tệp: newbiely.com.inoindex.h
    • Nhấp vào nút Tải lên trên Arduino IDE để tải mã lên ESP8266
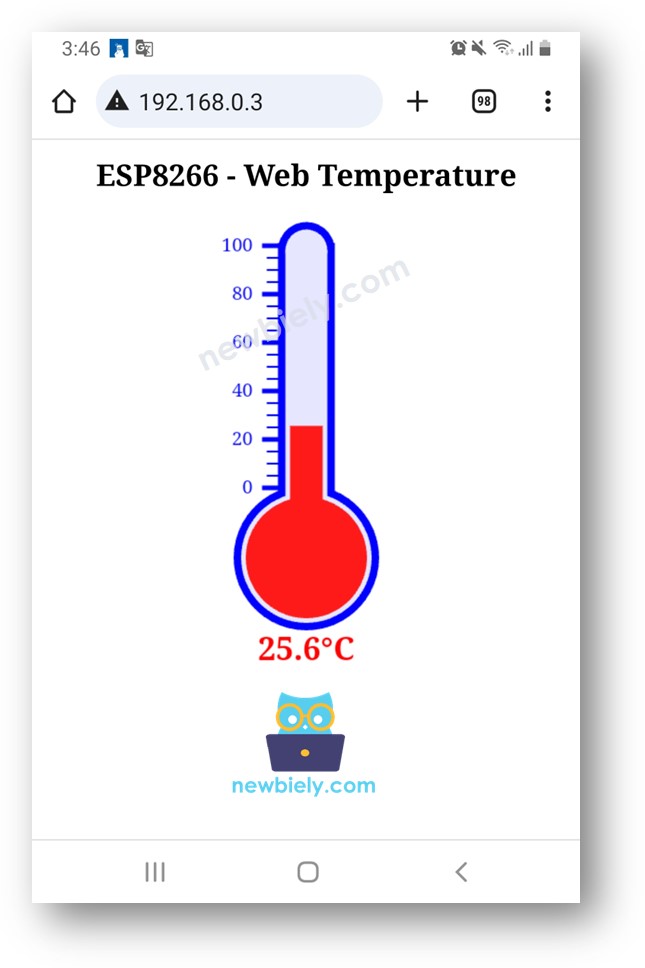
    • Truy cập trang web của bo mạch ESP8266 thông qua trình duyệt trên máy tính hoặc điện thoại của bạn như trước. Bạn sẽ thấy nó như dưới đây:
    máy chủ web nhiệt độ ESP8266 NodeMCU

    ※ Lưu ý:

    • Nếu bạn chỉnh sửa nội dung HTML ở index.h và không chạm vào bất kỳ điều gì trong tệp newbiely.com.ino, khi bạn biên dịch và tải lên mã tới ESP8266, Arduino IDE sẽ không cập nhật nội dung HTML.
    • Để Arduino IDE cập nhật nội dung HTML trong trường hợp này, hãy thực hiện một thay đổi trong tệp newbiely.com.ino (ví dụ: thêm một dòng trống, thêm một chú thích...).