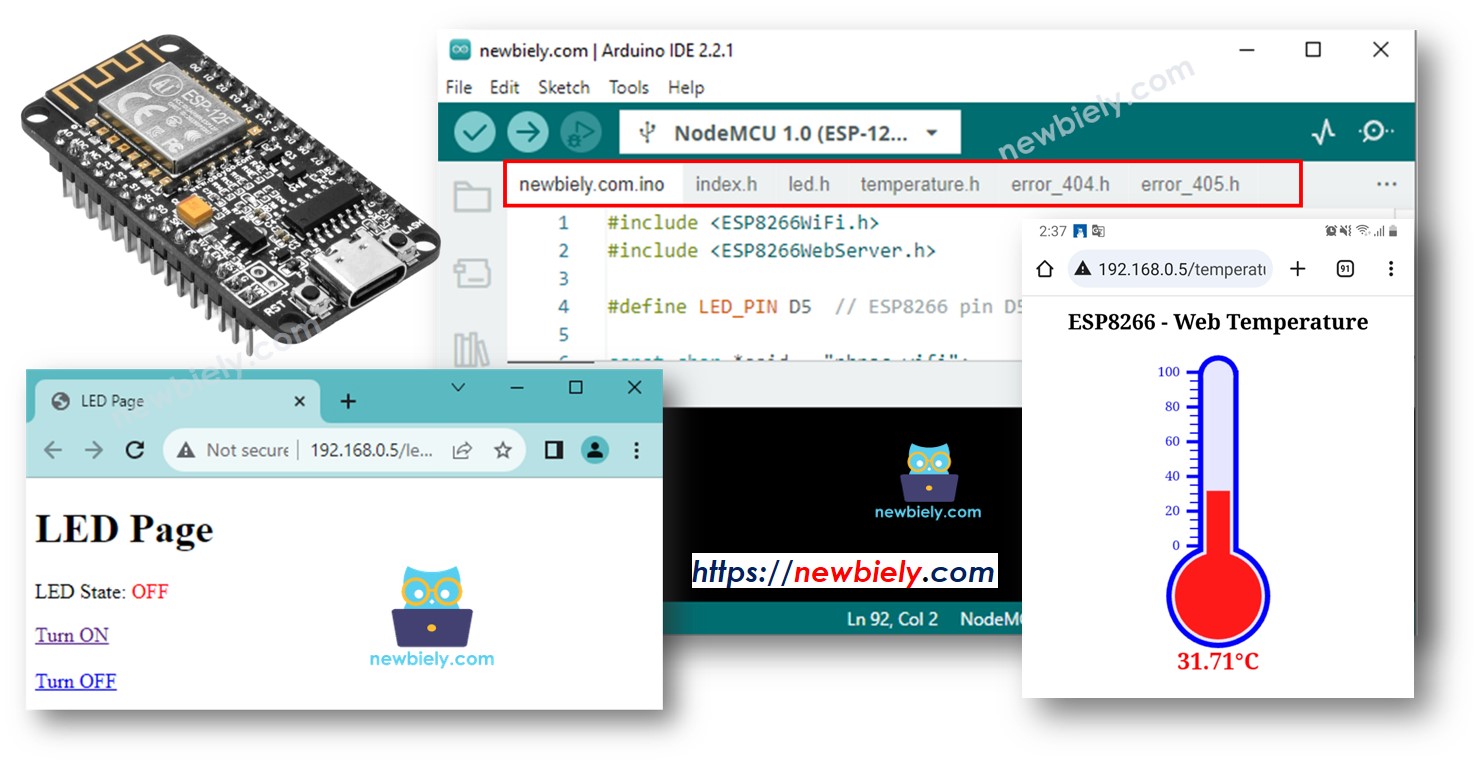
Hướng dẫn này chỉ cho bạn cách biến ESP8266 thành một máy chủ web có thể xử lý nhiều trang đồng thời, chẳng hạn như index.html, temperature.html, led.html, error_404.html, và error_405.html...
Bằng cách làm theo hướng dẫn này, bạn sẽ có thể biến ESP8266 của mình thành một máy chủ web với một số tính năng thú vị:
Nhiều trang web đang hoạt động đồng thời.
Nội dung HTML (bao gồm HTML, CSS và Javascript) cho mỗi trang được lưu riêng trong một tệp trên Arduino IDE.
Nội dung HTML có thể được cập nhật động với các giá trị thời gian thực từ các cảm biến, làm cho các trang web động và đáp ứng.
Máy chủ web cho phép điều khiển một thiết bị được kết nối với ESP8266 thông qua web.
Máy chủ web xử lý các mã lỗi HTTP như 404 Không tìm thấy và 405 Phương thức không được phép
Có thể nghe có vẻ phức tạp, nhưng đừng lo nhé! Hướng dẫn này cung cấp chỉ dẫn từng bước, và mã nguồn được thiết kế thân thiện với người mới bắt đầu, đảm bảo bạn có thể dễ dàng hiểu và tự tạo máy chủ web ESP8266 của riêng mình.
Dưới đây là toàn bộ mã ESP8266 tạo máy chủ web với nhiều trang. Để đơn giản hóa, nội dung HTML cho mỗi trang rất đơn giản và được nhúng trực tiếp vào mã ESP8266. Ở phần sau, chúng ta sẽ học cách tách nội dung HTML cho từng trang thành các tệp riêng biệt, làm cho mã nguồn được tổ chức và dễ quản lý hơn.
/* * Mã ESP8266 NodeMCU này được phát triển bởi newbiely.vn * Mã ESP8266 NodeMCU này được cung cấp để sử dụng công khai, không có ràng buộc. * Để xem hướng dẫn chi tiết và sơ đồ kết nối, vui lòng truy cập: * https://newbiely.vn/tutorials/esp8266/esp8266-web-server-multiple-pages */#include <ESP8266WiFi.h>#include <ESP8266WebServer.h>#define LED_PIN D5 // The ESP8266 pin D5 connected to LEDconstchar *ssid = "YOUR_WIFI_SSID"; // CHANGE ITconstchar *password = "YOUR_WIFI_PASSWORD"; // CHANGE ITESP8266WebServer server(80); // Web server on port 80int LED_state = LOW;floatgetTemperature() {// YOUR SENSOR IMPLEMENTATION HERE// simulate the temperature valuefloat temp_x100 = random(0, 10000); // a ramdom value from 0 to 10000return temp_x100 / 100; // return the simulated temperature value from 0 to 100 in float}voidsetup() {Serial.begin(9600);pinMode(LED_PIN, OUTPUT);// Connect to Wi-FiWiFi.begin(ssid, password);while (WiFi.status() != WL_CONNECTED) {delay(1000);Serial.println("Connecting to WiFi..."); }Serial.println("Connected to WiFi");// Print the ESP8266's IP address Serial.print("ESP8266 Web Server's IP address: "); Serial.println(WiFi.localIP());// Serve the specified HTML pages server.on("/", HTTP_GET, []() {Serial.println("Web Server: home page"); server.send(200, "text/html", "This is the ESP8266 home page"); }); server.on("/temperature.html", HTTP_GET, []() {Serial.println("Web Server: temperature page");float temperature = getTemperature(); server.send(200, "text/html", "Temperature: " + String(temperature)); }); server.on("/led.html", HTTP_GET, []() {Serial.print("Web Server: LED page");// Check for the 'state' parameter in the query stringif (server.arg("state")) {String state = server.arg("state");if (state == "on") { LED_state = HIGH; } elseif (state == "off") { LED_state = LOW; }// control LED heredigitalWrite(LED_PIN, LED_state);Serial.print(" => turning LED to ");Serial.print(state); }Serial.println(); server.send(200, "text/html", "LED state: " + String(LED_state)); });// 404 and 405 error handler server.onNotFound([]() {if (server.method() == HTTP_GET) {// Handle 404 Not Found errorSerial.println("Web Server: Not Found"); server.send(404, "text/html", "Not Found"); } else {// Handle 405 Method Not Allowed errorSerial.println("Web Server: Method Not Allowed"); server.send(405, "text/html", "Method Not Allowed"); } }); server.begin();Serial.println("ESP8266 Web server started");}voidloop() {// Handle client requests server.handleClient();// Your code can go here or be empty; the server is handled asynchronously}
Hướng dẫn từng bước
Để bắt đầu với ESP8266 trên Arduino IDE, hãy làm theo các bước sau:
Lưu ý rằng bạn cần thay đổi địa chỉ 192.168.0.5 thành địa chỉ IP bạn nhận được trên Serial Monitor.
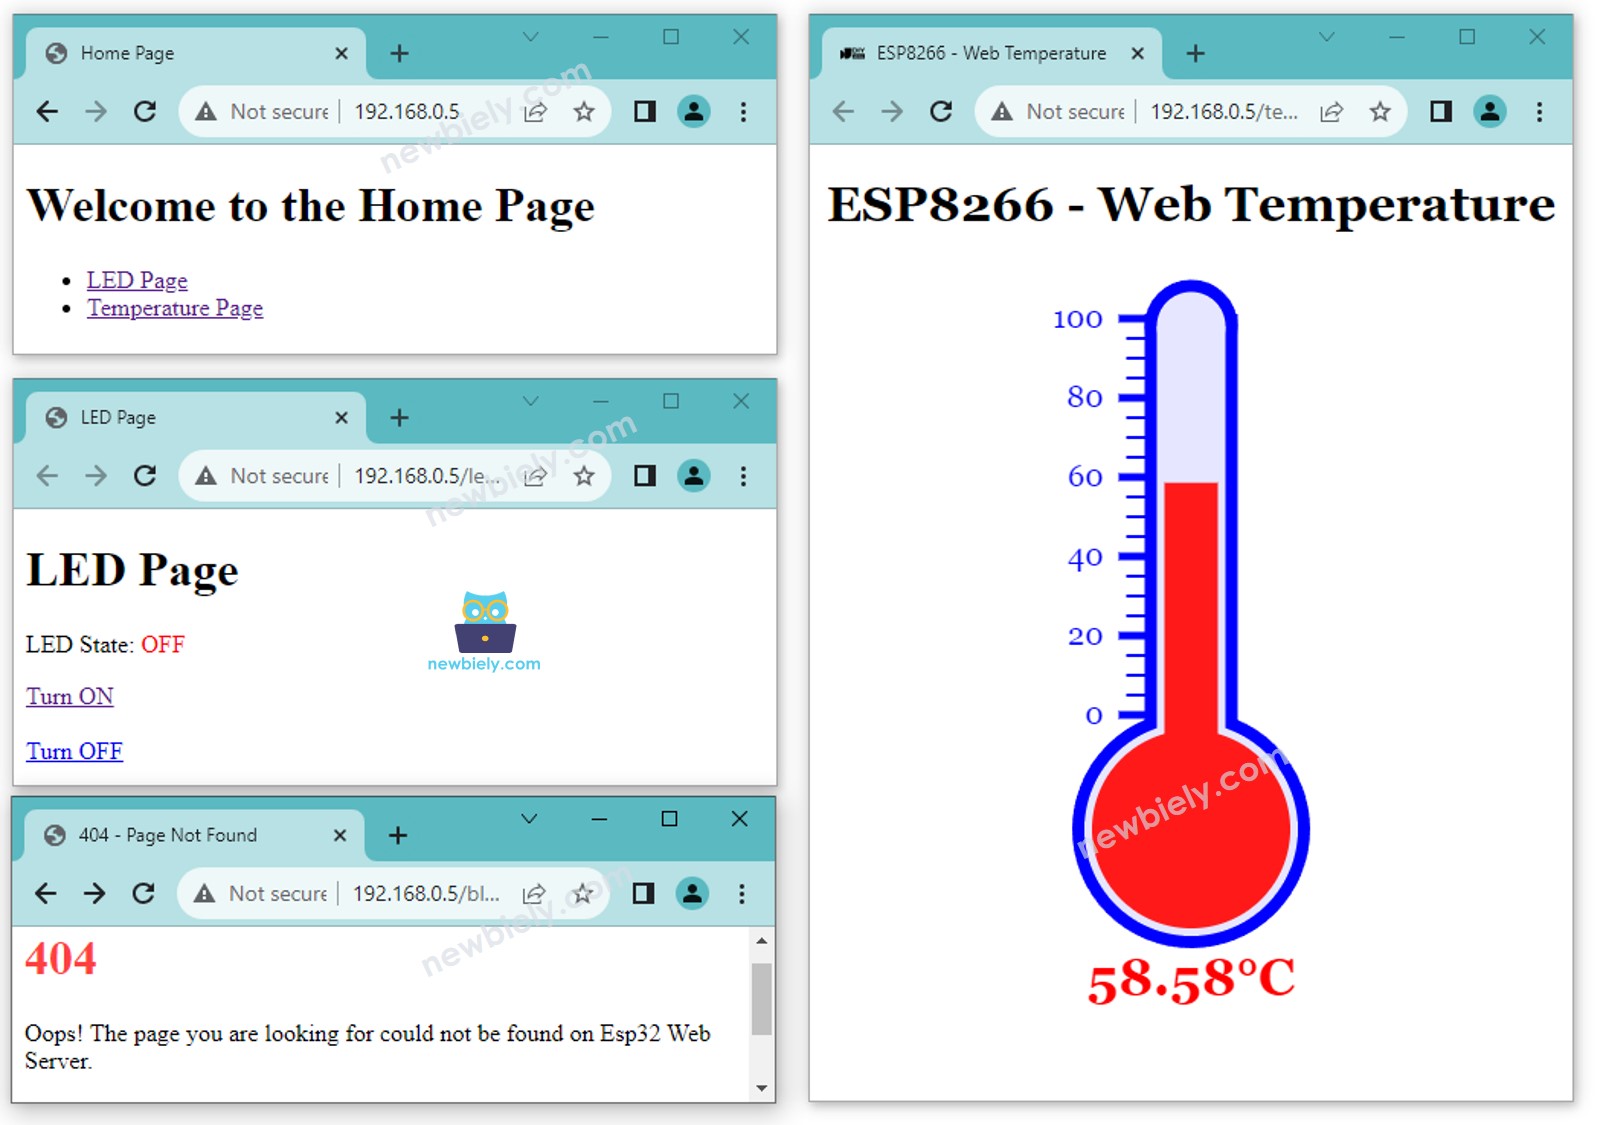
Bạn sẽ thấy các trang sau: trang chủ, trang đèn LED, trang nhiệt độ, và trang Không tìm thấy.
Bạn cũng có thể kiểm tra đầu ra trên Serial Monitor.
Newbiely | Arduino IDE 2.3.8
──
☐
✕
File
Edit
Sketch
Tools
Help
Nodemcu 1.0 (ESP-12E Module)
Newbiely.ino
···
8Serial.println("Hello World!");
Output
Serial Monitor
Message (Enter to send message to 'Nodemcu 1.0 (ESP-12E Module)' on 'COM15')
New Line
9600 baud
Connecting to WiFi...
Connected to WiFi
ESP8266 Web Server's IP address: 192.168.0.5
ESP8266 Web server started
Web Server: home page
Web Server: LED page
Web Server: LED page => turning LED to on
Web Server: LED page => turning LED to off
Web Server: temperature page
Web Server: Not Found
Ln 11, Col 1
Nodemcu 1.0 (ESP-12E Module) on COM15
2
Trước đây, mã có nội dung HTML rất đơn giản cho mỗi trang. Tuy nhiên, nếu chúng ta muốn tạo một giao diện bắt mắt với nhiều HTML, mã có thể trở nên lớn và lộn xộn. Để làm cho nó đơn giản hơn, chúng ta sẽ học cách tách HTML khỏi mã ESP8266. Điều này cho phép chúng ta giữ HTML trong các tệp riêng, giúp quản lý và làm việc với nó dễ dàng hơn.
Mã ESP8266 - Máy chủ web đa trang hoàn chỉnh
Mở Arduino IDE.
Tạo một bản phác thảo mới và đặt tên cho nó, ví dụ, ESP8266WebServer.ino.
Sao chép mã được cung cấp và dán vào tệp đó.
/* * Mã ESP8266 NodeMCU này được phát triển bởi newbiely.vn * Mã ESP8266 NodeMCU này được cung cấp để sử dụng công khai, không có ràng buộc. * Để xem hướng dẫn chi tiết và sơ đồ kết nối, vui lòng truy cập: * https://newbiely.vn/tutorials/esp8266/esp8266-web-server-multiple-pages */#include <ESP8266WiFi.h>#include <ESP8266WebServer.h>#include"index.h"#include"temperature.h"#include"led.h"#include"error_404.h"#include"error_405.h"#define LED_PIN D6 // The ESP8266 pin connected to LEDconstchar *ssid = "YOUR_WIFI_SSID"; // CHANGE ITconstchar *password = "YOUR_WIFI_PASSWORD"; // CHANGE ITESP8266WebServer server(80); // Web server on port 80int LED_state = LOW;floatgetTemperature() {// YOUR SENSOR IMPLEMENTATION HERE// simulate the temperature valuefloat temp_x100 = random(0, 10000); // a ramdom value from 0 to 10000return temp_x100 / 100; // return the simulated temperature value from 0 to 100 in float}voidsetup() {Serial.begin(9600);pinMode(LED_PIN, OUTPUT);// Connect to Wi-FiWiFi.begin(ssid, password);while (WiFi.status() != WL_CONNECTED) {delay(1000);Serial.println("Connecting to WiFi..."); }Serial.println("Connected to WiFi");// Print the ESP8266's IP address Serial.print("ESP8266 Web Server's IP address: "); Serial.println(WiFi.localIP());// Serve the specified HTML pages server.on("/", HTTP_GET, []() {Serial.println("Web Server: home page");String html = HTML_CONTENT_HOME; // Use the HTML content from the index.h file server.send(200, "text/html", html); }); server.on("/temperature.html", HTTP_GET, []() {Serial.println("Web Server: temperature page");String html = HTML_CONTENT_TEMPERATURE; // Use the HTML content from the temperature.h filefloat temperature = getTemperature(); html.replace("%TEMPERATURE_VALUE%", String(temperature)); // update the temperature value server.send(200, "text/html", html); }); server.on("/led.html", HTTP_GET, []() {Serial.print("Web Server: LED page");// Check for the 'state' parameter in the query stringif (server.arg("state")) {String state = server.arg("state");if (state == "on") { LED_state = HIGH; } elseif (state == "off") { LED_state = LOW; }// control LED heredigitalWrite(LED_PIN, LED_state);Serial.print(" => turning LED to ");Serial.print(state); }Serial.println();String html = HTML_CONTENT_LED; // Use the HTML content from the led.h file html.replace("%LED_STATE%", LED_state ? "ON" : "OFF"); // update the LED state server.send(200, "text/html", html); });// 404 and 405 error handler server.onNotFound([]() {if (server.method() == HTTP_GET) {// Handle 404 Not Found errorSerial.println("Web Server: Not Found");String html = HTML_CONTENT_404; // Use the HTML content from the error_404.h file server.send(404, "text/html", html); } else {// Handle 405 Method Not Allowed errorSerial.println("Web Server: Method Not Allowed");String html = HTML_CONTENT_405; // Use the HTML content from the error_405.h file server.send(405, "text/html", html); } }); server.begin();Serial.println("ESP8266 Web server started");}voidloop() {// Handle client requests server.handleClient();// Your code can go here or be empty; the server is handled asynchronously}
Thay đổi thông tin WiFi (SSID và mật khẩu) trong mã thành của bạn
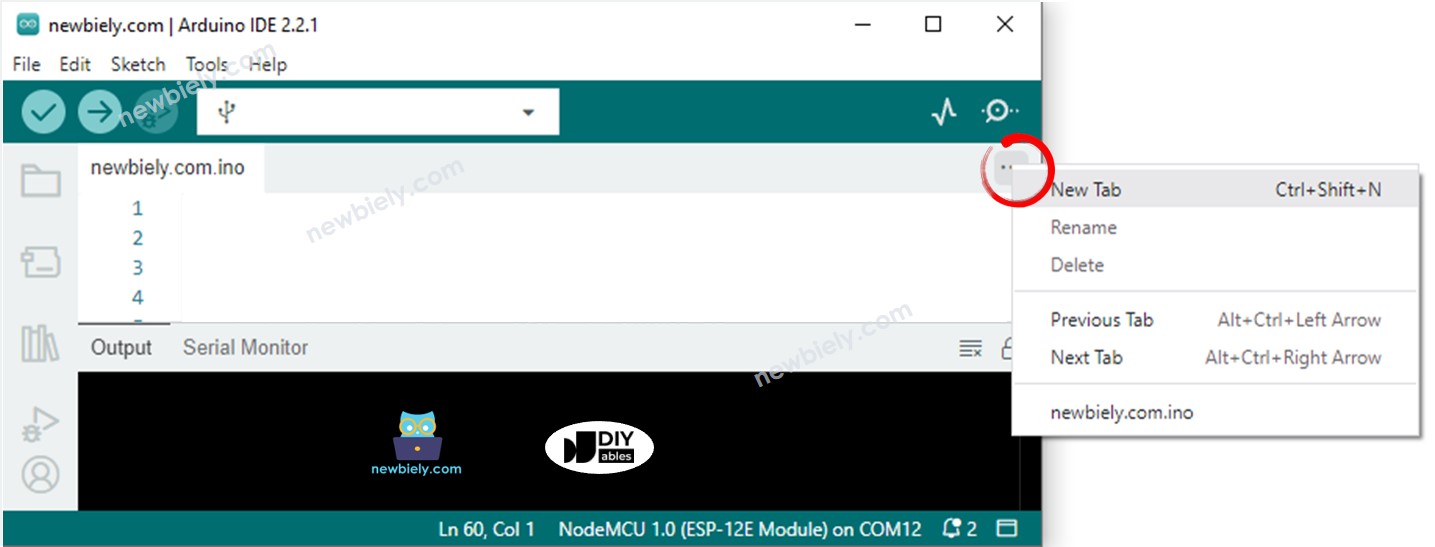
Tạo tệp index.h trên Arduino IDE bằng cách:
Hoặc nhấp vào nút ngay dưới biểu tượng Serial Monitor và chọn New Tab, hoặc dùng phím Ctrl+Shift+N
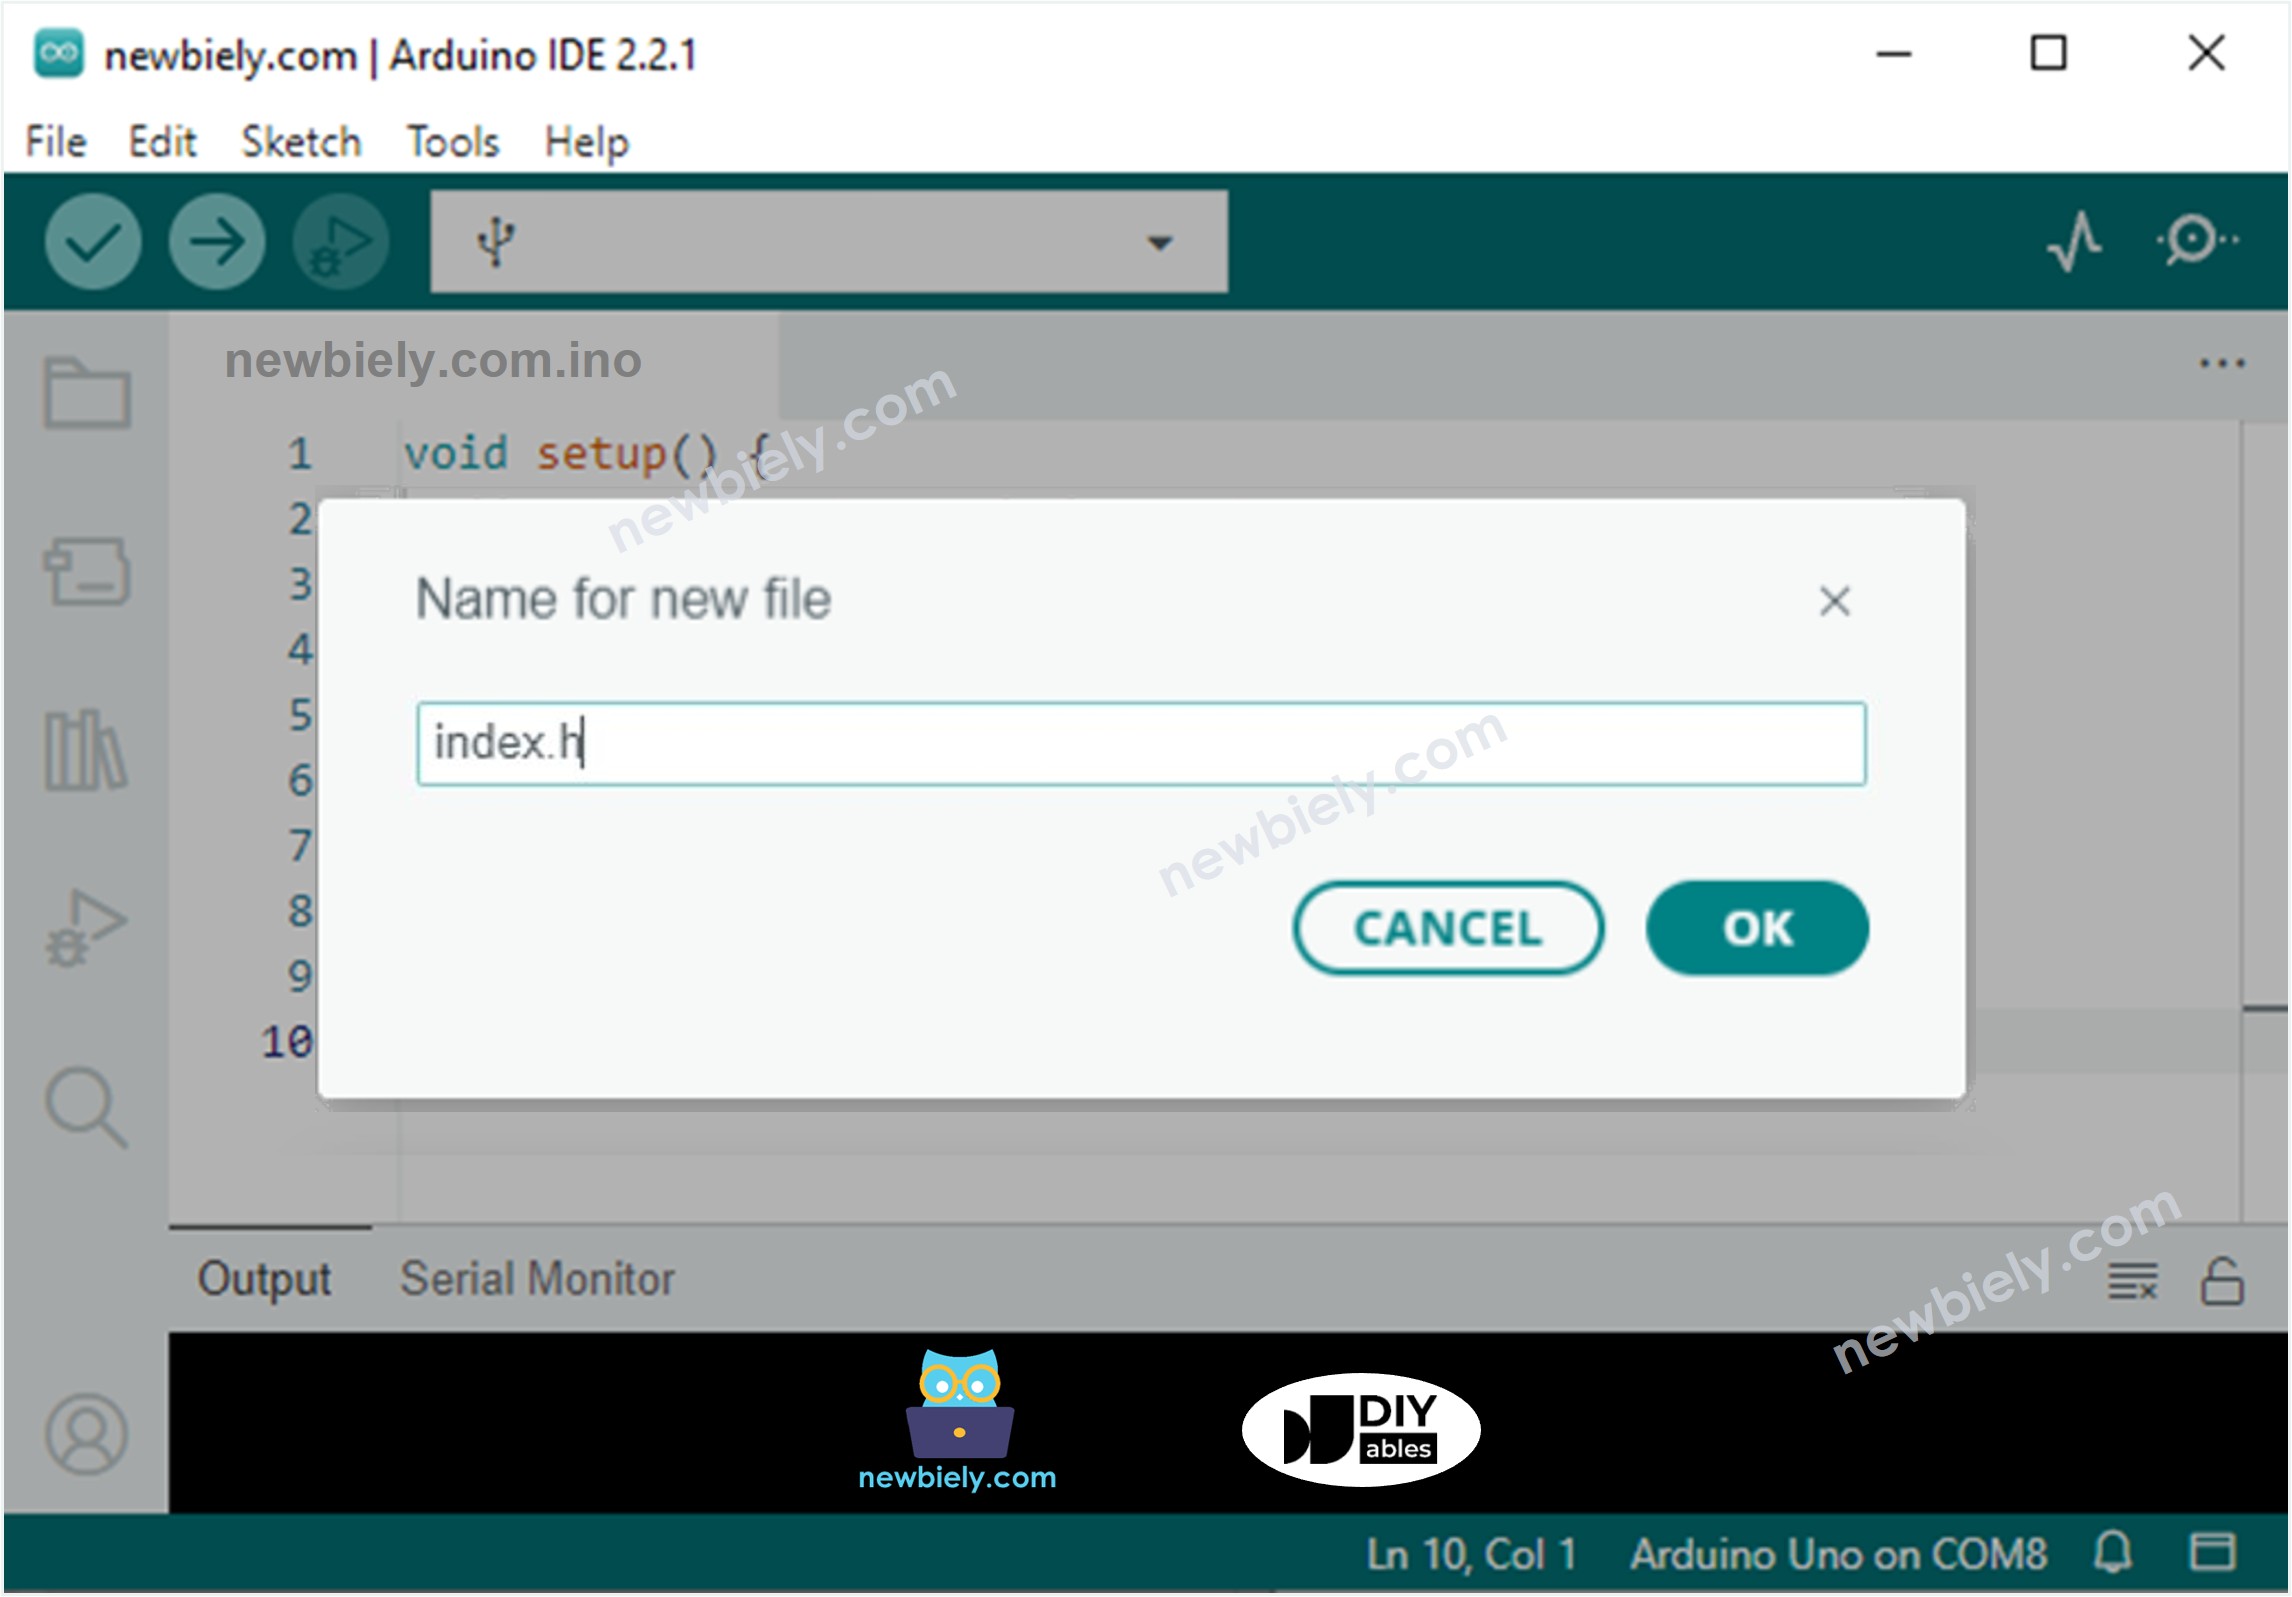
Đặt tên cho tệp là index.h và nhấn nút OK
Sao chép mã dưới đây và dán vào tệp index.h.
/* * Mã ESP8266 NodeMCU này được phát triển bởi newbiely.vn * Mã ESP8266 NodeMCU này được cung cấp để sử dụng công khai, không có ràng buộc. * Để xem hướng dẫn chi tiết và sơ đồ kết nối, vui lòng truy cập: * https://newbiely.vn/tutorials/esp8266/esp8266-web-server-multiple-pages */constchar *HTML_CONTENT_HOME = R"=====(<!DOCTYPE html><html lang="en"><head> <meta charset="UTF-8"> <meta name="viewport" content="width=device-width, initial-scale=1.0"> <link rel="icon" href="data:,"> <title>Home Page</title></head><body> <h1>Welcome to the Home Page</h1> <ul> <li><a href="/led.html">LED Page</a></li> <li><a href="/temperature.html">Temperature Page</a></li> </ul></body></html>)=====";
Tương tự, hãy tạo file led.h trên Arduino IDE với nội dung sau.
/* * Mã ESP8266 NodeMCU này được phát triển bởi newbiely.vn * Mã ESP8266 NodeMCU này được cung cấp để sử dụng công khai, không có ràng buộc. * Để xem hướng dẫn chi tiết và sơ đồ kết nối, vui lòng truy cập: * https://newbiely.vn/tutorials/esp8266/esp8266-web-server-multiple-pages */constchar *HTML_CONTENT_LED = R"=====(<!DOCTYPE html><html lang="en"><head> <meta charset="UTF-8"> <meta name="viewport" content="width=device-width, initial-scale=1.0"> <link rel="icon" href="data:,"> <title>LED Page</title></head><body> <h1>LED Page</h1> <p>LED State: <span style="color: red;">%LED_STATE%</span></p> <a href='/led.html?state=on'>Turn ON</a> <br><br> <a href='/led.html?state=off'>Turn OFF</a></body></html>)=====";
Tương tự, hãy tạo tệp temperature.h trên Arduino IDE với nội dung sau đây.
/* * Mã ESP8266 NodeMCU này được phát triển bởi newbiely.vn * Mã ESP8266 NodeMCU này được cung cấp để sử dụng công khai, không có ràng buộc. * Để xem hướng dẫn chi tiết và sơ đồ kết nối, vui lòng truy cập: * https://newbiely.vn/tutorials/esp8266/esp8266-web-server-multiple-pages */constchar *HTML_CONTENT_TEMPERATURE = R"=====(<!DOCTYPE html><html><head><title>ESP8266 - Web Temperature</title><meta name="viewport" content="width=device-width, initial-scale=0.7, maximum-scale=0.7"><meta charset="utf-8"><link rel="icon" href="https://diyables.io/images/page/diyables.svg"><style>body { font-family: "Georgia"; text-align: center; font-size: width/2pt;}h1 { font-weight: bold; font-size: width/2pt;}h2 { font-weight: bold; font-size: width/2pt;}button { font-weight: bold; font-size: width/2pt;}</style><script>var cvs_width = 200, cvs_height = 450;function init() { var canvas = document.getElementById("cvs"); canvas.width = cvs_width; canvas.height = cvs_height + 50; var ctx = canvas.getContext("2d"); ctx.translate(cvs_width/2, cvs_height - 80); update_view(%TEMPERATURE_VALUE%);}function update_view(temp) { var canvas = document.getElementById("cvs"); var ctx = canvas.getContext("2d"); var radius = 70; var offset = 5; var width = 45; var height = 330; ctx.clearRect(-cvs_width/2, -350, cvs_width, cvs_height); ctx.strokeStyle="blue"; ctx.fillStyle="blue";//5-step Degree var x = -width/2; ctx.lineWidth=2;for (var i = 0; i <= 100; i+=5) { var y = -(height - radius)*i/100 - radius - 5; ctx.beginPath(); ctx.lineTo(x, y); ctx.lineTo(x - 20, y); ctx.stroke(); }//20-step Degree ctx.lineWidth=5;for (var i = 0; i <= 100; i+=20) { var y = -(height - radius)*i/100 - radius - 5; ctx.beginPath(); ctx.lineTo(x, y); ctx.lineTo(x - 25, y); ctx.stroke(); ctx.font="20px Georgia"; ctx.textBaseline="middle"; ctx.textAlign="right"; ctx.fillText(i.toString(), x - 35, y); }// shape ctx.lineWidth=16; ctx.beginPath(); ctx.arc(0, 0, radius, 0, 2 * Math.PI); ctx.stroke(); ctx.beginPath(); ctx.rect(-width/2, -height, width, height); ctx.stroke(); ctx.beginPath(); ctx.arc(0, -height, width/2, 0, 2 * Math.PI); ctx.stroke(); ctx.fillStyle="#e6e6ff"; ctx.beginPath(); ctx.arc(0, 0, radius, 0, 2 * Math.PI); ctx.fill(); ctx.beginPath(); ctx.rect(-width/2, -height, width, height); ctx.fill(); ctx.beginPath(); ctx.arc(0, -height, width/2, 0, 2 * Math.PI); ctx.fill(); ctx.fillStyle="#ff1a1a"; ctx.beginPath(); ctx.arc(0, 0, radius - offset, 0, 2 * Math.PI); ctx.fill(); temp = Math.round(temp * 100) / 100; var y = (height - radius)*temp/100.0 + radius + 5; ctx.beginPath(); ctx.rect(-width/2 + offset, -y, width - 2*offset, y); ctx.fill(); ctx.fillStyle="red"; ctx.font="bold 34px Georgia"; ctx.textBaseline="middle"; ctx.textAlign="center"; ctx.fillText(temp.toString() + "°C", 0, 100);}window.onload = init;</script></head><body><h1>ESP8266 - Web Temperature</h1><canvas id="cvs"></canvas></body></html>)=====";
Tương tự, tạo tệp error_404.h trên Arduino IDE với nội dung sau.
/* * Mã ESP8266 NodeMCU này được phát triển bởi newbiely.vn * Mã ESP8266 NodeMCU này được cung cấp để sử dụng công khai, không có ràng buộc. * Để xem hướng dẫn chi tiết và sơ đồ kết nối, vui lòng truy cập: * https://newbiely.vn/tutorials/esp8266/esp8266-web-server-multiple-pages */constchar *HTML_CONTENT_404 = R"=====(<!DOCTYPE html><html lang="en"><head> <meta charset="UTF-8"> <meta name="viewport" content="width=device-width, initial-scale=1.0"> <link rel="icon" href="data:,"> <title>404 - Page Not Found</title> <style> h1 {color: #ff4040;} </style></head><body> <h1>404</h1> <p>Oops! The page you are looking for could not be found on Esp32 Web Server.</p> <p>Please check the URL or go back to the <a href="/">homepage</a>.</p> <p>Or check <a href="https://esp32io.com/tutorials/esp32-web-server-multiple-pages"> Esp32 Web Server</a> tutorial.</p></body></html>)=====";
Tương tự, hãy tạo tệp error_405.h trong Arduino IDE với nội dung sau.
/* * Mã ESP8266 NodeMCU này được phát triển bởi newbiely.vn * Mã ESP8266 NodeMCU này được cung cấp để sử dụng công khai, không có ràng buộc. * Để xem hướng dẫn chi tiết và sơ đồ kết nối, vui lòng truy cập: * https://newbiely.vn/tutorials/esp8266/esp8266-web-server-multiple-pages */constchar *HTML_CONTENT_405 = R"=====(<!DOCTYPE html><html lang="en"><head> <meta charset="UTF-8"> <meta name="viewport" content="width=device-width, initial-scale=1.0"> <link rel="icon" href="data:,"> <title>405 - Method Not Allowed</title> <style> h1 {color: #ff4040;} </style></head><body> <h1>405 - Method Not Allowed</h1> <p>Oops! The requested method is not allowed for this resource.</p> <p>Please check your request or go back to the <a href="/">homepage</a>.</p> <p>Or check <a href="https://esp32io.com/tutorials/esp32-web-server-multiple-pages"> Esp32 Web Server</a> tutorial.</p></body></html>)=====";
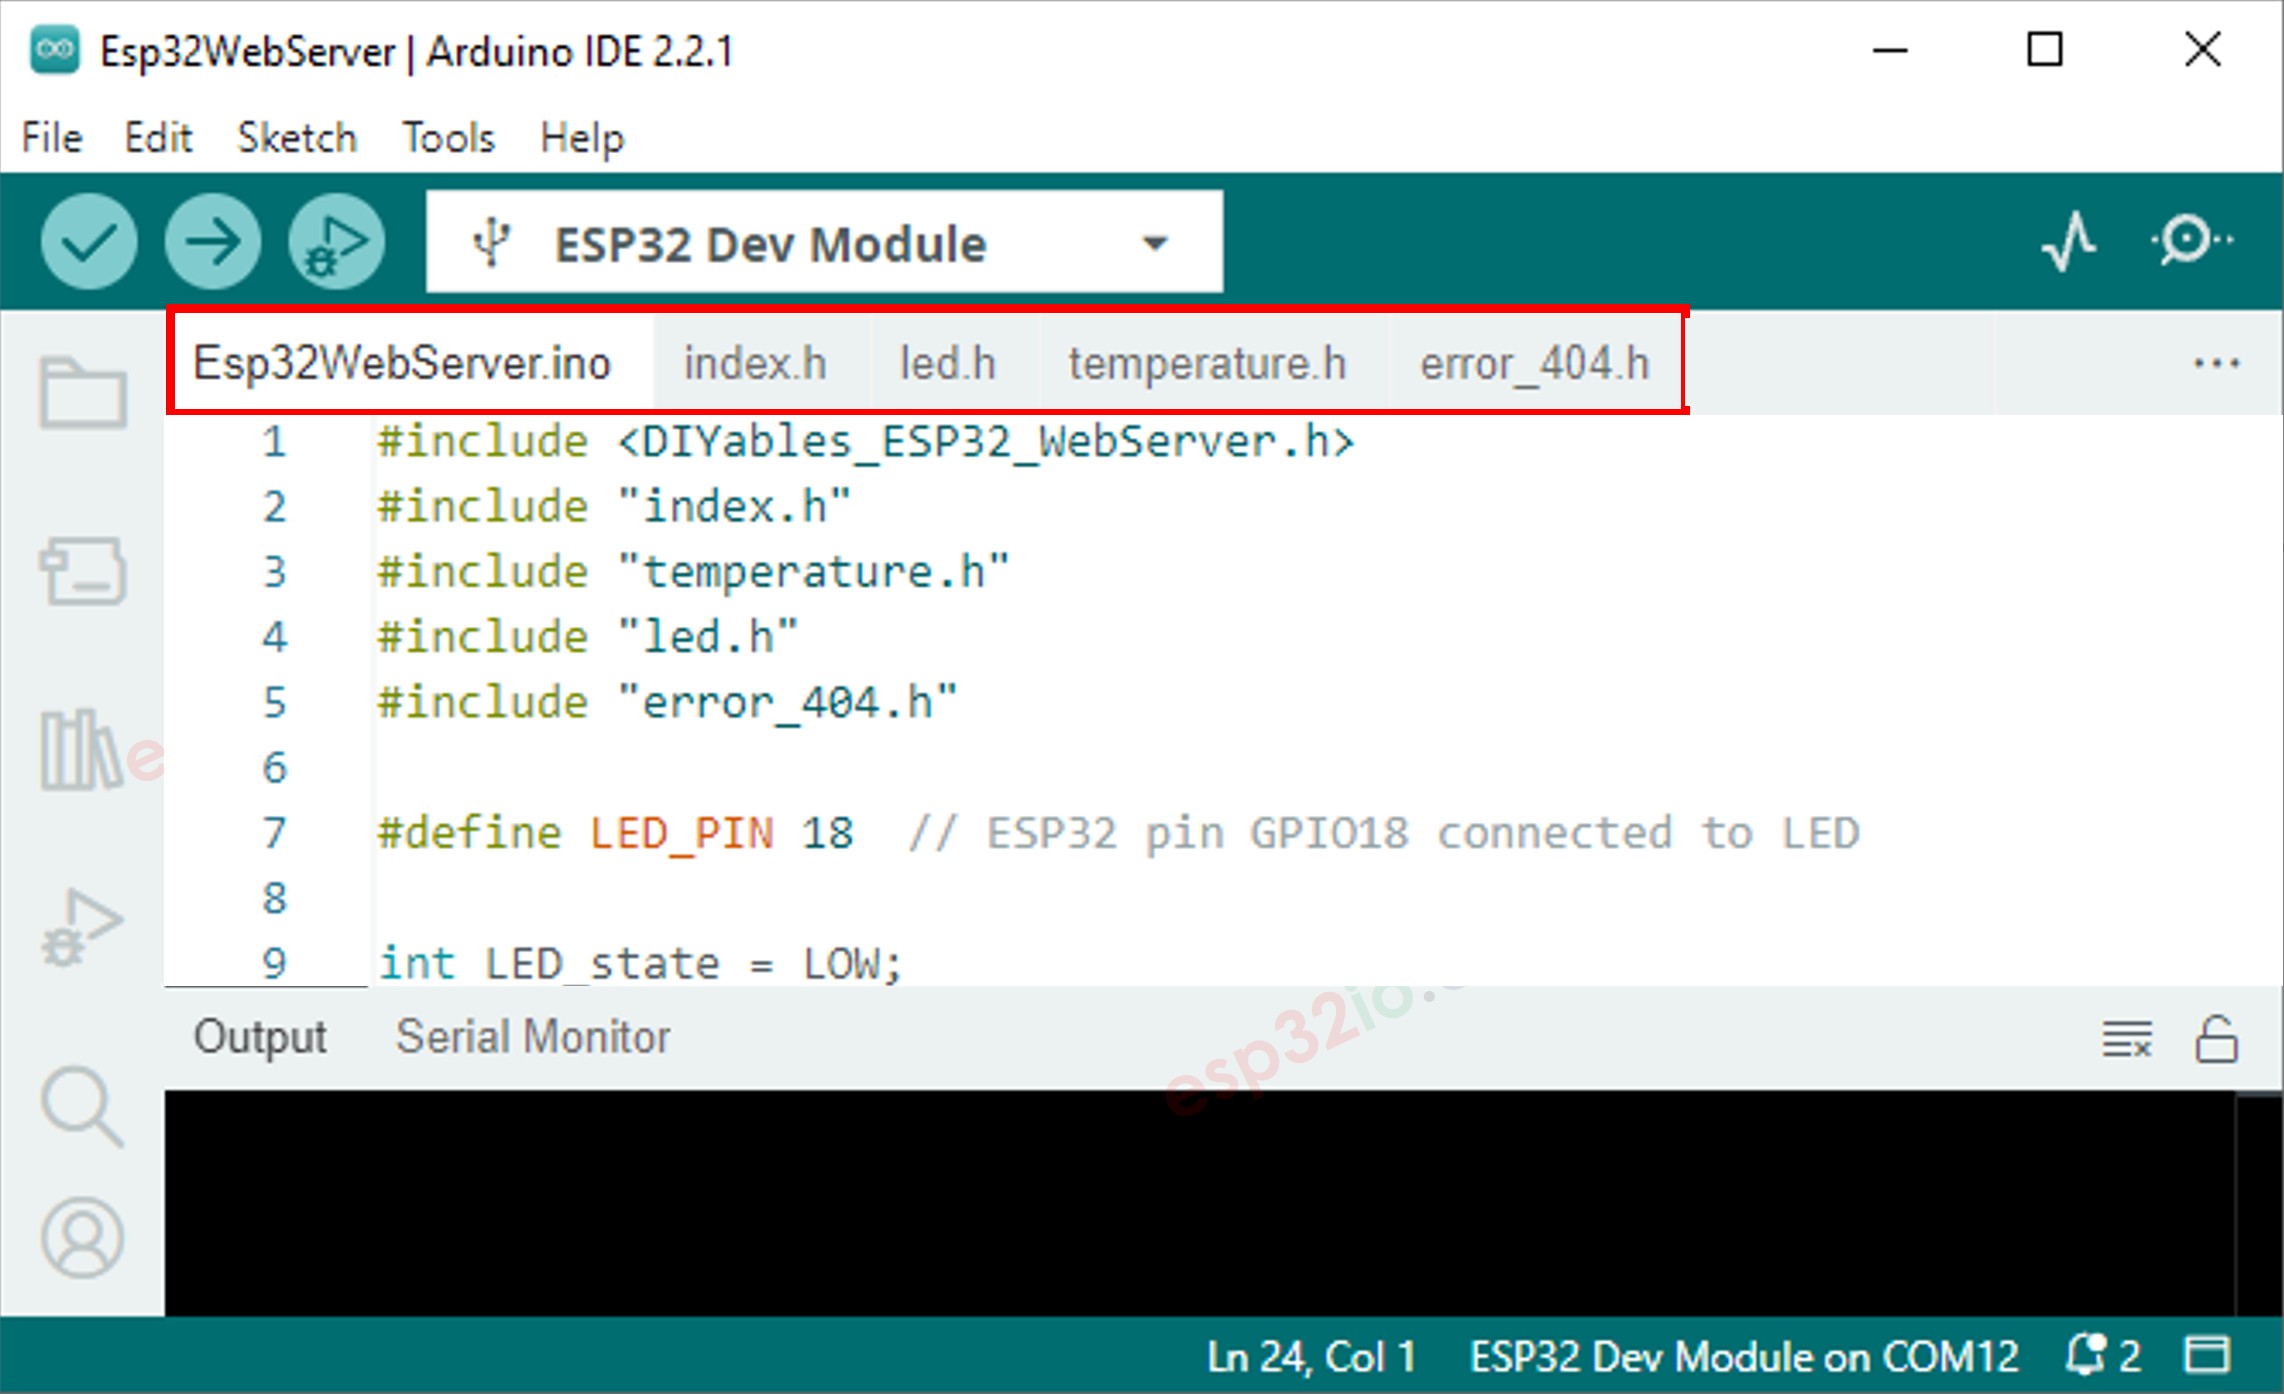
Bây giờ bạn có nhiều tệp tin trên Arduino IDE như dưới đây:
Nhấn nút Tải lên trong Arduino IDE để tải mã nguồn lên ESP8266
Truy cập lần lượt các trang web của bo mạch ESP8266 bằng trình duyệt web như trước đây. Bạn sẽ thấy tất cả các trang web như dưới đây:
 English for KidsHọc tiếng Anh vui nhộn cho trẻ nhỏ.Tải về trênGoogle PlayTải về trênApp Store
 Bubble NoteGhi chú tự xóa — viết như nhắn tin.Tải về trênGoogle PlayTải về trênApp Store
 Tôi Không MuaĐánh bại mua sắm bốc đồng, tiết kiệm hơn.Tải về trênGoogle PlayTải về trênApp Store
 Con Đường Tri ThứcBài thi thử để học mọi thứ.Tải về trênGoogle PlayTải về trênApp Store