Arduino UNO R4 WiFi Bluetooth Monitor Hướng dẫn Wireless Serial Monitor qua BLE
Tổng Quan
Ví dụ Bluetooth Monitor cung cấp wireless serial monitor có thể truy cập qua ứng dụng DIYables Bluetooth STEM. Được thiết kế cho Arduino UNO R4 WiFi sử dụng BLE (Bluetooth Low Energy) để stream tin nhắn trạng thái thời gian thực, debug output và dữ liệu cảm biến không dây đến smartphone của bạn. Cũng có thể nhận lệnh văn bản từ ứng dụng. Hoàn hảo cho wireless debugging, remote monitoring và system logging.
Lưu ý: Arduino UNO R4 WiFi chỉ hỗ trợ BLE (Bluetooth Low Energy). Nó không hỗ trợ Classic Bluetooth. DIYables Bluetooth App hỗ trợ cả BLE và Classic Bluetooth trên Android, và BLE trên iOS. Vì bo mạch này sử dụng BLE, ứng dụng hoạt động trên cả Android và iOS.
Tính Năng
- Wireless Serial Monitor: Stream tin nhắn văn bản đến điện thoại của bạn
- Two-Way Communication: Gửi lệnh từ ứng dụng đến Arduino
- Real-Time Streaming: Continuous output giống như Serial Monitor
- Command Handling: Xử lý lệnh văn bản từ ứng dụng
- Hoạt động trên Android & iOS: BLE được hỗ trợ trên cả hai nền tảng
- Không Cần Pairing: BLE tự động kết nối mà không cần pairing thủ công
- Tiết Kiệm Pin: BLE tiêu thụ ít năng lượng hơn Classic Bluetooth
Phần Cứng Cần Thiết
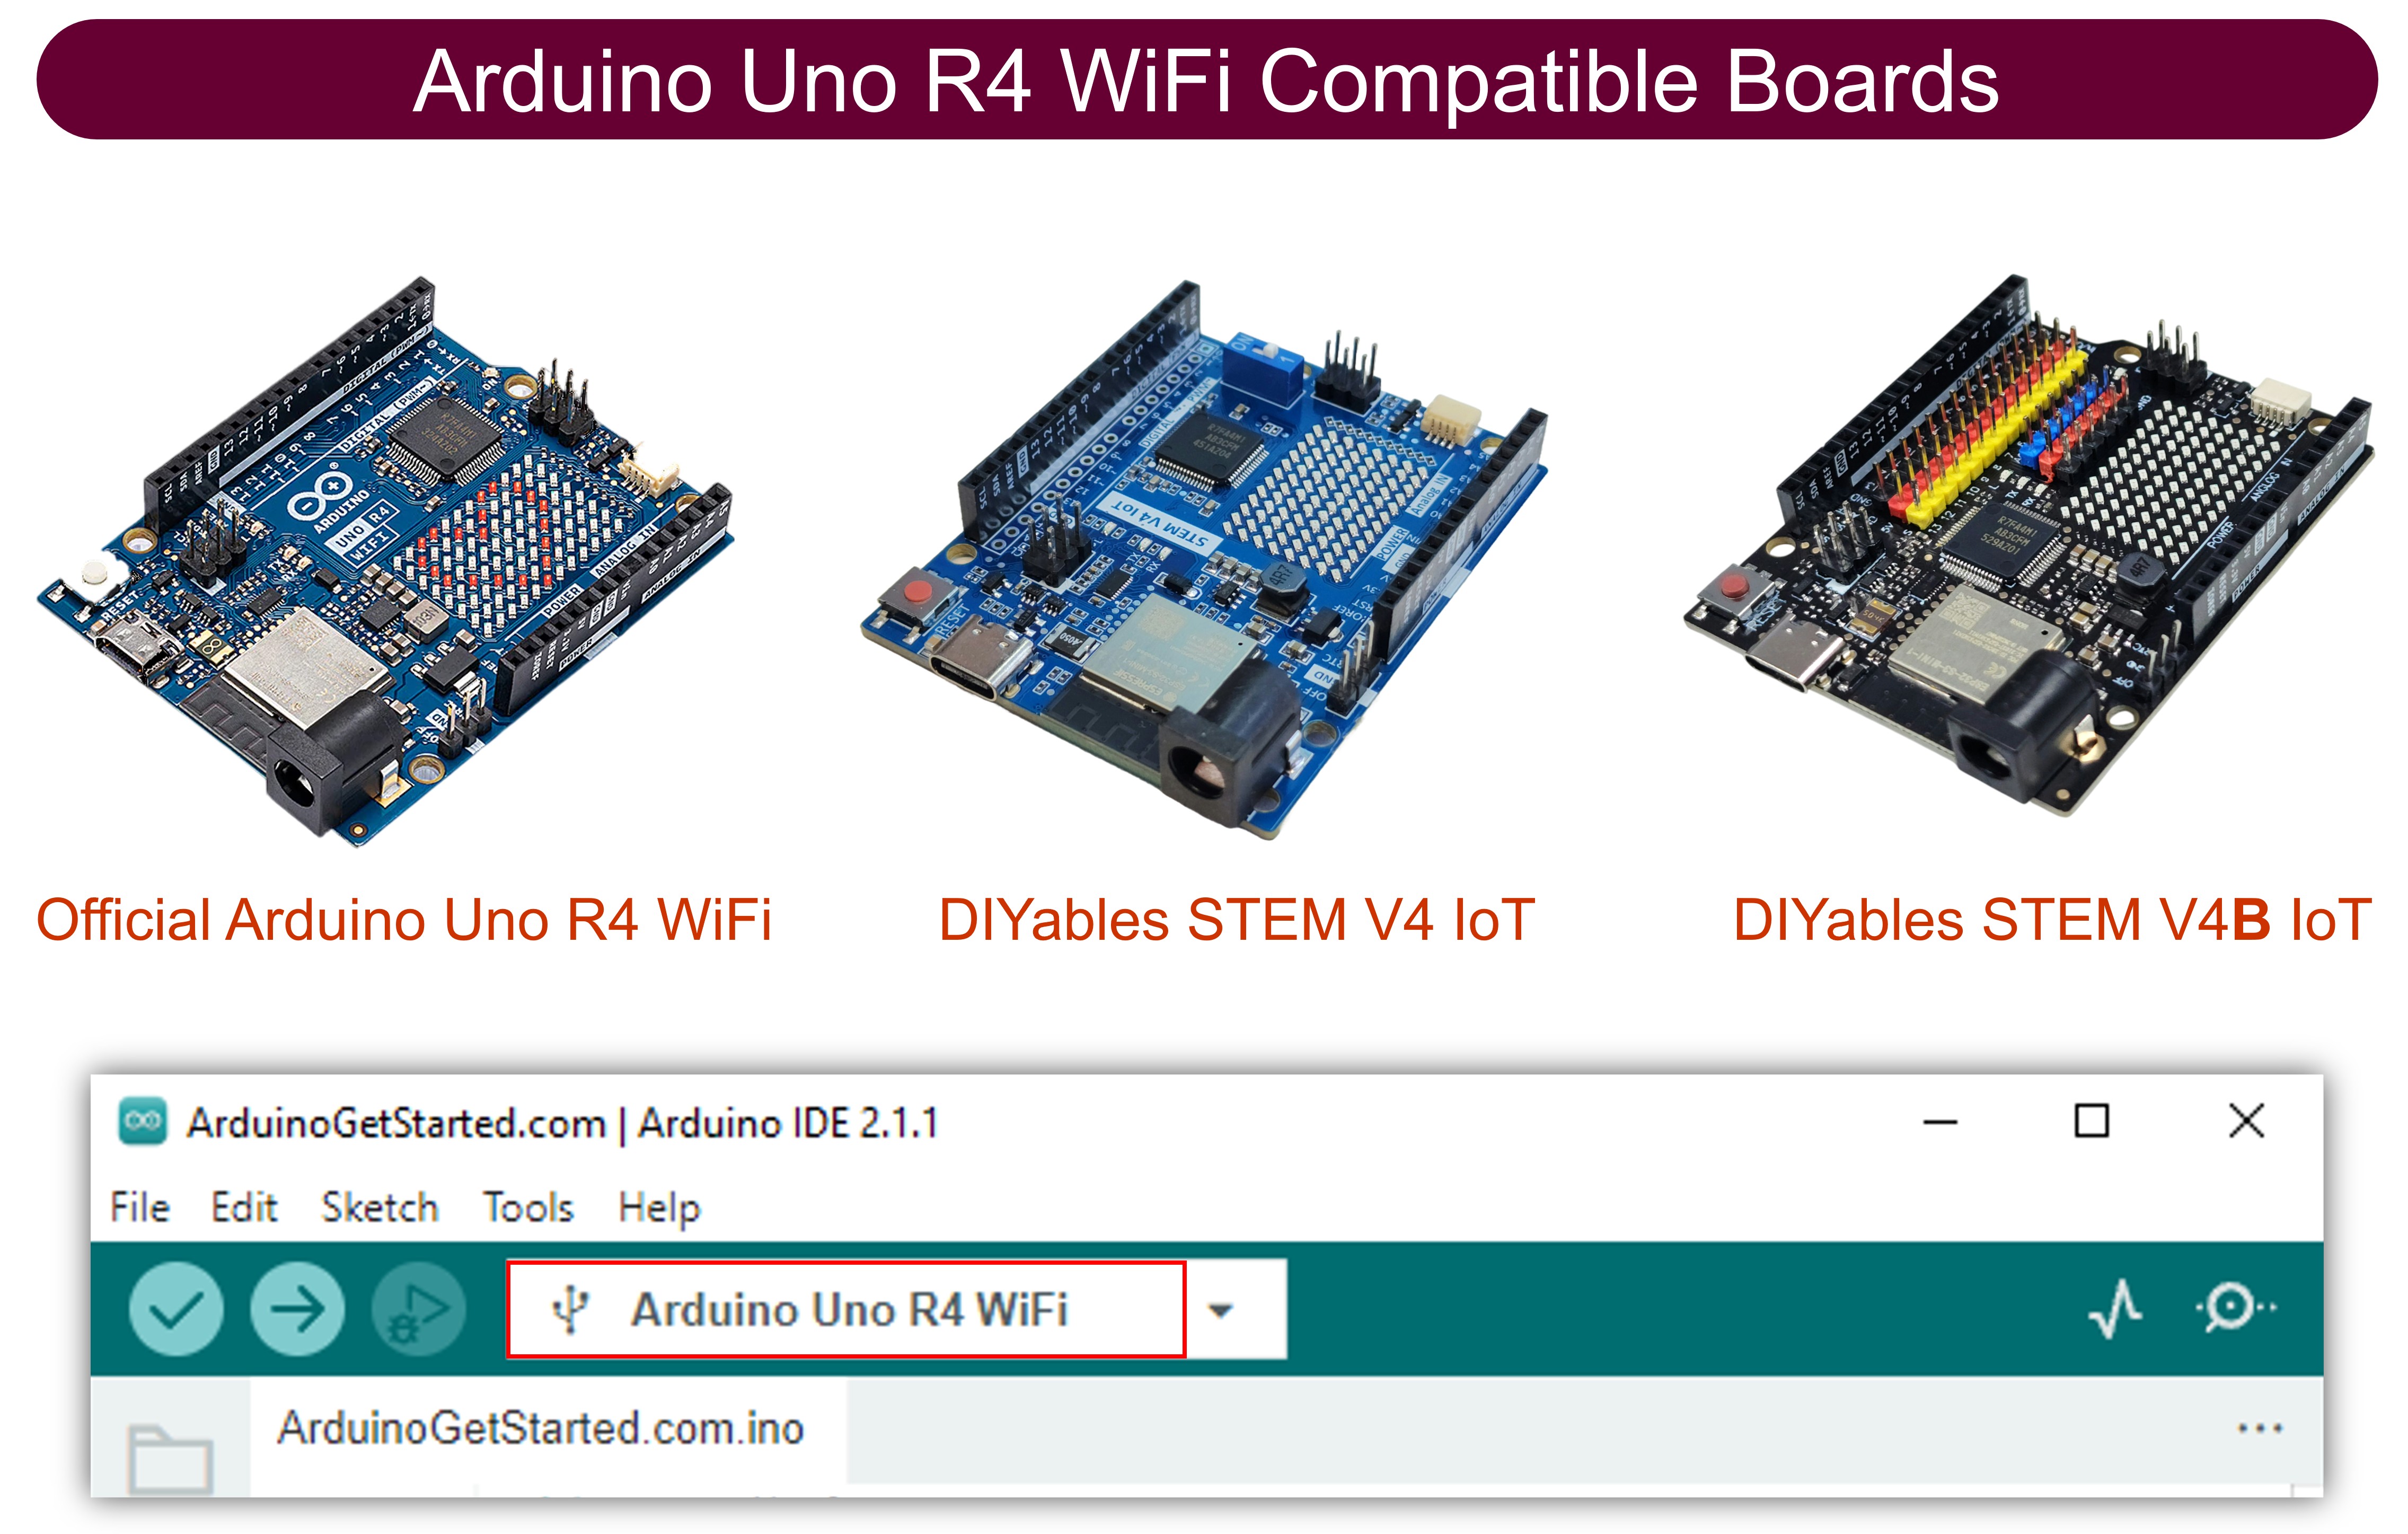
| 1 | × | Arduino UNO R4 WiFi | Amazon | |
| 1 | × | Alternatively, DIYables STEM V4 IoT | Amazon | |
| 1 | × | Alternatively, DIYables STEM V4B IoT | Amazon | |
| 1 | × | (Tùy chọn) DIYables STEM V4 IoT | Amazon | |
| 1 | × | Cáp USB Type-C | Amazon | |
| 1 | × | (Khuyến nghị) Screw Terminal Block Shield for Arduino UNO R4 | Amazon | |
| 1 | × | (Khuyến nghị) Sensors/Servo Expansion Shield for Arduino UNO R4 | Amazon | |
| 1 | × | (Khuyến nghị) Breadboard Shield for Arduino UNO R4 | Amazon | |
| 1 | × | (Khuyến nghị) Enclosure for Arduino UNO R4 | Amazon | |
| 1 | × | (Khuyến nghị) Power Splitter for Arduino UNO R4 | Amazon | |
| 1 | × | (Khuyến nghị) Prototyping Base Plate & Breadboard Kit for Arduino UNO | Amazon |
Or you can buy the following kits:
| 1 | × | DIYables STEM V4 IoT Starter Kit (Arduino included) | Amazon | |
| 1 | × | DIYables Sensor Kit (18 sensors/displays) | Amazon |
Code Arduino UNO R4 WiFi
Các Bước Nhanh
Thực hiện theo các hướng dẫn từng bước:
- Nếu đây là lần đầu bạn sử dụng Arduino UNO R4 WiFi, hãy tham khảo Arduino UNO R4 - Cài Đặt Phần Mềm.
- Kết nối bo mạch Arduino UNO R4 WiFi với máy tính bằng cáp USB.
- Khởi động Arduino IDE trên máy tính của bạn.
- Chọn bo mạch Arduino UNO R4 WiFi và COM port thích hợp.
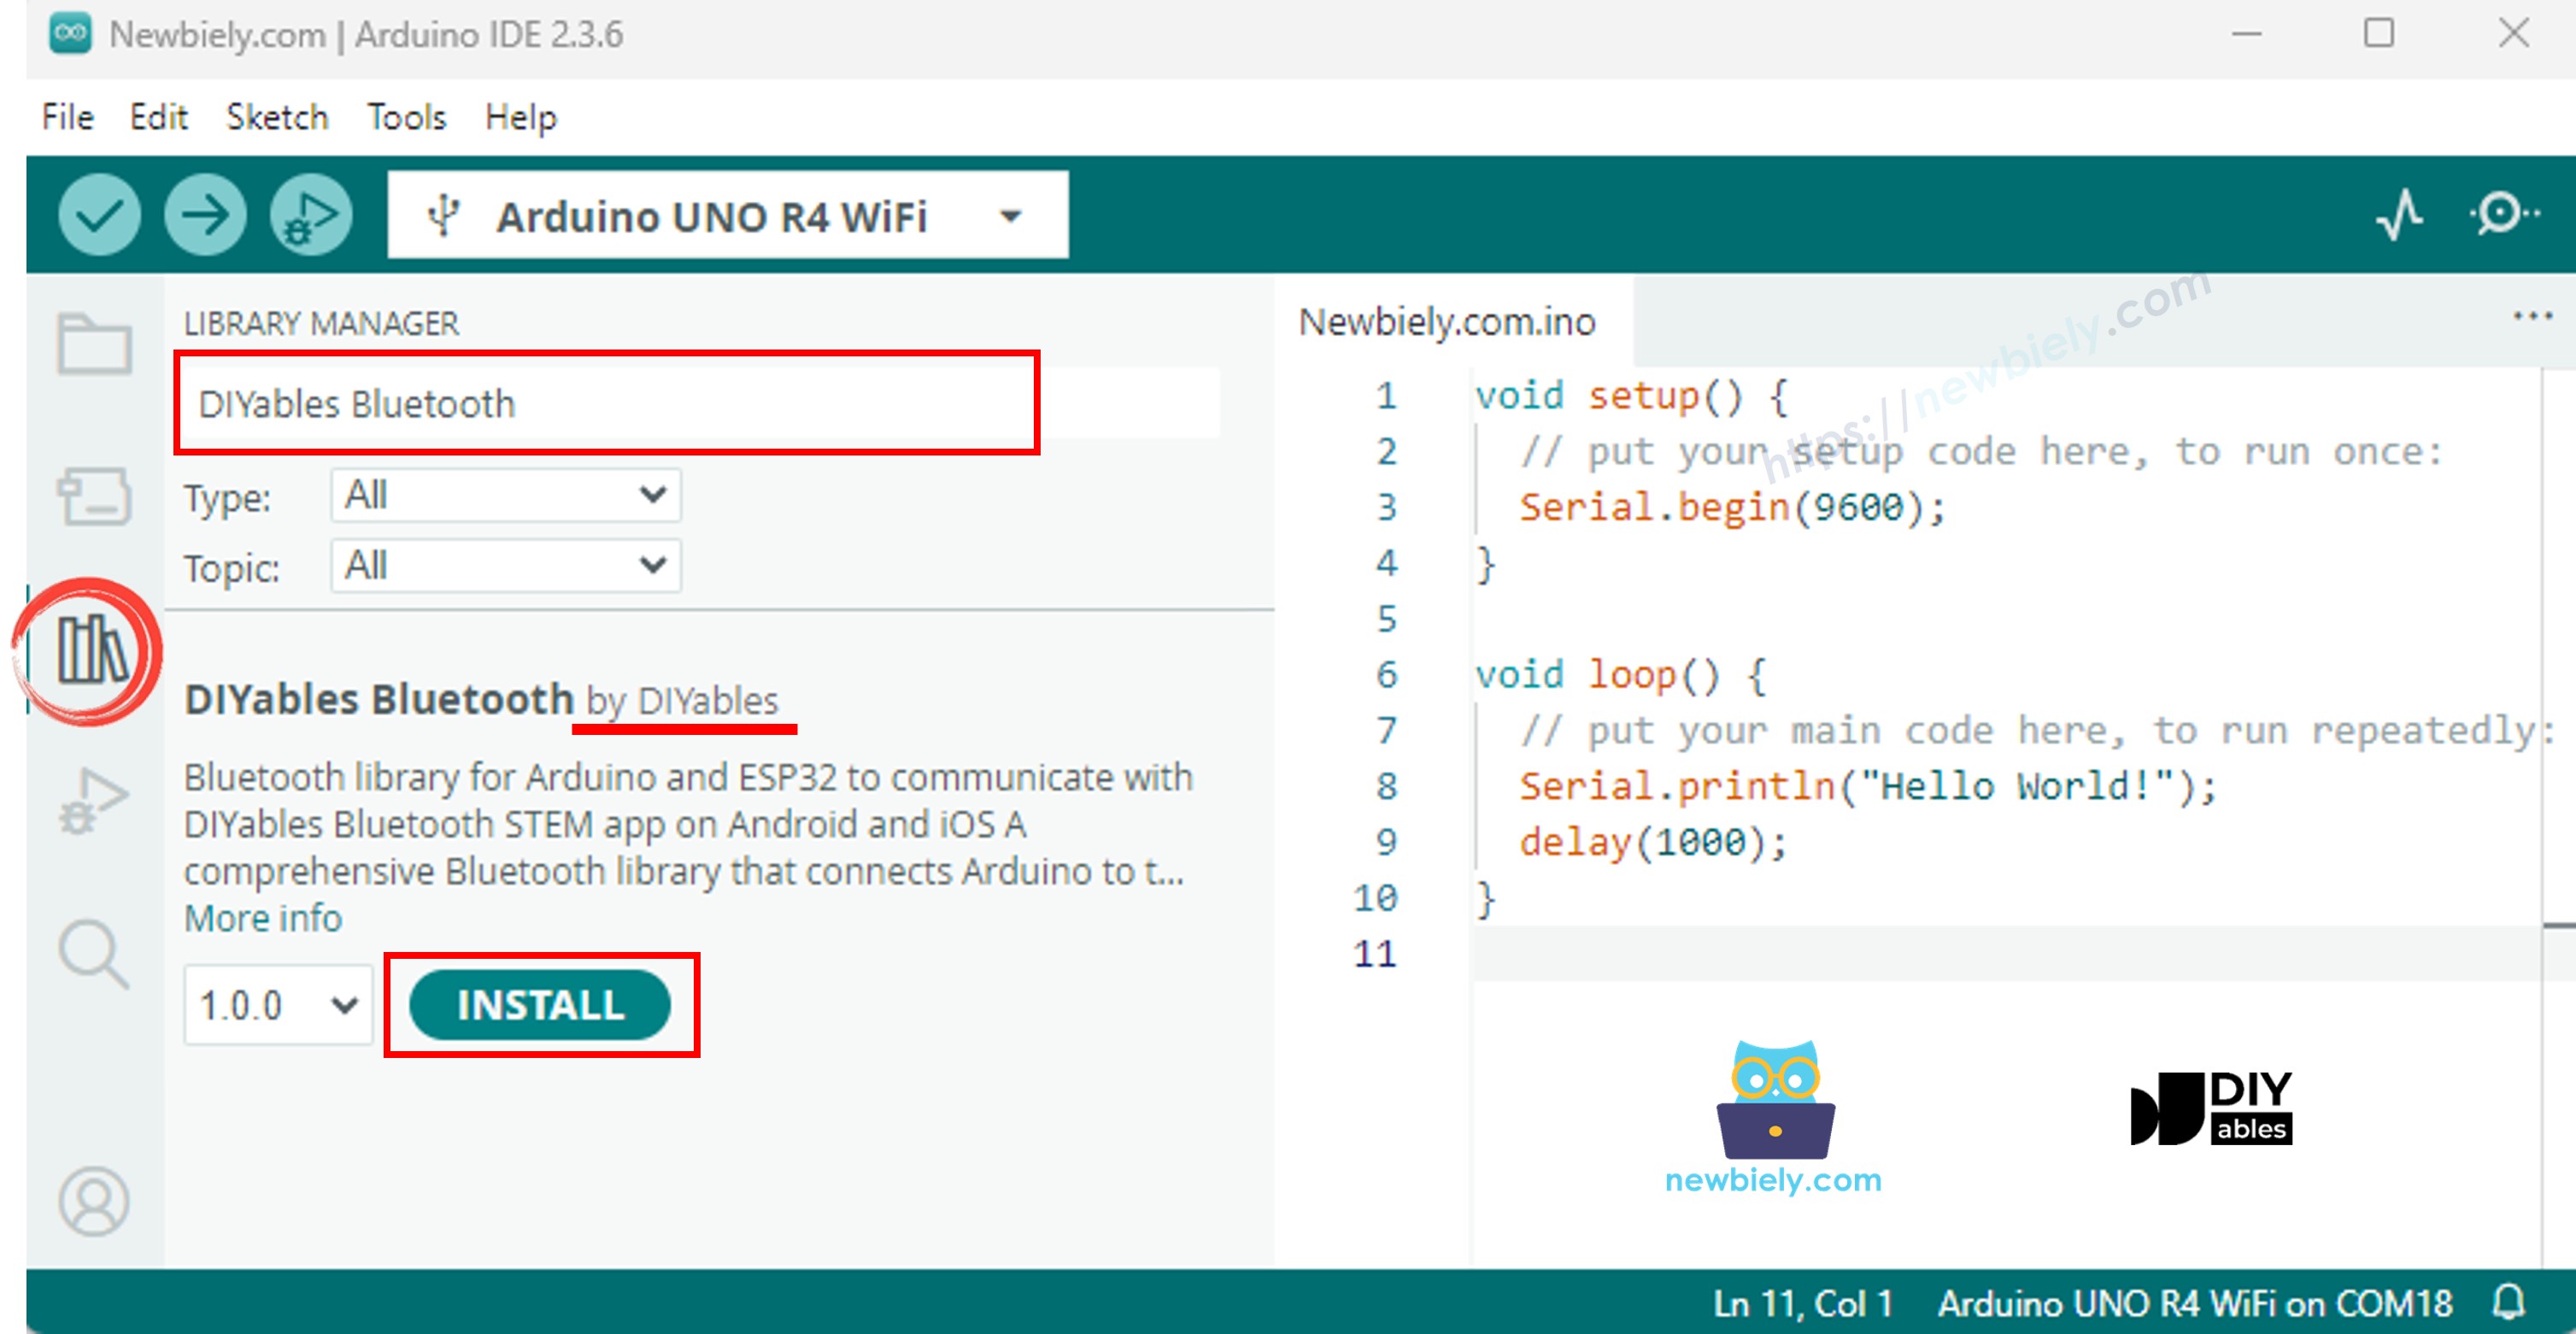
- Điều hướng đến biểu tượng Libraries ở thanh bên trái của Arduino IDE.
- Tìm kiếm "DIYables Bluetooth", sau đó tìm thư viện DIYables Bluetooth của DIYables
- Nhấn nút Install để cài đặt thư viện.
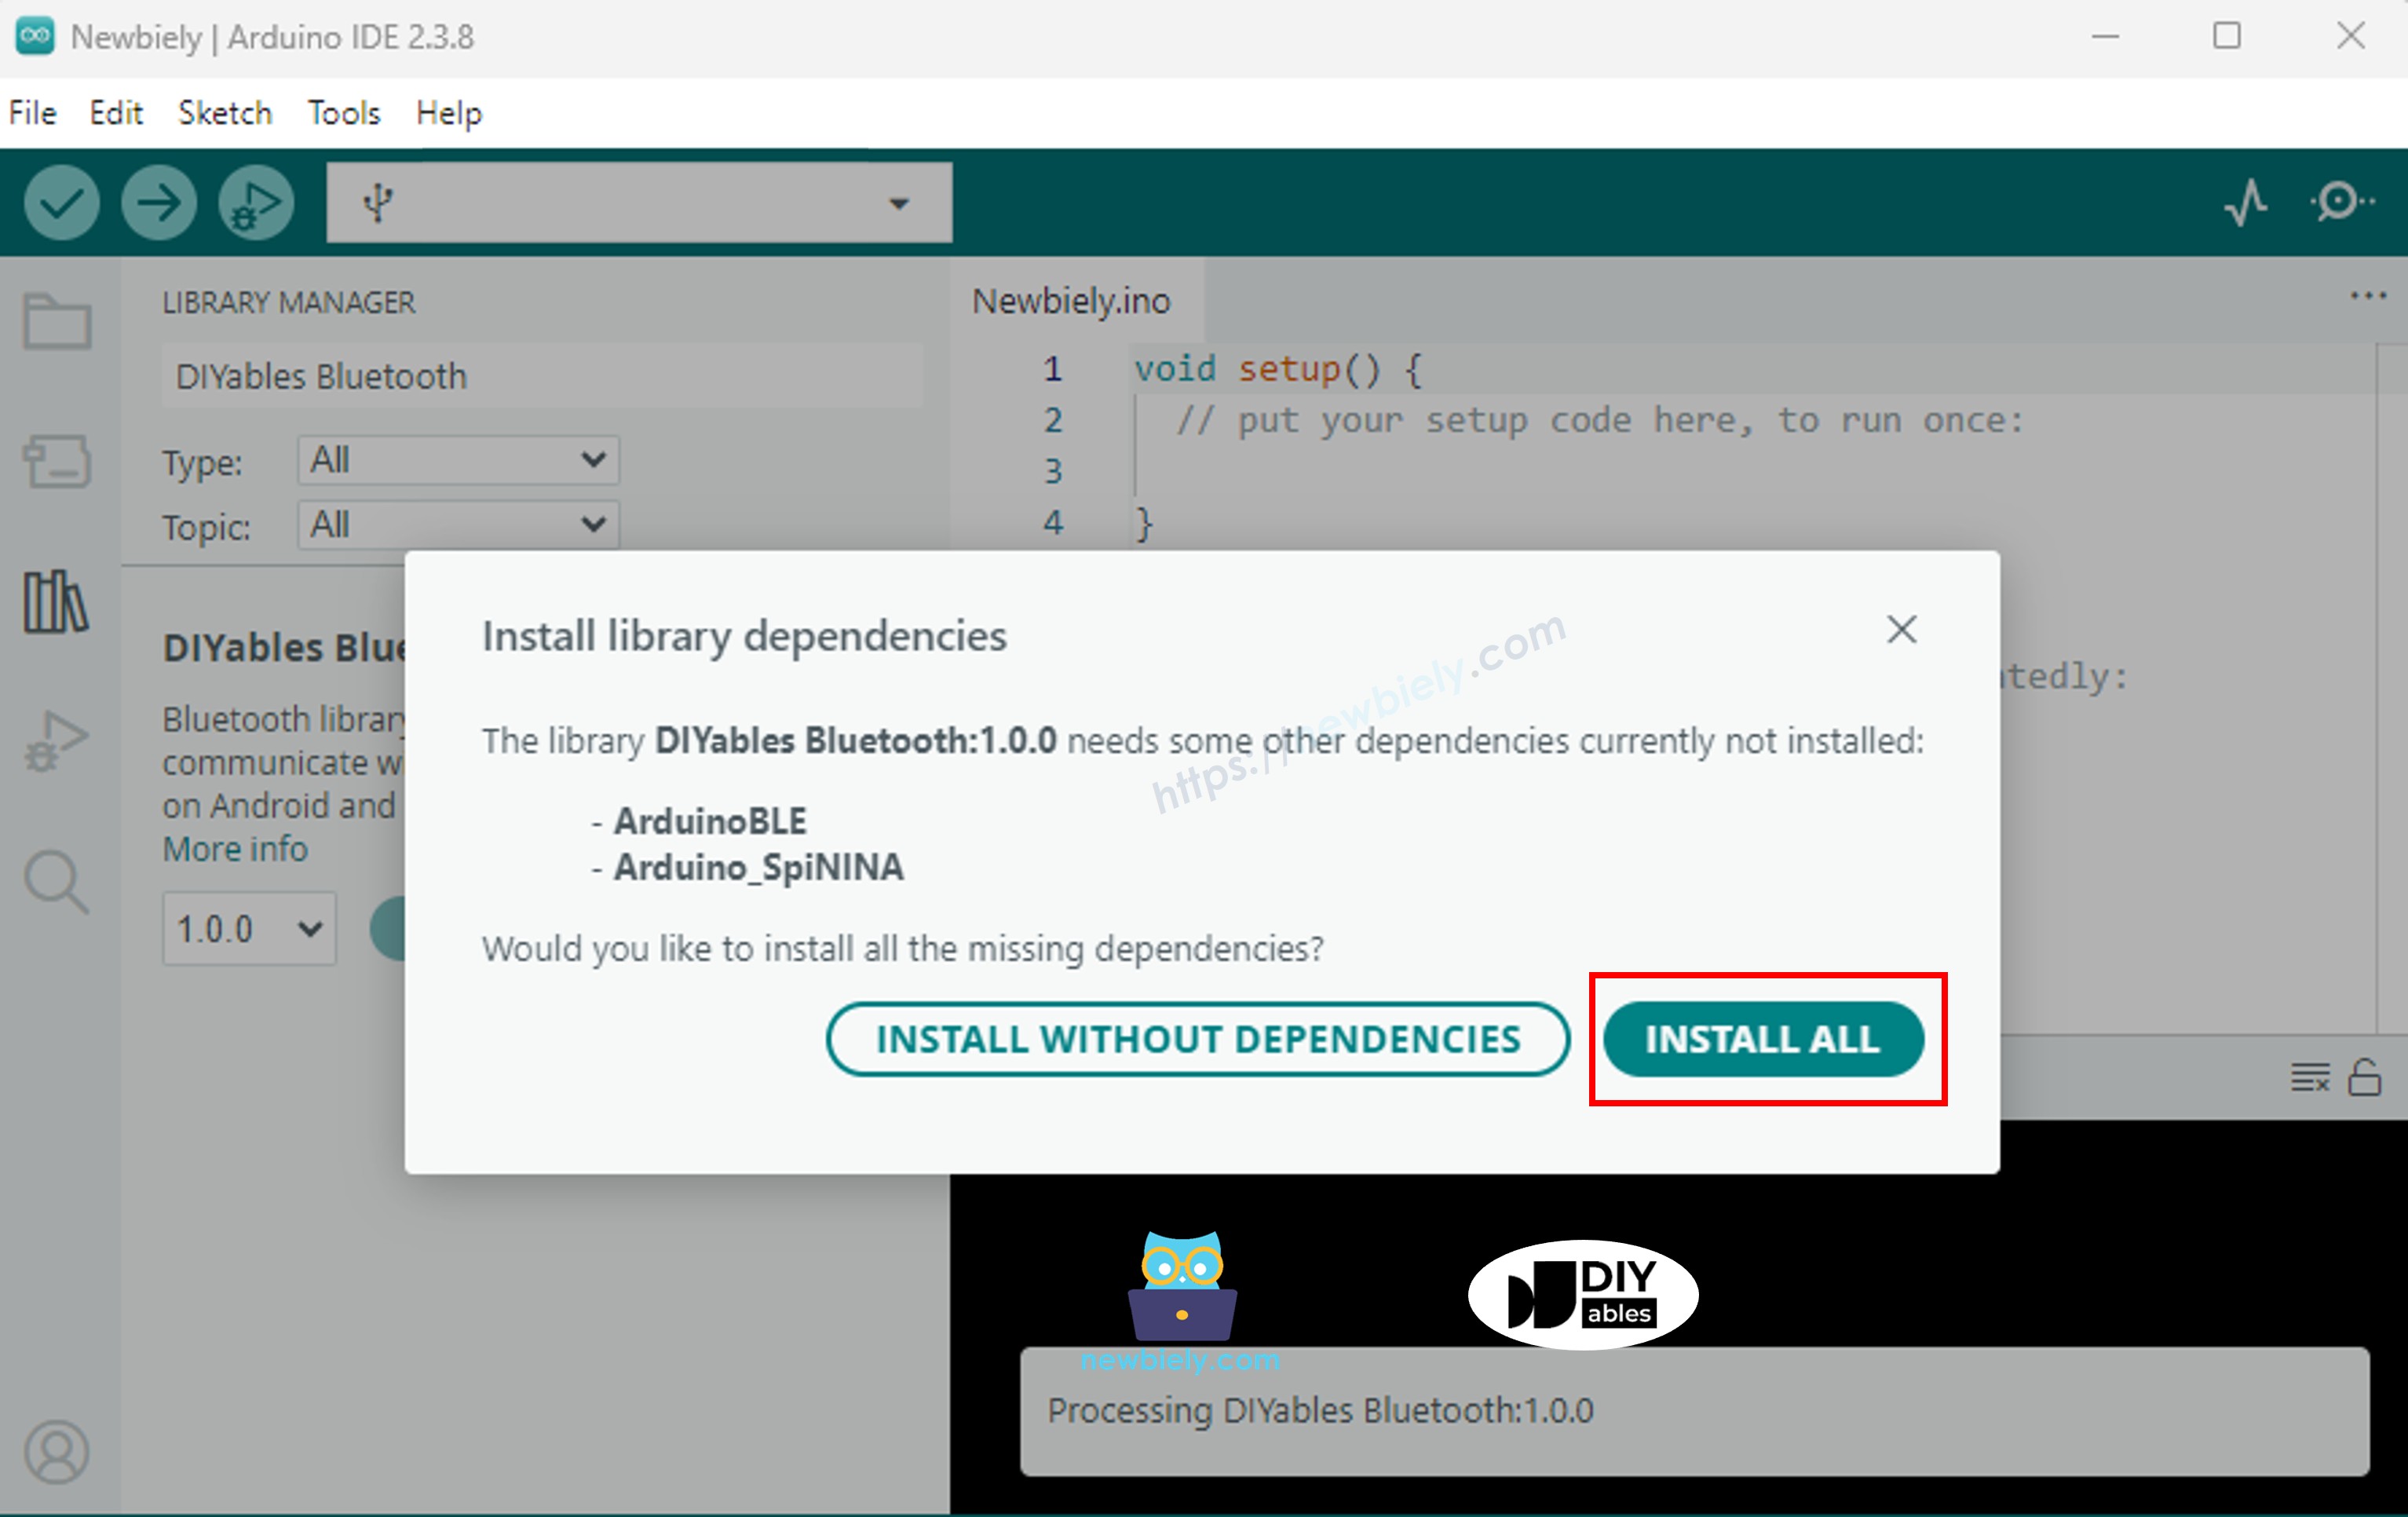
- Bạn sẽ được yêu cầu cài đặt một số thư viện phụ thuộc khác
- Nhấn nút Install All để cài đặt tất cả các thư viện phụ thuộc.
BLE Code
- Trong Arduino IDE, đi đến File Examples DIYables Bluetooth ArduinoBLE_Monitor example, hoặc sao chép code trên và dán vào editor của Arduino IDE
- Nhấn nút Upload trên Arduino IDE để upload code lên Arduino UNO R4 WiFi
- Mở Serial Monitor
- Kiểm tra kết quả trên Serial Monitor. Nó sẽ giống như sau:
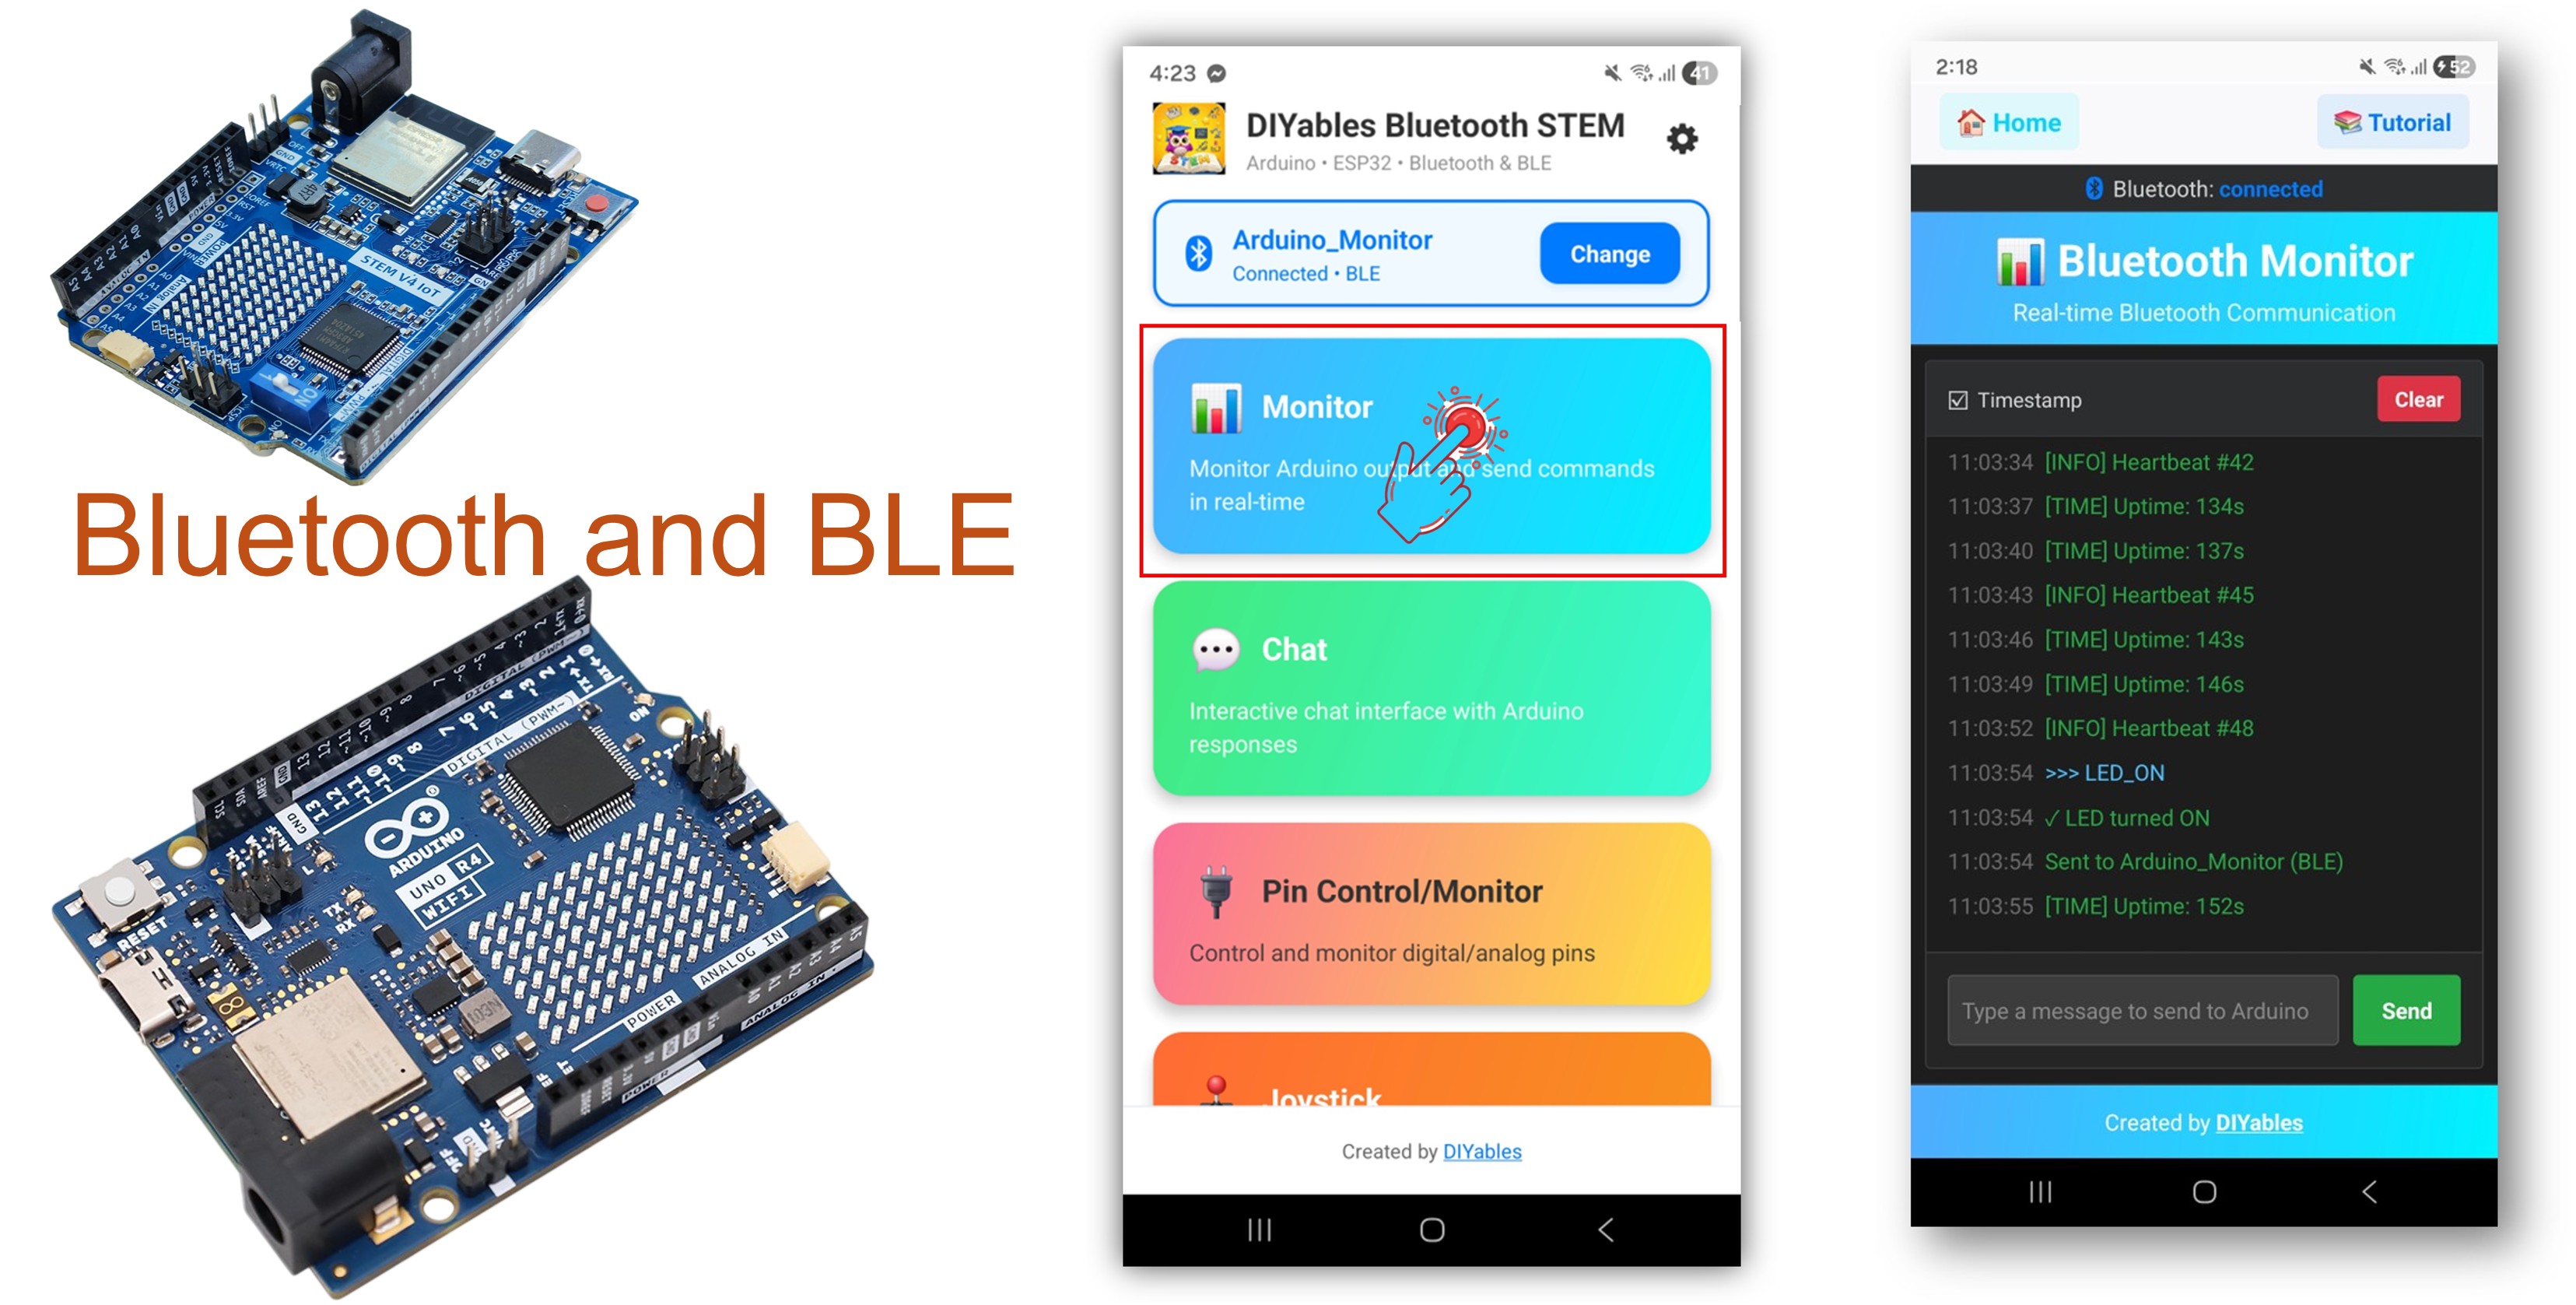
Ứng Dụng Di Động
Lưu ý: DIYables Bluetooth App hỗ trợ cả BLE và Classic Bluetooth trên Android, và BLE trên iOS. Vì Arduino UNO R4 WiFi sử dụng BLE, ứng dụng hoạt động trên cả Android và iOS. Không cần pairing thủ công cho BLE — chỉ cần scan và kết nối.
- Mở DIYables Bluetooth App
- Khi mở ứng dụng lần đầu tiên, nó sẽ yêu cầu quyền. Vui lòng cấp các quyền sau:
- Quyền Nearby Devices (Android 12+) / quyền Bluetooth (iOS) - cần thiết để scan và kết nối với thiết bị Bluetooth
- Quyền Location (chỉ Android 11 trở xuống) - cần thiết cho các phiên bản Android cũ để scan thiết bị BLE
- Đảm bảo Bluetooth được bật trên điện thoại của bạn
- Trên màn hình chính, nhấn nút Connect. Ứng dụng sẽ scan các thiết bị BLE.
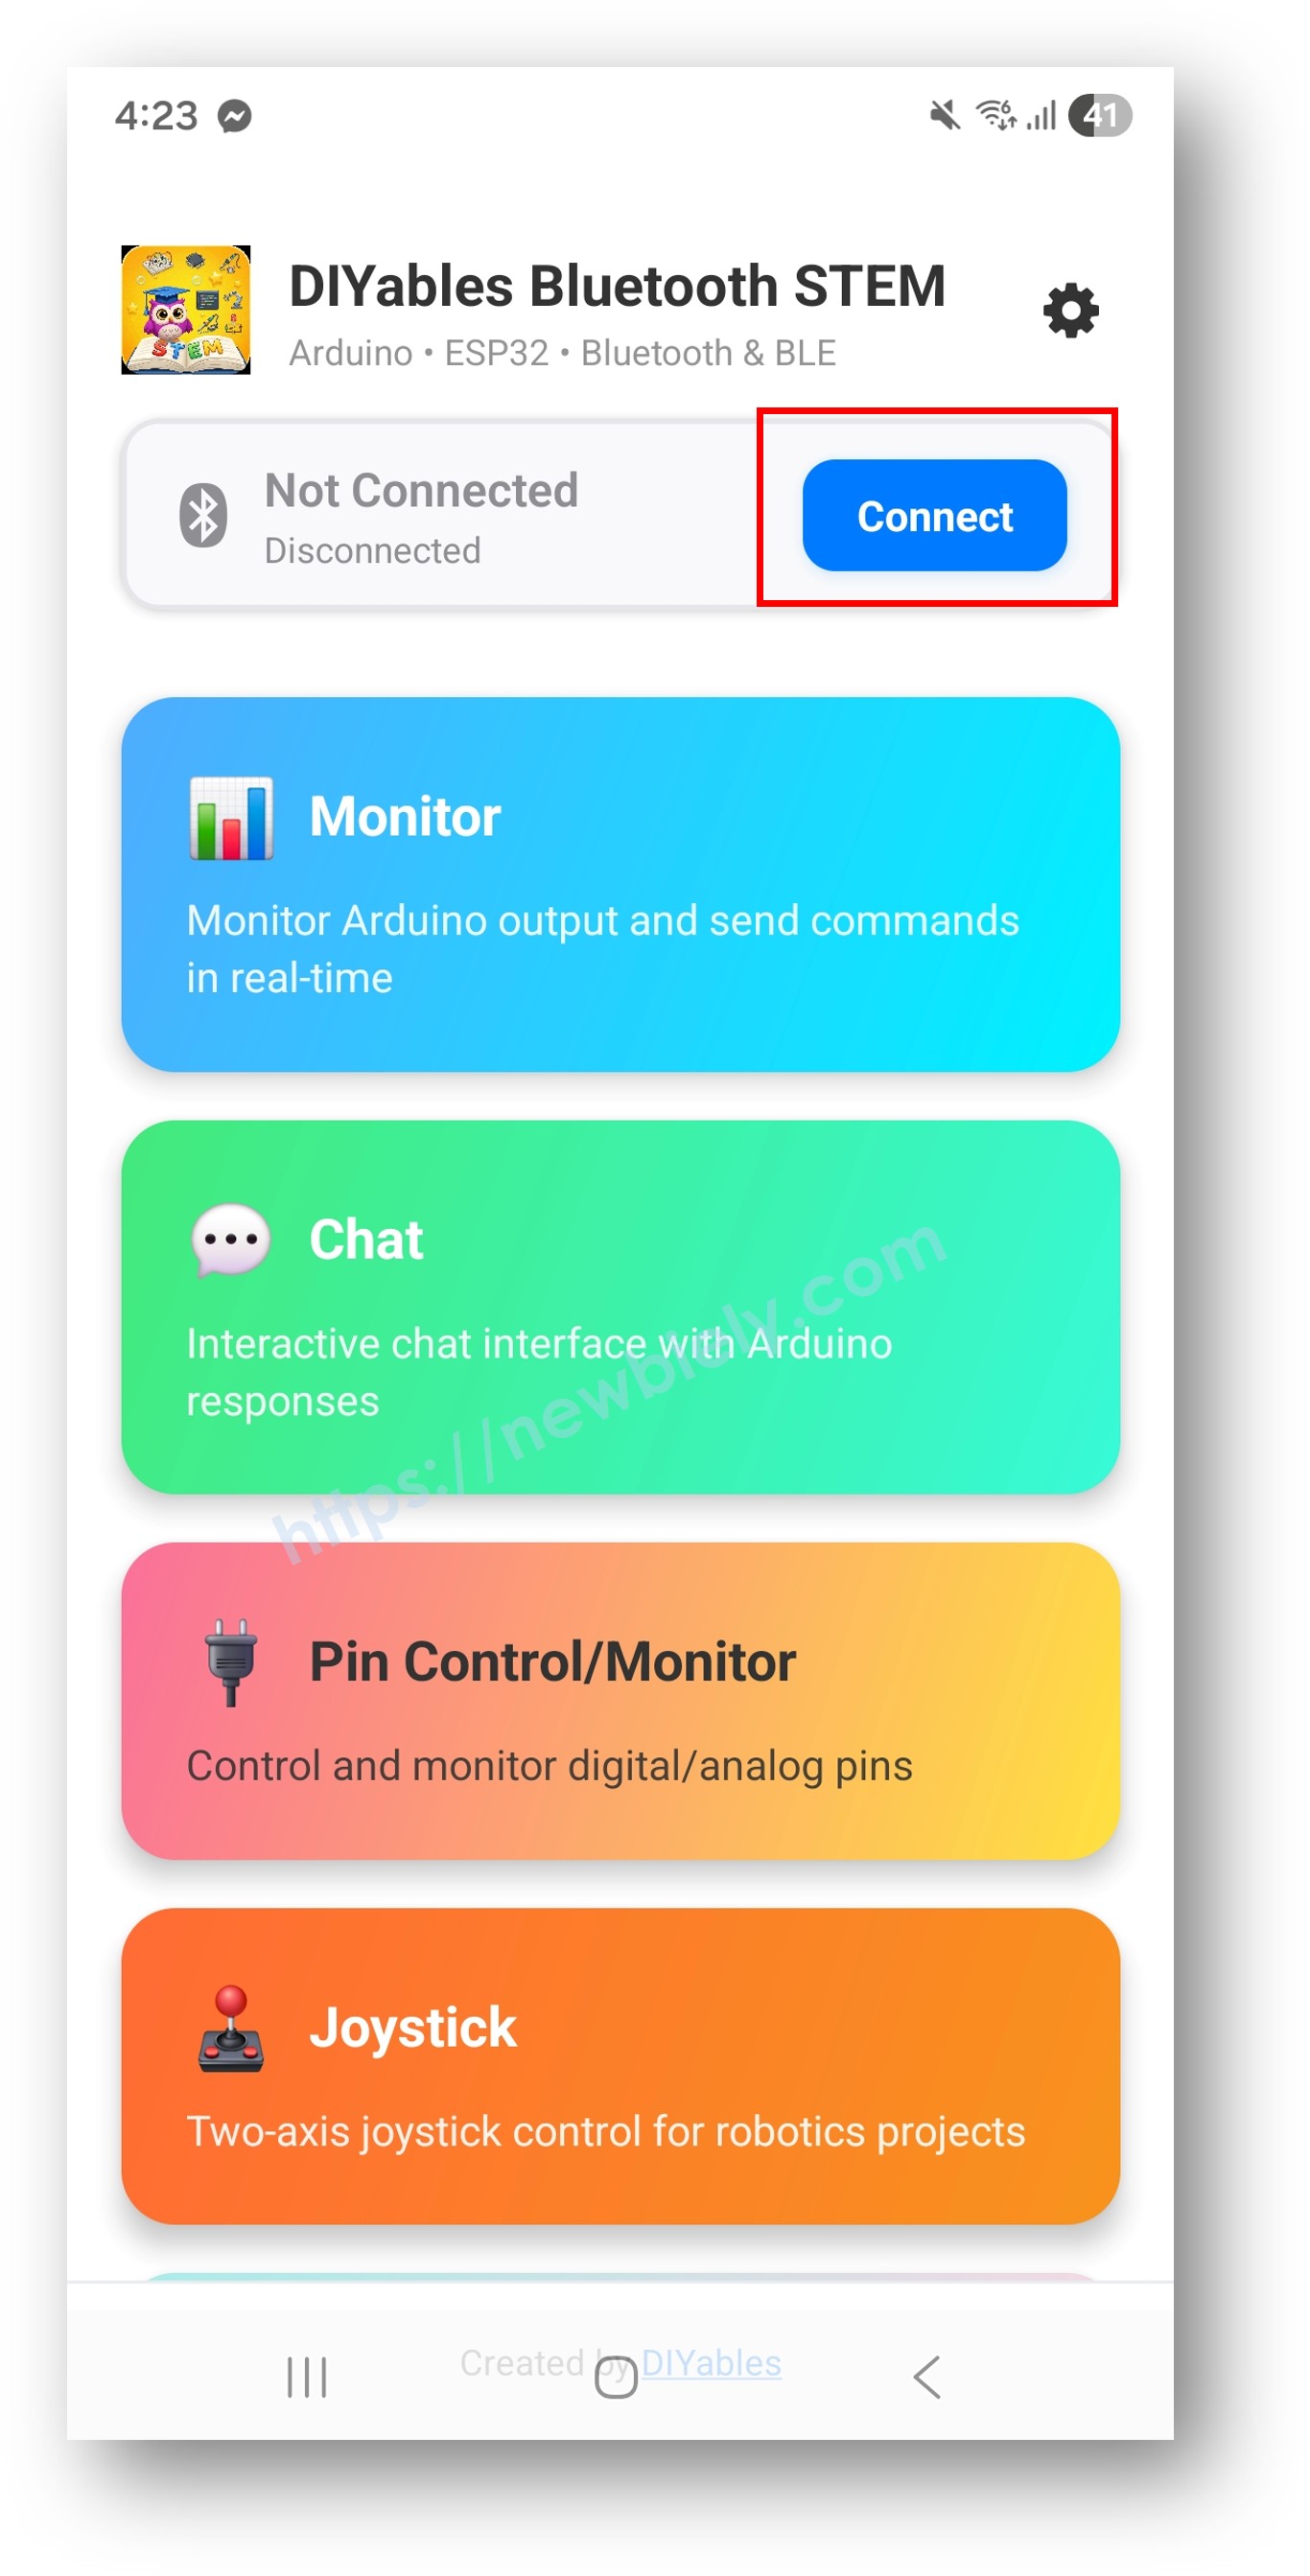
- Tìm và nhấn "Arduino_Monitor" trong kết quả scan để kết nối.
- Sau khi kết nối, ứng dụng tự động quay về màn hình chính. Chọn ứng dụng Monitor từ menu ứng dụng.

Lưu ý: Bạn có thể nhấn biểu tượng cài đặt trên màn hình chính để ẩn/hiện ứng dụng trên màn hình chính. Để biết thêm chi tiết, xem DIYables Bluetooth App User Manual.
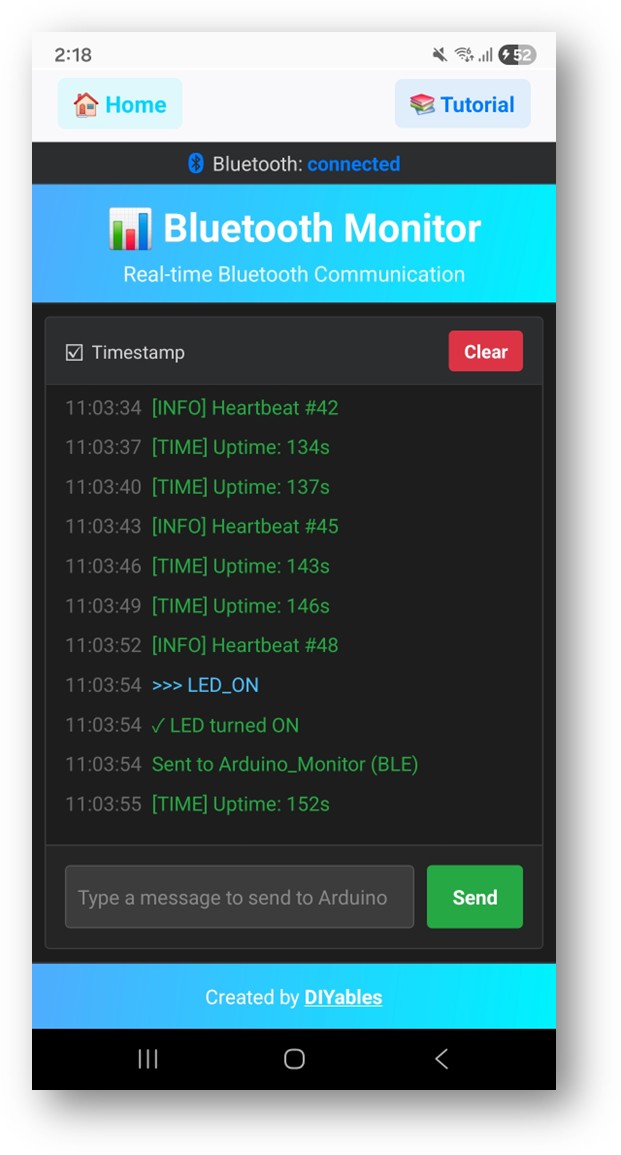
- Bạn sẽ thấy các tin nhắn trạng thái streaming trong màn hình monitor
- Nhập LED_ON vào trường input và nhấn Send — LED built-in trên Arduino UNO R4 WiFi sẽ bật, và monitor sẽ hiển thị tin nhắn xác nhận
Bây giờ nhìn lại Serial Monitor trên Arduino IDE. Bạn sẽ thấy:
Tùy Chỉnh Sáng Tạo - Điều Chỉnh Code Cho Dự Án Của Bạn
Gửi Tin Nhắn
Xử Lý Lệnh Đến
Sử dụng callback onMonitorMessage() để nhận lệnh được nhập trong ứng dụng Monitor và phản ứng với chúng:
Bạn có thể thêm bao nhiêu lệnh tùy chỉnh tùy ý bằng cách thêm nhiều khối else if. Ví dụ, thêm RELAY_ON / RELAY_OFF để điều khiển relay, hoặc READ để kích hoạt đọc cảm biến — bất kỳ từ nào bạn nhập trong ứng dụng đều trở thành một lệnh.
Ví Dụ Lập Trình
Sensor Status Streaming
Event-Based Logging
Khắc Phục Sự Cố
Các Vấn Đề Thường Gặp
1. Không thể tìm thấy thiết bị trong ứng dụng
- Đảm bảo Arduino UNO R4 WiFi được cấp nguồn và sketch đã được upload
- Đảm bảo Bluetooth trên điện thoại của bạn đã được bật
- Trên Android 11 trở xuống, cũng bật Location services
2. Không có tin nhắn xuất hiện trong ứng dụng
- Xác minh bluetoothMonitor.send() đang được gọi
- Kiểm tra rằng bluetoothServer.loop() có trong main loop
- Xác nhận kết nối trong Serial Monitor
3. Tin nhắn bị trễ
- Giảm update interval để có tin nhắn thường xuyên hơn
- Tránh gửi quá nhiều tin nhắn quá nhanh (BLE có giới hạn bandwidth)
4. Lệnh từ ứng dụng không được nhận
- Xác minh callback onMonitorMessage đã được thiết lập
- Kiểm tra Serial Monitor cho output lệnh đã nhận
5. Kết nối thường xuyên bị mất
- Di chuyển gần hơn Arduino (giảm khoảng cách)
- Đảm bảo nguồn USB ổn định
6. Upload thất bại hoặc bo mạch không được nhận dạng
- Cài đặt Arduino UNO R4 board package mới nhất qua Board Manager
- Thử cáp USB hoặc port khác
Ý Tưởng Dự Án
- Wireless debug console
- Sensor data logger
- System health monitor
- Event notification system
- Remote command interface
Các Bước Tiếp Theo
Sau khi thành thạo ví dụ Bluetooth Monitor, hãy thử:
- Bluetooth Chat - Cho tin nhắn hai chiều tương tác
- Bluetooth Table - Cho hiển thị dữ liệu có cấu trúc
- Bluetooth Plotter - Cho visualization dữ liệu
- Multiple Bluetooth Apps - Kết hợp monitor với các ứng dụng khác
Hỗ Trợ
Để được trợ giúp thêm:
- Kiểm tra tài liệu API Reference
- Truy cập DIYables tutorials
- Diễn đàn cộng đồng Arduino
Bài hướng dẫn liên quan
📱 Ứng dụng đề xuất
 English for KidsHọc tiếng Anh vui nhộn cho trẻ nhỏ.Tải về trênGoogle PlayTải về trênApp Store
 Bubble NoteGhi chú tự xóa — viết như nhắn tin.Tải về trênGoogle PlayTải về trênApp Store
 Tôi Không MuaĐánh bại mua sắm bốc đồng, tiết kiệm hơn.Tải về trênGoogle PlayTải về trênApp Store
 Con Đường Tri ThứcBài thi thử để học mọi thứ.Tải về trênGoogle PlayTải về trênApp Store