Arduino WebJoystick Example Hướng Dẫn Điều Khiển Joystick Ảo
Tổng Quan
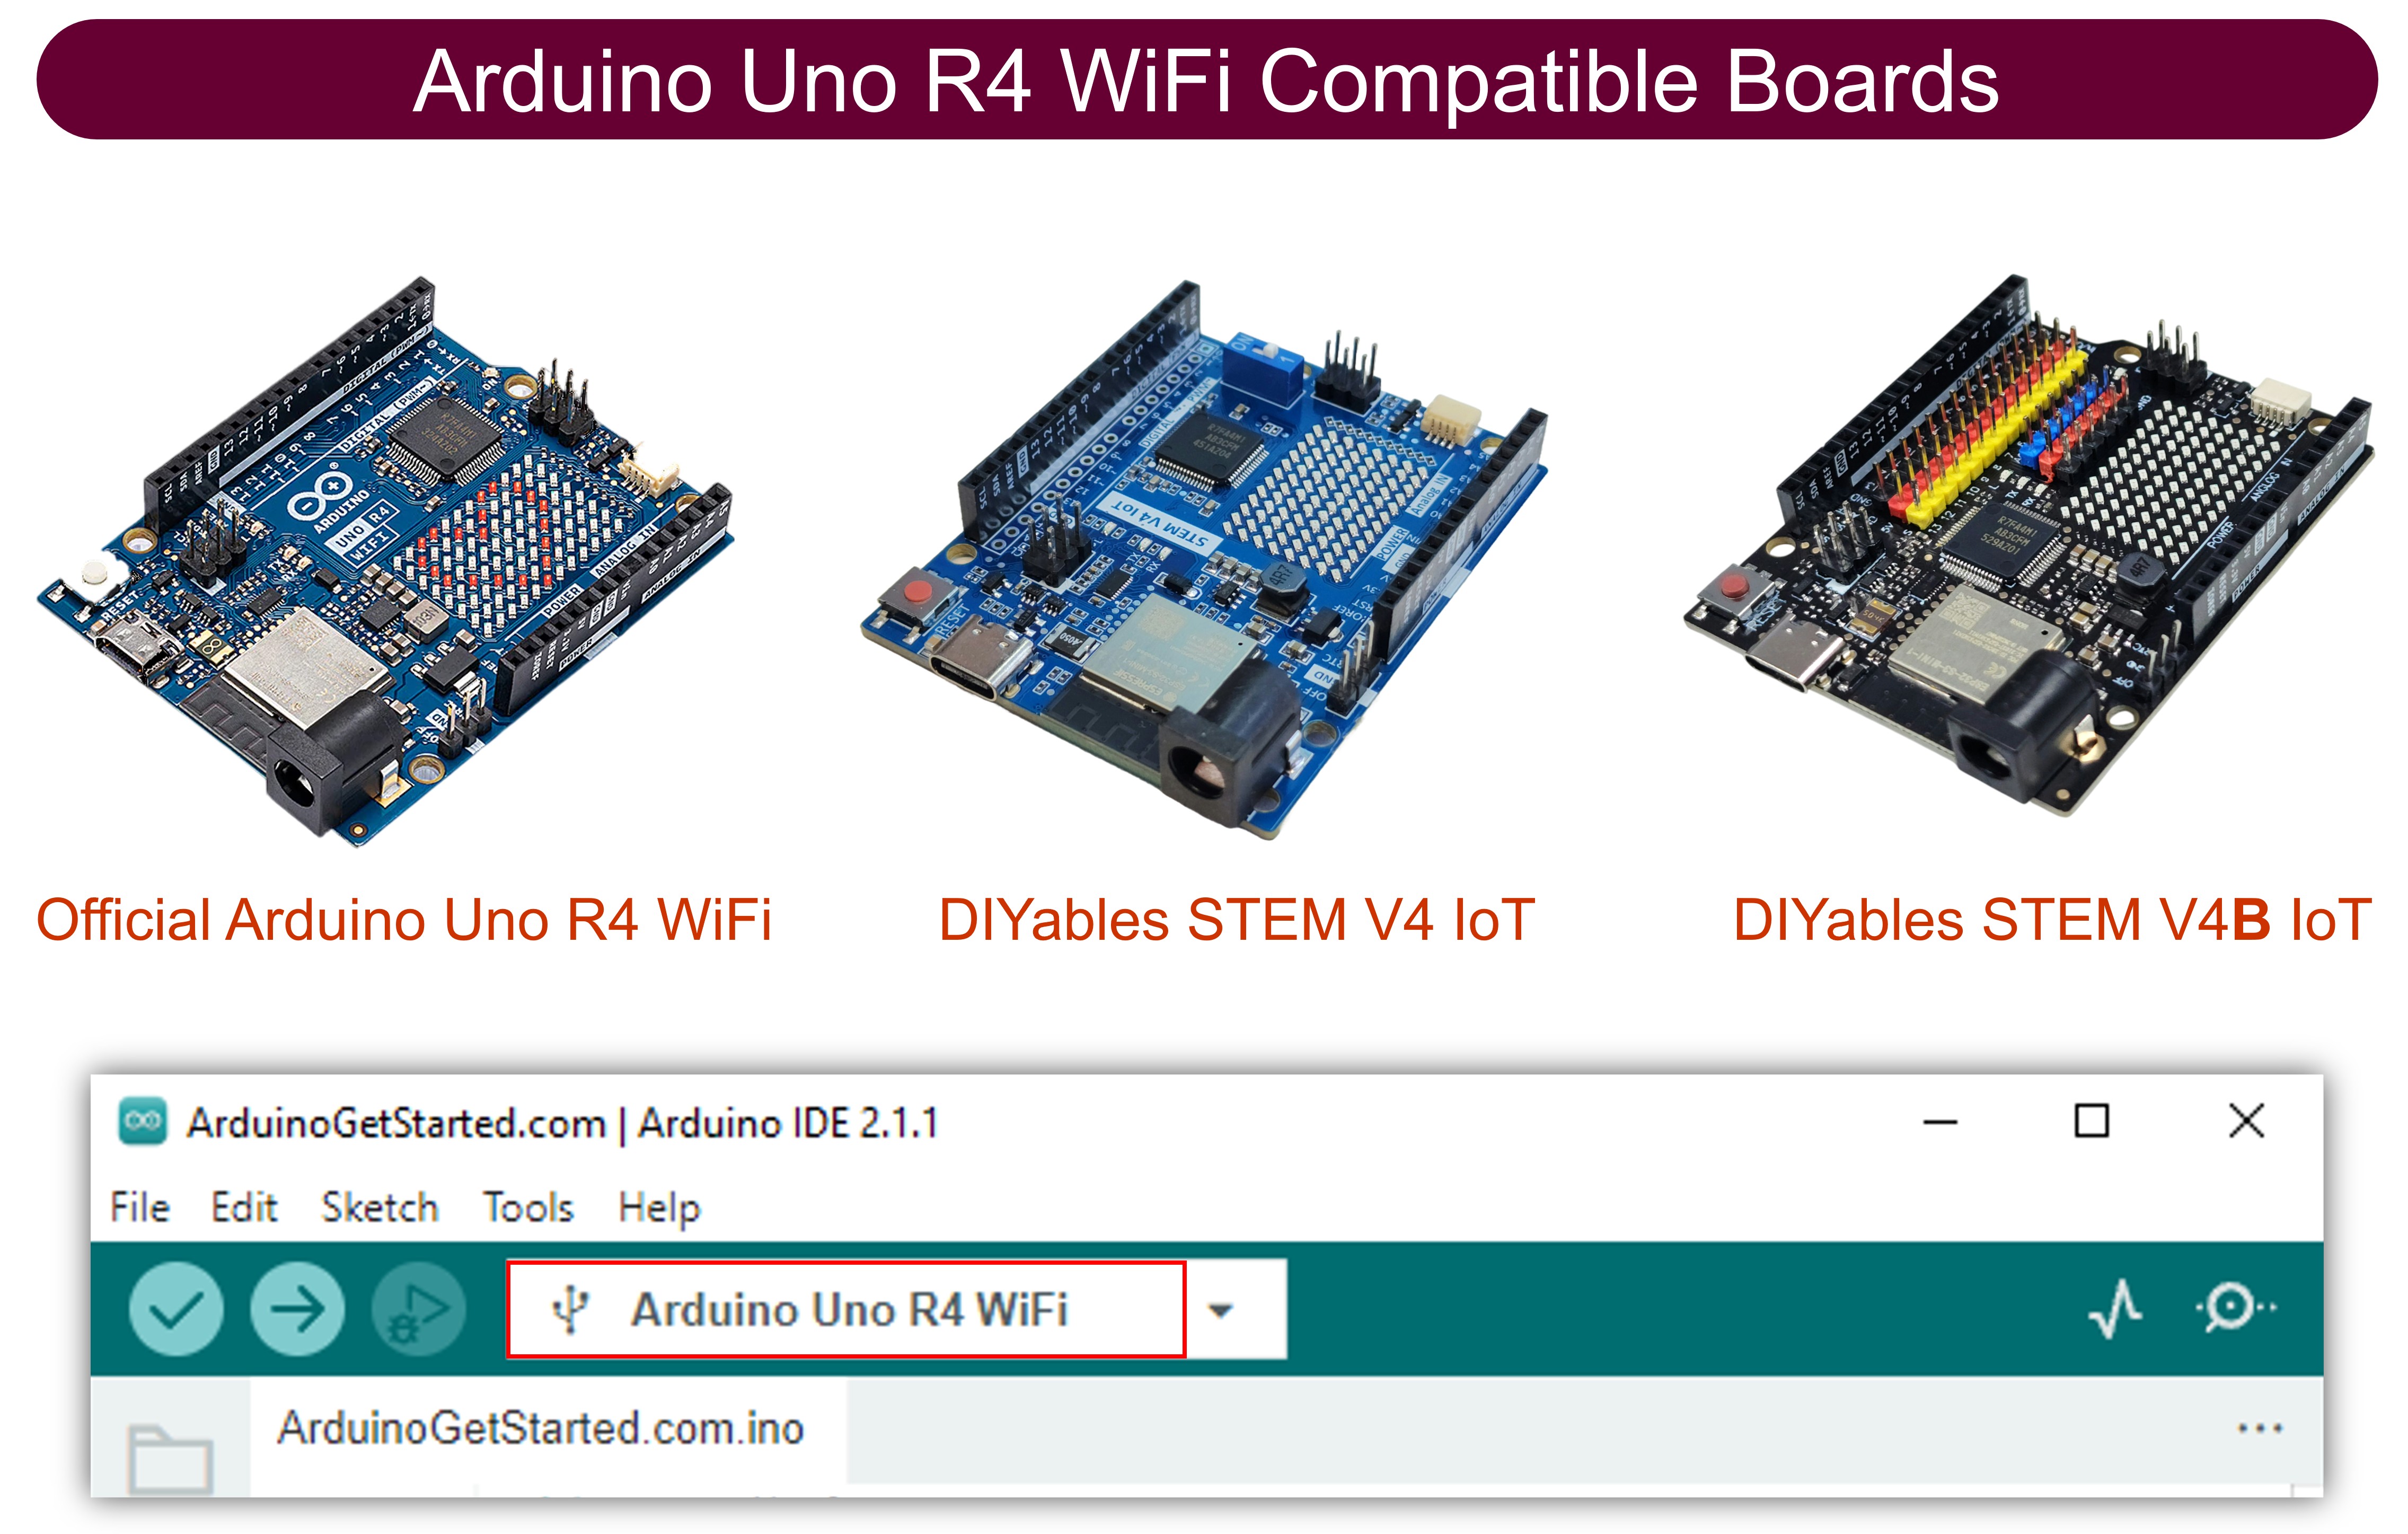
Ví dụ WebJoystick tạo ra giao diện joystick ảo có thể truy cập từ bất kỳ trình duyệt web nào. Được thiết kế cho Arduino Uno R4 WiFi và nền tảng giáo dục DIYables STEM V4 IoT với khả năng robotics nâng cao, tính năng điều khiển động cơ tích hợp, và tích hợp liền mạch với các module giáo dục robotics. Hoàn hảo để điều khiển robot, xe cộ, hoặc bất kỳ hệ thống nào yêu cầu đầu vào vị trí 2D.
Tính Năng
- Joystick Ảo: Điều khiển joystick tương tác qua giao diện web
- Tọa Độ Thời Gian Thực: Giá trị X/Y từ -100 đến +100 để điều khiển chính xác
- Hỗ Trợ Touch & Mouse: Hoạt động trên desktop, tablet và thiết bị di động
- Auto-Return Có Thể Cấu Hình: Tùy chọn cho joystick quay về giữa khi thả ra
- Điều Khiển Độ Nhạy: Độ nhạy có thể điều chỉnh để tránh cập nhật quá mức
- Phản Hồi Trực Quan: Hiển thị vị trí thời gian thực và giá trị tọa độ
- Giao Tiếp WebSocket: Phản hồi tức thì không cần làm mới trang
- Vị Trí Trung Tâm: Chỉ báo vị trí trung tâm rõ ràng cho điều khiển trung tính
- Có Thể Mở Rộng Nền Tảng: Hiện tại được triển khai cho Arduino Uno R4 WiFi, nhưng có thể mở rộng cho các nền tảng phần cứng khác. Xem DIYables_WebApps_ESP32
Phần Cứng Cần Thiết
| 1 | × | Arduino UNO R4 WiFi | Amazon | |
| 1 | × | Alternatively, DIYables STEM V4 IoT | Amazon | |
| 1 | × | Alternatively, DIYables STEM V4B IoT | Amazon | |
| 1 | × | (Tùy chọn) DIYables STEM V4 IoT | Amazon | |
| 1 | × | USB Cable Type-A to Type-C (for USB-A PC) | Amazon | |
| 1 | × | USB Cable Type-C to Type-C (for USB-C PC) | Amazon | |
| 1 | × | (Khuyến nghị) Screw Terminal Block Shield for Arduino UNO R4 | Amazon | |
| 1 | × | (Khuyến nghị) Sensors/Servo Expansion Shield for Arduino UNO R4 | Amazon | |
| 1 | × | (Khuyến nghị) Breadboard Shield for Arduino UNO R4 | Amazon | |
| 1 | × | (Khuyến nghị) Enclosure for Arduino UNO R4 | Amazon | |
| 1 | × | (Khuyến nghị) Power Splitter for Arduino UNO R4 | Amazon | |
| 1 | × | (Khuyến nghị) Prototyping Base Plate & Breadboard Kit for Arduino UNO | Amazon |
Or you can buy the following kits:
| 1 | × | DIYables STEM V4 IoT Starter Kit (Arduino included) | Amazon | |
| 1 | × | DIYables Sensor Kit (18 sensors/displays) | Amazon |
Tiết lộ: Một số liên kết trong bài viết này là liên kết tiếp thị Amazon và có thể nhận hoa hồng theo chính sách của chương trình.
Hướng Dẫn Cài Đặt
Các Bước Nhanh
Thực hiện theo các hướng dẫn sau từng bước:
- Nếu đây là lần đầu tiên bạn sử dụng Arduino Uno R4 WiFi/DIYables STEM V4 IoT, hãy tham khảo hướng dẫn về Arduino UNO R4 - Cài Đặt Phần Mềm.
- Kết nối bo mạch Arduino Uno R4/DIYables STEM V4 IoT với máy tính của bạn bằng cáp USB.
- Khởi chạy Arduino IDE trên máy tính của bạn.
- Chọn bo mạch Arduino Uno R4 phù hợp (ví dụ: Arduino Uno R4 WiFi) và cổng COM.
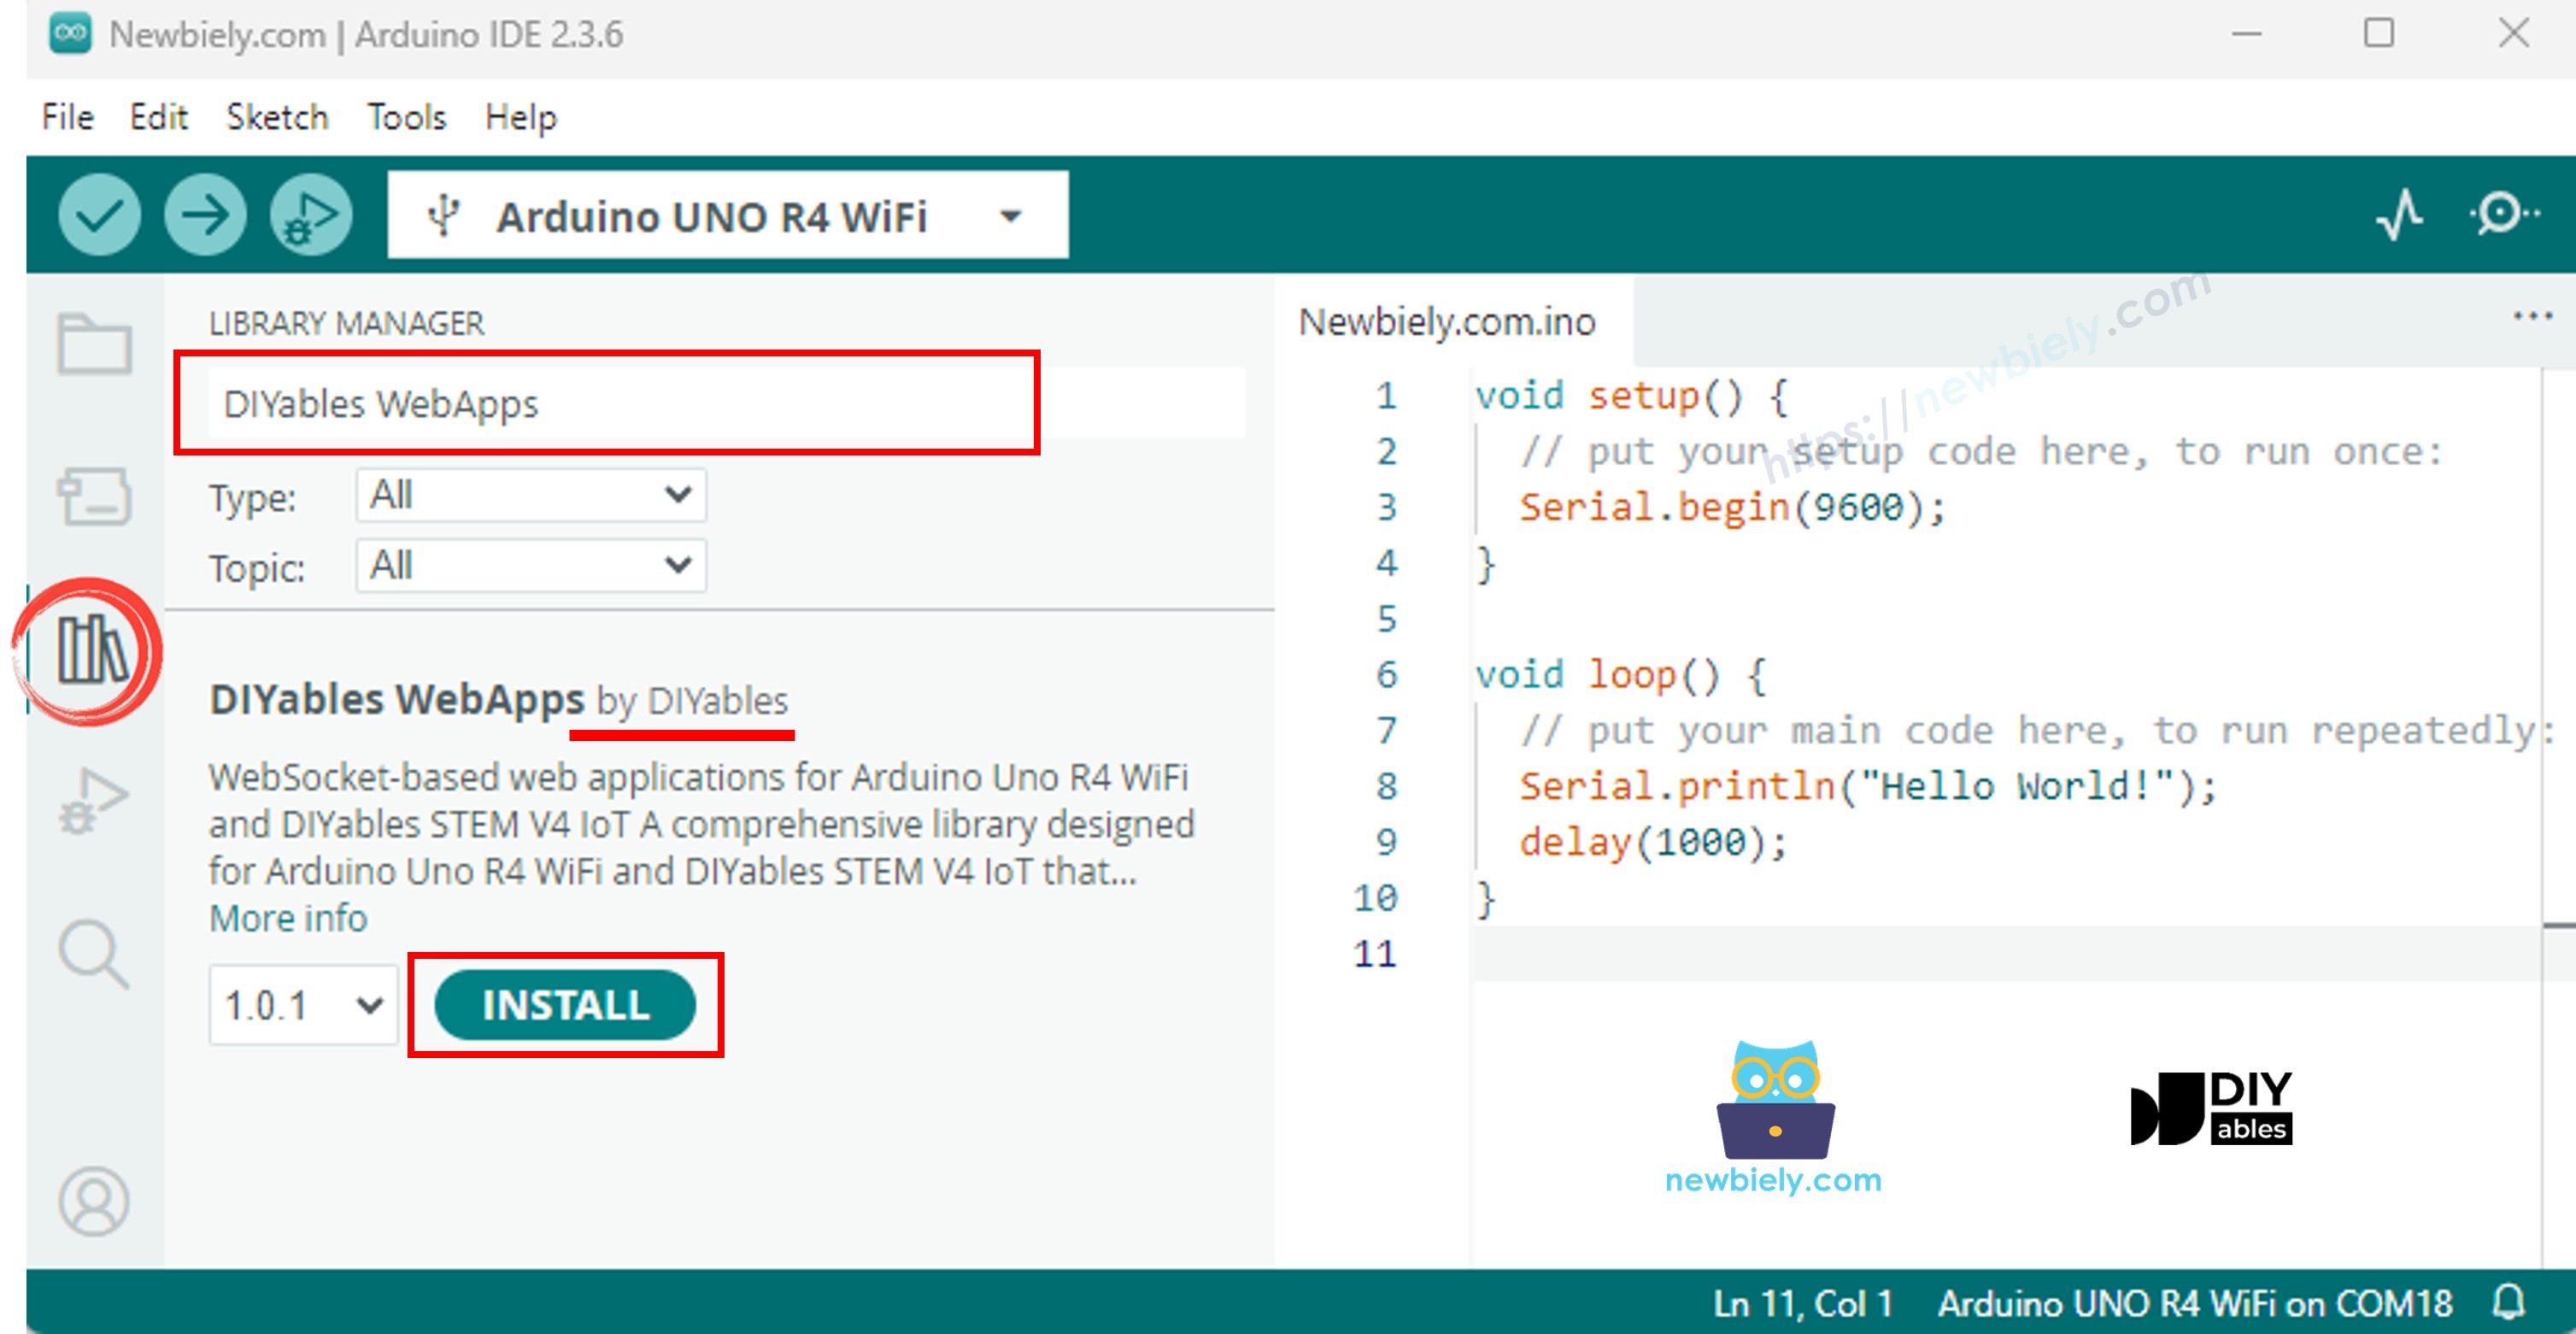
- Điều hướng đến biểu tượng Libraries trên thanh bên trái của Arduino IDE.
- Tìm kiếm "DIYables WebApps", sau đó tìm thư viện DIYables WebApps bởi DIYables
- Nhấp nút Install để cài đặt thư viện.
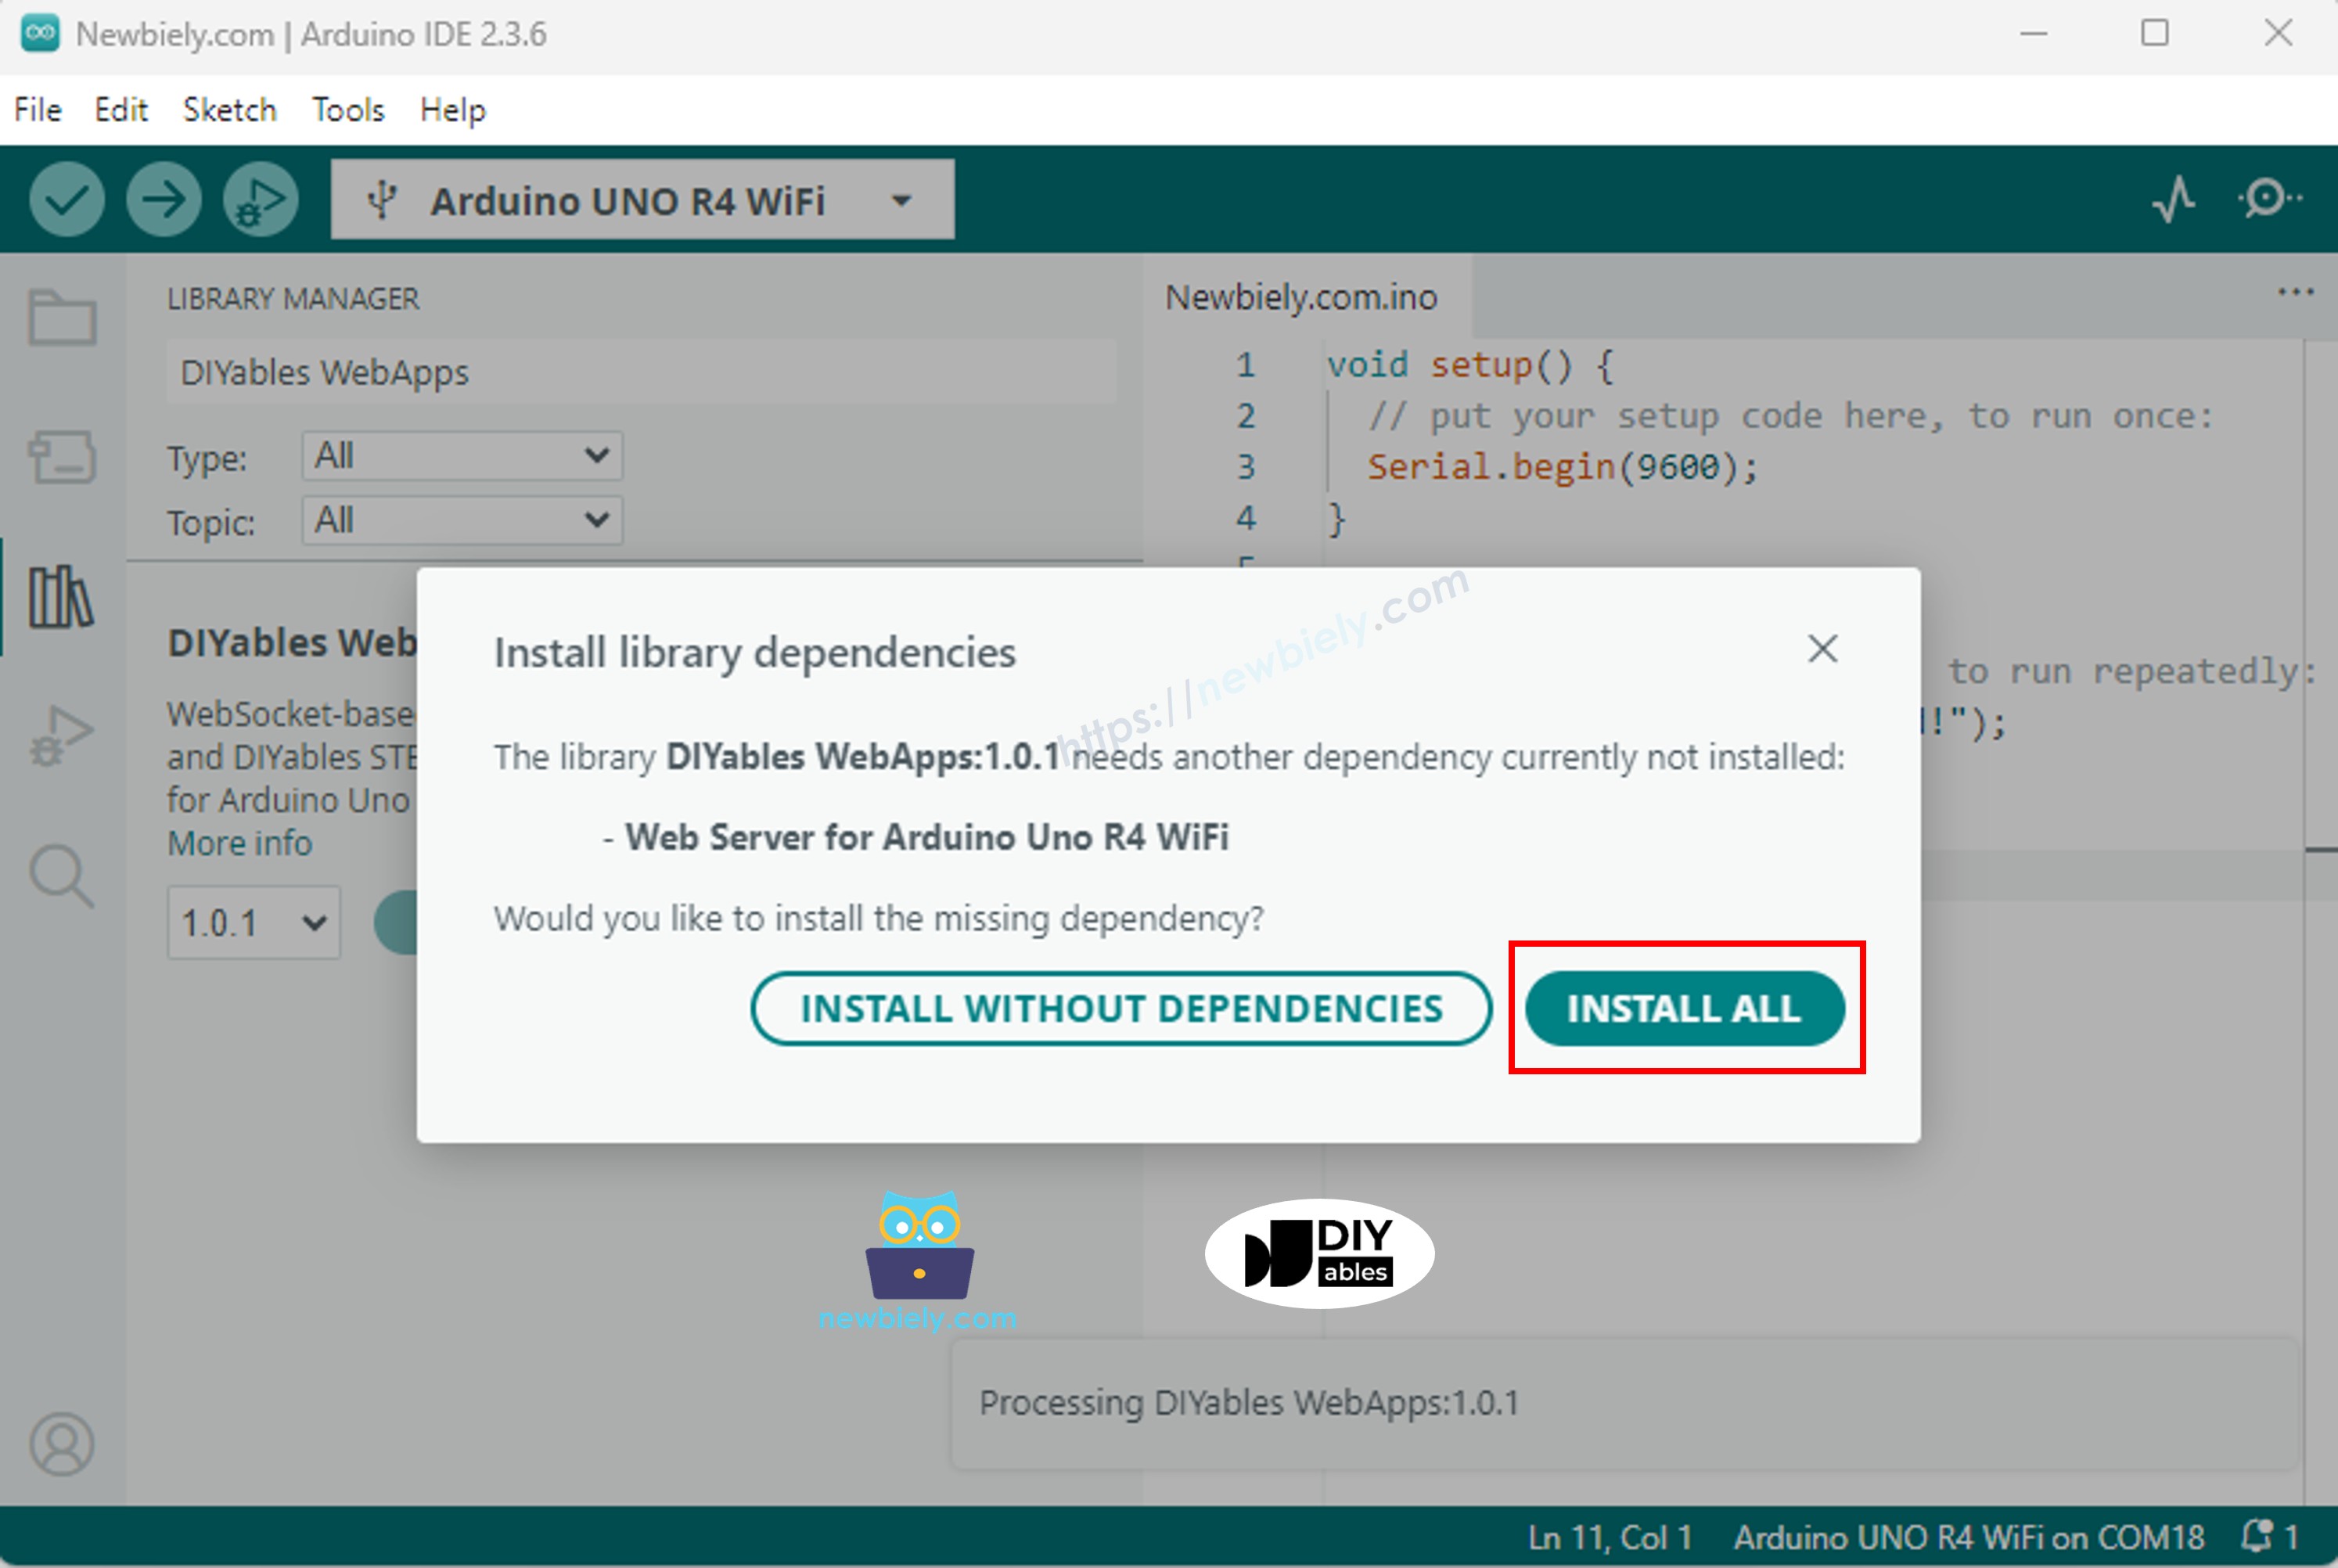
- Bạn sẽ được hỏi về việc cài đặt một số thư viện phụ thuộc khác
- Nhấp nút Install All để cài đặt tất cả các thư viện phụ thuộc.
- Trên Arduino IDE, vào File Examples DIYables WebApps WebJoystick example, hoặc sao chép đoạn code trên và dán vào editor của Arduino IDE
/*
* DIYables WebApp Library - Web Joystick Example
*
* This example demonstrates the Web Joystick feature:
* - Interactive joystick control via web interface
* - Real-time X/Y coordinate values (-100 to +100)
* - Control pins based on joystick position
*
* Hardware: Arduino Uno R4 WiFi or DIYables STEM V4 IoT
*
* Setup:
* 1. Update WiFi credentials below
* 2. Upload the sketch to your Arduino
* 3. Open Serial Monitor to see the IP address
* 4. Navigate to http://[IP_ADDRESS]/webjoystick
*/
#include <DIYablesWebApps.h>
// WiFi credentials - UPDATE THESE WITH YOUR NETWORK
const char WIFI_SSID[] = "YOUR_WIFI_SSID";
const char WIFI_PASSWORD[] = "YOUR_WIFI_PASSWORD";
// Create WebApp server and page instances
// MEMORY SAFETY FIX: Use static factory to avoid stack object lifetime issues
static UnoR4ServerFactory serverFactory; // Static ensures lifetime matches program
DIYablesWebAppServer webAppsServer(serverFactory, 80, 81);
DIYablesHomePage homePage;
// Configure joystick with autoReturn=false and sensitivity=5 (minimum 5% change to trigger updates)
DIYablesWebJoystickPage webJoystickPage(false, 5);
// Variables to store current joystick values
int currentJoystickX = 0;
int currentJoystickY = 0;
void setup() {
Serial.begin(9600);
delay(1000);
// TODO: initialize your hardware pins here
Serial.println("DIYables WebApp - Web Joystick Example");
// Add home and web joystick pages
webAppsServer.addApp(&homePage);
webAppsServer.addApp(&webJoystickPage);
// Optional: Add 404 page for better user experience
webAppsServer.setNotFoundPage(DIYablesNotFoundPage());
// Start the WebApp server
if (!webAppsServer.begin(WIFI_SSID, WIFI_PASSWORD)) {
while (1) {
Serial.println("Failed to start WebApp server!");
delay(1000);
}
}
// Set up joystick callback for position changes
webJoystickPage.onJoystickValueFromWeb([](int x, int y) {
// Store the received values
currentJoystickX = x;
currentJoystickY = y;
// Print joystick position values (-100 to +100)
Serial.println("Joystick - X: " + String(x) + ", Y: " + String(y));
// TODO: Add your control logic here based on joystick position
// Examples:
// - Control motors: if (x > 50) { /* move right */ }
// - Control servos: servo.write(map(y, -100, 100, 0, 180));
// - Control LEDs: analogWrite(LED_PIN, map(abs(x), 0, 100, 0, 255));
// - Send commands to other devices via Serial, I2C, SPI, etc.
});
// Optional: Handle requests for current joystick values (when web page loads)
webJoystickPage.onJoystickValueToWeb([]() {
// Send the stored joystick values back to the web client
webJoystickPage.sendToWebJoystick(currentJoystickX, currentJoystickY);
Serial.println("Web client requested values - Sent to Web: X=" + String(currentJoystickX) + ", Y=" + String(currentJoystickY));
});
// You can change configuration at runtime:
// webJoystickPage.setAutoReturn(false); // Disable auto-return
// webJoystickPage.setSensitivity(10.0); // Only send updates when joystick moves >10% (less sensitive)
}
void loop() {
// Handle WebApp server communications
webAppsServer.loop();
// TODO: Add your main application code here
delay(10);
}
- Cấu hình thông tin đăng nhập WiFi trong code bằng cách cập nhật các dòng này:
const char WIFI_SSID[] = "YOUR_WIFI_NETWORK";
const char WIFI_PASSWORD[] = "YOUR_WIFI_PASSWORD";
- Nhấp nút Upload trên Arduino IDE để upload code lên Arduino UNO R4/DIYables STEM V4 IoT
- Mở Serial Monitor
- Kiểm tra kết quả trên Serial Monitor. Nó trông như bên dưới
8
Serial.println("Hello World!");
Message (Enter to send message to 'Arduino Uno R4 WiFi' on 'COM15')
New Line
9600 baud
DIYables WebApp - Web Joystick Example
INFO: Added app /
INFO: Added app /web-joystick
DIYables WebApp Library
Platform: Arduino Uno R4 WiFi
Network connected!
IP address: 192.168.0.2
HTTP server started on port 80
Configuring WebSocket server callbacks...
WebSocket server started on port 81
WebSocket URL: ws://192.168.0.2:81
WebSocket server started on port 81
==========================================
DIYables WebApp Ready!
==========================================
📱 Web Interface: http://192.168.0.2
🔗 WebSocket: ws://192.168.0.2:81
📋 Available Applications:
🏠 Home Page: http://192.168.0.2/
🕹️ Web Joystick: http://192.168.0.2/web-joystick
==========================================
- Nếu bạn không thấy gì, hãy khởi động lại bo mạch Arduino.
- Ghi chú địa chỉ IP được hiển thị, và nhập địa chỉ này vào thanh địa chỉ của trình duyệt web trên smartphone hoặc PC của bạn.
- Ví dụ: http://192.168.0.2
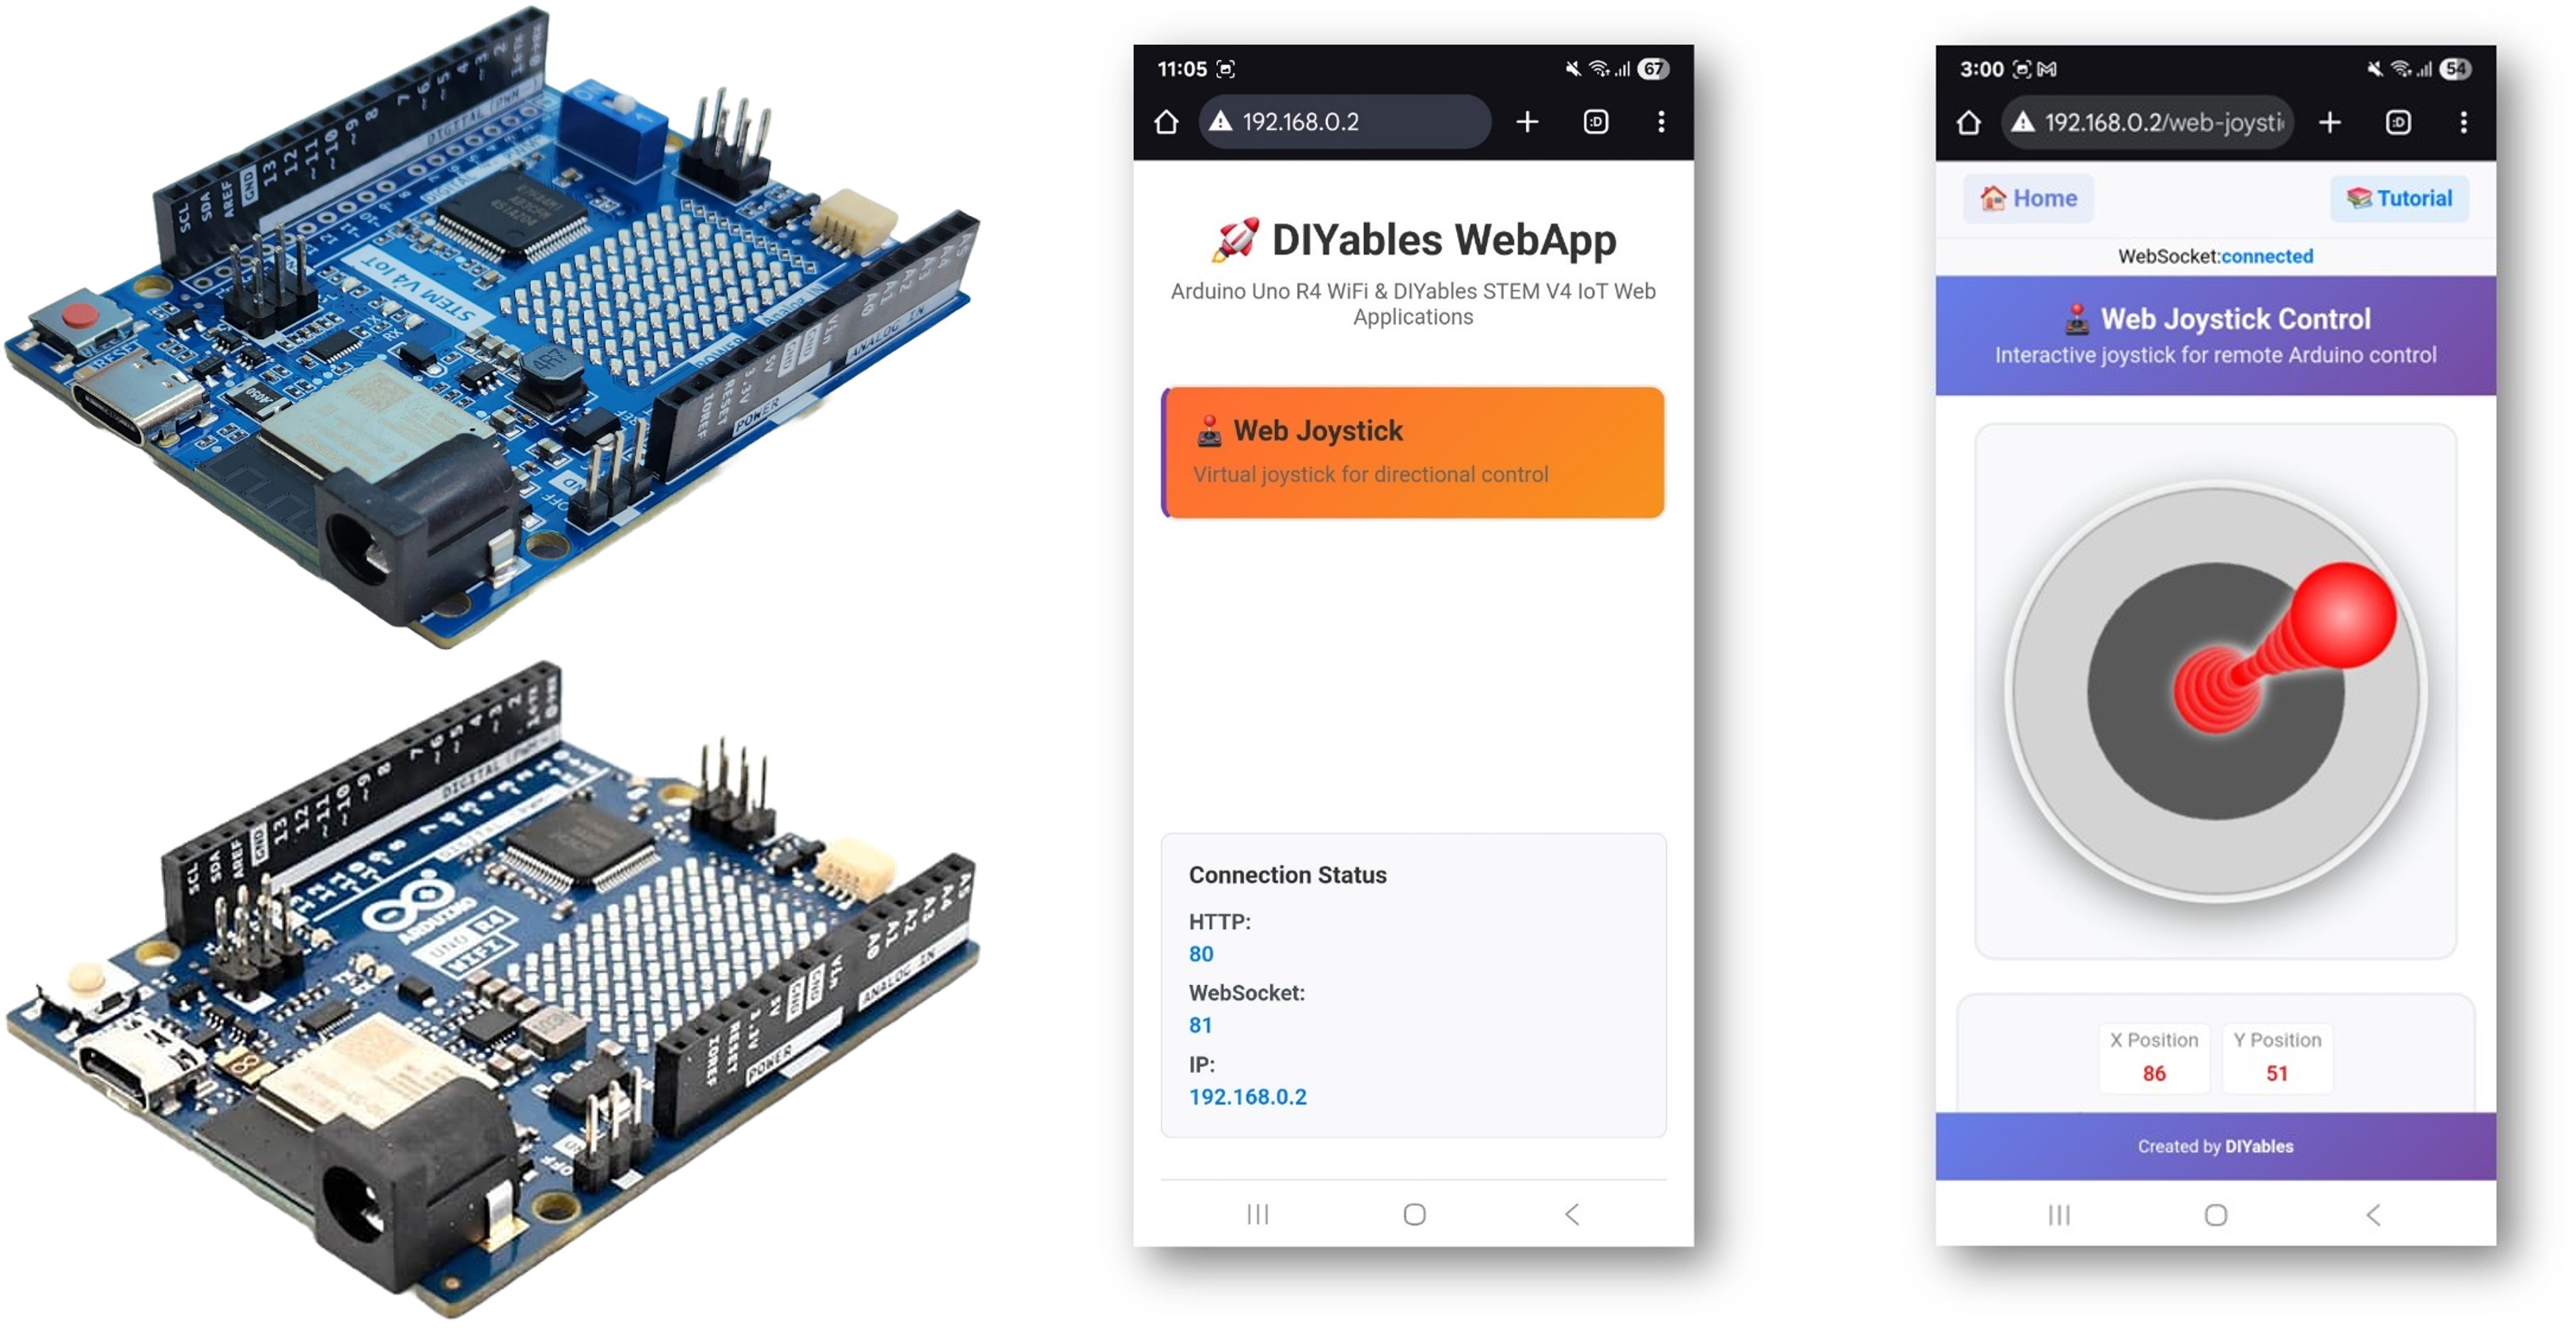
- Bạn sẽ thấy trang chủ như hình dưới đây:
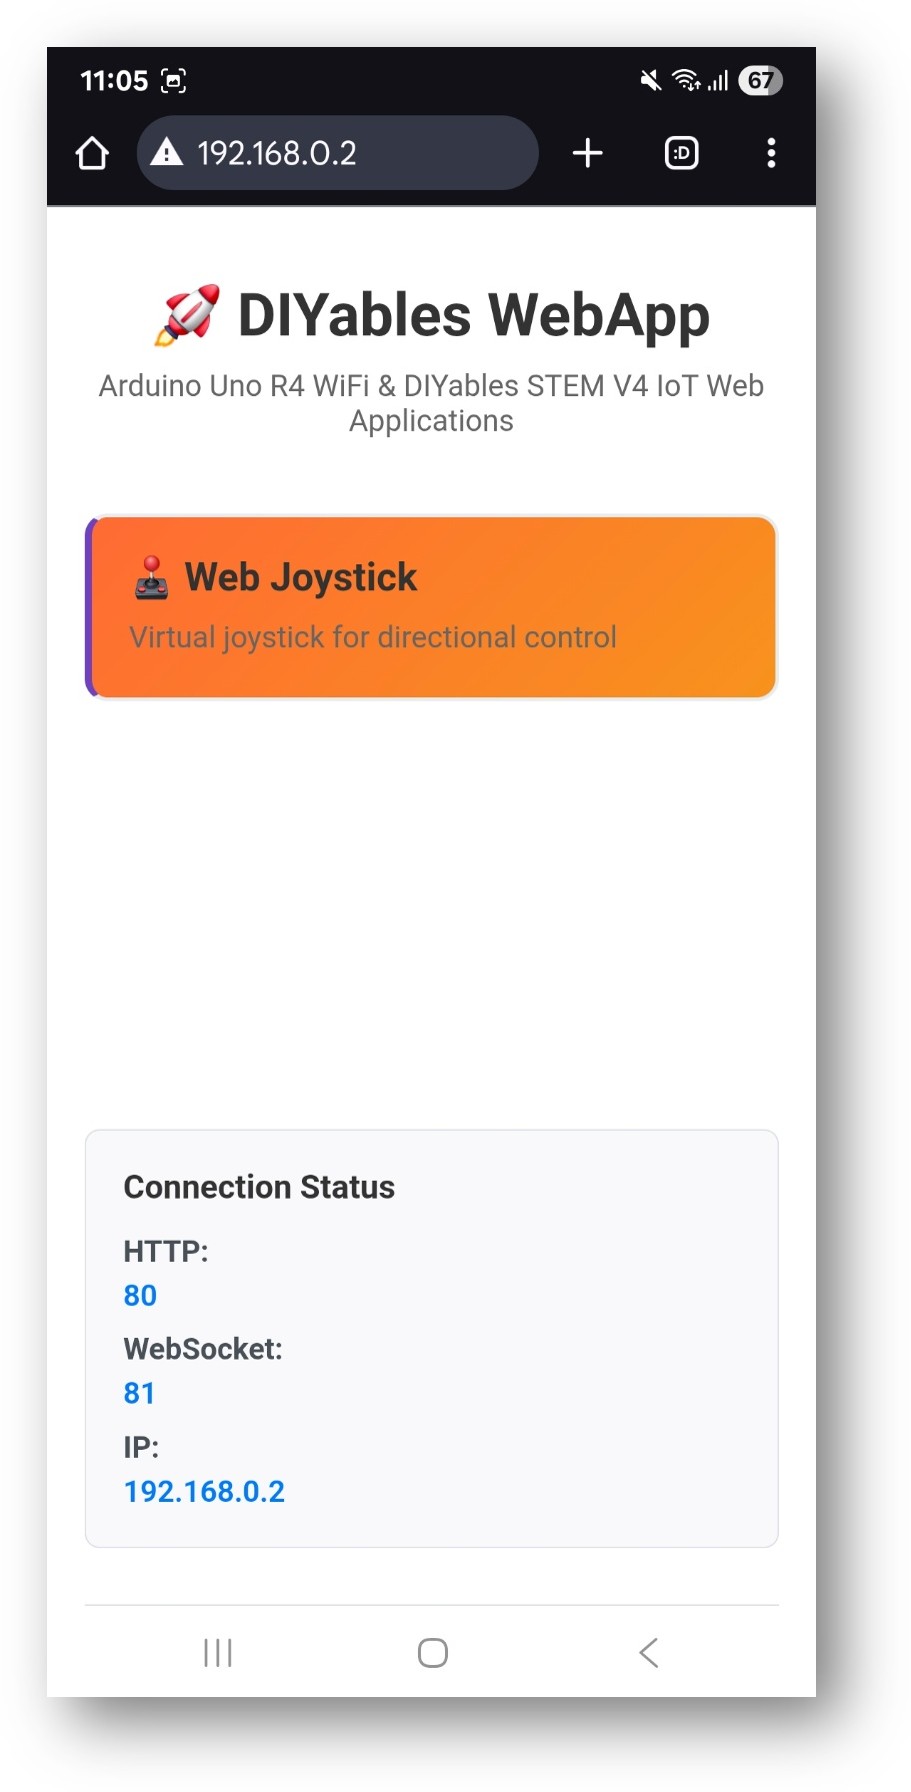
- Nhấp vào liên kết Web Joystick, bạn sẽ thấy giao diện của ứng dụng Web Joystick như bên dưới:
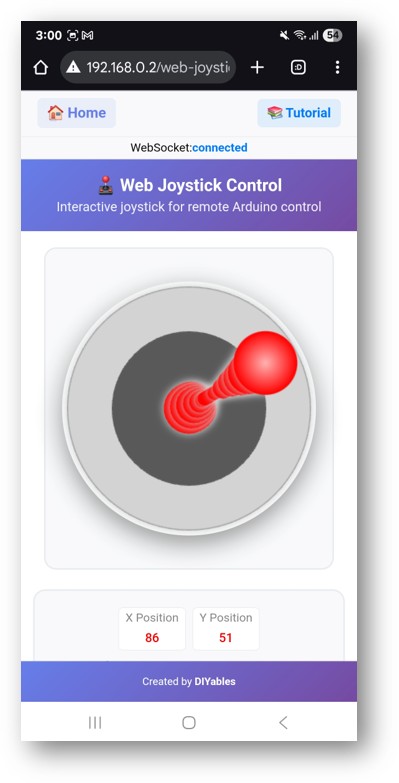
- Hoặc bạn cũng có thể truy cập trực tiếp trang bằng địa chỉ IP theo sau bởi /web-joystick. Ví dụ: http://192.168.0.2/web-joystick
- Thử điều khiển joystick ảo bằng cách nhấp và kéo trên khu vực joystick và quan sát các giá trị tọa độ X/Y (-100 đến +100) trong Serial Monitor.
Tùy Chỉnh Sáng Tạo - Điều Chỉnh Code Cho Dự Án Của Bạn
2. Cấu Hình Cài Đặt Joystick
Joystick có thể được cấu hình với các tham số khác nhau:
Cấu Hình Cơ Bản
// Tạo joystick với cài đặt mặc định (autoReturn=true, sensitivity=1)
DIYablesWebJoystickPage webJoystickPage;
Cấu Hình Nâng Cao
// Tạo joystick với cài đặt tùy chỉnh
// autoReturn=false: Joystick giữ nguyên vị trí cuối khi thả ra
// sensitivity=5: Chỉ gửi cập nhật khi chuyển động > 5%
DIYablesWebJoystickPage webJoystickPage(false, 5);
Cách Sử Dụng Joystick
Điều Khiển Giao Diện Web
Giao diện joystick cung cấp:
- Bảng Joystick: Khu vực điều khiển hình tròn cho đầu vào touch/mouse
- Chỉ Báo Vị Trí: Hiển thị vị trí joystick hiện tại
- Hiển Thị Tọa Độ: Giá trị X/Y thời gian thực (-100 đến +100)
- Điểm Trung Tâm: Tham chiếu trực quan cho điều khiển trung tính
Vận Hành Joystick
Desktop (Điều Khiển Mouse)
- Click và Kéo: Click vào joystick và kéo để di chuyển
- Thả: Joystick quay về trung tâm (nếu autoReturn=true)
- Click Vị Trí: Click trực tiếp để đặt vị trí joystick
Mobile/Tablet (Điều Khiển Touch)
- Touch và Kéo: Chạm vào joystick và kéo ngón tay để di chuyển
- Multi-touch: Một ngón tay cho điều khiển chính xác
- Thả: Tự động quay về trung tâm (nếu được bật)
Hệ Tọa Độ
Joystick cung cấp tọa độ trong hệ tọa độ Cartesian tiêu chuẩn:
- Trục X: -100 (hoàn toàn trái) đến +100 (hoàn toàn phải)
- Trục Y: -100 (hoàn toàn xuống) đến +100 (hoàn toàn lên)
- Trung Tâm: X=0, Y=0 (vị trí trung tính)
- Góc: Vị trí chéo cung cấp giá trị X/Y kết hợp
Ví Dụ Lập Trình
Handler Joystick Cơ Bản
void setup() {
// Thiết lập callback joystick cho thay đổi vị trí
webJoystickPage.onJoystickValueFromWeb([](int x, int y) {
// Lưu trữ các giá trị nhận được
currentJoystickX = x;
currentJoystickY = y;
// In giá trị vị trí joystick
Serial.println("Joystick - X: " + String(x) + ", Y: " + String(y));
// Thêm logic điều khiển của bạn ở đây
});
}
Ví Dụ Điều Khiển Động Cơ
// Định nghĩa pin cho driver động cơ
const int MOTOR_LEFT_PIN1 = 2;
const int MOTOR_LEFT_PIN2 = 3;
const int MOTOR_RIGHT_PIN1 = 4;
const int MOTOR_RIGHT_PIN2 = 5;
const int MOTOR_LEFT_PWM = 9;
const int MOTOR_RIGHT_PWM = 10;
void setup() {
// Cấu hình các pin động cơ
pinMode(MOTOR_LEFT_PIN1, OUTPUT);
pinMode(MOTOR_LEFT_PIN2, OUTPUT);
pinMode(MOTOR_RIGHT_PIN1, OUTPUT);
pinMode(MOTOR_RIGHT_PIN2, OUTPUT);
pinMode(MOTOR_LEFT_PWM, OUTPUT);
pinMode(MOTOR_RIGHT_PWM, OUTPUT);
webJoystickPage.onJoystickValueFromWeb([](int x, int y) {
controlRobot(x, y);
});
}
void controlRobot(int x, int y) {
// Chuyển đổi tọa độ joystick thành tốc độ động cơ
int leftSpeed = y + x; // Tiến/lùi + rẽ trái/phải
int rightSpeed = y - x; // Tiến/lùi - rẽ trái/phải
// Giới hạn tốc độ trong phạm vi hợp lệ
leftSpeed = constrain(leftSpeed, -100, 100);
rightSpeed = constrain(rightSpeed, -100, 100);
// Điều khiển động cơ trái
if (leftSpeed > 0) {
digitalWrite(MOTOR_LEFT_PIN1, HIGH);
digitalWrite(MOTOR_LEFT_PIN2, LOW);
analogWrite(MOTOR_LEFT_PWM, map(leftSpeed, 0, 100, 0, 255));
} else if (leftSpeed < 0) {
digitalWrite(MOTOR_LEFT_PIN1, LOW);
digitalWrite(MOTOR_LEFT_PIN2, HIGH);
analogWrite(MOTOR_LEFT_PWM, map(-leftSpeed, 0, 100, 0, 255));
} else {
digitalWrite(MOTOR_LEFT_PIN1, LOW);
digitalWrite(MOTOR_LEFT_PIN2, LOW);
analogWrite(MOTOR_LEFT_PWM, 0);
}
// Điều khiển động cơ phải
if (rightSpeed > 0) {
digitalWrite(MOTOR_RIGHT_PIN1, HIGH);
digitalWrite(MOTOR_RIGHT_PIN2, LOW);
analogWrite(MOTOR_RIGHT_PWM, map(rightSpeed, 0, 100, 0, 255));
} else if (rightSpeed < 0) {
digitalWrite(MOTOR_RIGHT_PIN1, LOW);
digitalWrite(MOTOR_RIGHT_PIN2, HIGH);
analogWrite(MOTOR_RIGHT_PWM, map(-rightSpeed, 0, 100, 0, 255));
} else {
digitalWrite(MOTOR_RIGHT_PIN1, LOW);
digitalWrite(MOTOR_RIGHT_PIN2, LOW);
analogWrite(MOTOR_RIGHT_PWM, 0);
}
}
Ví Dụ Điều Khiển Servo
#include <Servo.h>
Servo panServo; // Điều khiển trục X (trái/phải)
Servo tiltServo; // Điều khiển trục Y (lên/xuống)
void setup() {
// Gắn servo vào các pin
panServo.attach(9);
tiltServo.attach(10);
// Đặt servo về giữa ban đầu
panServo.write(90);
tiltServo.write(90);
webJoystickPage.onJoystickValueFromWeb([](int x, int y) {
controlServos(x, y);
});
}
void controlServos(int x, int y) {
// Chuyển đổi tọa độ joystick thành góc servo
int panAngle = map(x, -100, 100, 0, 180); // X điều khiển pan (0-180°)
int tiltAngle = map(y, -100, 100, 180, 0); // Y điều khiển tilt (đảo ngược)
// Di chuyển servo đến vị trí được tính toán
panServo.write(panAngle);
tiltServo.write(tiltAngle);
Serial.println("Pan: " + String(panAngle) + "°, Tilt: " + String(tiltAngle) + "°");
}
Chỉ Báo Vị Trí LED
// Các pin LED để chỉ báo vị trí
const int LED_UP = 2;
const int LED_DOWN = 3;
const int LED_LEFT = 4;
const int LED_RIGHT = 5;
const int LED_CENTER = 13;
void setup() {
// Cấu hình các pin LED
pinMode(LED_UP, OUTPUT);
pinMode(LED_DOWN, OUTPUT);
pinMode(LED_LEFT, OUTPUT);
pinMode(LED_RIGHT, OUTPUT);
pinMode(LED_CENTER, OUTPUT);
webJoystickPage.onJoystickValueFromWeb([](int x, int y) {
updateLEDIndicators(x, y);
});
}
void updateLEDIndicators(int x, int y) {
// Tắt tất cả LED trước
digitalWrite(LED_UP, LOW);
digitalWrite(LED_DOWN, LOW);
digitalWrite(LED_LEFT, LOW);
digitalWrite(LED_RIGHT, LOW);
digitalWrite(LED_CENTER, LOW);
// Kiểm tra nếu joystick gần trung tâm
if (abs(x) < 10 && abs(y) < 10) {
digitalWrite(LED_CENTER, HIGH);
return;
}
// Kích hoạt LED dựa trên hướng
if (y > 20) digitalWrite(LED_UP, HIGH);
if (y < -20) digitalWrite(LED_DOWN, HIGH);
if (x > 20) digitalWrite(LED_RIGHT, HIGH);
if (x < -20) digitalWrite(LED_LEFT, HIGH);
}
Cấu Hình Nâng Cao
Thay Đổi Cấu Hình Runtime
void setup() {
// Thiết lập ban đầu với giá trị mặc định
webJoystickPage.onJoystickValueFromWeb([](int x, int y) {
handleJoystickInput(x, y);
});
// Thay đổi cài đặt tại runtime
webJoystickPage.setAutoReturn(false); // Tắt auto-return
webJoystickPage.setSensitivity(10.0); // Giảm độ nhạy
}
void handleJoystickInput(int x, int y) {
// Xử lý các chế độ khác nhau dựa trên cài đặt hiện tại
static bool precisionMode = false;
// Chuyển chế độ chính xác với vị trí cực đoan
if (abs(x) > 95 && abs(y) > 95) {
precisionMode = !precisionMode;
if (precisionMode) {
webJoystickPage.setSensitivity(1.0); // Độ nhạy cao
Serial.println("Chế độ chính xác BẬT");
} else {
webJoystickPage.setSensitivity(10.0); // Độ nhạy thấp
Serial.println("Chế độ chính xác TẮT");
}
}
}
Triển Khai Dead Zone
void processJoystickWithDeadZone(int x, int y) {
const int DEAD_ZONE = 15; // 15% dead zone xung quanh trung tâm
// Áp dụng lọc dead zone
int filteredX = (abs(x) < DEAD_ZONE) ? 0 : x;
int filteredY = (abs(y) < DEAD_ZONE) ? 0 : y;
// Tỷ lệ giá trị ngoài dead zone
if (filteredX != 0) {
filteredX = map(abs(filteredX), DEAD_ZONE, 100, 0, 100);
filteredX = (x < 0) ? -filteredX : filteredX;
}
if (filteredY != 0) {
filteredY = map(abs(filteredY), DEAD_ZONE, 100, 0, 100);
filteredY = (y < 0) ? -filteredY : filteredY;
}
// Sử dụng giá trị đã lọc để điều khiển
controlDevice(filteredX, filteredY);
}
Ramping Tốc Độ
class SpeedController {
private:
int targetX = 0, targetY = 0;
int currentX = 0, currentY = 0;
unsigned long lastUpdate = 0;
const int RAMP_RATE = 5; // Thay đổi mỗi chu kỳ cập nhật
public:
void setTarget(int x, int y) {
targetX = x;
targetY = y;
}
void update() {
if (millis() - lastUpdate > 20) { // Cập nhật mỗi 20ms
// Ramp giá trị X
if (currentX < targetX) {
currentX = min(currentX + RAMP_RATE, targetX);
} else if (currentX > targetX) {
currentX = max(currentX - RAMP_RATE, targetX);
}
// Ramp giá trị Y
if (currentY < targetY) {
currentY = min(currentY + RAMP_RATE, targetY);
} else if (currentY > targetY) {
currentY = max(currentY - RAMP_RATE, targetY);
}
// Áp dụng giá trị ramped
applyControlValues(currentX, currentY);
lastUpdate = millis();
}
}
void applyControlValues(int x, int y) {
// Logic điều khiển của bạn ở đây với giá trị ramped mượt
Serial.println("Ramped - X: " + String(x) + ", Y: " + String(y));
}
};
SpeedController speedController;
void setup() {
webJoystickPage.onJoystickValueFromWeb([](int x, int y) {
speedController.setTarget(x, y);
});
}
void loop() {
server.loop();
speedController.update(); // Áp dụng speed ramping
}
Ví Dụ Tích Hợp Phần Cứng
Điều Khiển Xe Robot
void setupRobotCar() {
// Các pin driver động cơ
pinMode(2, OUTPUT); // Hướng động cơ trái 1
pinMode(3, OUTPUT); // Hướng động cơ trái 2
pinMode(4, OUTPUT); // Hướng động cơ phải 1
pinMode(5, OUTPUT); // Hướng động cơ phải 2
pinMode(9, OUTPUT); // PWM động cơ trái
pinMode(10, OUTPUT); // PWM động cơ phải
webJoystickPage.onJoystickValueFromWeb([](int x, int y) {
// Tính toán điều khiển kiểu tank
int leftMotor = y + (x / 2); // Tiến/lùi + lái
int rightMotor = y - (x / 2); // Tiến/lùi - lái
// Giới hạn trong phạm vi hợp lệ
leftMotor = constrain(leftMotor, -100, 100);
rightMotor = constrain(rightMotor, -100, 100);
// Điều khiển động cơ
setMotorSpeed(9, 2, 3, leftMotor); // Động cơ trái
setMotorSpeed(10, 4, 5, rightMotor); // Động cơ phải
});
}
void setMotorSpeed(int pwmPin, int dir1Pin, int dir2Pin, int speed) {
if (speed > 0) {
digitalWrite(dir1Pin, HIGH);
digitalWrite(dir2Pin, LOW);
analogWrite(pwmPin, map(speed, 0, 100, 0, 255));
} else if (speed < 0) {
digitalWrite(dir1Pin, LOW);
digitalWrite(dir2Pin, HIGH);
analogWrite(pwmPin, map(-speed, 0, 100, 0, 255));
} else {
digitalWrite(dir1Pin, LOW);
digitalWrite(dir2Pin, LOW);
analogWrite(pwmPin, 0);
}
}
Điều Khiển Gimbal Camera
#include <Servo.h>
Servo panServo, tiltServo;
int panOffset = 90, tiltOffset = 90; // Vị trí trung tâm
void setupCameraGimbal() {
panServo.attach(9);
tiltServo.attach(10);
// Đặt vị trí trung tâm ban đầu
panServo.write(panOffset);
tiltServo.write(tiltOffset);
webJoystickPage.onJoystickValueFromWeb([](int x, int y) {
// Tính toán vị trí servo với offset
int panPos = panOffset + map(x, -100, 100, -45, 45); // Phạm vi ±45°
int tiltPos = tiltOffset + map(y, -100, 100, -30, 30); // Phạm vi ±30°
// Giới hạn trong giới hạn servo
panPos = constrain(panPos, 0, 180);
tiltPos = constrain(tiltPos, 0, 180);
// Di chuyển servo mượt mà
panServo.write(panPos);
tiltServo.write(tiltPos);
});
}
Điều Khiển Màu LED RGB
const int RED_PIN = 9;
const int GREEN_PIN = 10;
const int BLUE_PIN = 11;
void setupRGBControl() {
pinMode(RED_PIN, OUTPUT);
pinMode(GREEN_PIN, OUTPUT);
pinMode(BLUE_PIN, OUTPUT);
webJoystickPage.onJoystickValueFromWeb([](int x, int y) {
// Chuyển đổi vị trí joystick thành giá trị RGB
int red = map(abs(x), 0, 100, 0, 255);
int green = map(abs(y), 0, 100, 0, 255);
int blue = map(abs(x + y), 0, 141, 0, 255); // Khoảng cách chéo
// Áp dụng trộn màu theo góc phần tư
if (x > 0 && y > 0) {
// Phía trên bên phải: Đỏ + Xanh lá = Vàng
blue = 0;
} else if (x < 0 && y > 0) {
// Phía trên bên trái: Xanh lá + Xanh dương = Cyan
red = 0;
} else if (x < 0 && y < 0) {
// Phía dưới bên trái: Xanh dương + Đỏ = Magenta
green = 0;
} else if (x > 0 && y < 0) {
// Phía dưới bên phải: Chỉ đỏ
green = blue = 0;
}
// Đặt giá trị RGB
analogWrite(RED_PIN, red);
analogWrite(GREEN_PIN, green);
analogWrite(BLUE_PIN, blue);
});
}
Bài hướng dẫn liên quan
📱 Ứng dụng đề xuất
 English for KidsHọc tiếng Anh vui nhộn cho trẻ nhỏ.Tải về trênGoogle PlayTải về trênApp Store
 Bubble NoteGhi chú tự xóa — viết như nhắn tin.Tải về trênGoogle PlayTải về trênApp Store
 Tôi Không MuaĐánh bại mua sắm bốc đồng, tiết kiệm hơn.Tải về trênGoogle PlayTải về trênApp Store
 Con Đường Tri ThứcBài thi thử để học mọi thứ.Tải về trênGoogle PlayTải về trênApp Store