Arduino Custom WebApp Ví Dụ Hướng Dẫn Giao Diện Web Đơn Giản Cho Người Mới Bắt Đầu
Tổng Quan
Ví dụ này cung cấp một template hoàn chỉnh để tạo ứng dụng web tùy chỉnh của riêng bạn, tích hợp liền mạch với thư viện DIYables WebApps.
Template CustomWebApp hoàn hảo cho người mới bắt đầu muốn thêm giao diện web riêng vào hệ sinh thái DIYables WebApps! Hướng dẫn này sẽ chỉ cho bạn cách xây dựng một trang web đơn giản với trao đổi dữ liệu hai chiều thời gian thực giữa trình duyệt web và Arduino qua WebSocket có thể:
- Gửi tin nhắn văn bản từ trình duyệt web đến Arduino ngay lập tức qua WebSocket
- Nhận tin nhắn từ Arduino và hiển thị chúng thời gian thực trên trang web
- Duy trì kết nối WebSocket liên tục cho việc giao tiếp không ngừng
- Tự động kết nối lại khi mất kết nối WebSocket
- Hoạt động trên thiết bị di động với thiết kế responsive
Được thiết kế cho Arduino Uno R4 WiFi và DIYables STEM V4 IoT - template này tích hợp hoàn hảo với các ứng dụng web DIYables hiện có và cung cấp nền tảng để xây dựng giao diện IoT tùy chỉnh của riêng bạn!
Template này cung cấp mã code tối thiểu để bạn bắt đầu. Người dùng có thể phát triển các ứng dụng web phức tạp của riêng mình bằng cách chỉnh sửa template này. Khuyến nghị có kiến thức lập trình web cơ bản (HTML, CSS, JavaScript) để tùy chỉnh giao diện web và thêm các tính năng nâng cao.
Bạn Sẽ Học Được Gì
- Cách tạo ứng dụng web tùy chỉnh tích hợp với thư viện DIYables WebApps
- Cách thêm trang tùy chỉnh vào hệ sinh thái ứng dụng web DIYables
- Cách gửi tin nhắn văn bản từ trình duyệt web đến Arduino
- Cách gửi dữ liệu từ Arduino đến trình duyệt web
- Cách xử lý kết nối WebSocket và tự động kết nối lại
- Cách tạo giao diện web responsive cho mobile
- Cách sử dụng hệ thống template DIYables WebApps để phát triển nhanh
Tính Năng
- Tích Hợp DIYables WebApps: Tích hợp liền mạch với hệ sinh thái thư viện DIYables WebApps
- Code Template Tối Thiểu: Cung cấp nền tảng cơ bản mà bạn có thể mở rộng và tùy chỉnh
- Phát Triển Dựa Trên Template: Điểm khởi đầu hoàn chỉnh để bạn chỉnh sửa tạo ứng dụng phức tạp
- Nhắn Tin Văn Bản Đơn Giản: Gửi tin nhắn giữa trình duyệt web và Arduino
- Tự Động Kết Nối Lại: Tự động kết nối lại khi mất kết nối
- Mobile Responsive: Hoạt động hoàn hảo trên điện thoại, tablet và máy tính
- Thân Thiện Với Người Mới: Code sạch, đơn giản dễ hiểu
- Framework Mở Rộng: Yêu cầu kiến thức lập trình web cơ bản (HTML/CSS/JavaScript) để tùy chỉnh nâng cao
- Nền Tảng Mở Rộng: Hiện được triển khai cho Arduino Uno R4 WiFi, nhưng có thể mở rộng cho các nền tảng phần cứng khác. Xem DIYables_WebApps_ESP32
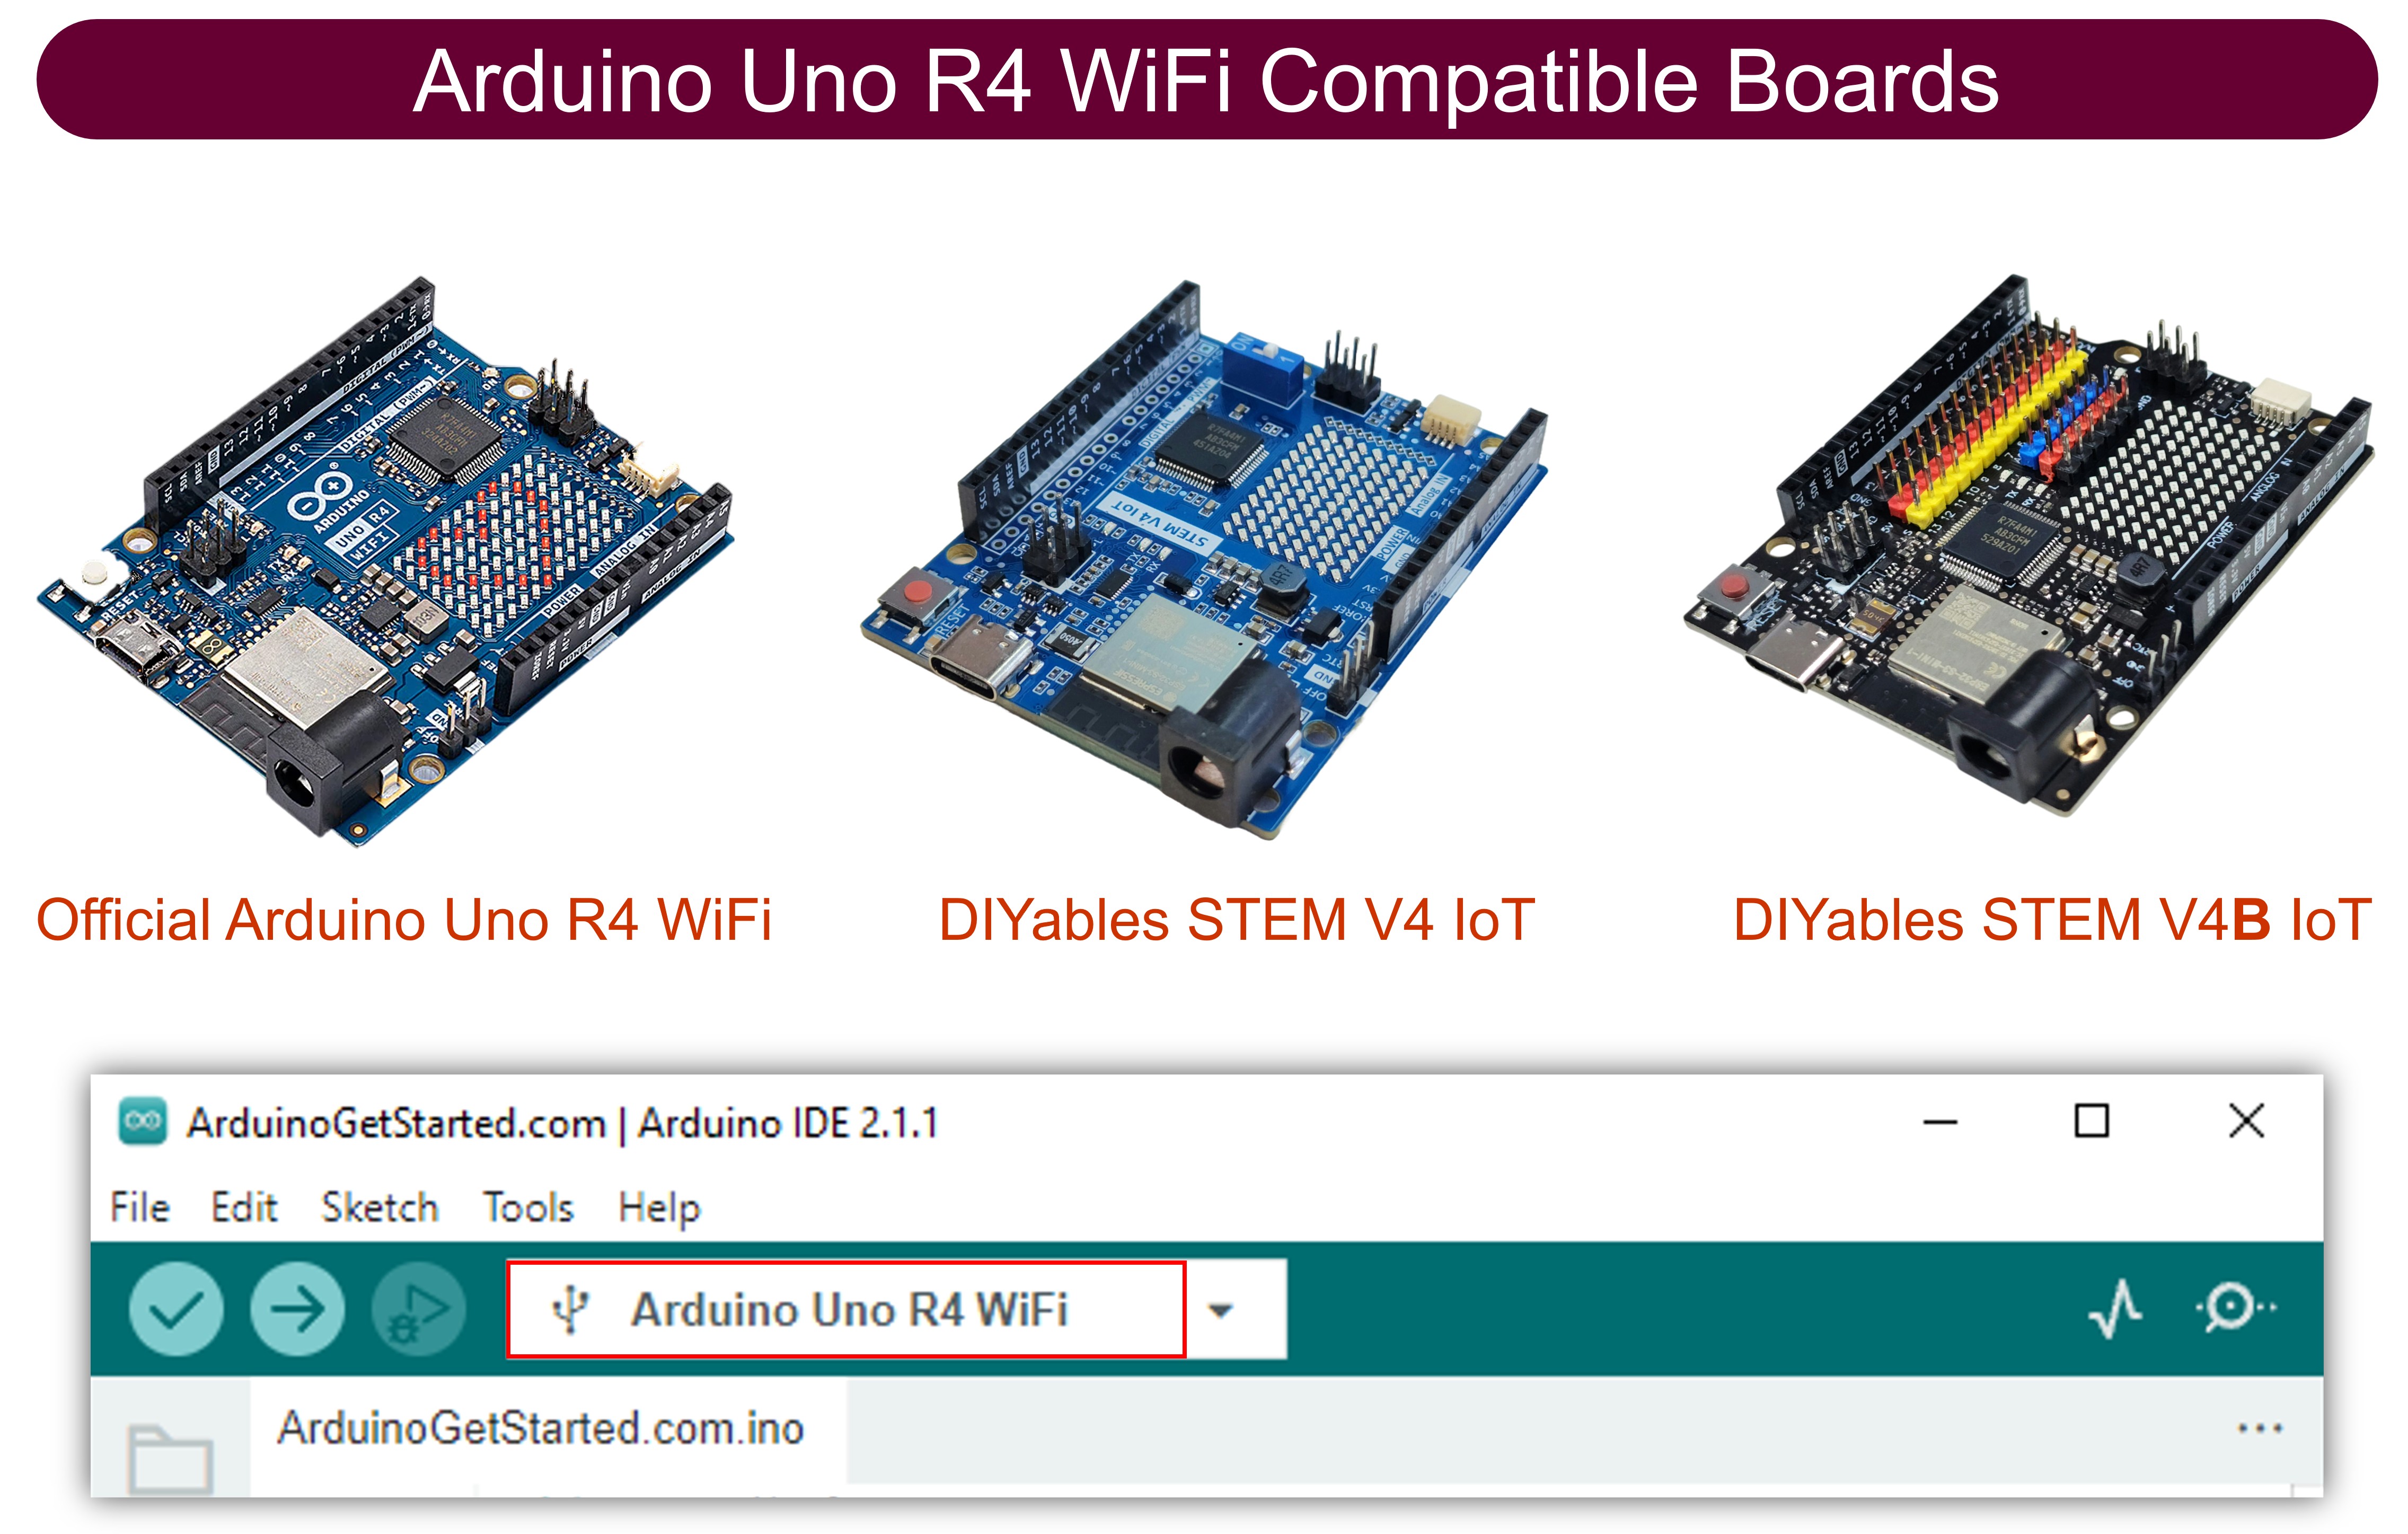
Phần Cứng Cần Thiết
| 1 | × | Arduino UNO R4 WiFi | Amazon | |
| 1 | × | Alternatively, DIYables STEM V4 IoT | Amazon | |
| 1 | × | Alternatively, DIYables STEM V4B IoT | Amazon | |
| 1 | × | (Tùy chọn) DIYables STEM V4 IoT | Amazon | |
| 1 | × | Cáp USB Type-C | Amazon | |
| 1 | × | (Khuyến nghị) Screw Terminal Block Shield for Arduino UNO R4 | Amazon | |
| 1 | × | (Khuyến nghị) Sensors/Servo Expansion Shield for Arduino UNO R4 | Amazon | |
| 1 | × | (Khuyến nghị) Breadboard Shield for Arduino UNO R4 | Amazon | |
| 1 | × | (Khuyến nghị) Enclosure for Arduino UNO R4 | Amazon | |
| 1 | × | (Khuyến nghị) Power Splitter for Arduino UNO R4 | Amazon | |
| 1 | × | (Khuyến nghị) Prototyping Base Plate & Breadboard Kit for Arduino UNO | Amazon |
Or you can buy the following kits:
| 1 | × | DIYables STEM V4 IoT Starter Kit (Arduino included) | Amazon | |
| 1 | × | DIYables Sensor Kit (18 sensors/displays) | Amazon |
Cách Bắt Đầu
Bạn có thể bắt đầu xây dựng ứng dụng web tùy chỉnh cho Arduino Uno R4/DIYables STEM V4 IoT board bằng cách thực hiện các bước chính sau:
- Chạy Template Custom App Mặc Định trên Bo Arduino
- Kiểm Tra và Xác Minh Custom Web App Mặc Định Hoạt Động Đúng
- Hiểu Giao Thức Giao Tiếp và Cách Hoạt Động Bên Trong
- Chỉnh Sửa Template để Phù Hợp với Ứng Dụng Của Bạn
- Quản Lý Nhiều Custom Web Apps - Hướng Dẫn Ngăn Ngừa Xung Đột Quan Trọng
Hãy bắt đầu từng bước một.
Chạy Template Custom App Mặc Định trên Bo Arduino
Các Bước Nhanh
- Nếu đây là lần đầu tiên bạn sử dụng Arduino Uno R4 WiFi/DIYables STEM V4 IoT, hãy tham khảo hướng dẫn Arduino UNO R4 - Cài Đặt Phần Mềm
- Kết nối bo Arduino Uno R4/DIYables STEM V4 IoT với máy tính bằng cáp USB
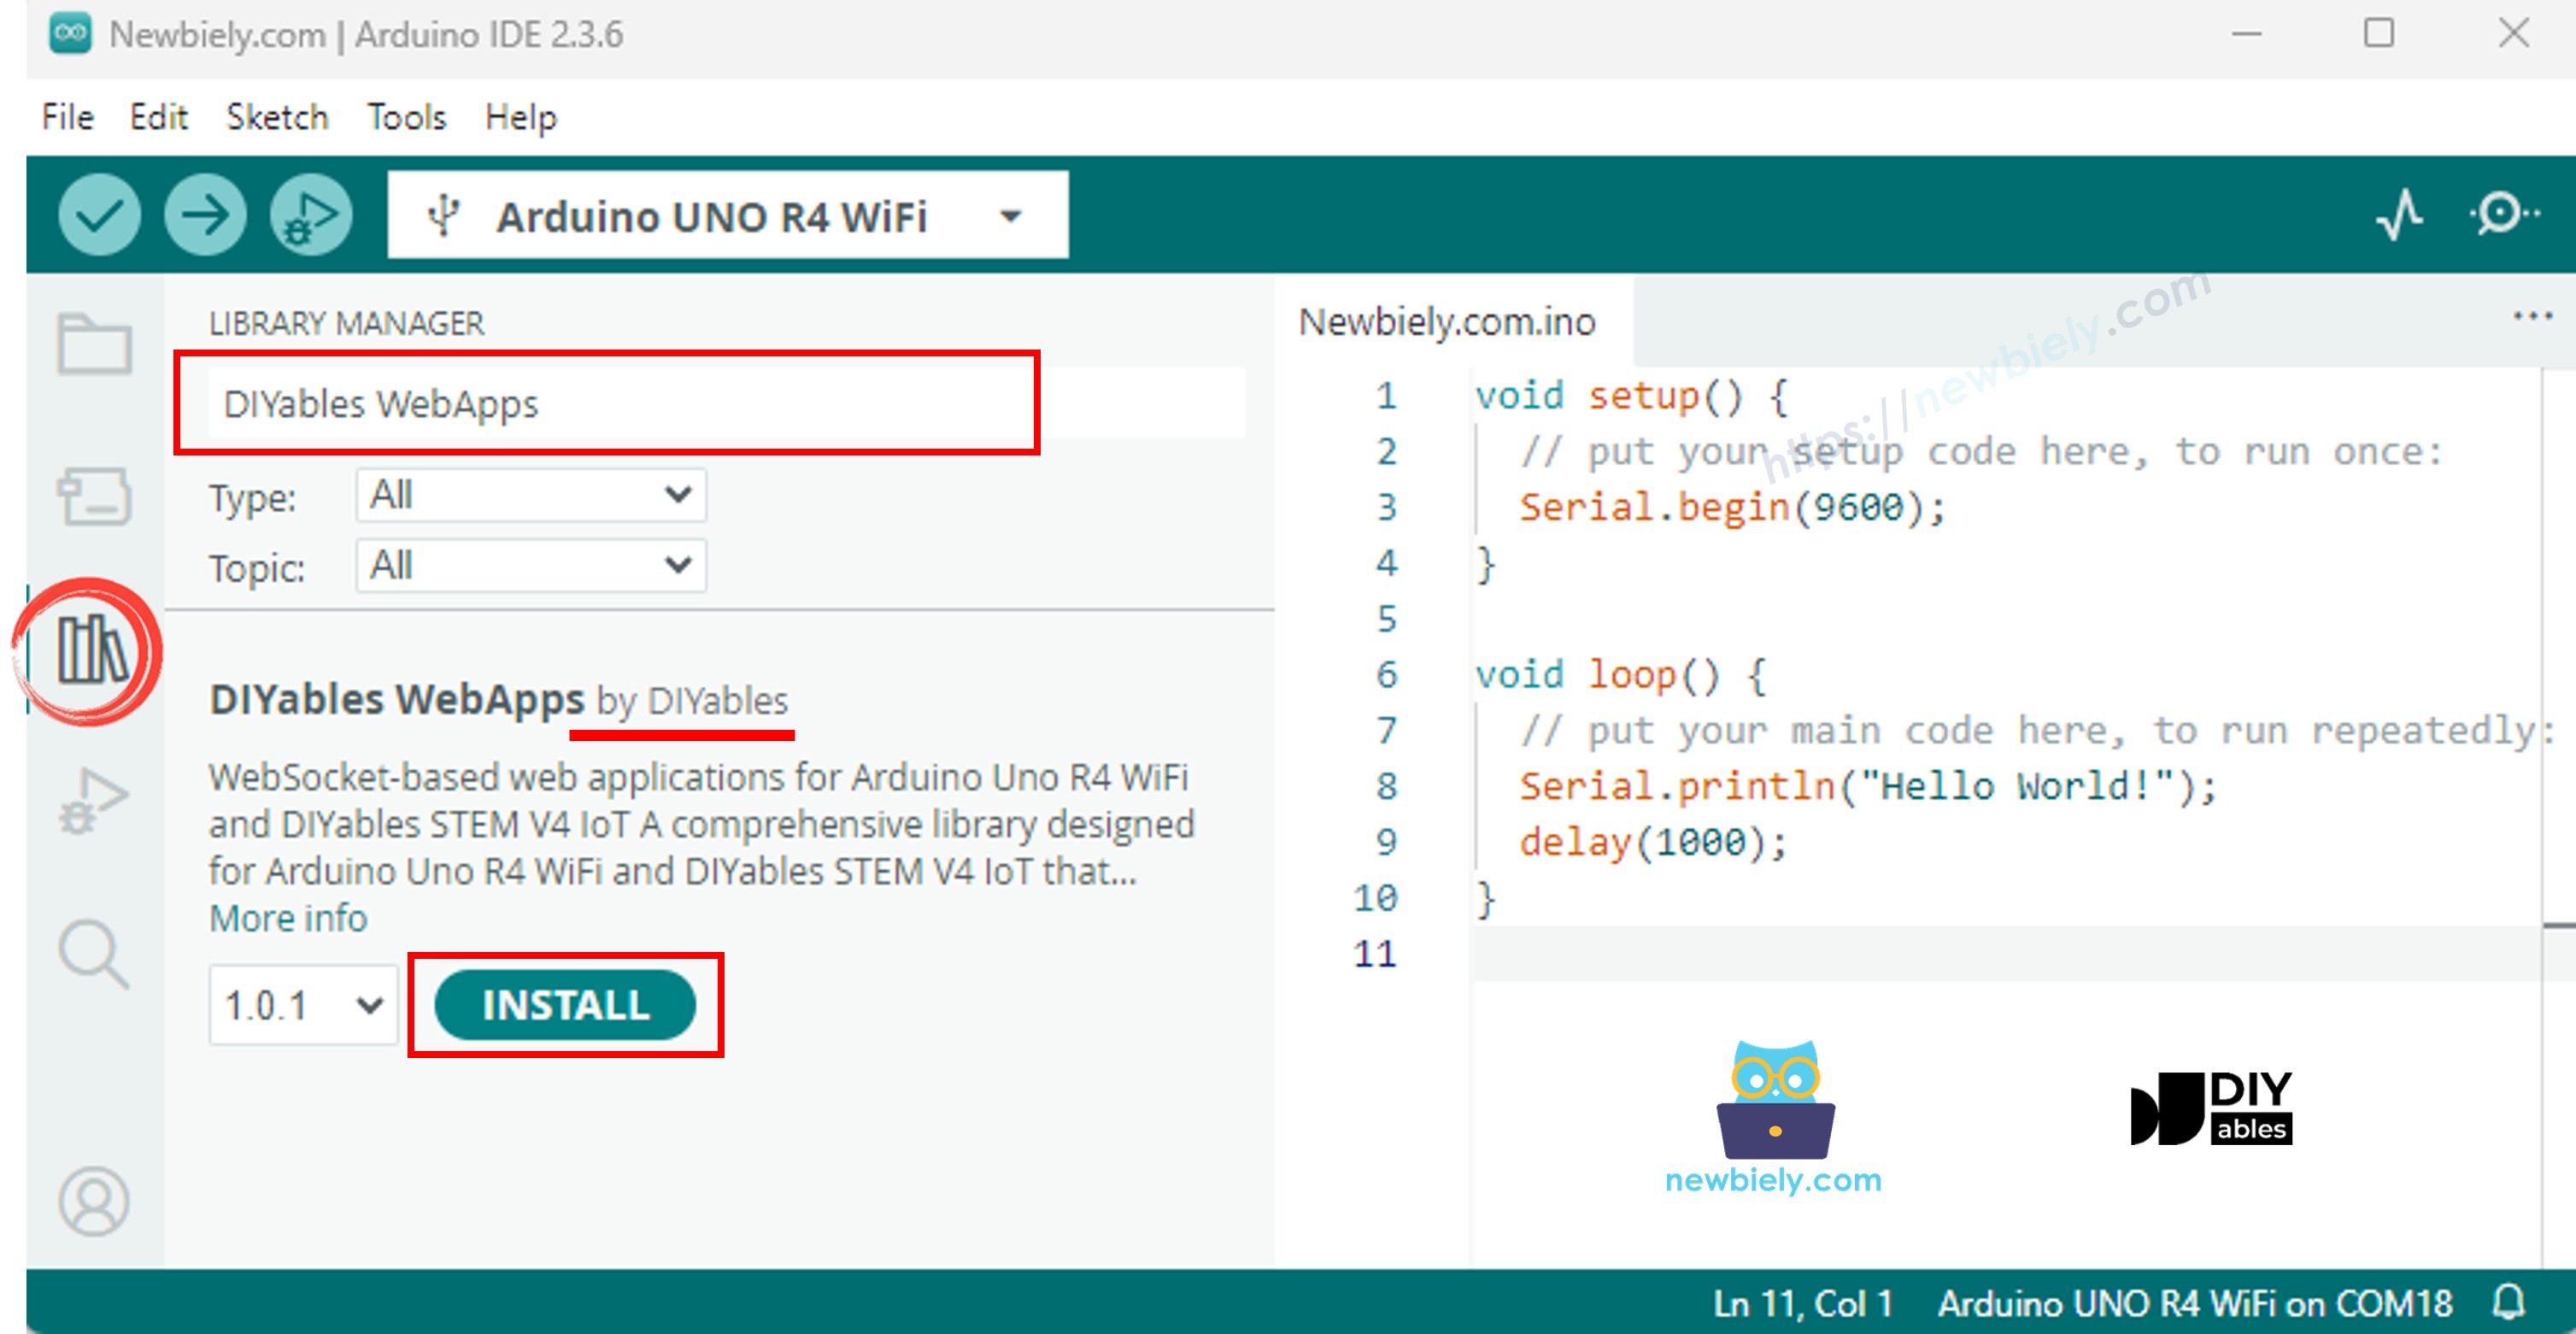
- Khởi động Arduino IDE trên máy tính
- Chọn bo Arduino Uno R4 phù hợp (ví dụ: Arduino Uno R4 WiFi) và cổng COM
- Điều hướng đến biểu tượng Libraries ở thanh bên trái của Arduino IDE
- Tìm kiếm "DIYables WebApps", sau đó tìm thư viện DIYables WebApps của DIYables
- Nhấp nút Install để cài đặt thư viện
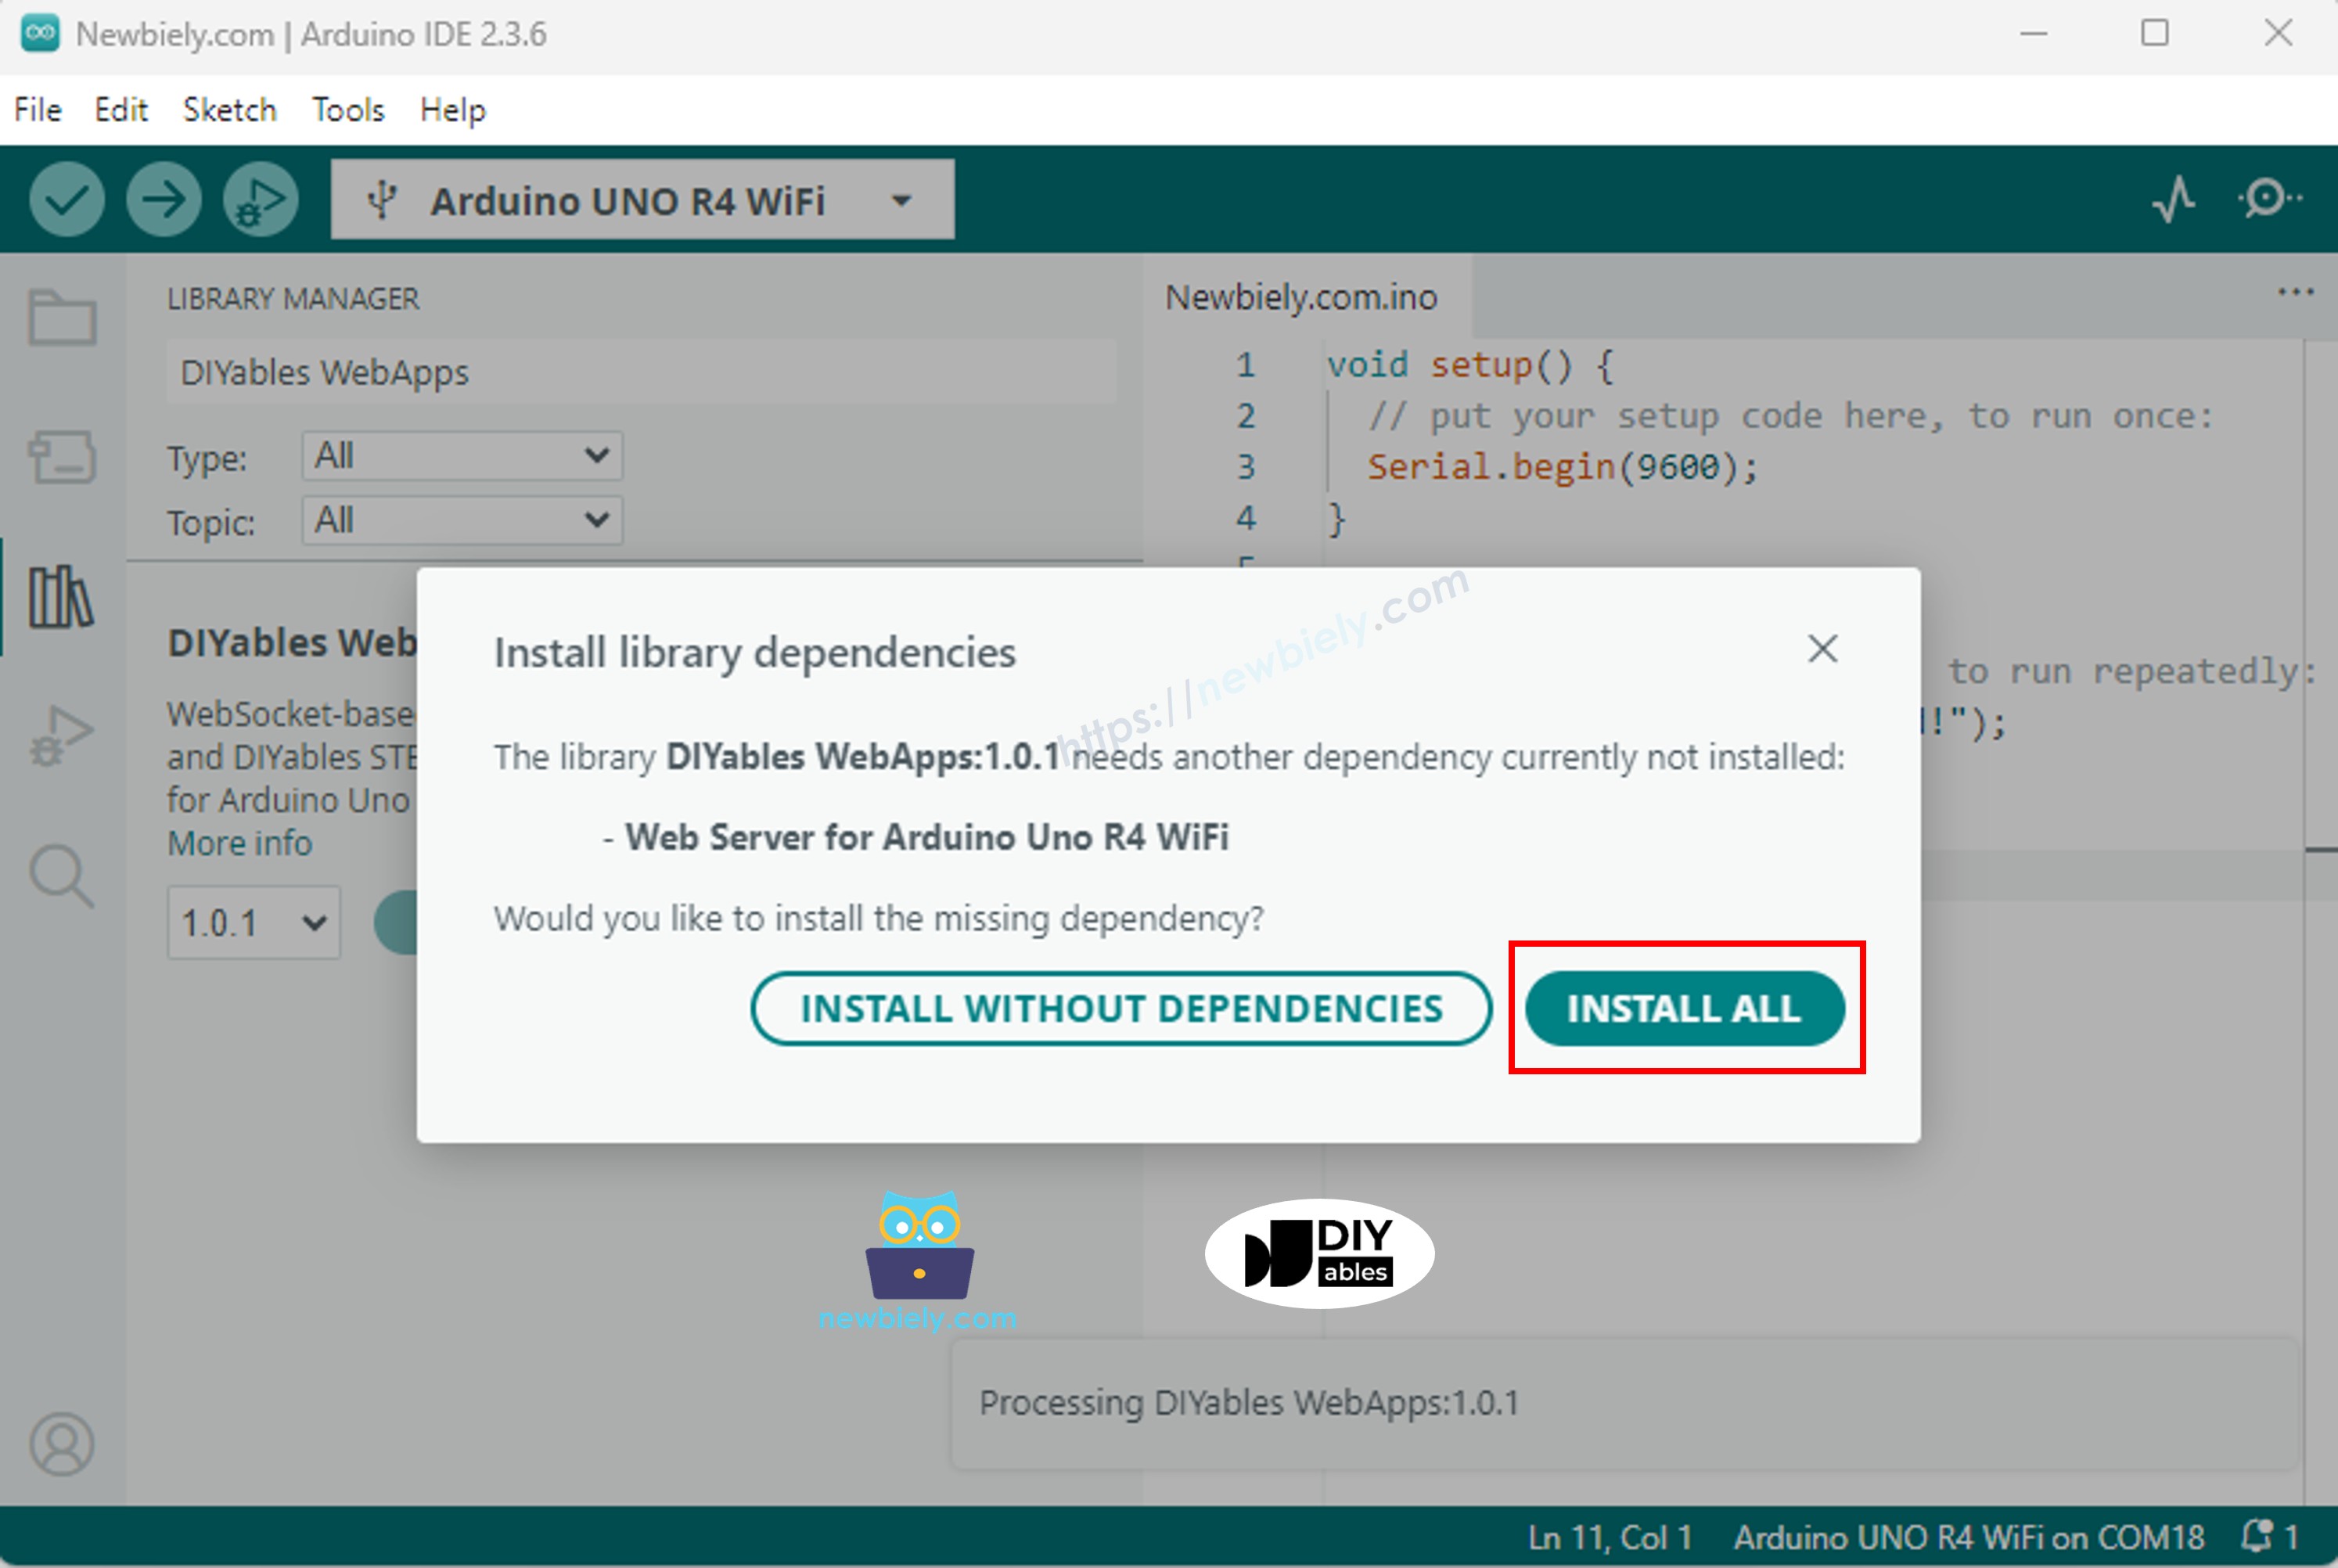
- Bạn sẽ được yêu cầu cài đặt một số thư viện phụ thuộc khác
- Nhấp nút Install All để cài đặt tất cả thư viện phụ thuộc
- Trong Arduino IDE, đi đến File > Examples > DIYables WebApps > CustomWebApp
- Bạn sẽ thấy 4 file tạo nên template custom web app hoàn chỉnh:
- CustomWebApp.ino - Code Arduino chính (đây là nơi bạn thêm logic tùy chỉnh!)
- CustomWebApp.h - File header (định nghĩa giao diện đến thư viện DIYables WebApps)
- CustomWebApp.cpp - File triển khai (xử lý tích hợp với framework thư viện)
- custom_page_html.h - Thiết kế trang web (tùy chỉnh giao diện web tại đây!)
- Cấu hình WiFi bằng cách thay đổi các dòng này trong CustomWebApp.ino:
Bước 5: Upload và Kiểm Tra
- Nhấp nút Upload trên Arduino IDE để upload code lên Arduino UNO R4/DIYables STEM V4 IoT
- Mở Serial Monitor để xem trạng thái kết nối
- Ghi nhớ địa chỉ IP hiển thị trong Serial Monitor
- Mở Serial Monitor
- Kiểm tra kết quả trên Serial Monitor. Nó sẽ giống như sau:
- Nếu bạn không thấy gì, hãy khởi động lại bo Arduino.
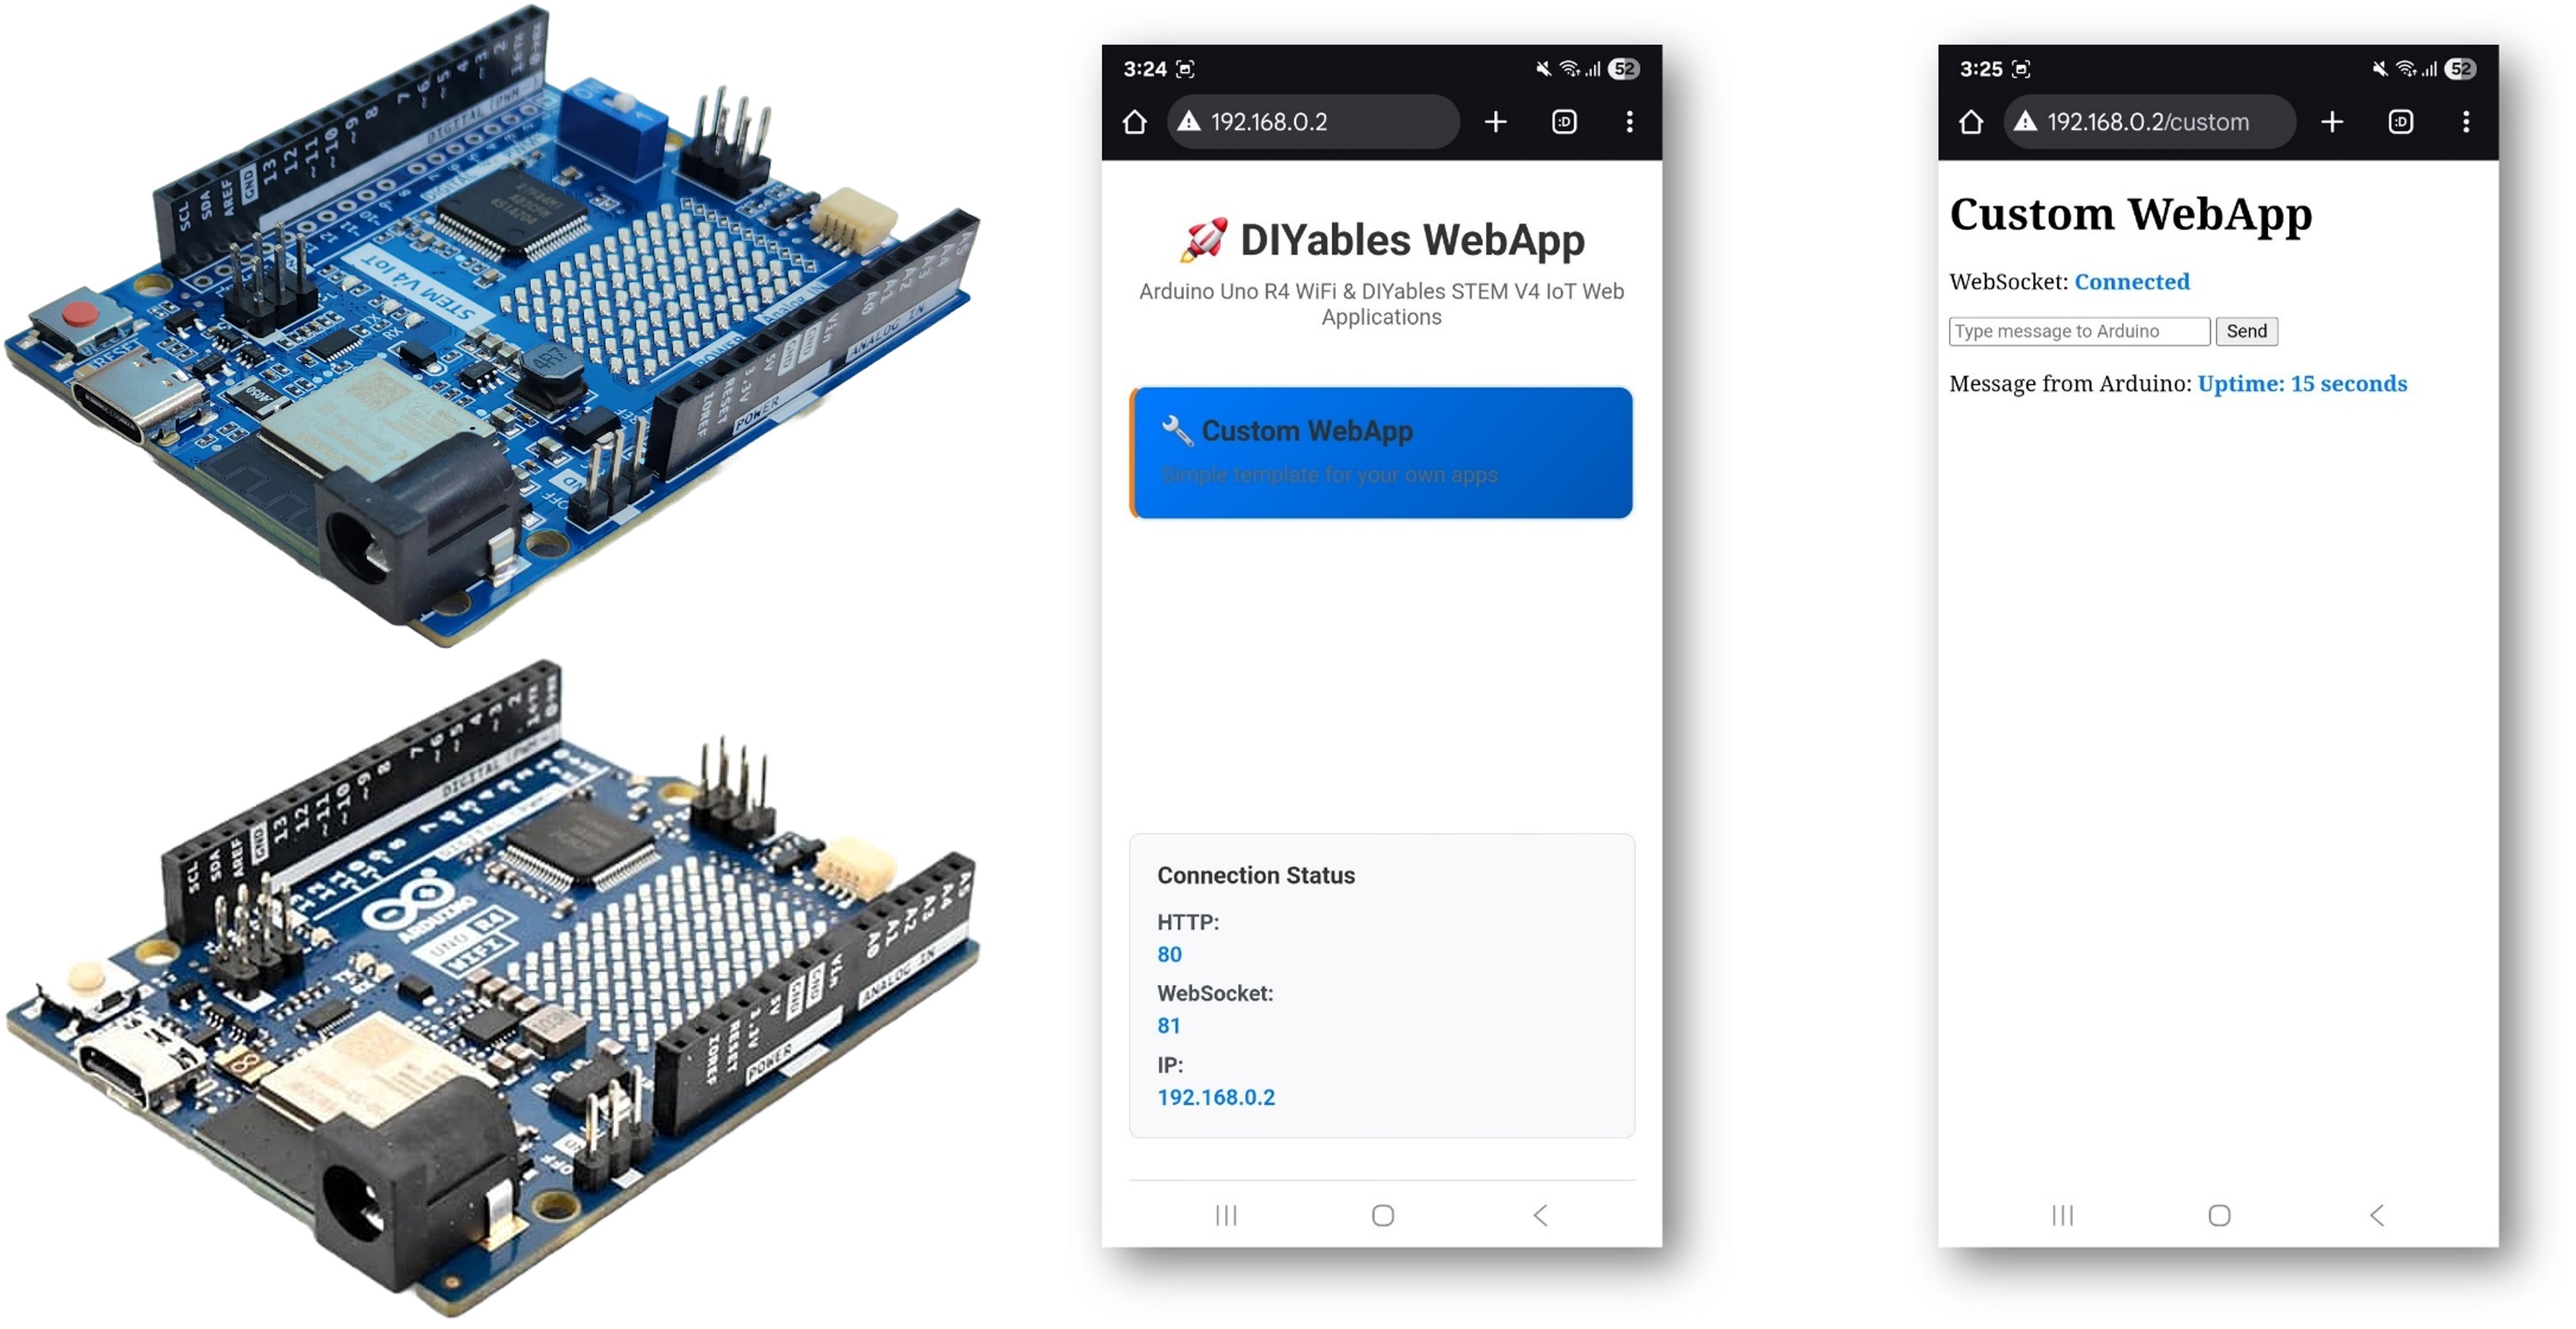
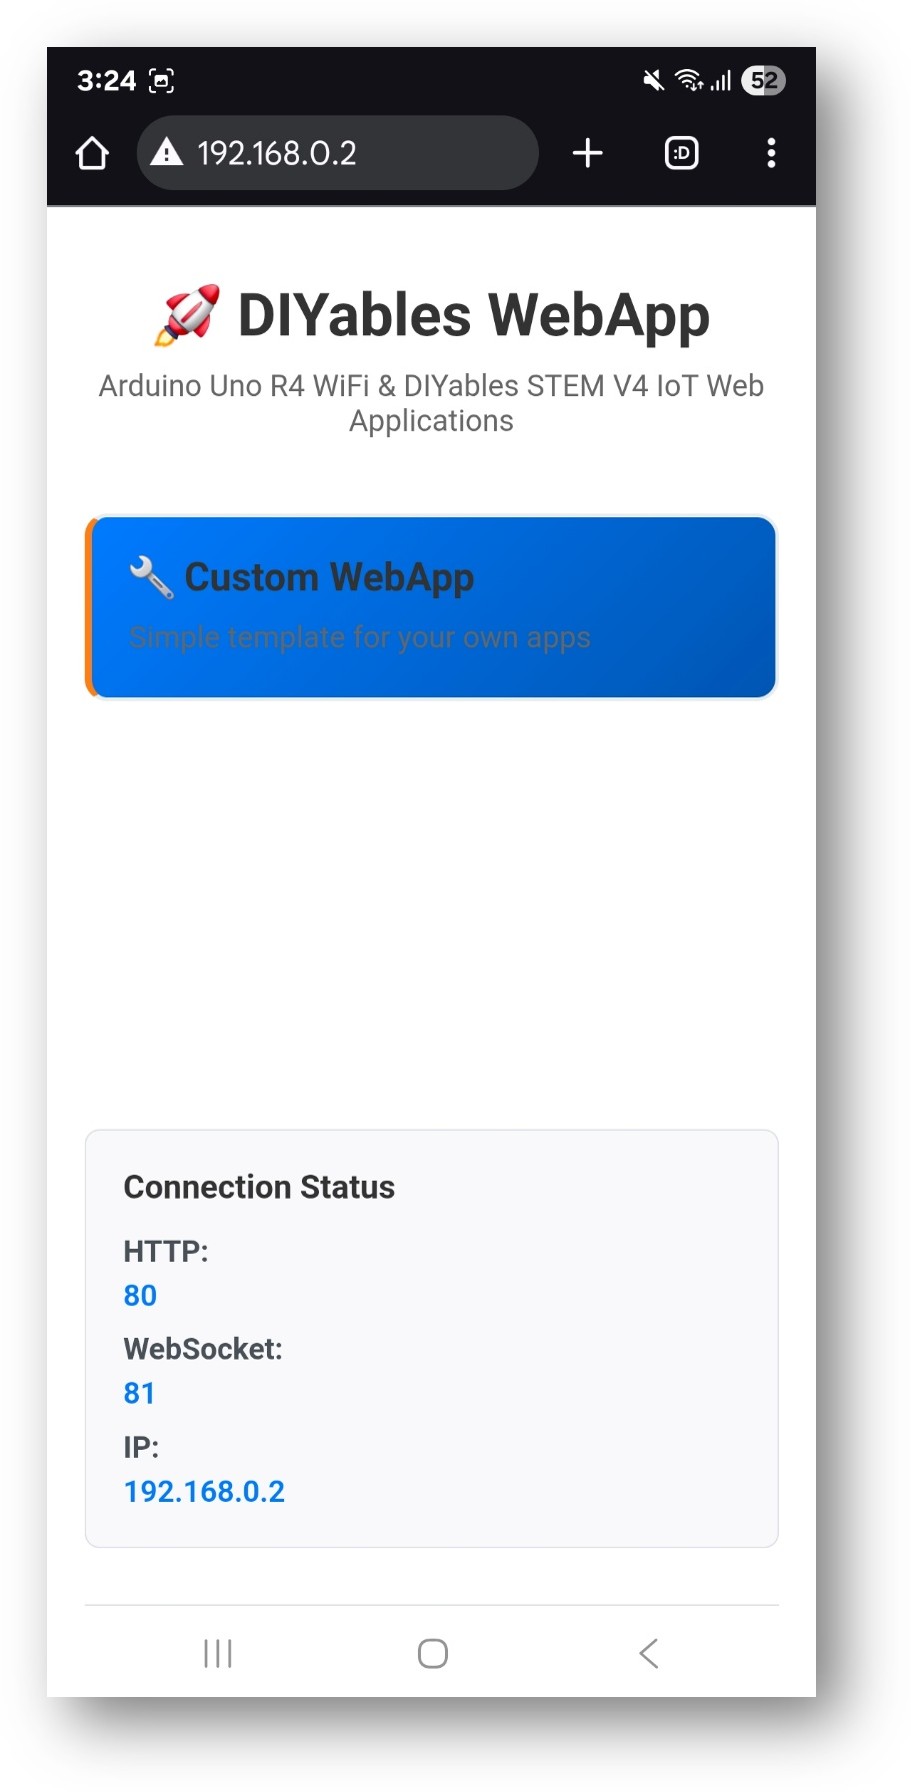
- Ghi nhớ địa chỉ IP hiển thị, và nhập địa chỉ này vào thanh địa chỉ của trình duyệt web trên smartphone hoặc PC.
- Ví dụ: http://192.168.0.2
- Bạn sẽ thấy trang chủ như hình dưới đây:
- Nhấp vào link Web Custom, bạn sẽ thấy giao diện của Web Custom app như sau:
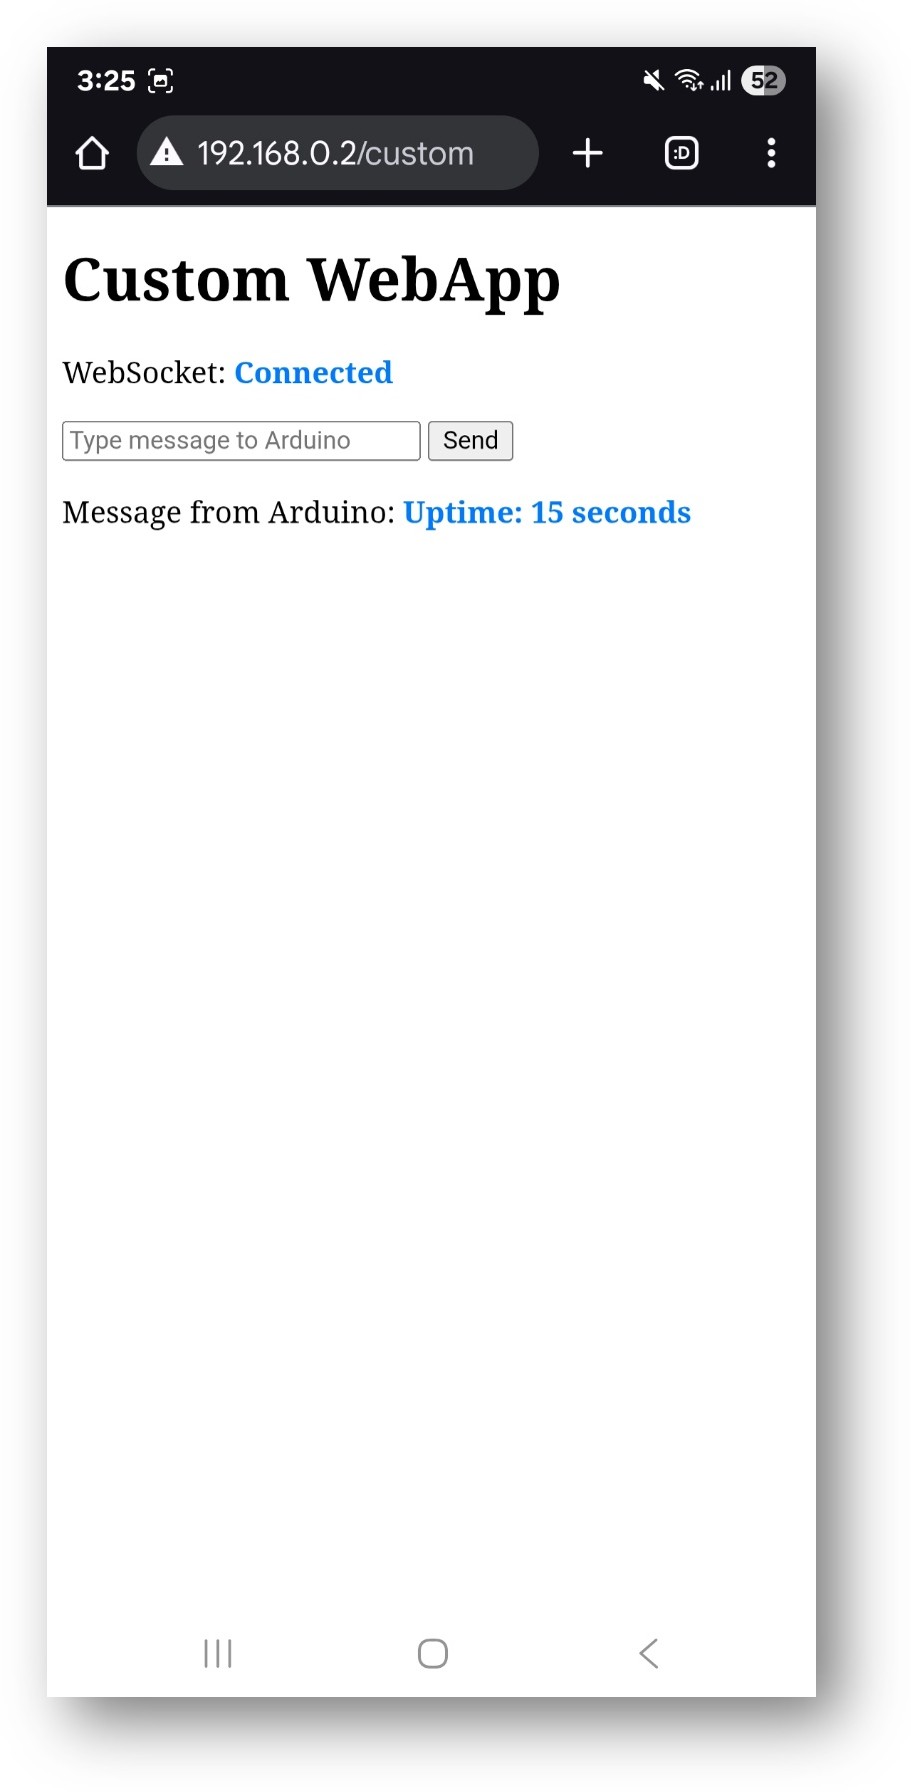
- Hoặc bạn cũng có thể truy cập trang trực tiếp bằng địa chỉ IP theo sau là /custom. Ví dụ: http://[IP_ADDRESS]/custom
Kiểm Tra và Xác Minh Custom Web App Mặc Định Hoạt Động Đúng
Khi bạn chạy template CustomWebApp mặc định, đây là những gì bạn sẽ thấy:
Trên Giao Diện Web:
- Trạng thái kết nối: Hiển thị "Connected" màu xanh khi WebSocket hoạt động
- Hộp nhập tin nhắn: Trường văn bản để gõ tin nhắn gửi đến Arduino
- Nút Send: Nhấp để gửi tin nhắn (hoặc nhấn Enter)
- Hiển thị tin nhắn Arduino: Hiển thị tin nhắn nhận từ Arduino bằng chữ xanh
Hoạt động của Arduino:
- Phản hồi Echo: Khi bạn gửi "Hello" từ web, Arduino phản hồi với "Echo: Hello"
- Cập nhật định kỳ: Arduino gửi tin nhắn uptime mỗi 5 giây: "Arduino uptime: X seconds"
- Serial Monitor: Tất cả tin nhắn nhận được được ghi lại để debug
Kiểm tra giao tiếp:
- Gõ tin nhắn vào hộp nhập (ví dụ: "test message")
- Nhấp Send hoặc nhấn Enter
- Kiểm tra Serial Monitor - bạn sẽ thấy: "Received from web: test message"
- Kiểm tra trang web - bạn sẽ thấy: "Echo: test message"
- Đợi vài giây - bạn sẽ thấy tin nhắn uptime định kỳ được cập nhật mỗi 3 giây (ví dụ: "Arduino uptime: 15 seconds", "Arduino uptime: 18 seconds", v.v.)
Hiểu Giao Thức Giao Tiếp và Cách Hoạt Động Bên Trong
Hiểu cơ chế bên trong giúp bạn tùy chỉnh template một cách hiệu quả.
Hệ Thống Định Danh App
Template CustomWebApp sử dụng các thẻ tin nhắn duy nhất (gọi là "App Identifiers") giúp code Arduino và web client lọc tin nhắn thuộc về chúng. Điều này rất quan trọng vì ứng dụng của bạn có thể bao gồm nhiều web app, và mỗi app cần xử lý chỉ tin nhắn của riêng mình trong khi bỏ qua những tin nhắn khác:
Phía Arduino (CustomWebApp.h & CustomWebApp.cpp)
Phía JavaScript (custom_page_html.h)
Lợi ích của thiết kế này:
- Nguồn duy nhất của sự thật: Thay đổi identifier ở một nơi cho mỗi ngôn ngữ
- Không có chuỗi ma thuật: Loại bỏ "CUSTOM:" được mã hóa cứng trong code
- An toàn kiểu: Sử dụng hằng số ngăn ngừa lỗi gõ
- Có thể mở rộng: Dễ dàng tạo nhiều custom app với identifier khác nhau
- Tránh xung đột dữ liệu giữa nhiều app: Mỗi app sử dụng identifier duy nhất để ngăn ngừa can thiệp tin nhắn
- Chuyên nghiệp: Tuân theo nguyên tắc thiết kế hướng đối tượng
Ghi chú quan trọng:
- Bạn có thể giữ identifier hiện tại "CUSTOM:" khi chỉnh sửa template custom web app này để phù hợp với dự án của bạn. Tuy nhiên, khi bạn tạo nhiều hơn một custom app, hãy chắc chắn thay đổi nó để tránh xung đột.
- Nếu thay đổi identifier, hãy đảm bảo rằng giá trị trong JavaScript (file .h) và code Arduino (file .cpp) giống nhau (ví dụ: cả hai đều sử dụng "TEMP:" hoặc cả hai đều sử dụng "SENSOR:").
- Identifier được dành riêng bởi built-in apps: Những identifier sau đã được sử dụng bởi các ứng dụng built-in DIYables WebApps và nên tránh:
- Main app identifiers: "CHAT:", "MONITOR:", "PLOTTER:", "DIGITAL_PINS:", "JOYSTICK:", "SLIDER:", "TABLE:", "RTC:", "ROTATOR:", "GAUGE:"
- Sub-protocol identifiers: "TIME:", "DATETIME:", "JOYSTICK_CONFIG:", "PLOTTER_DATA:", "PLOTTER_CONFIG:", "SLIDER_VALUES:", "TABLE_CONFIG:", "TABLE_DATA:", "VALUE_UPDATE:", "PIN_CONFIG:", "PIN_STATES:", "PIN_UPDATE:"
- JavaScript thêm identifier: JavaScript tự động thêm app identifier (là "CUSTOM:" trong template này) sử dụng hằng số APP_IDENTIFIER, sau đó gửi tin nhắn đến Arduino qua WebSocket. Tin nhắn thực tế được gửi là: CUSTOM:Hello
- Thư viện DIYables WebApps nhận: Thư viện nhận tin nhắn CUSTOM:Hello và chuyển nó đến method CustomWebAppPage::handleWebSocketMessage của bạn
- Class CustomWebAppPage loại bỏ identifier: Trong handleWebSocketMessage, class CustomWebAppPage kiểm tra xem tin nhắn có bắt đầu với APP_IDENTIFIER của nó không, loại bỏ identifier bằng .substring(APP_IDENTIFIER.length()), sau đó chuyển tin nhắn còn lại Hello bằng cách gọi callback function được triển khai trong file .ino của bạn
- Ứng dụng của bạn xử lý: Ứng dụng của bạn trong file .ino nhận chỉ Hello và có thể xử lý tin nhắn tùy thuộc vào logic tùy chỉnh của bạn. Template hiện tại chỉ in nó ra và gửi lại phản hồi
- Ứng dụng của bạn gọi sendToWeb(): Trong file .ino của bạn, bạn gọi customPage.sendToWeb("Temperature: 25°C") để gửi dữ liệu đến trình duyệt web
- Class CustomWebAppPage thêm identifier và broadcast: Class CustomWebAppPage tự động thêm app identifier sử dụng hằng số APP_IDENTIFIER vào tin nhắn của bạn và broadcast CUSTOM:Temperature: 25°C đến tất cả web client đã kết nối qua WebSocket
- JavaScript nhận và lọc tin nhắn: Trình duyệt web nhận CUSTOM:Temperature: 25°C thông qua event handler ws.onmessage, nhưng JavaScript chỉ xử lý tin nhắn bắt đầu với APP_IDENTIFIER và loại bỏ identifier bằng .substring(APP_IDENTIFIER.length())
- Trang web hiển thị tin nhắn sạch: Template hiện tại hiển thị tin nhắn sạch Temperature: 25°C (không có identifier) trong phần "Message from Arduino". Bạn có thể tùy chỉnh JavaScript để phân tích và hiển thị dữ liệu theo những cách khác nhau tùy thuộc vào nhu cầu ứng dụng của bạn
- CustomWebApp.ino - Sketch Arduino chính với logic ứng dụng của bạn
- CustomWebApp.h - File header định nghĩa custom page class (giao diện thư viện)
- CustomWebApp.cpp - Triển khai với logic giao tiếp (code thư viện)
- custom_page_html.h - Giao diện HTML tách biệt để dễ tùy chỉnh
Luồng Giao Tiếp
Từ Trang Web đến Arduino:
Khi bạn gõ tin nhắn trên giao diện web và nhấp nút send, ví dụ: Hello, luồng sau sẽ xảy ra:
Từ Arduino đến Trang Web:
Khi Arduino của bạn muốn gửi dữ liệu đến giao diện web, ví dụ: Temperature: 25°C, luồng sau sẽ xảy ra:
Tổng Quan Kiến Trúc
Ví dụ CustomWebApp bao gồm bốn file chính:
Chỉnh Sửa Template để Phù Hợp với Ứng Dụng Của Bạn
Template được thiết kế để dễ dàng tùy chỉnh theo nhu cầu cụ thể của bạn. Đây là cách để điều chỉnh nó:
1. Tích Hợp Phần Cứng
Thêm Khởi Tạo Phần Cứng
Trong hàm setup() của CustomWebApp.ino:
Xử Lý Lệnh Tùy Chỉnh
Mở rộng callback function để xử lý lệnh tùy chỉnh của bạn:
Gửi Dữ Liệu Cảm Biến Thời Gian Thực
2. Tùy Chỉnh Giao Diện Web
Chỉnh Sửa Bố Cục HTML
Chỉnh sửa HTML trong custom_page_html.h để thay đổi giao diện:
Tùy Chỉnh Xử Lý JavaScript
Cập nhật hàm ws.onmessage để xử lý các loại dữ liệu cụ thể:
Thêm Styling
Tùy chỉnh CSS cho ứng dụng của bạn:
Other Customization
Beyond modifying the web interface and hardware integration, you can also customize how your app appears in the DIYables WebApps ecosystem:
1. Customize App Path
You can change the URL path where your custom web app is accessible by modifying the constructor in your header file:
Default Path:
Custom Path Examples:
Important Notes:
- Path must start with "/": Always begin your path with a forward slash
- Use descriptive names: Choose paths that clearly describe your app's function
- Avoid conflicts: Don't use paths already taken by built-in apps like /chat, /monitor, /plotter, etc.
- Use lowercase and hyphens: Follow web URL conventions for better compatibility
2. Customize App Card on Home Page
You can customize how your app appears on the DIYables WebApps home page by modifying the getNavigationInfo() method in your implementation file:
Basic App Card:
Advanced App Card with Inline CSS:
Manage Multiple Custom Web Apps - Essential Conflict Prevention Guide
When developing multiple custom web applications, it's crucial to avoid conflicts between different apps. Let's suppose that we want to add three custom apps named "Temperature Monitor", "Motor Controller", and "Sensor Dashboard" to our Arduino project. Here's how to ensure they work together harmoniously:
1. Use Unique App Identifiers
Each custom web app must have a unique identifier to prevent message conflicts:
Example: Temperature Monitor App
Example: Motor Controller App
Example: Sensor Dashboard App
2. Use Unique Page Paths
Each web app needs a unique URL path:
3. Use Unique Class Names
Avoid naming conflicts by using descriptive class names:
4. Organize Multiple Apps in One Project
Here's how to structure a project with multiple custom apps:
5. Best Practices for Multiple Apps
File Organization
Navigation Between Apps
Update the getNavigationInfo() method in each app to provide easy navigation:
6. Testing Multiple Apps
When testing multiple apps:
- Test each app individually first
- Check Serial Monitor for message conflicts
- Verify unique identifiers are working correctly
- Test navigation between different apps
- Monitor memory usage with multiple apps loaded
By following these guidelines, you can create multiple custom web applications that work together seamlessly without interfering with each other or with other DIYables WebApps.
Real-World Example
Want to see a complete project built using this custom web app template? Check out this color sensor project that demonstrates how to create a fully functional web application:
📱 Tutorial for Web App: Arduino Uno R4 - Color Sensor via Web
This example shows a complete implementation featuring:
- Real-time color detection display
- Interactive web interface for sensor readings
- WebSocket communication for instant updates
- Mobile-responsive design
🎥 Video Tutorial: Watch the complete build and demonstration on YouTube
This project is an excellent reference for understanding how to adapt the custom web app template for your own sensor projects!
Bài hướng dẫn liên quan
📱 Ứng dụng đề xuất
 English for KidsHọc tiếng Anh vui nhộn cho trẻ nhỏ.Tải về trênGoogle PlayTải về trênApp Store
 Bubble NoteGhi chú tự xóa — viết như nhắn tin.Tải về trênGoogle PlayTải về trênApp Store
 Tôi Không MuaĐánh bại mua sắm bốc đồng, tiết kiệm hơn.Tải về trênGoogle PlayTải về trênApp Store
 Con Đường Tri ThứcBài thi thử để học mọi thứ.Tải về trênGoogle PlayTải về trênApp Store