Arduino UNO R4 Màn Hình OLED SSD1309 128x64 | Hướng Dẫn OLED I2C 2.42 inch
Màn hình Organic Light-Emitting Diode (OLED) có các pixel tự phát sáng tạo ra màu đen thực sự, tỷ lệ tương phản vượt trội và góc nhìn tuyệt vời từ mọi hướng — mang lại lợi thế đáng kể so với công nghệ LCD truyền thống. Chip điều khiển SSD1309 cung cấp năng lượng cho các module OLED đơn sắc 2.42-inch (còn được gọi là 2.4-inch) 128×64 sử dụng giao tiếp I2C.
Hướng dẫn thực hành này sẽ dẫn bạn qua việc kết nối OLED SSD1309 128×64 với bo mạch Arduino Uno R4 thông qua thư viện DIYables_OLED_SSD1309. Bạn sẽ khám phá cách:
- Kết nối OLED SSD1309 2.42-inch với Arduino Uno R4 sử dụng bus I2C
- Hiển thị chuỗi văn bản và giá trị số trên màn hình
- Định vị văn bản ở giữa theo chiều ngang và dọc
- Vẽ các hình học cơ bản (đường thẳng, hình chữ nhật, hình tròn, tam giác, hình bo góc)
- Hiển thị đồ họa bitmap đơn sắc
- Kích hoạt cuộn phần cứng theo nhiều hướng
- Điều khiển độ sáng và mức độ tương phản của màn hình
- Tích hợp phông chữ tùy chỉnh từ thư viện font Adafruit GFX
Phần Cứng Cần Thiết
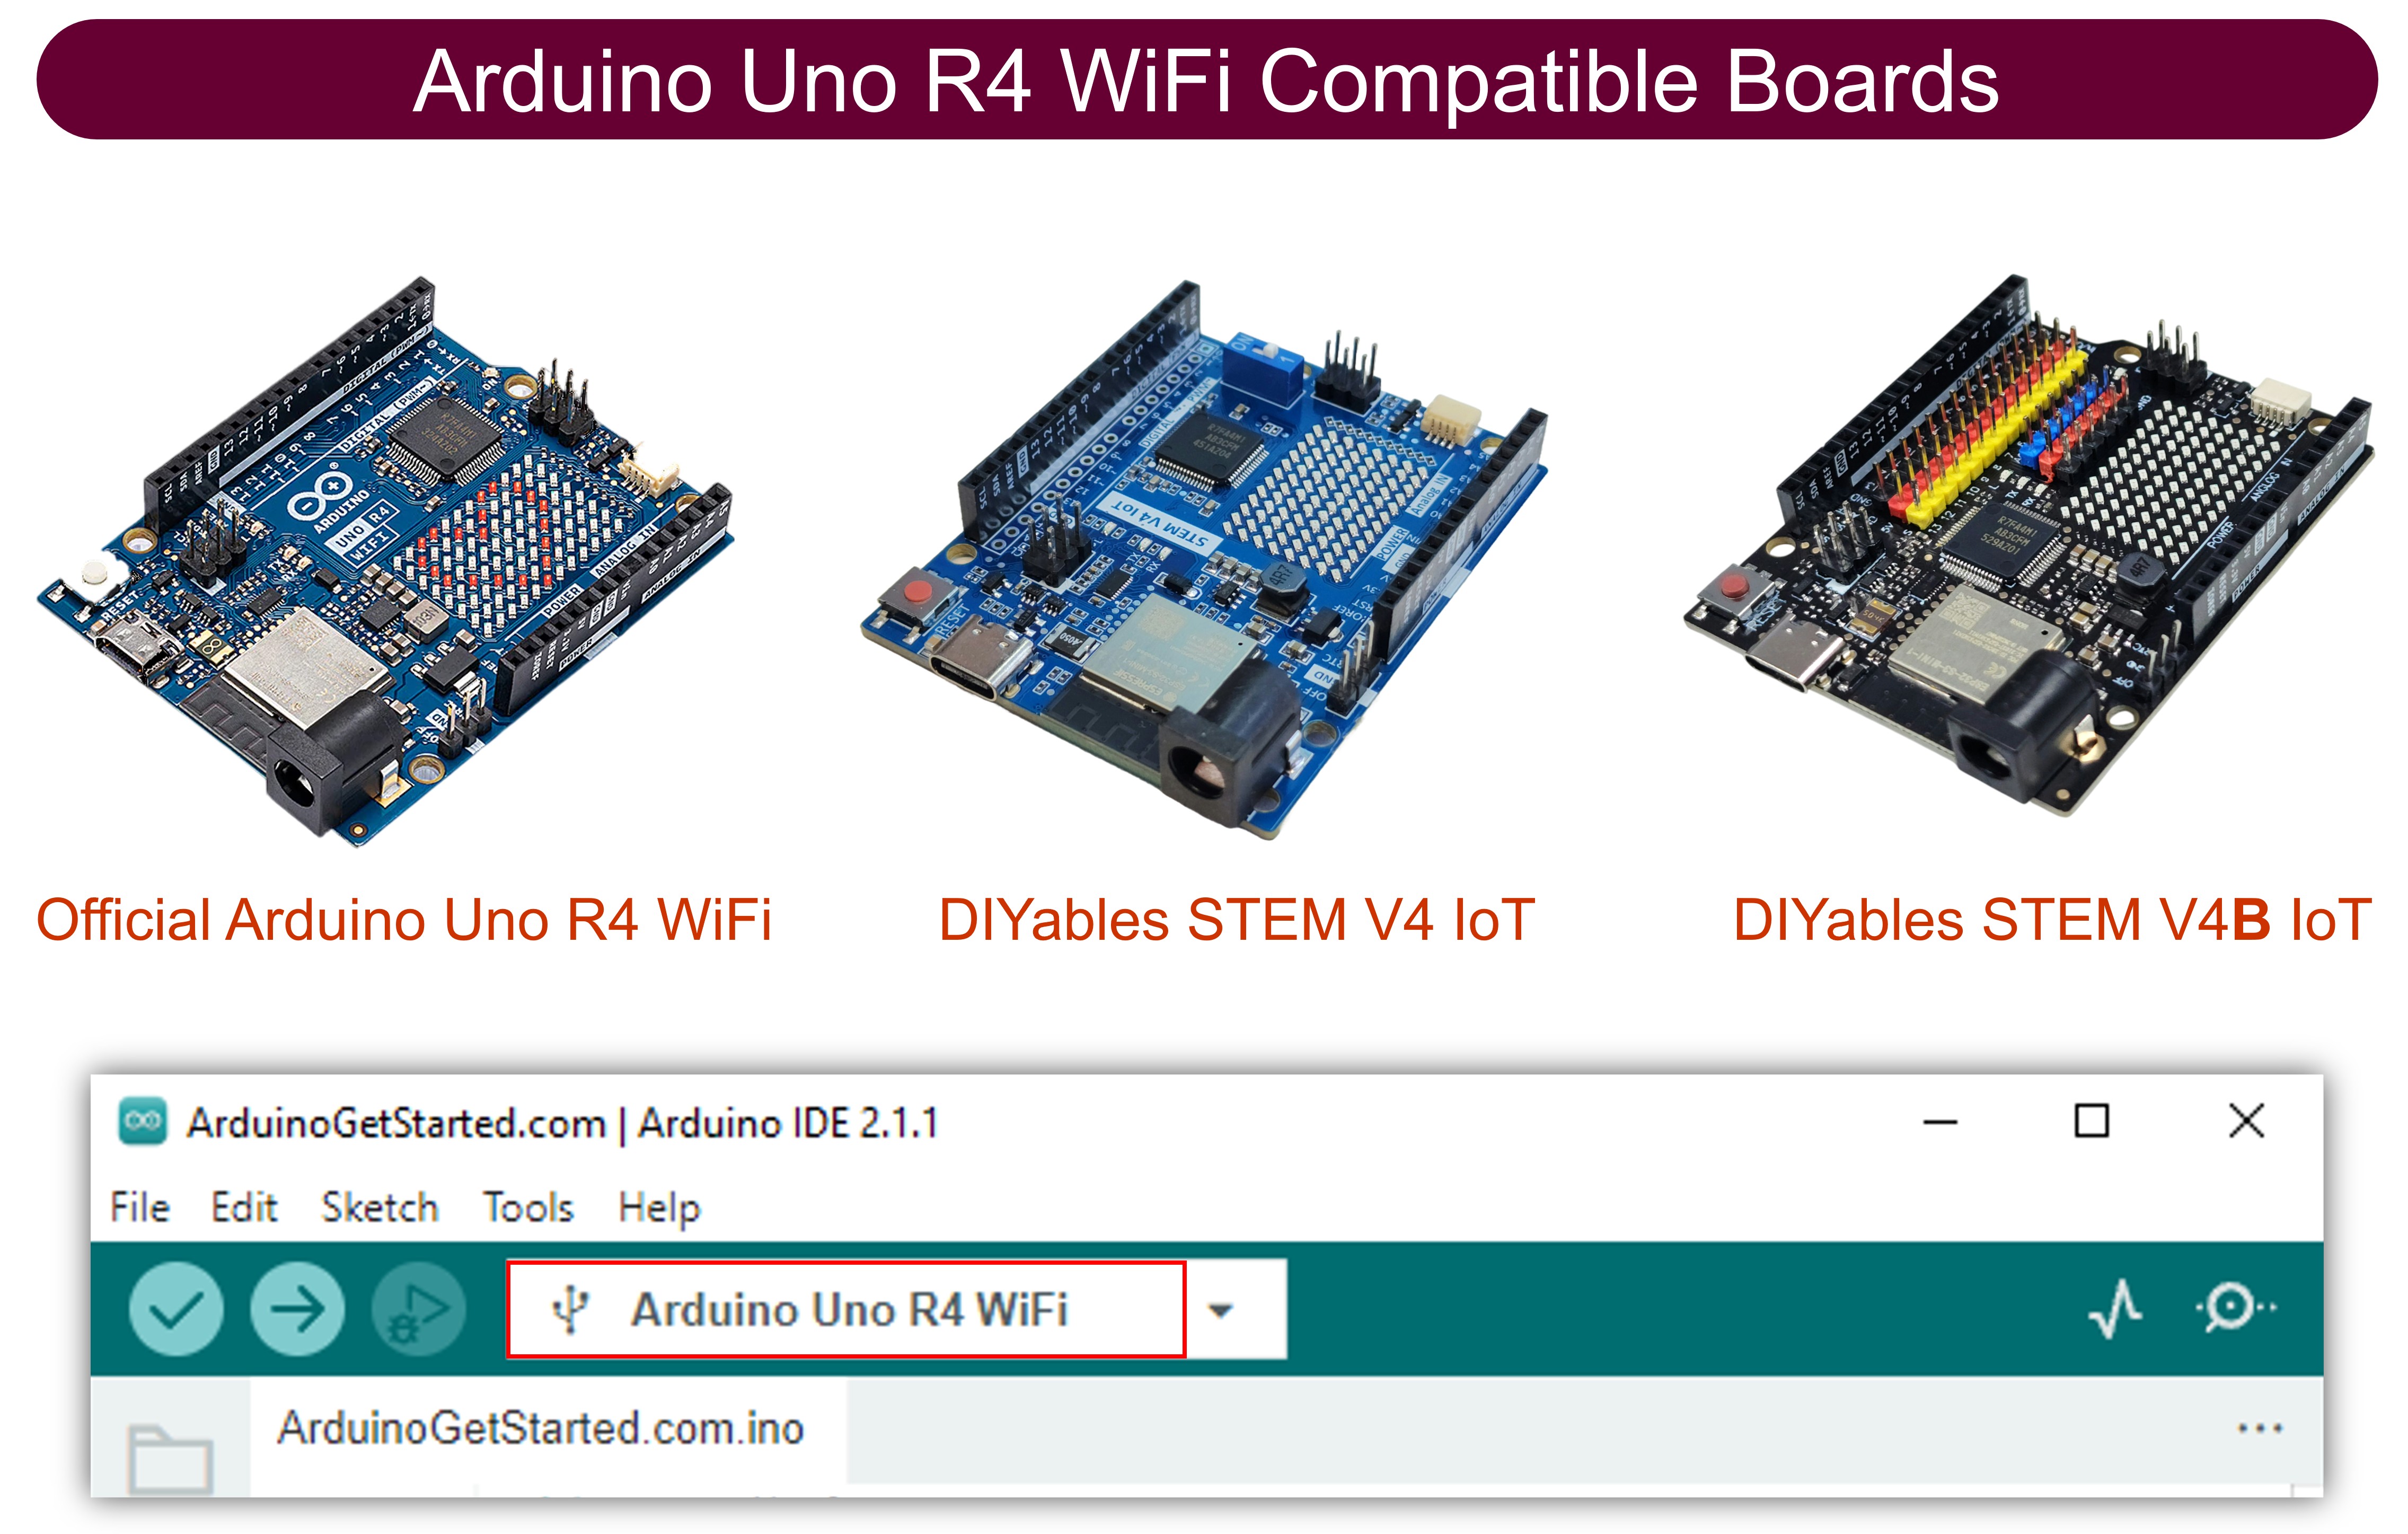
| 1 | × | Arduino Uno R3 R4 WiFi | Amazon | |
| 1 | × | Arduino Uno R3 R4 Minima (Thay thế) | Amazon | |
| 1 | × | Cáp USB Type-C | Amazon | |
| 1 | × | Màn Hình OLED I2C SSD1309 128x64 (2.42 inch) | Amazon | |
| 1 | × | Dây Jumper | Amazon | |
| 1 | × | (Khuyến nghị) Screw Terminal Block Shield for Arduino UNO R4 | Amazon | |
| 1 | × | (Khuyến nghị) Sensors/Servo Expansion Shield for Arduino UNO R4 | Amazon | |
| 1 | × | (Khuyến nghị) Breadboard Shield for Arduino UNO R4 | Amazon | |
| 1 | × | (Khuyến nghị) Enclosure for Arduino UNO R4 | Amazon | |
| 1 | × | (Khuyến nghị) Power Splitter for Arduino UNO R4 | Amazon | |
| 1 | × | (Khuyến nghị) Prototyping Base Plate & Breadboard Kit for Arduino UNO | Amazon |
Or you can buy the following kits:
| 1 | × | DIYables Sensor Kit (18 sensors/displays) | Amazon |
Về Màn Hình OLED SSD1309 2.42-Inch
SSD1309 hoạt động như một IC điều khiển CMOS chuyên dụng được thiết kế cho ma trận OLED 128×64 pixel. Bộ thanh ghi của nó tương thích với SSD1306 phổ biến, cho phép tái sử dụng code với những điều chỉnh nhỏ. Những điểm khác biệt phần cứng đáng chú ý bao gồm:
- Yêu cầu nguồn bên ngoài — khác với bơm điện tích tích hợp của SSD1306, SSD1309 dựa vào nguồn cung cấp VCC bên ngoài. Tuy nhiên, các bo mạch breakout có sẵn trên thị trường (bao gồm các biến thể 2.42-inch và 2.4-inch) tích hợp bộ chuyển đổi tăng áp onboard, làm cho sự khác biệt này trở nên trong suốt khi sử dụng.
- Dải điện áp mở rộng — SSD1309 xử lý đầu vào VCC lên đến 16 V, trong khi SSD1306 giới hạn ở khoảng 4.2 V.
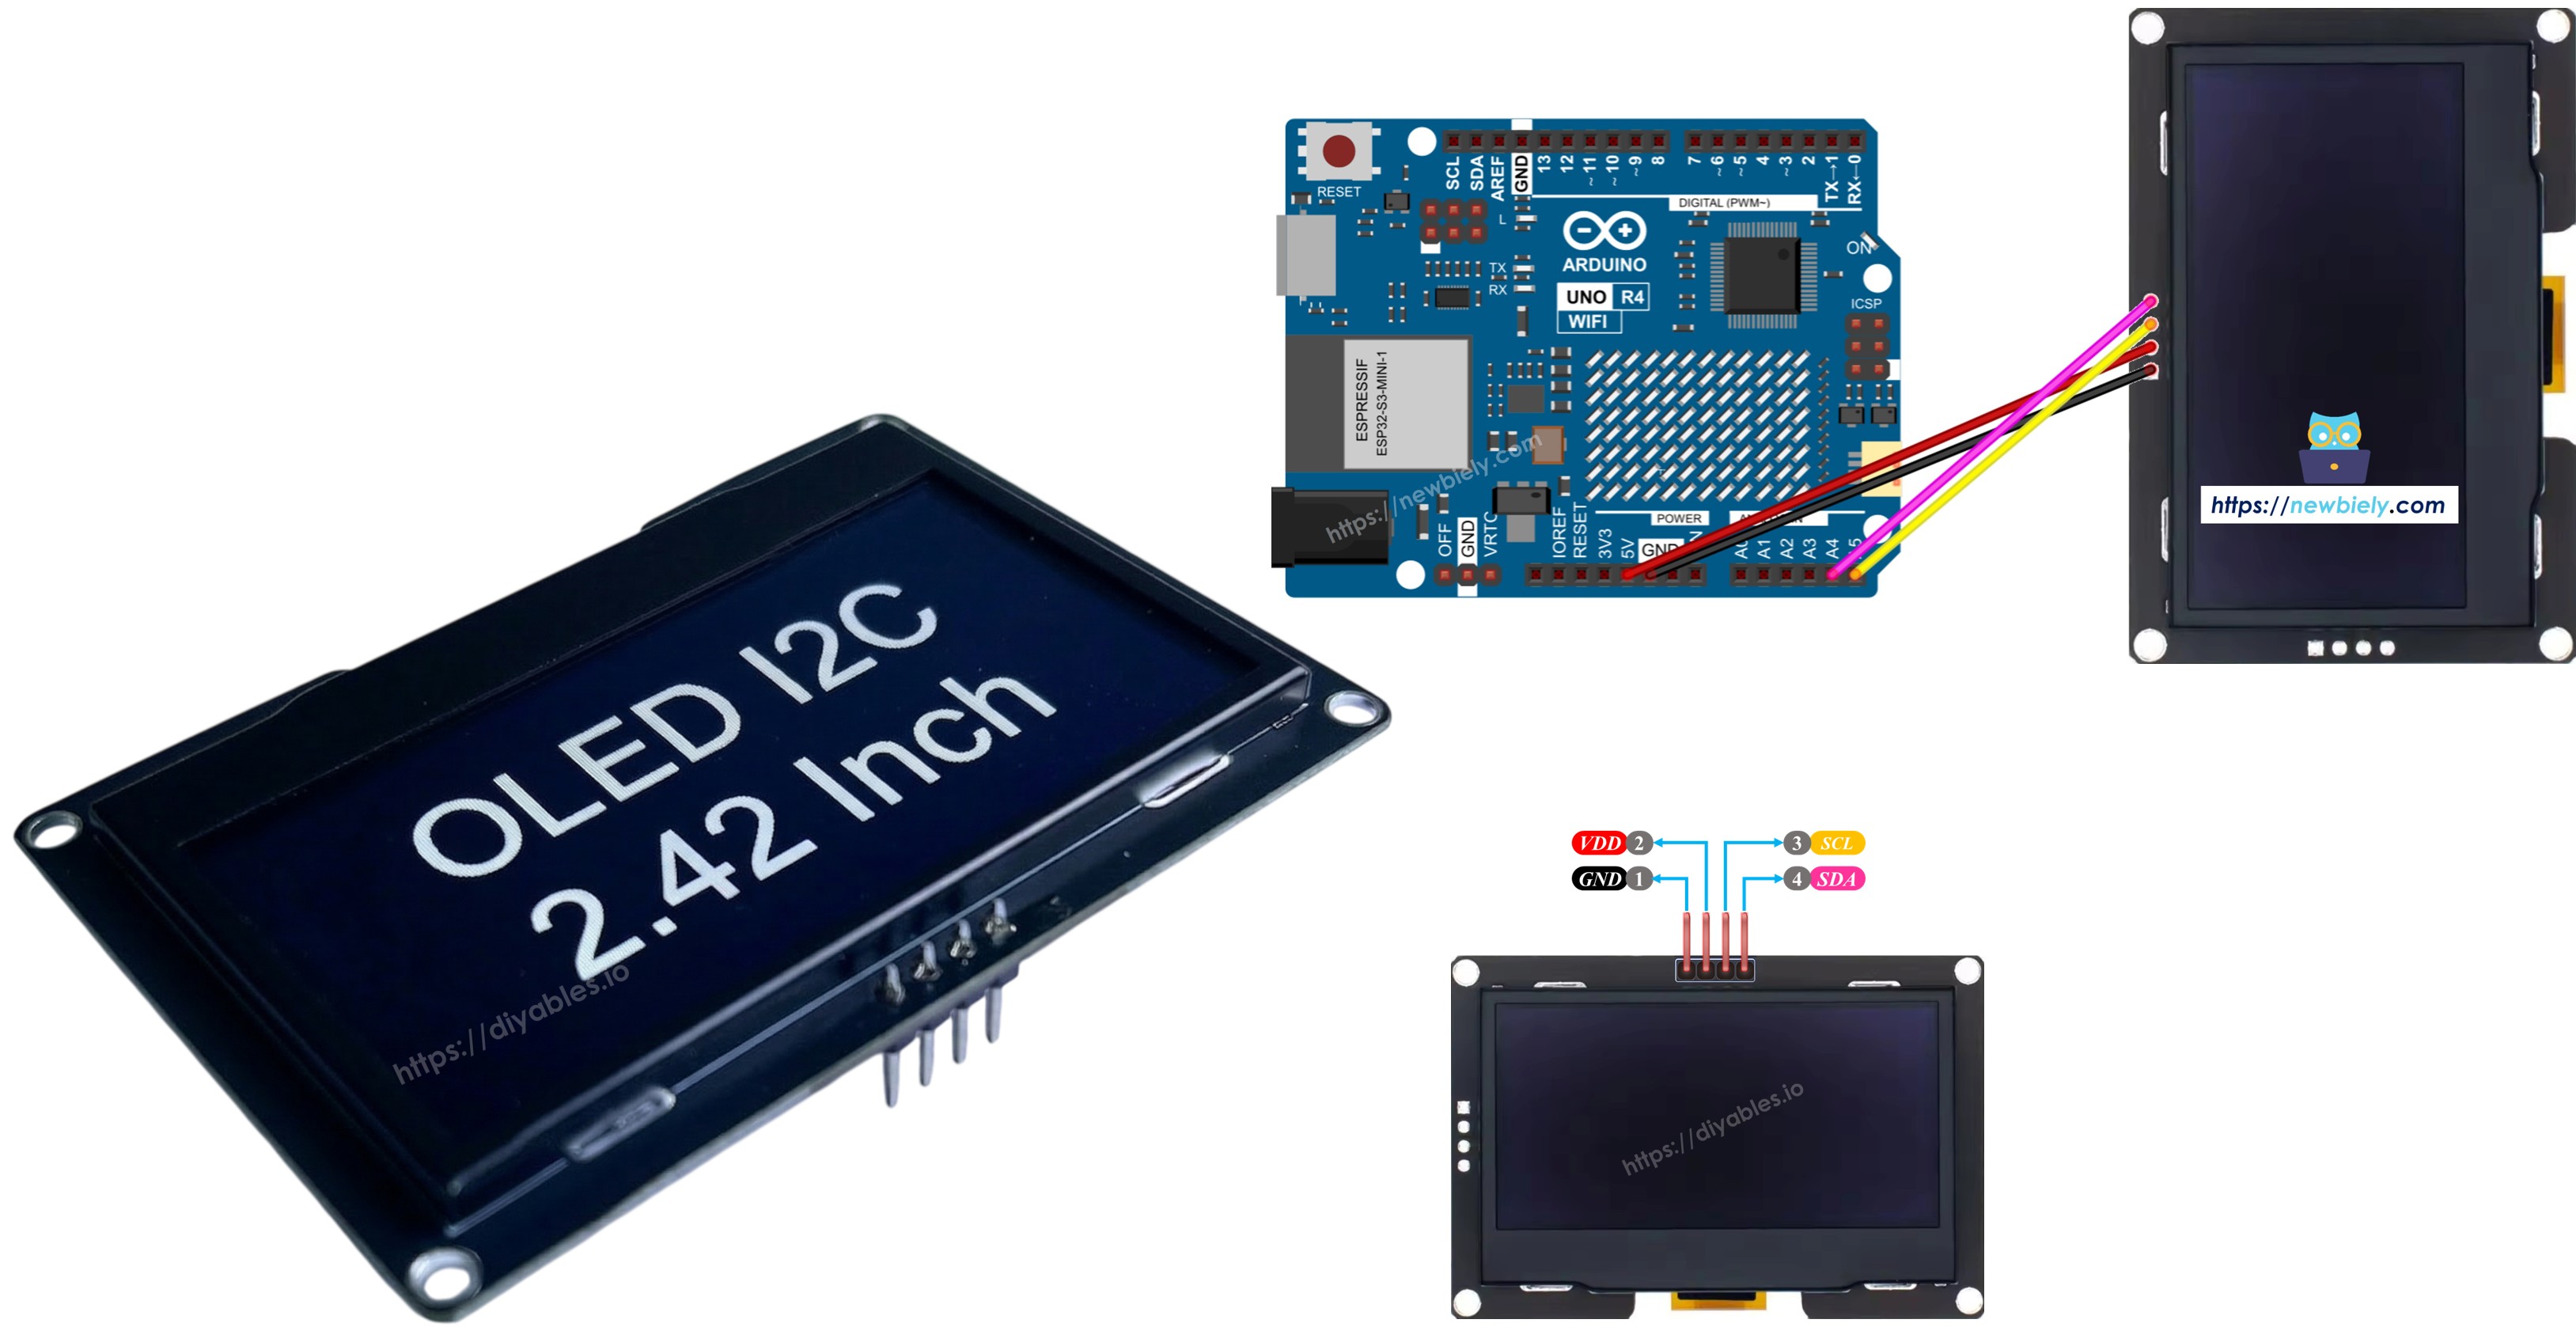
Module OLED 2.42 inch (2.4 inch) thường sử dụng bộ điều khiển SSD1309 và cung cấp màn hình độ phân giải 128×64 giao tiếp qua giao thức I2C. Màu hiển thị (trắng, xanh dương, vàng, xanh lá hoặc vùng hai màu) phụ thuộc vào chất nền OLED vật lý và không thể thay đổi thông qua các lệnh phần mềm.
Hướng dẫn này kết nối với màn hình thông qua bus I2C, chỉ yêu cầu hai đường tín hiệu (SDA và SCL) và cho phép chia sẻ bus với các thiết bị ngoại vi I2C bổ sung.
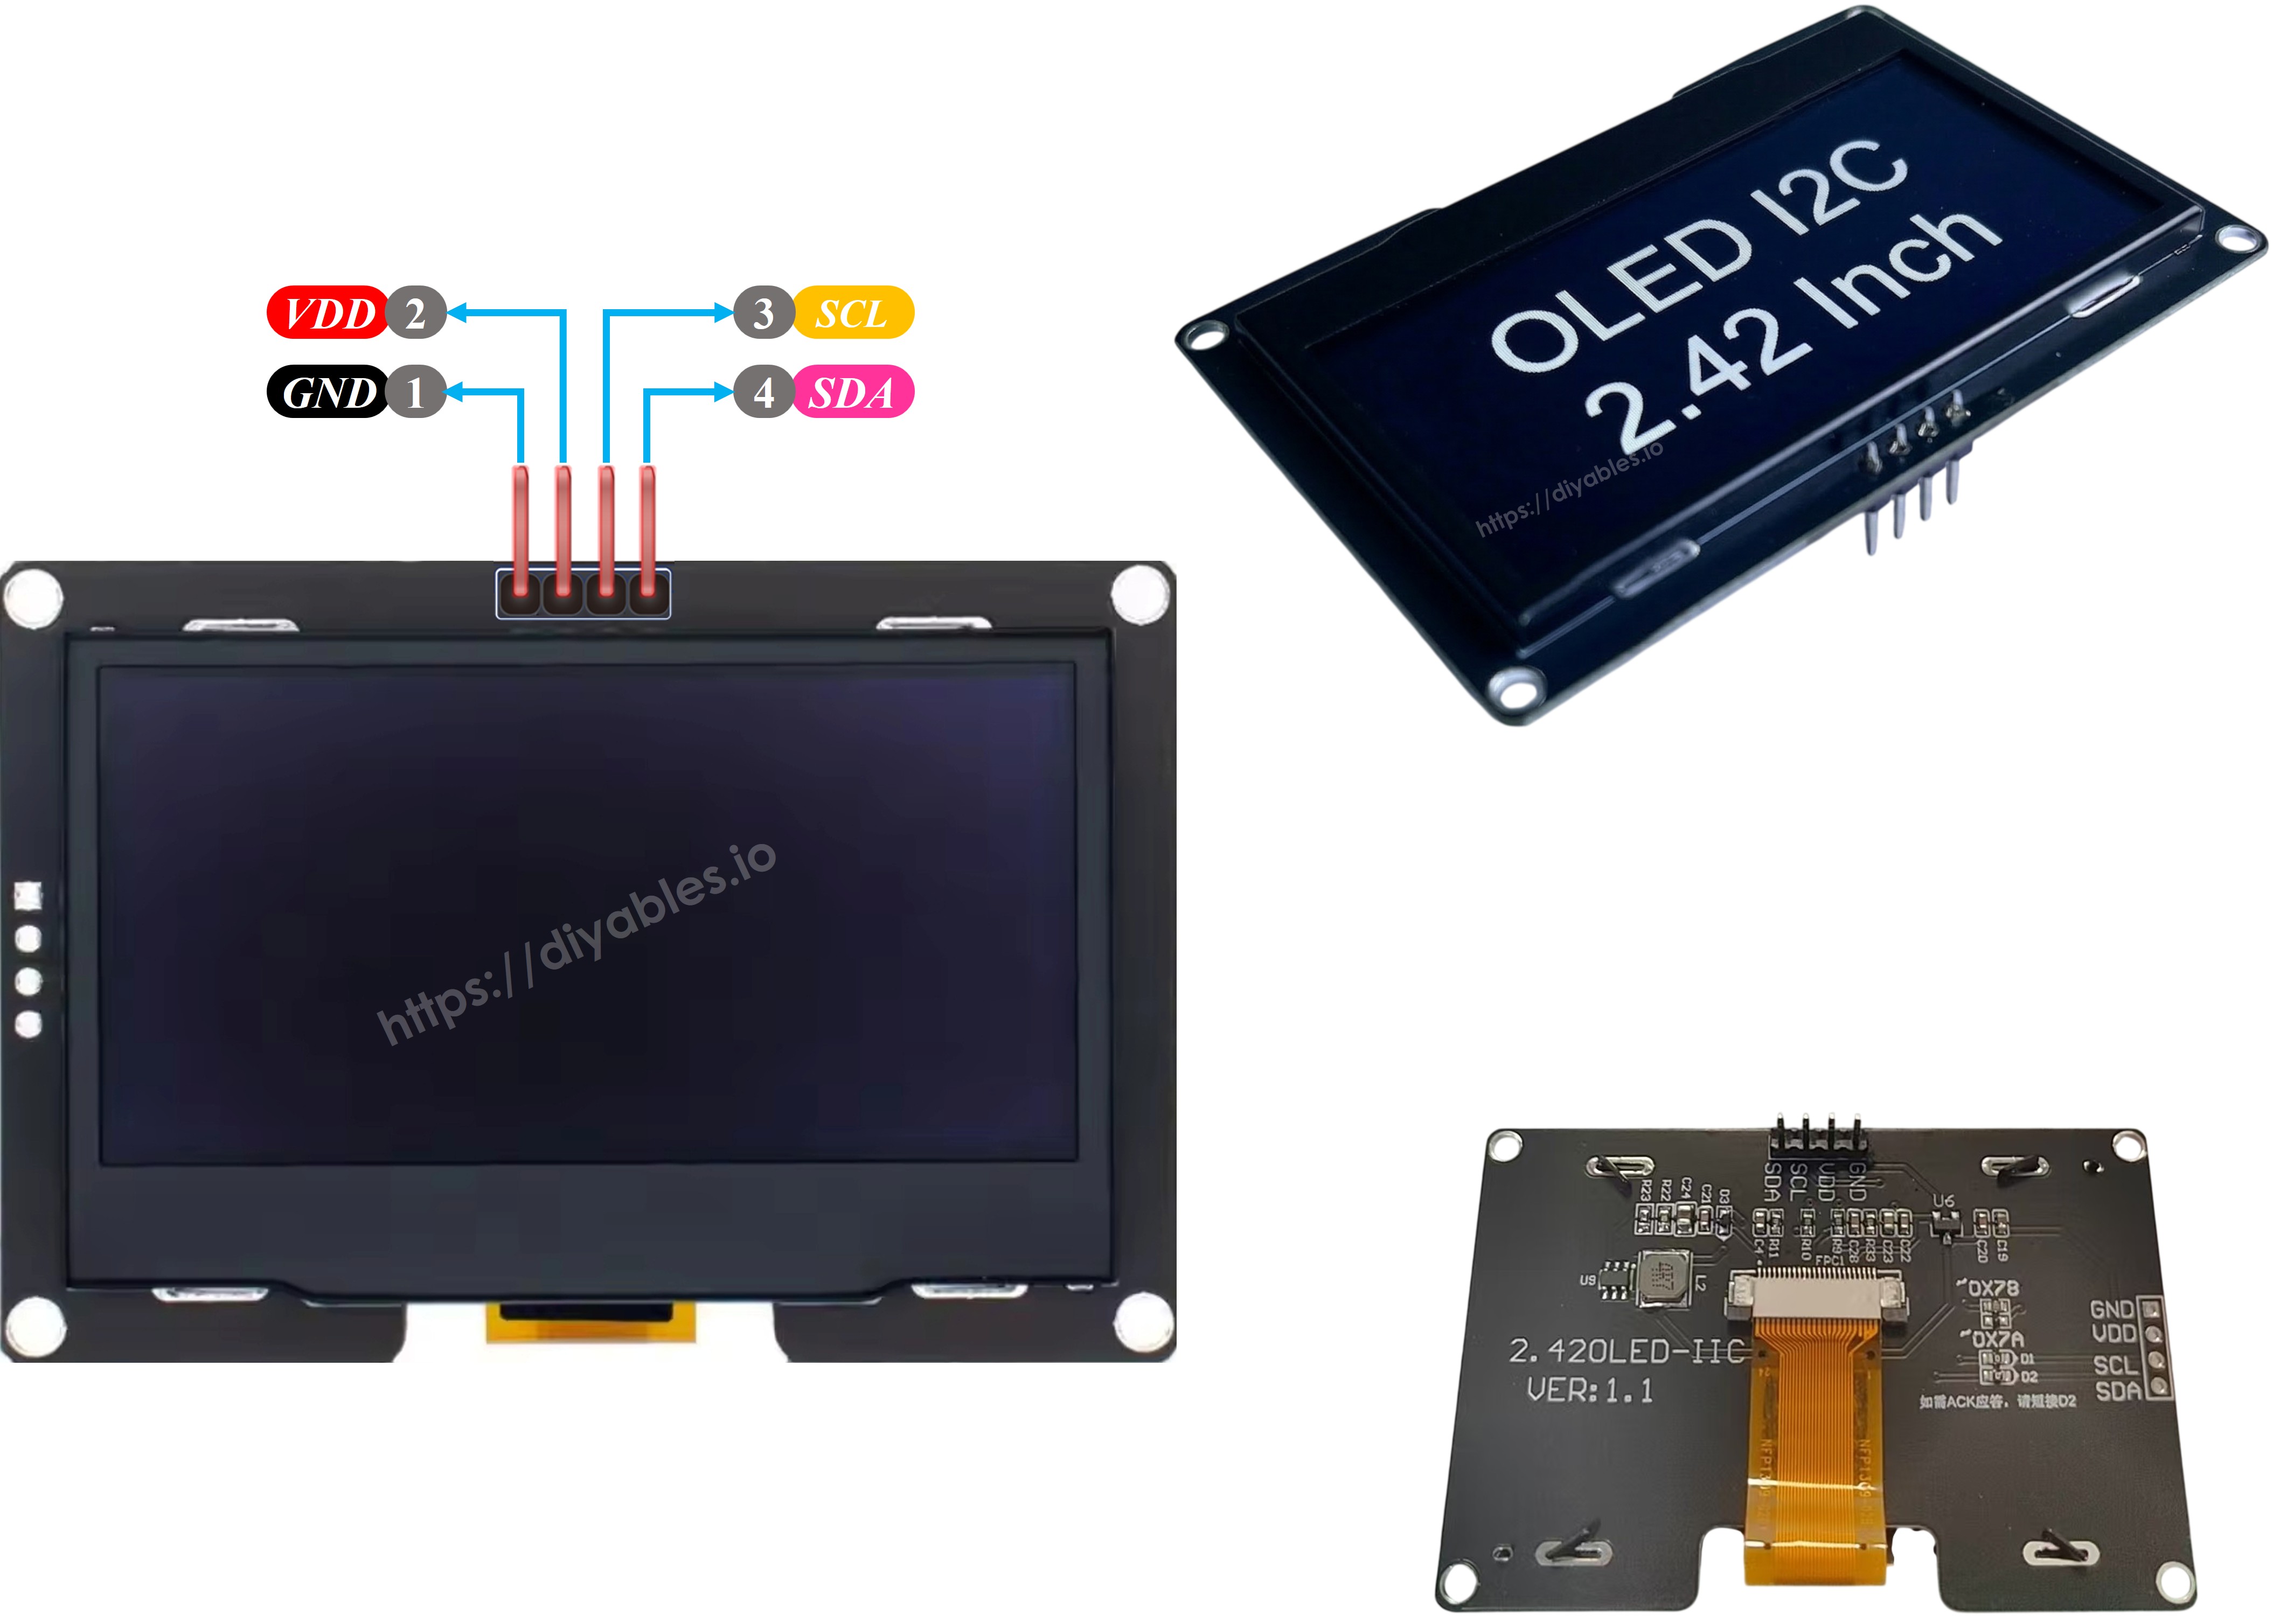
Sơ Đồ Chân OLED SSD1309 (Module I2C)
Các module OLED I2C SSD1309 2.42-inch tiêu chuẩn có bốn chân kết nối:
- GND — Kết nối với mass của Arduino Uno R4.
- VCC — Đầu vào nguồn điện. Kết nối với đầu ra 5 V của Arduino Uno R4 (hoặc 3.3 V nếu module hỗ trợ).
- SCL — Đường tín hiệu clock I2C.
- SDA — Đường tín hiệu dữ liệu I2C.
※ Lưu ý:
- Cách sắp xếp chân khác nhau giữa các nhà sản xuất. Luôn kiểm tra nhãn silkscreen trên module cụ thể của bạn trước khi thực hiện kết nối.
- Hướng dẫn này đã được xác thực với màn hình OLED SSD1309 2.42 inch từ DIYables. Các module 2.4/2.42-inch khác dựa trên SSD1309 sẽ hoạt động tương tự.
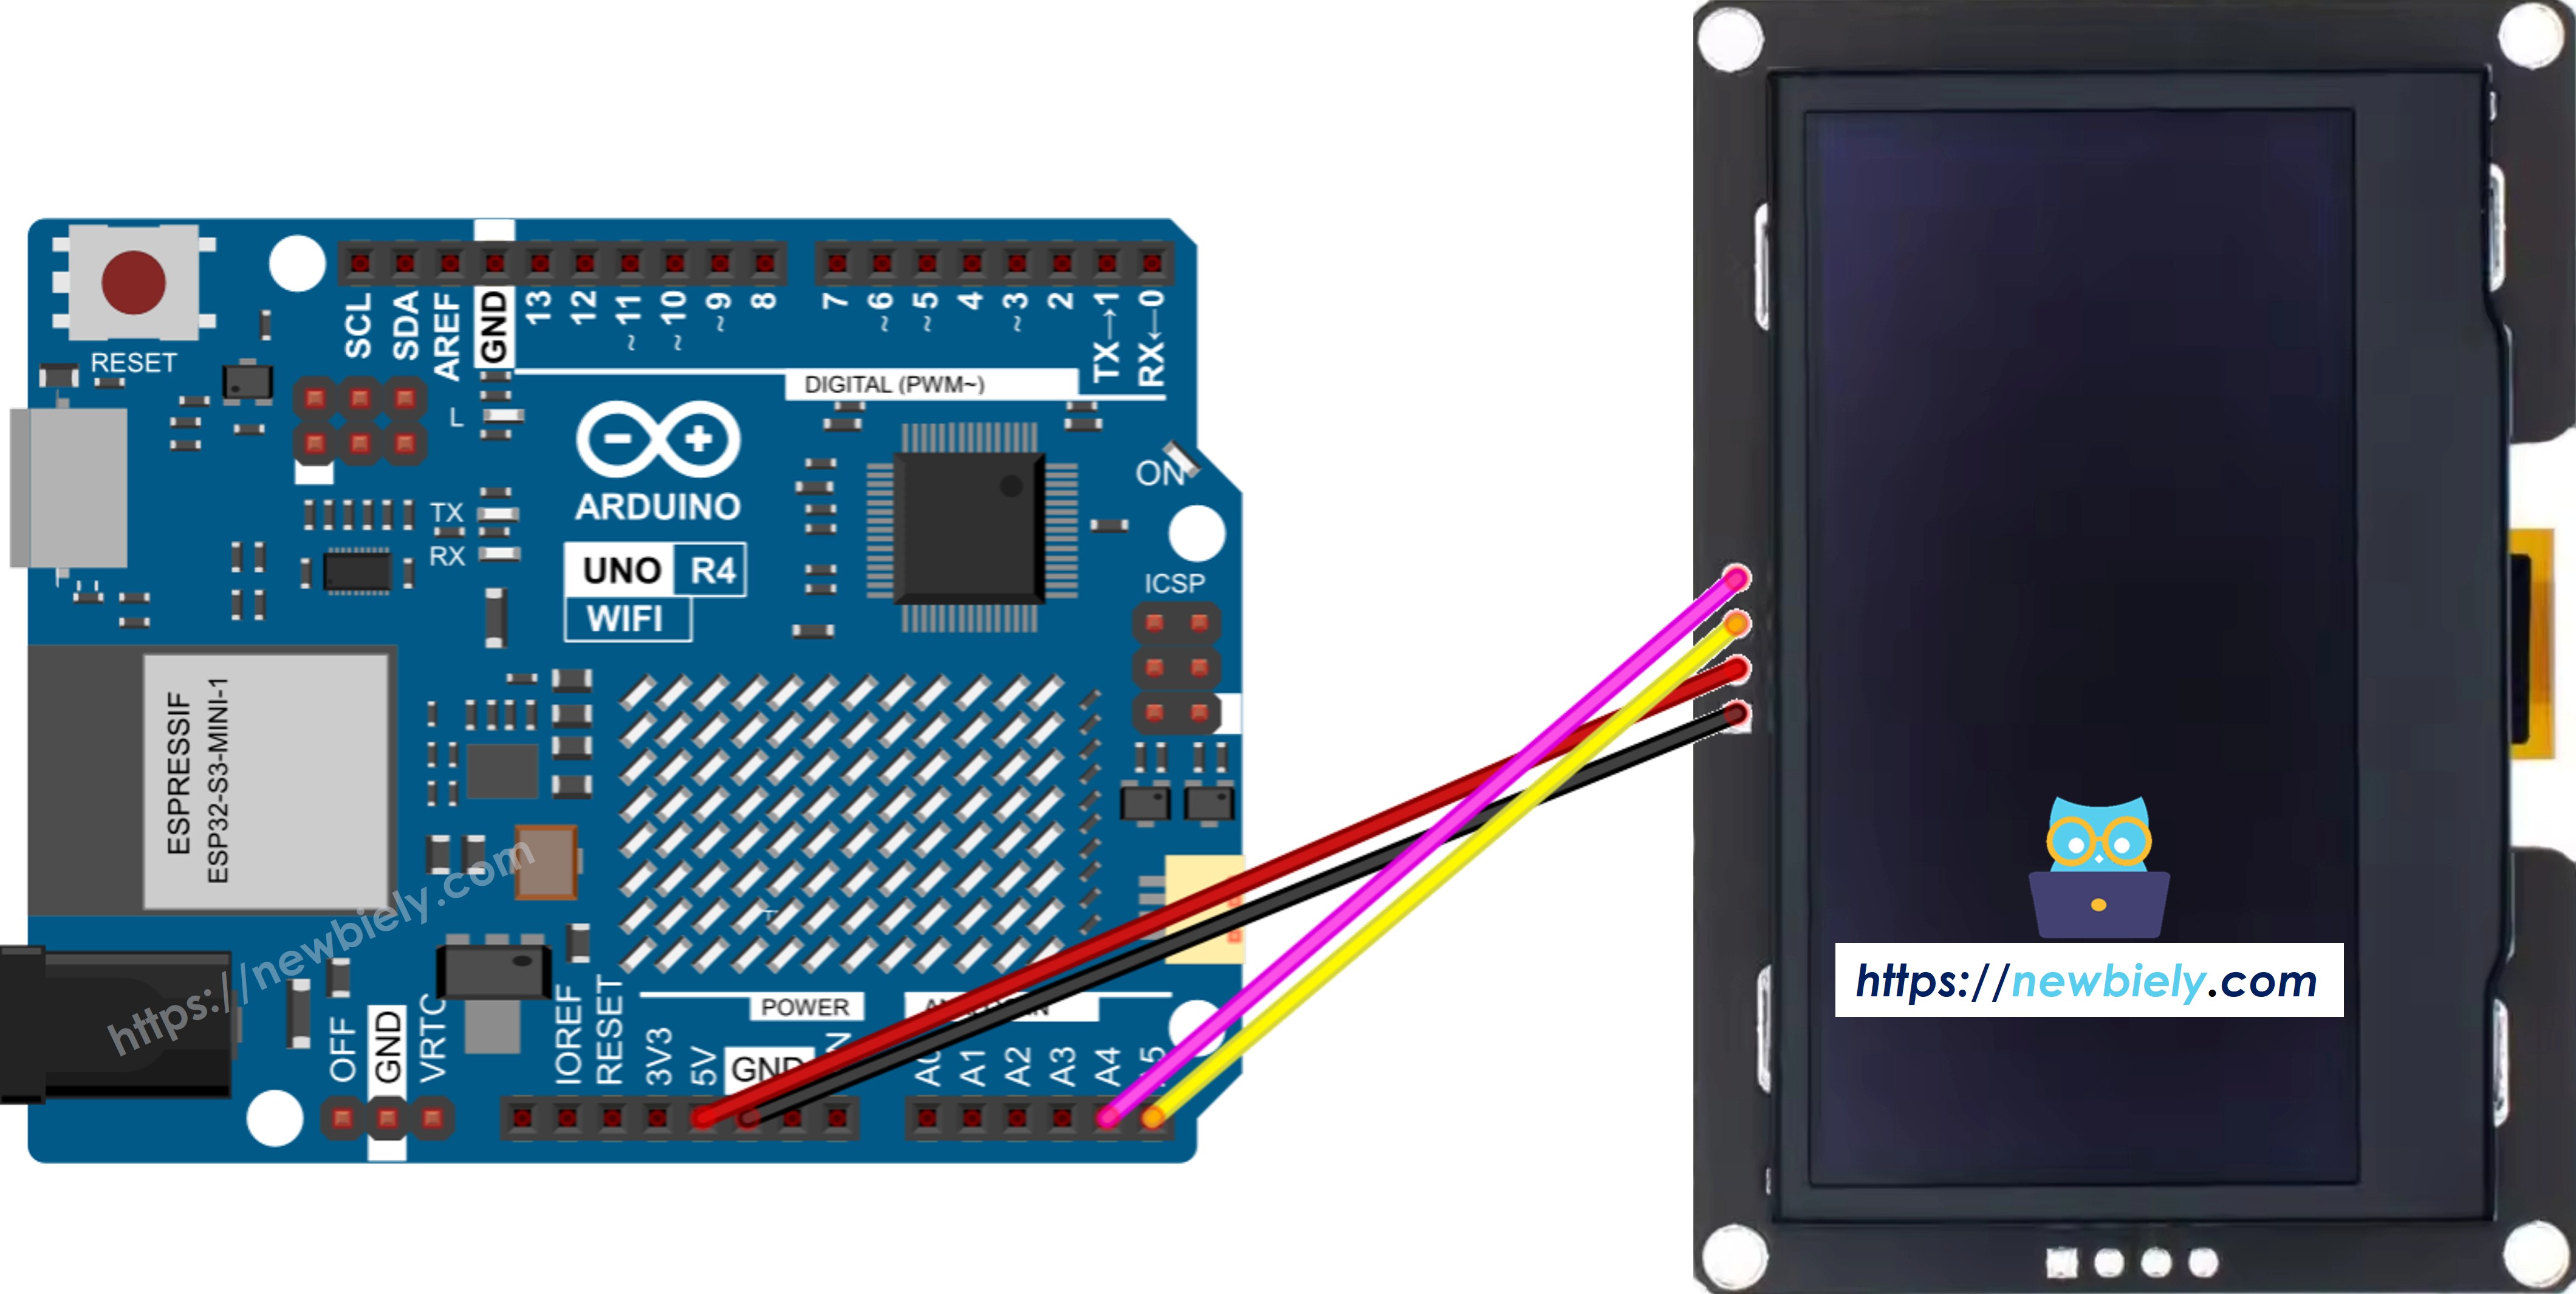
Sơ Đồ Kết Nối — Arduino Uno R4 & OLED SSD1309 128×64
- Sơ đồ kết nối giữa Arduino Uno R4 và OLED SSD1309 128×64 2.42 inch

This image is created using Fritzing. Click to enlarge image
- Hình ảnh kết nối thực tế giữa Arduino Uno R4 và OLED SSD1309 128×64
This image is created using Fritzing. Click to enlarge image
Arduino Uno R4 sử dụng cùng vị trí chân I2C như Uno cổ điển. Chi tiết kết nối:
| Module OLED | Arduino Uno R4 |
|---|---|
| Vin | 5V |
| GND | GND |
| SDA | A4 (hoặc chân SDA) |
| SCL | A5 (hoặc chân SCL) |
Bắt Đầu — OLED SSD1309 với Arduino Uno R4
Bước 1: Cài Đặt Thư Viện DIYables_OLED_SSD1309
- Khởi động Arduino IDE và click biểu tượng Libraries ở thanh bên trái.
- Nhập "DIYables_OLED_SSD1309" vào trường tìm kiếm và tìm thư viện của DIYables.
- Click nút Install.
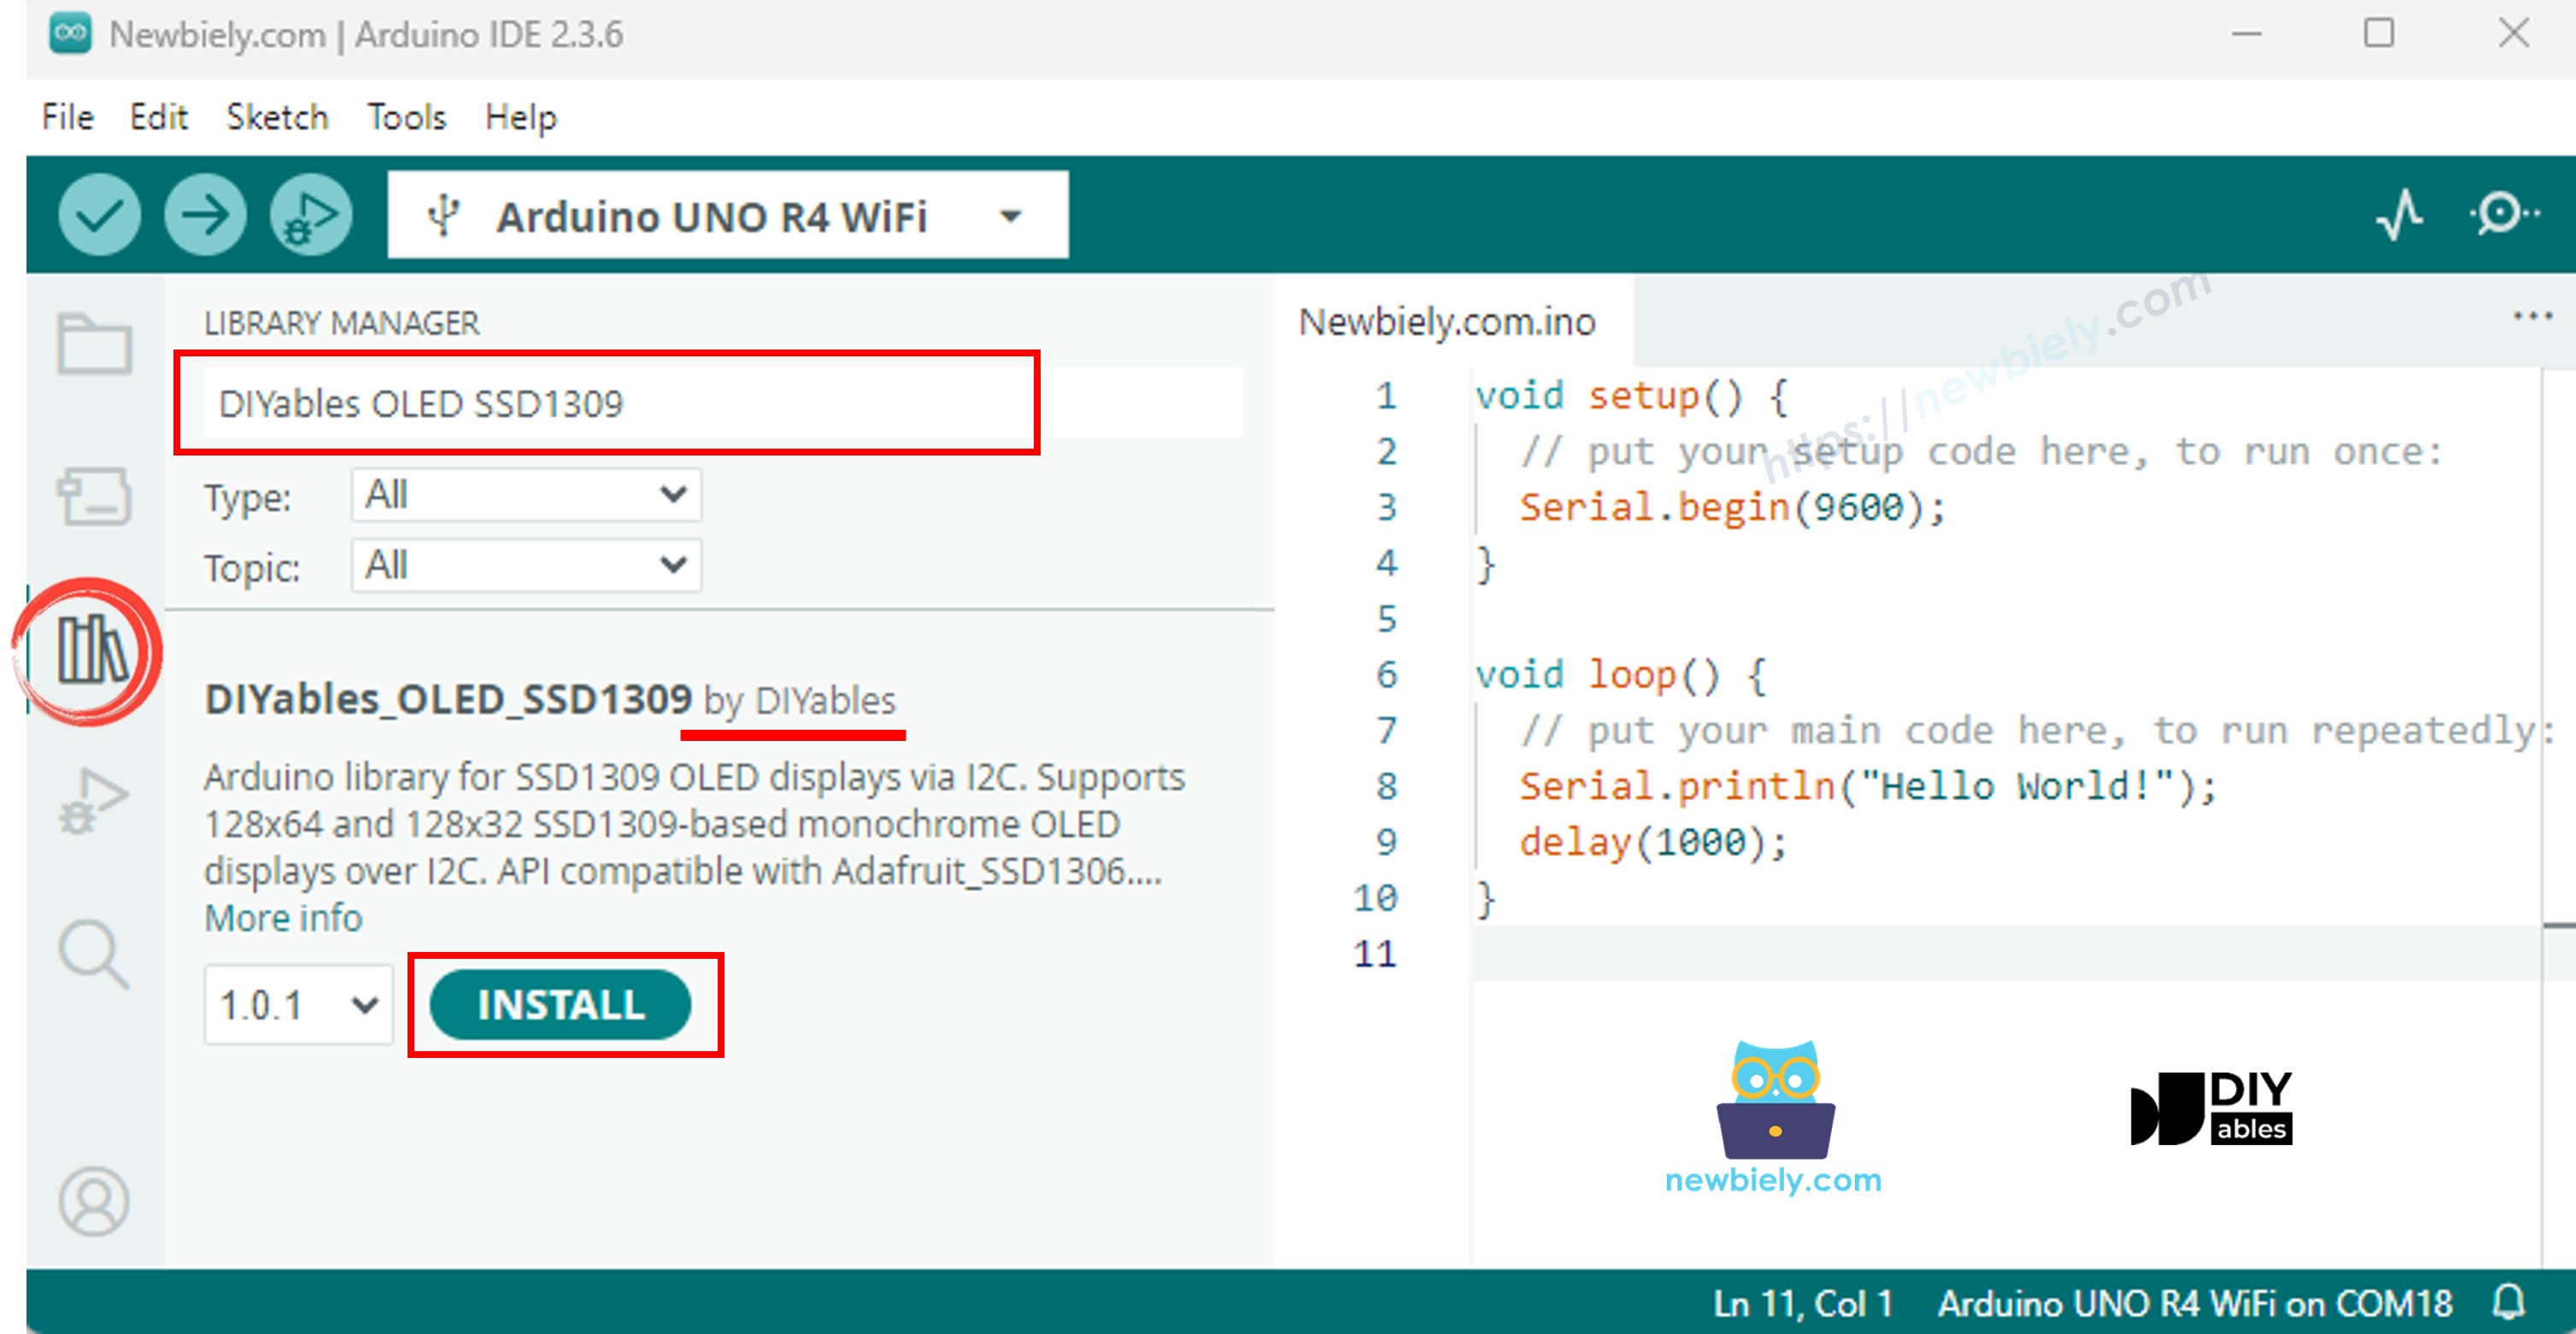
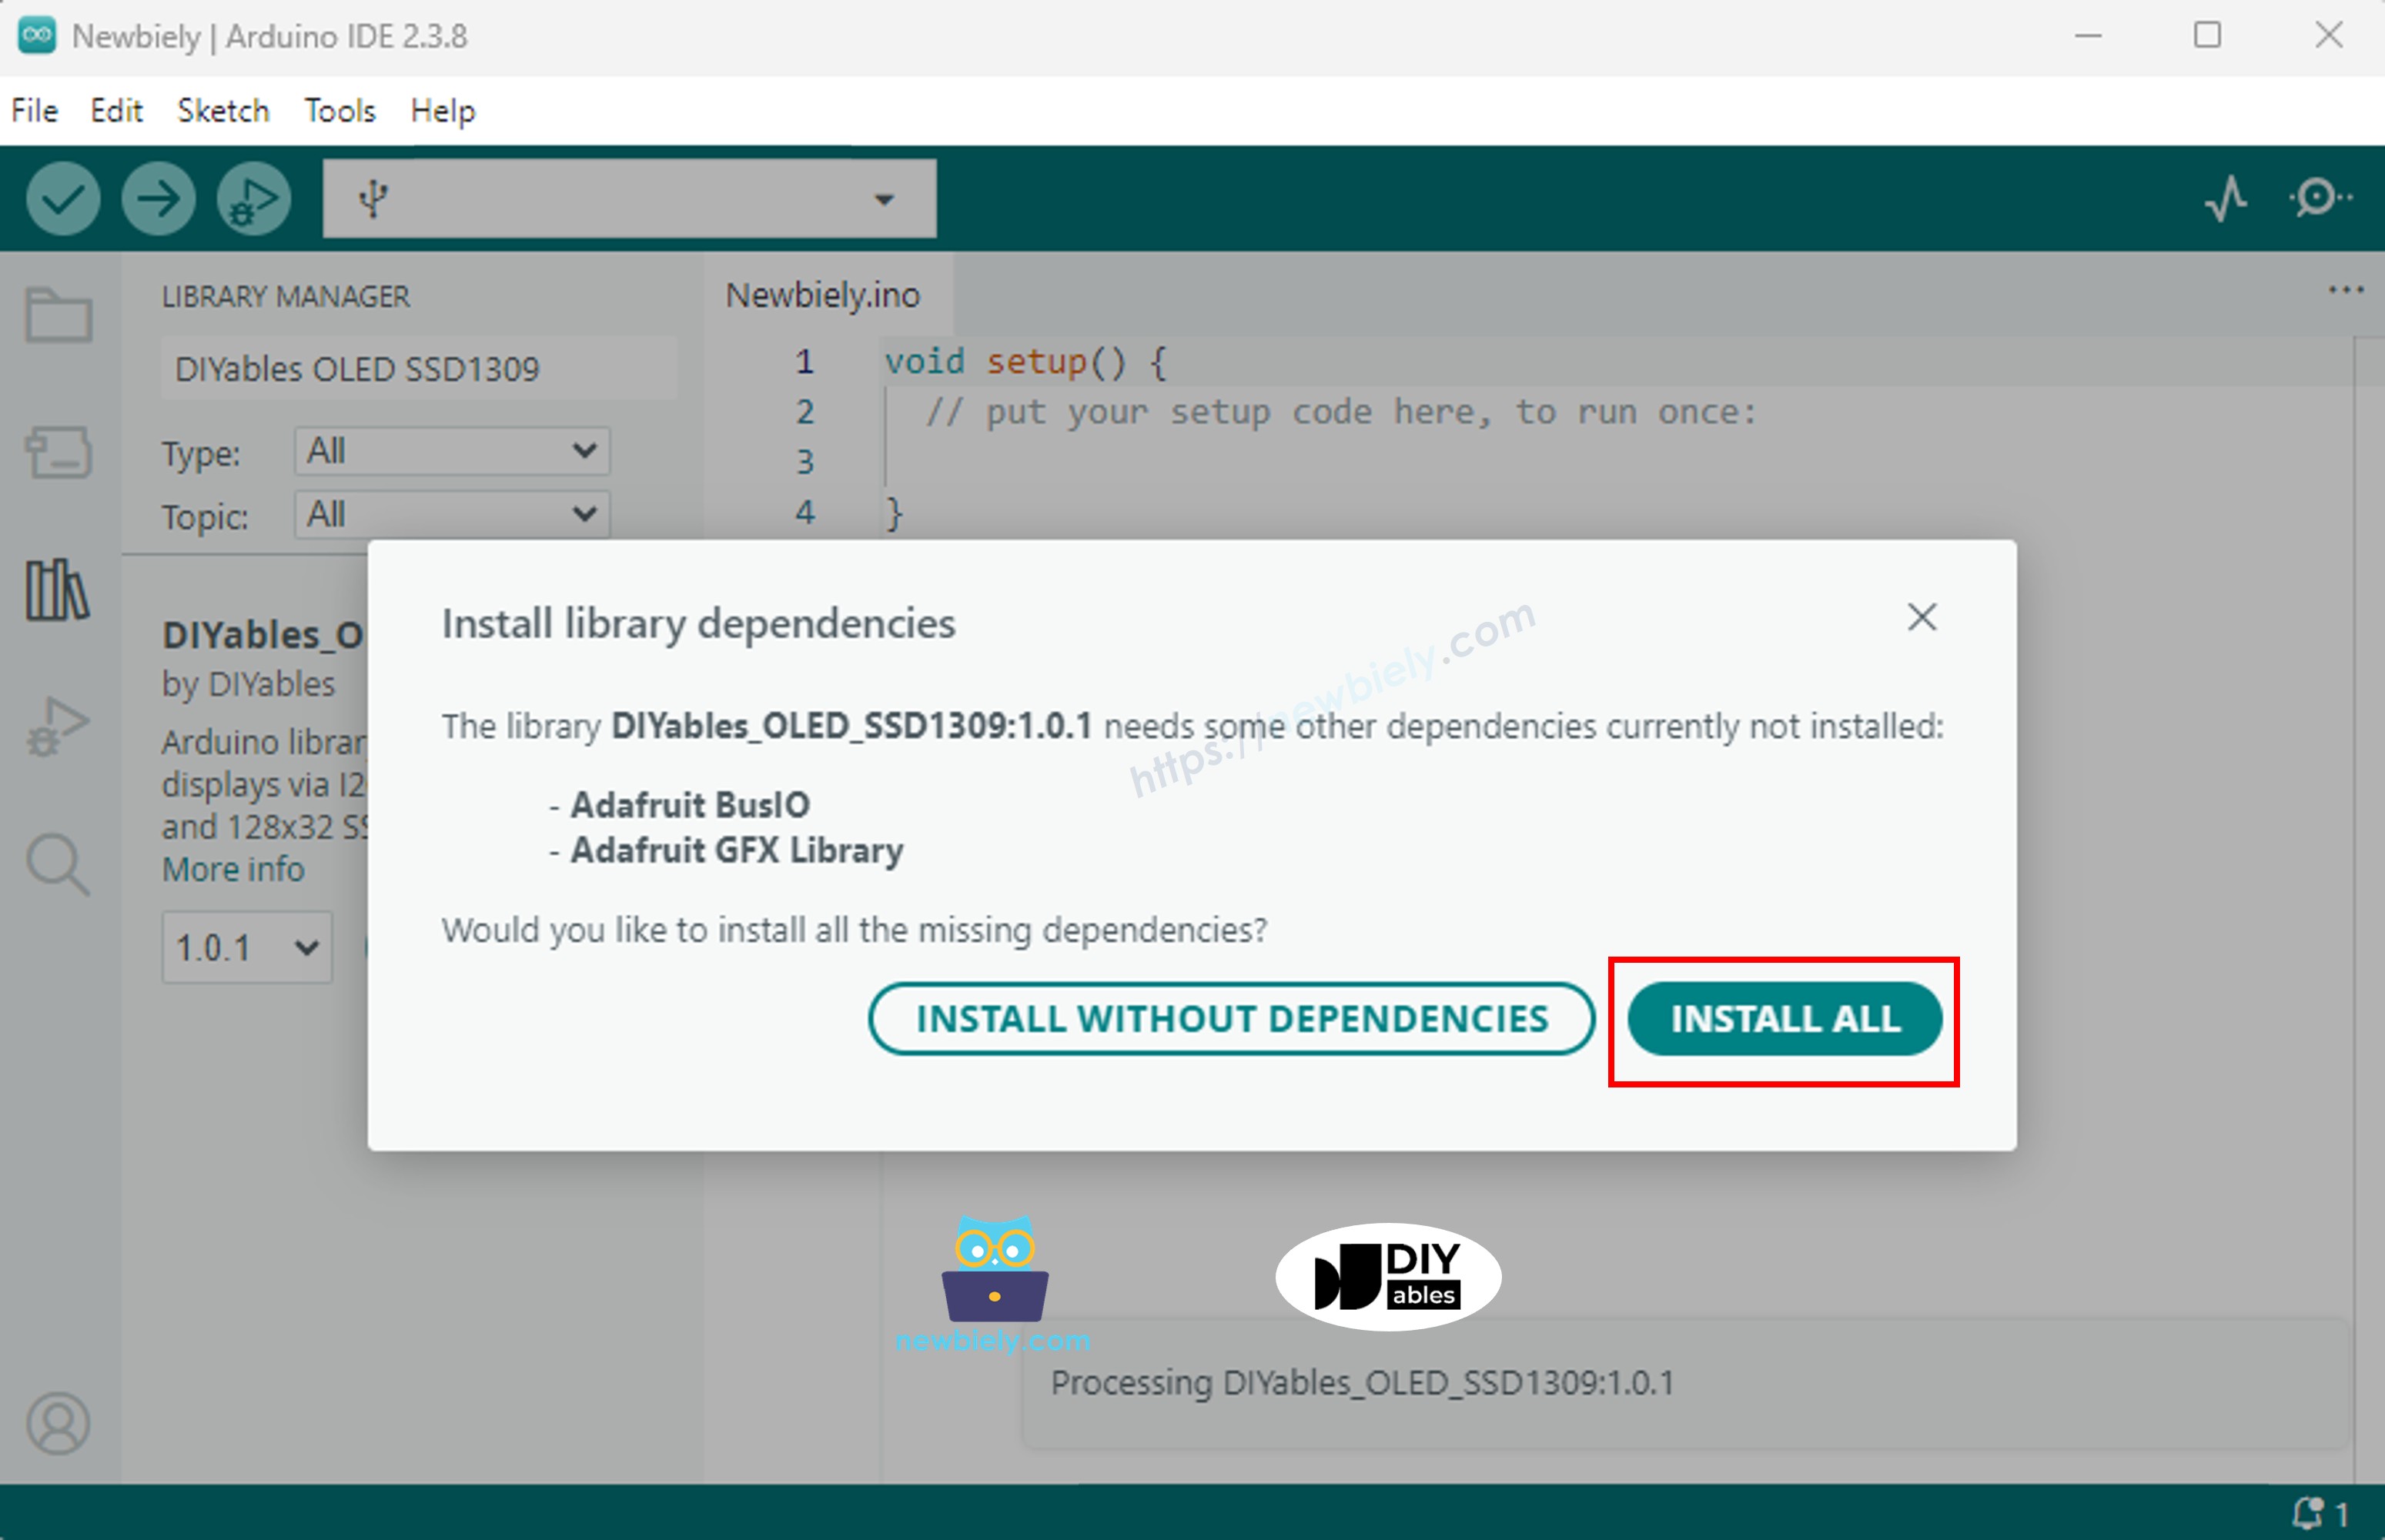
- IDE sẽ nhắc bạn cài đặt thư viện phụ thuộc cần thiết (Adafruit GFX Library). Click Install All.
Bước 2: Cấu Trúc Lập Trình Cơ Bản
Tất cả các sketch SSD1309 đều tuân theo cấu trúc nhất quán này: include header, khởi tạo đối tượng display, khởi tạo nó trong setup(), vẽ nội dung vào frame buffer, sau đó chuyển buffer lên màn hình bằng display().
- Include các header cần thiết:
- Định nghĩa kích thước màn hình (128×64 cho module 2.42-inch):
- Khởi tạo đối tượng display (sử dụng -1 khi không có chân reset được kết nối):
- Khởi tạo display bên trong setup():
- Sau khi khởi tạo, gọi các hàm vẽ (clearDisplay(), drawPixel(), print(), v.v.) sau đó gọi oled.display() để làm mới màn hình.
※ Lưu ý:
Tất cả ví dụ code trong hướng dẫn này nhắm đến OLED SSD1309 128×64 (2.42 inch) và sử dụng thư viện DIYables_OLED_SSD1309 với Arduino Uno R4.
Mã Arduino Uno R4 — Hello World trên OLED SSD1309
Minh họa đơn giản nhất: hiển thị văn bản ở nhiều kích thước.
Mã Arduino Uno R4 — Hiển Thị Văn Bản trên OLED SSD1309
Ví dụ này giới thiệu các tính năng văn bản nâng cao — kích thước biến đổi, định dạng số và macro F() để tiết kiệm RAM.
Tham Chiếu Các Hàm Display Hữu Ích
Tham chiếu nhanh cho các hàm OLED SSD1309 thường dùng qua thư viện DIYables:
- oled.clearDisplay() — xóa frame buffer (tất cả pixel tắt).
- oled.display() — chuyển buffer lên OLED để hiển thị thay đổi.
- oled.drawPixel(x, y, color) — thiết lập hoặc xóa một pixel.
- oled.setTextSize(n) — phóng to font theo hệ số *n* (1 = 6×8, 2 = 12×16, …, lên đến 8).
- oled.setCursor(x, y) — đặt con trở văn bản tại tọa độ pixel *(x, y)*.
- oled.setTextColor(SSD1309_PIXEL_ON) — chỉ màu chữ (nền trong suốt).
- oled.setTextColor(SSD1309_PIXEL_OFF, SSD1309_PIXEL_ON) — văn bản với màu nền rõ ràng.
- oled.println("message") — in một chuỗi và chuyển sang dòng tiếp theo.
- oled.println(number) — in một số nguyên ở định dạng thập phân.
- oled.println(number, HEX) — in một số nguyên ở định dạng thập lục phân.
- oled.startscrollright(start, stop) — cuộn phần cứng sang phải giữa trang *start* và trang *stop*.
- oled.startscrollleft(start, stop) — cuộn phần cứng sang trái.
- oled.startscrolldiagright(start, stop) — cuộn phần cứng theo đường chéo phải.
- oled.startscrolldiagleft(start, stop) — cuộn phần cứng theo đường chéo trái.
- oled.stopscroll() — dừng bất kỳ cuộn phần cứng nào đang hoạt động.
- oled.setContrast(value) — điều chỉnh độ sáng màn hình (0–255).
- oled.dim(true/false) — nhanh chóng làm tối màn hình xuống mức tối thiểu hoặc khôi phục độ tương phản trước đó.
- oled.invertDisplay(true/false) — đảo màu ở mức phần cứng (pixel sáng ↔ pixel tắt).
Cách Căn Giữa Văn Bản Theo Chiều Dọc và Ngang trên OLED SSD1309
Mã Arduino Uno R4 — Vẽ Hình trên OLED SSD1309
Thư viện DIYables_OLED_SSD1309 kế thừa từ Adafruit_GFX, cung cấp khả năng vẽ hình hoàn chỉnh: pixel, đường thẳng, hình chữ nhật, hình chữ nhật có tô màu, hình tròn, hình tròn có tô màu, tam giác, tam giác có tô màu và hình chữ nhật bo góc. Sketch sau đây minh họa tất cả chúng với các chuỗi hoạt hình.
Mã Arduino Uno R4 — Cuộn Phần Cứng trên OLED SSD1309
SSD1309 bao gồm một động cơ cuộn phần cứng di chuyển nội dung hiển thị mà không cần can thiệp của CPU. Thư viện DIYables cung cấp bốn chế độ cuộn: phải, trái, chéo-phải và chéo-trái. Mỗi chế độ chấp nhận tham số trang bắt đầu và trang kết thúc (trang là các dải ngang cao 8-pixel được đánh số 0–7 trên màn hình cao 64-pixel).
※ Lưu ý:
Luôn gọi display() để chuyển nội dung của bạn lên OLED trước khi bắt đầu cuộn. Tránh vẽ nội dung mới trong khi cuộn đang hoạt động — gọi stopscroll() trước.
Mã Arduino Uno R4 — Hiển Thị Hình Ảnh Bitmap trên OLED SSD1309
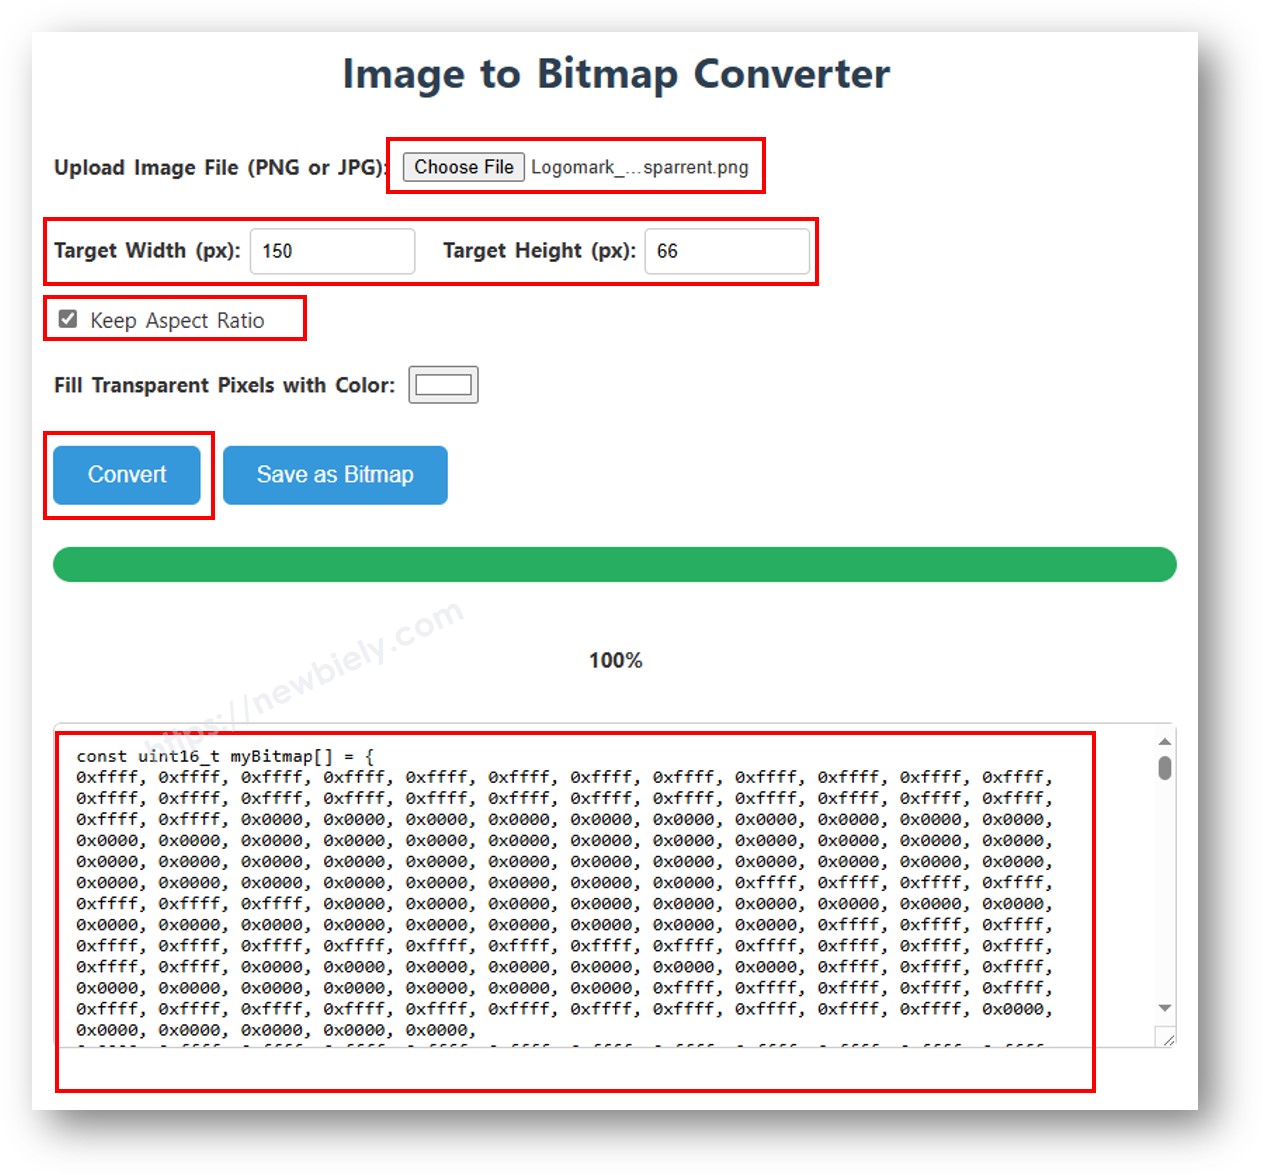
Để hiển thị bitmap trên OLED SSD1309, trước tiên bạn phải chuyển đổi hình ảnh của mình thành mảng byte C. Sử dụng công cụ trực tuyến miễn phí image2cpp để chuyển đổi:
- Upload file hình ảnh của bạn (PNG, JPG, BMP, v.v.).
- Cấu hình kích thước canvas thành 128×64 (hoặc nhỏ hơn).
- Chọn Arduino code làm định dạng đầu ra.
- Copy mảng được tạo vào sketch của bạn.
Ví dụ dưới đây xen kẽ giữa biểu tượng trái tim 16×16 và logo DIYables toàn chiều rộng:
※ Lưu ý:
- Kích thước bitmap không được vượt quá độ phân giải màn hình (128×64 cho module 2.42 inch).
Mã Arduino Uno R4 — Độ Tương Phản và Làm Tối trên OLED SSD1309
SSD1309 cung cấp 256 mức độ tương phản (0–255). Thư viện DIYables cung cấp setContrast() để điều khiển chính xác và dim() để chuyển đổi nhanh giữa độ sáng tối thiểu và mức đã thiết lập trước đó.
Mã Arduino Uno R4 — Font Chữ Bên Ngoài Tùy Chỉnh trên OLED SSD1309
Thư viện Adafruit GFX bao gồm hàng chục kiểu chữ FreeFont có thể mở rộng (Serif, Sans, Mono — mỗi loại có Regular, Bold, Italic và nhiều kích thước). Bạn có thể sử dụng bất kỳ font nào trong số chúng trên màn hình SSD1309 bằng cách include header liên quan và gọi setFont().
※ Lưu ý:
- Khi font bên ngoài được kích hoạt, tọa độ Y của con trỏ đề cập đến baseline của văn bản, không phải góc trên-trái. Điều này khác với hành vi font 5×7 tích hợp.
- Font bên ngoài được lưu trữ trong flash (PROGMEM). Trên các bo mạch hạn chế bộ nhớ như Uno cổ điển (32 KB flash), sử dụng chúng một cách thận trọng. Arduino Uno R4 có nhiều bộ nhớ hơn, cho phép linh hoạt hơn.
Khắc Phục Sự Cố OLED SSD1309 với Arduino Uno R4
Nếu OLED SSD1309 2.42 inch vẫn trống sau khi upload sketch của bạn, hãy thực hiện theo các bước chẩn đoán sau:
- Xác minh kết nối — xác nhận SDA, SCL, VCC và GND được kết nối đúng chân Arduino Uno R4.
- Xác nhận chip điều khiển — thư viện này được thiết kế cho SSD1309. Nếu module của bạn sử dụng bộ điều khiển khác (ví dụ SH1106), nó sẽ không phản hồi đúng cách.
- Kiểm tra địa chỉ I2C — hầu hết các module SSD1309 mặc định là 0x3C, nhưng một số sử dụng 0x3D. Chạy sketch quét I2C dưới đây để phát hiện địa chỉ thực tế:
Kết quả Serial Monitor mong đợi khi phát hiện SSD1309:
- Đảm bảo display() được gọi — SSD1309 sử dụng frame buffer. Các hàm vẽ chỉ sửa đổi buffer trong RAM; không có gì xuất hiện trên màn hình cho đến khi bạn gọi oled.display().
- Kiểm tra nguồn cung cấp — module 2.42 inch tiêu thụ nhiều dòng điện hơn các OLED nhỏ hơn. Đảm bảo nguồn điện của bạn có thể cung cấp đủ dòng điện (thường 20–40 mA ở độ sáng đầy đủ).
Bài hướng dẫn liên quan
📱 Ứng dụng đề xuất
 English for KidsHọc tiếng Anh vui nhộn cho trẻ nhỏ.Tải về trênGoogle PlayTải về trênApp Store
 Bubble NoteGhi chú tự xóa — viết như nhắn tin.Tải về trênGoogle PlayTải về trênApp Store
 Tôi Không MuaĐánh bại mua sắm bốc đồng, tiết kiệm hơn.Tải về trênGoogle PlayTải về trênApp Store
 Con Đường Tri ThứcBài thi thử để học mọi thứ.Tải về trênGoogle PlayTải về trênApp Store