Arduino MultipleWebApps Example Hướng Dẫn Tạo Bảng Điều Khiển IoT Toàn Diện
Tổng Quan
Ví dụ này trình bày cách sử dụng nhiều ứng dụng web đồng thời với thư viện DIYables WebApps. Nó minh họa việc tích hợp một số giao diện web tương tác - chẳng hạn như giám sát, điều khiển và giao tiếp - trong một dự án duy nhất. Được thiết kế cho Arduino Uno R4 WiFi và nền tảng DIYables STEM V4 IoT, ví dụ này lý tưởng để học cách kết hợp và quản lý nhiều tính năng dựa trên web cùng lúc, cung cấp nền tảng vững chắc cho các dự án IoT nâng cao.
Tính Năng
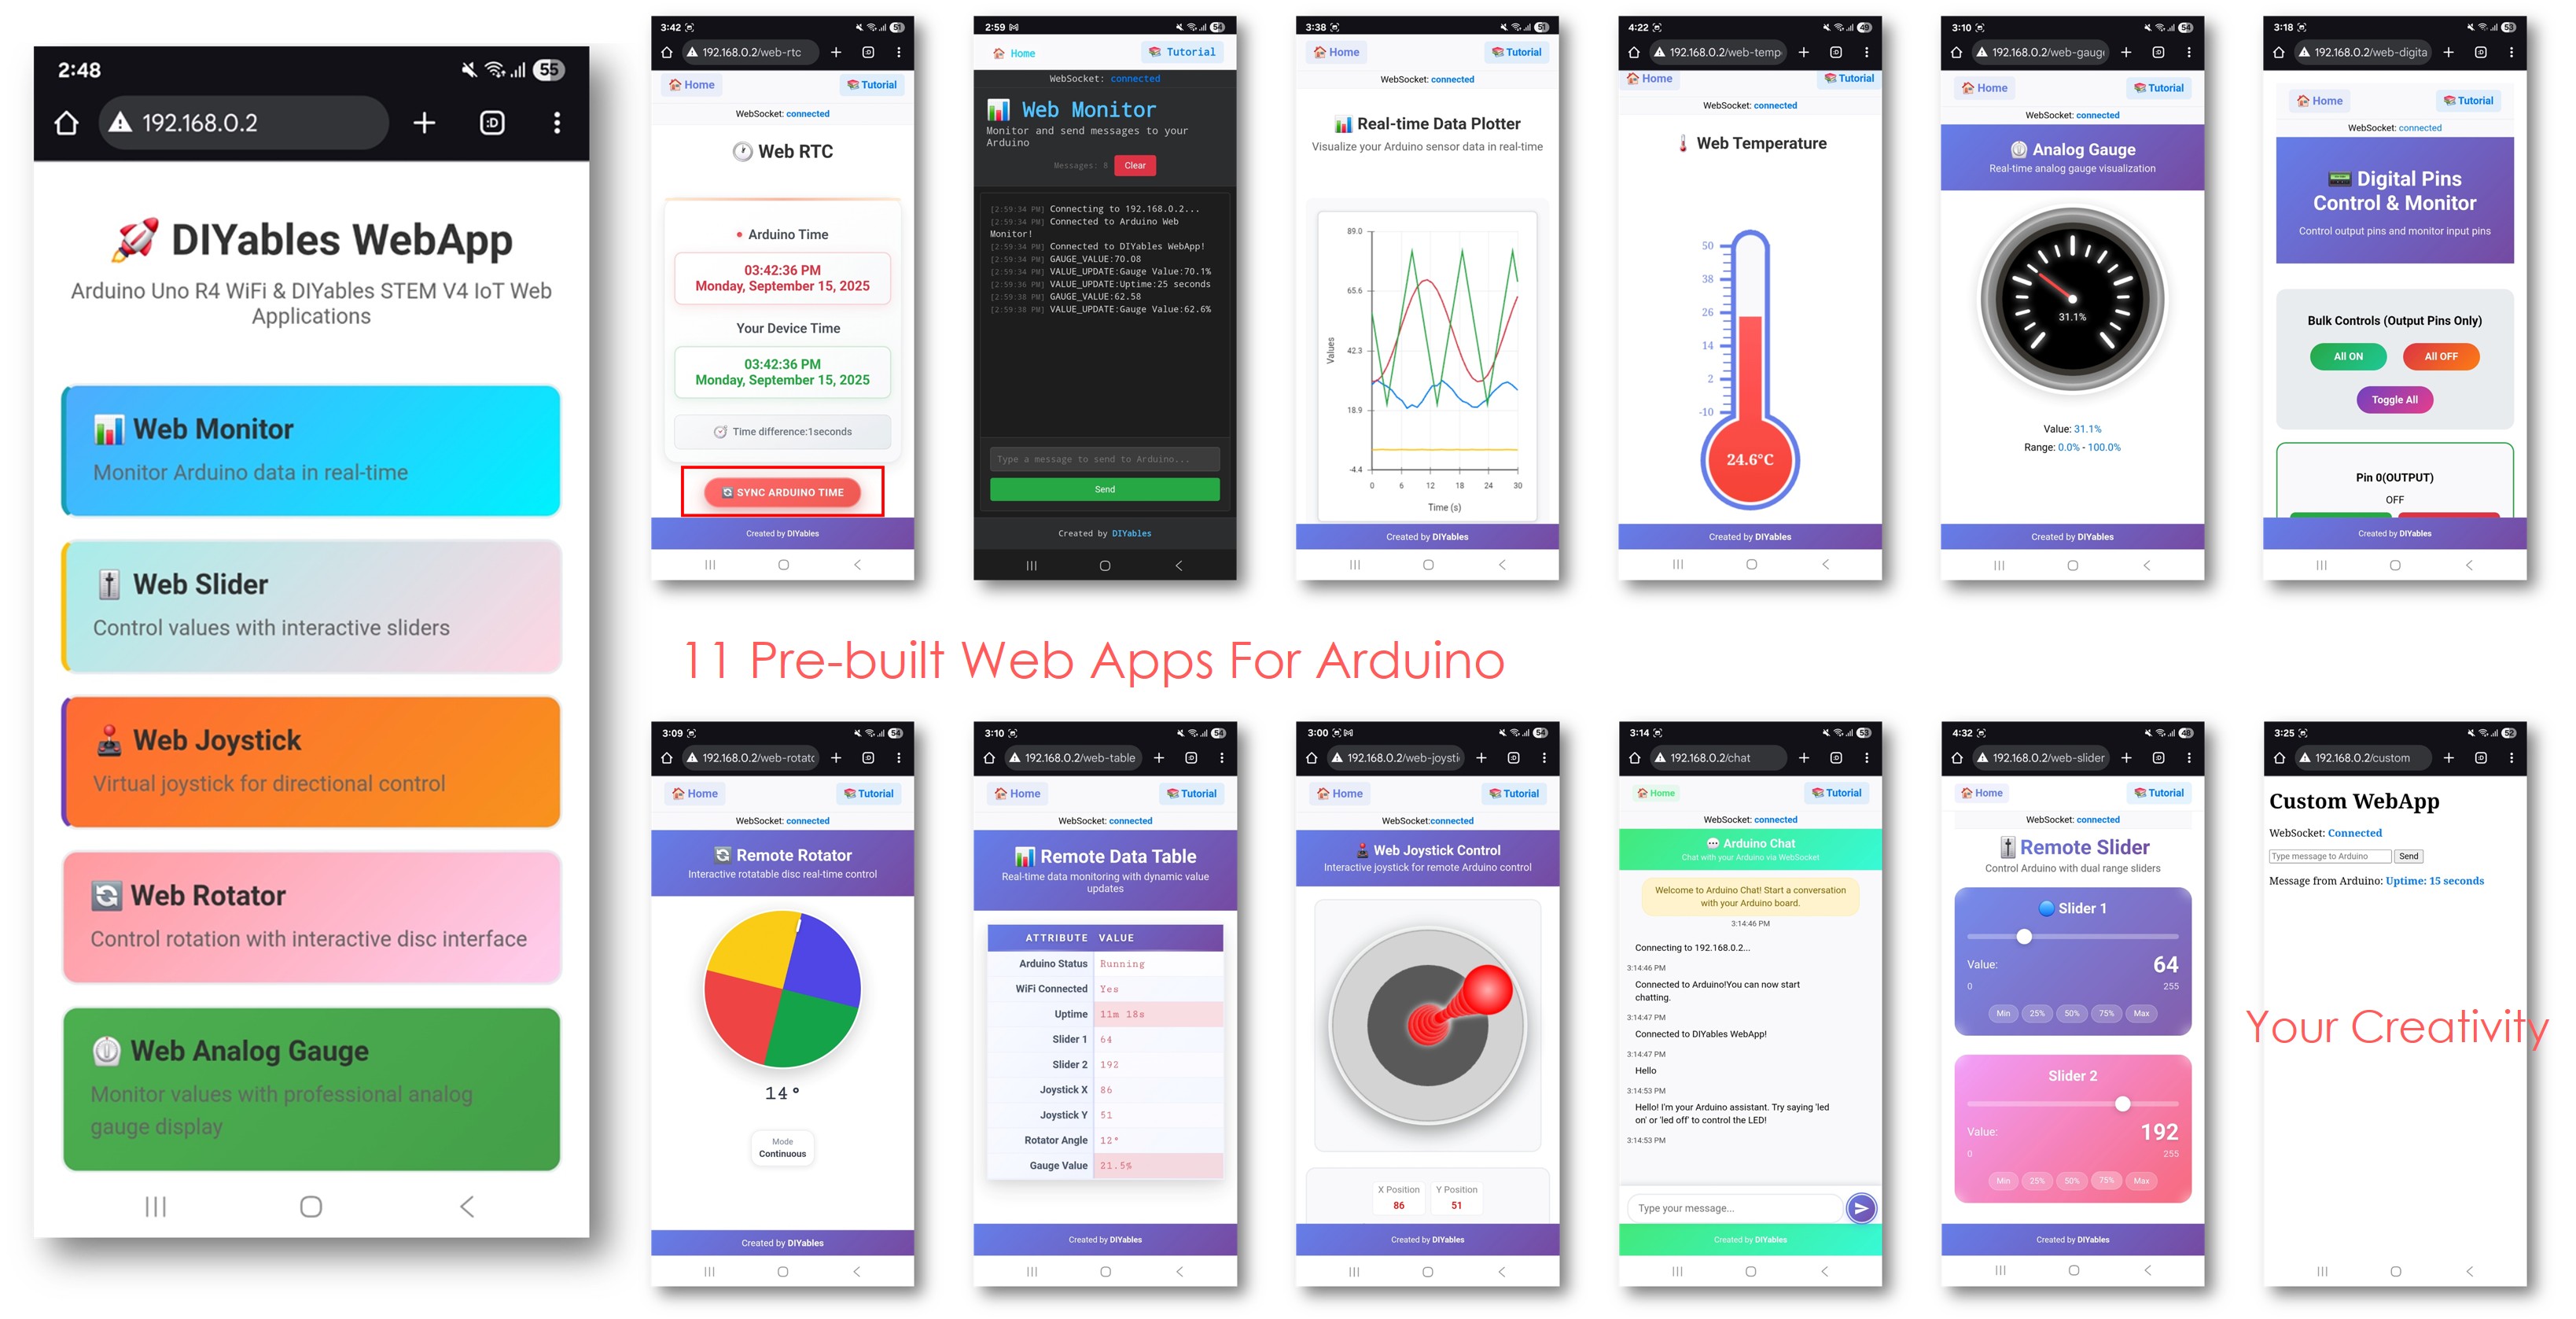
Trang Chủ: Trung tâm điều hướng với liên kết đến tất cả ứng dụng web
Web Monitor: Giao diện giao tiếp serial và debug theo thời gian thực
Giao Diện Chat: Hệ thống chat tương tác với khả năng phản hồi của Arduino
Điều Khiển Digital Pin: Điều khiển và giám sát tất cả digital pin qua web
Điều Khiển Slider Kép: Hai slider độc lập để điều khiển giá trị analog
Joystick Ảo: Điều khiển vị trí 2D cho các ứng dụng định hướng
Quản Lý Trạng Thái Thống Nhất: Tất cả giao diện chia sẻ thông tin trạng thái đồng bộ
Cập Nhật Thời Gian Thực: Giao tiếp WebSocket để phản hồi tức thì
Cấu Trúc Template: Nền tảng sẵn sàng tùy chỉnh cho các dự án phức tạp
Có Thể Mở Rộng Nền Tảng: Hiện được triển khai cho Arduino Uno R4 WiFi, nhưng có thể mở rộng cho các nền tảng phần cứng khác. Xem DIYables_WebApps_ESP32
Kết nối bo Arduino Uno R4/DIYables STEM V4 IoT với máy tính bằng cáp USB.
Khởi động Arduino IDE trên máy tính.
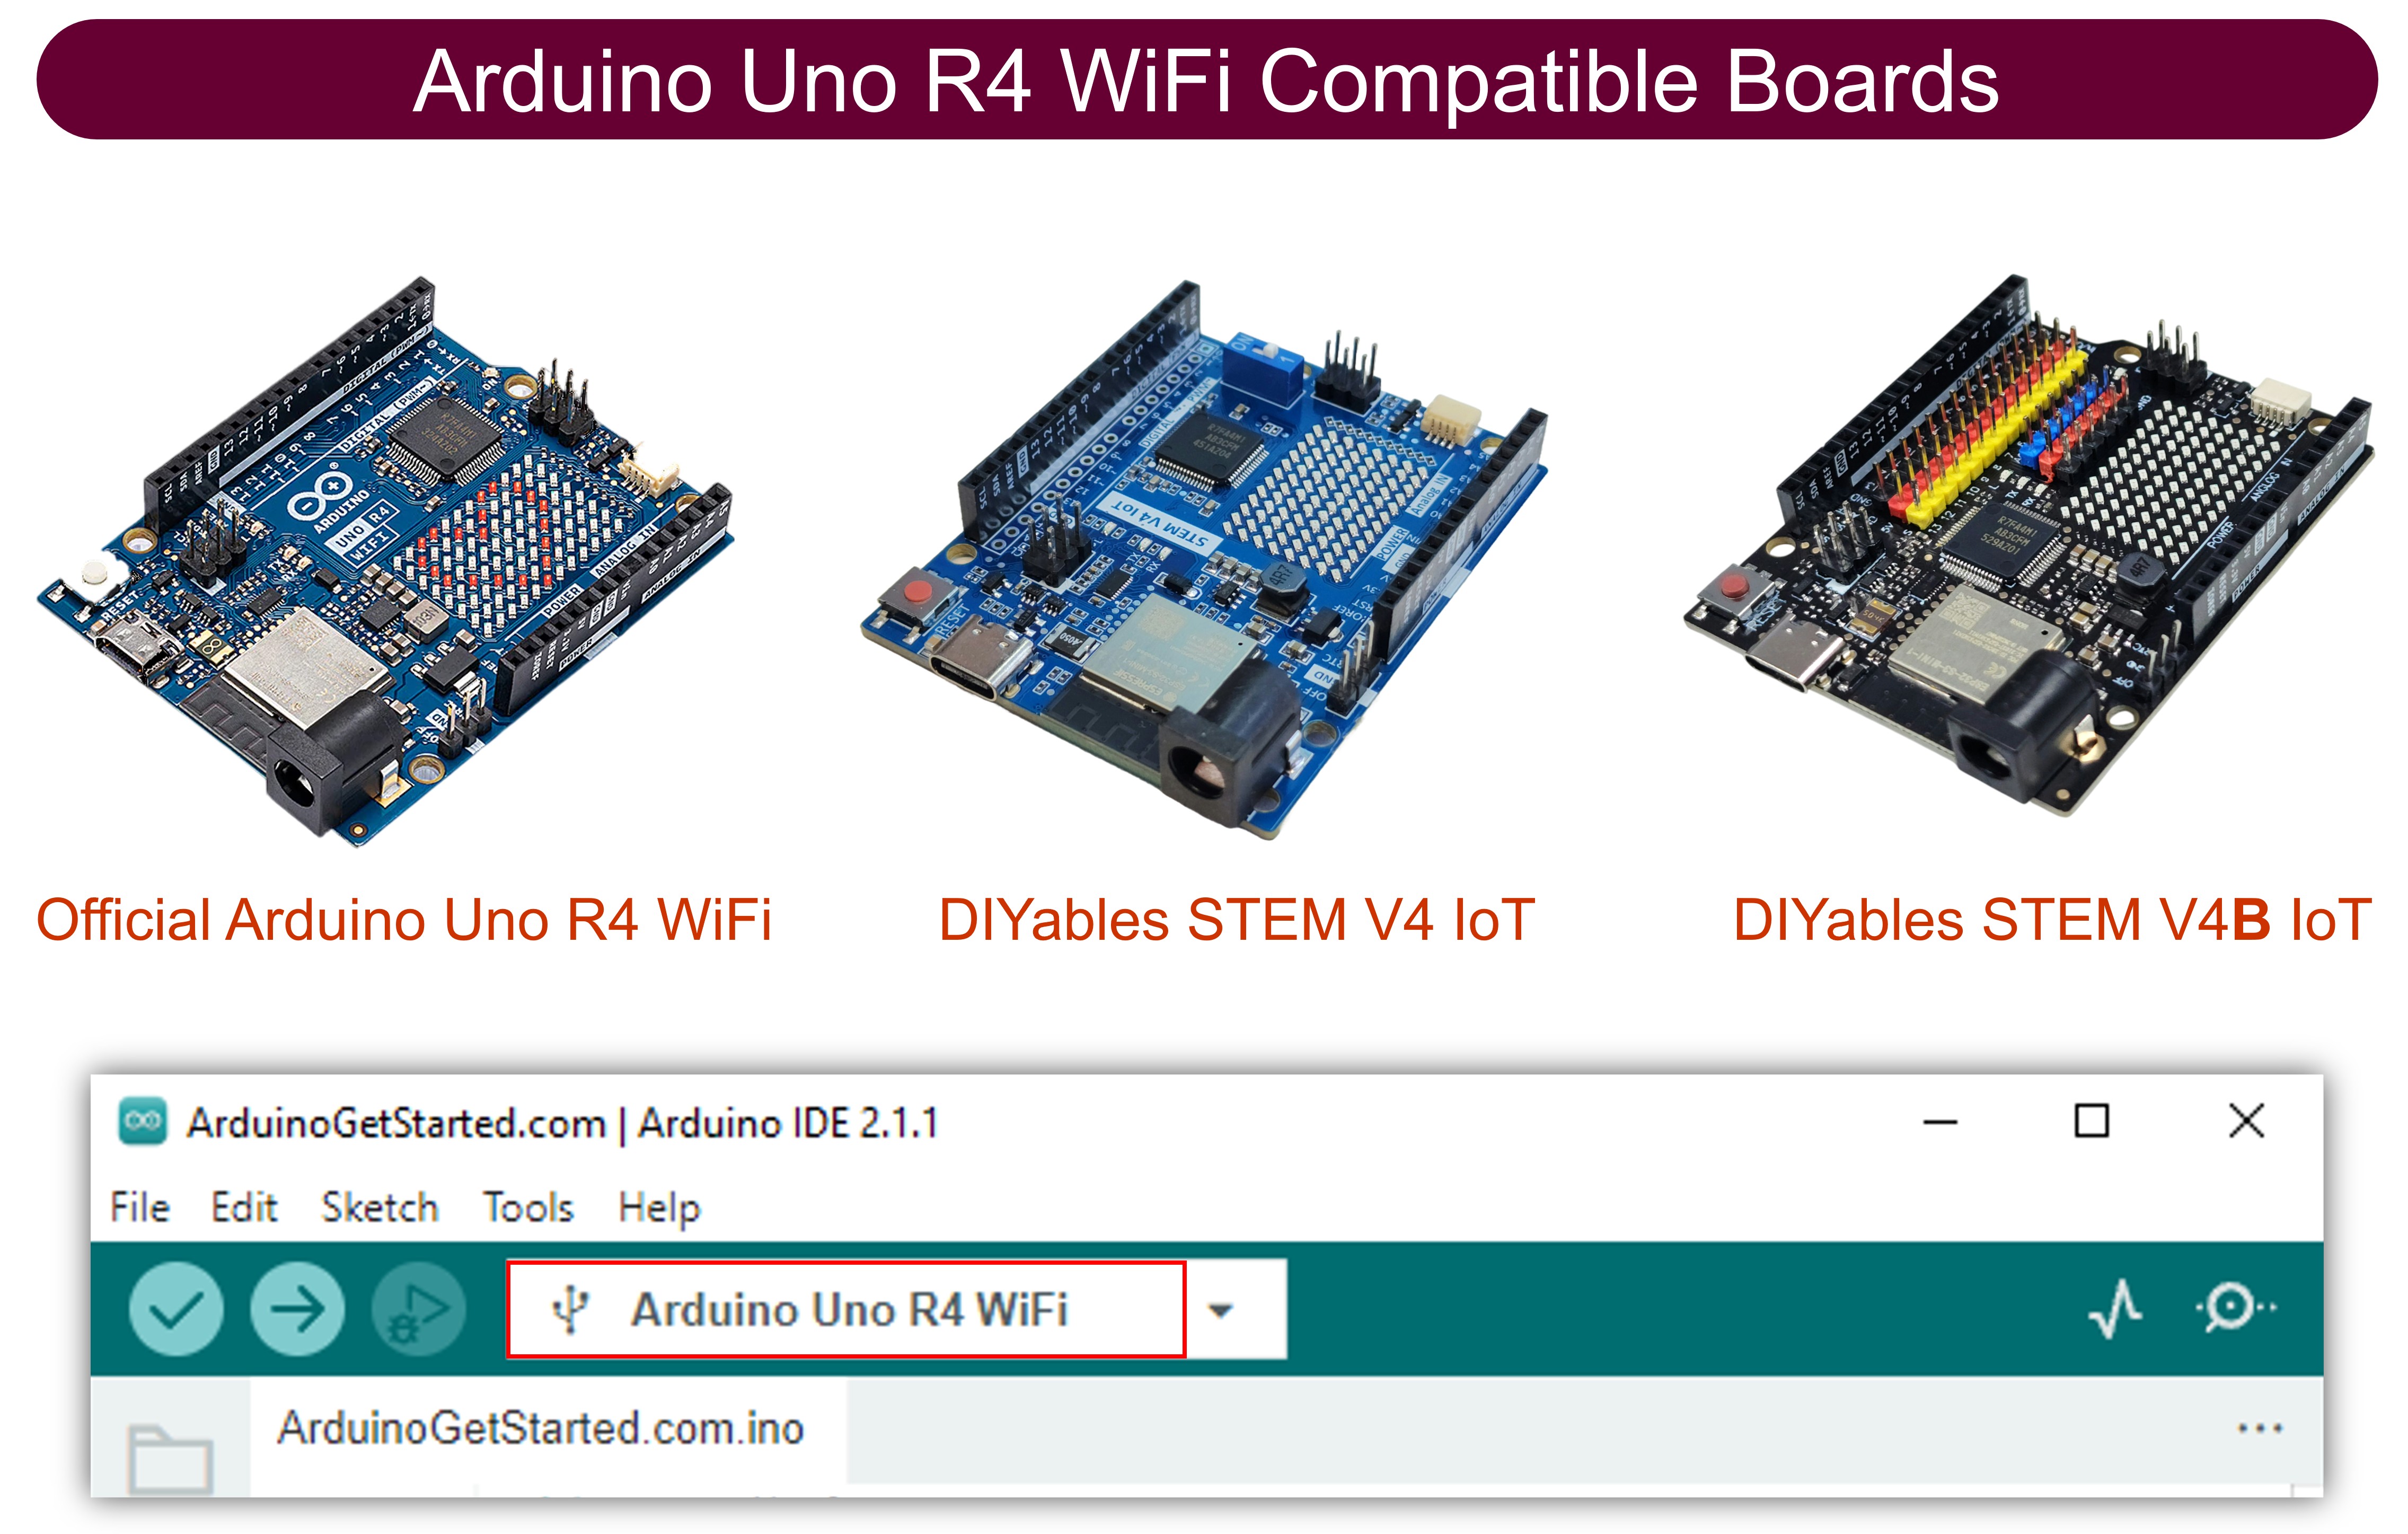
Chọn bo Arduino Uno R4 phù hợp (ví dụ: Arduino Uno R4 WiFi) và cổng COM.
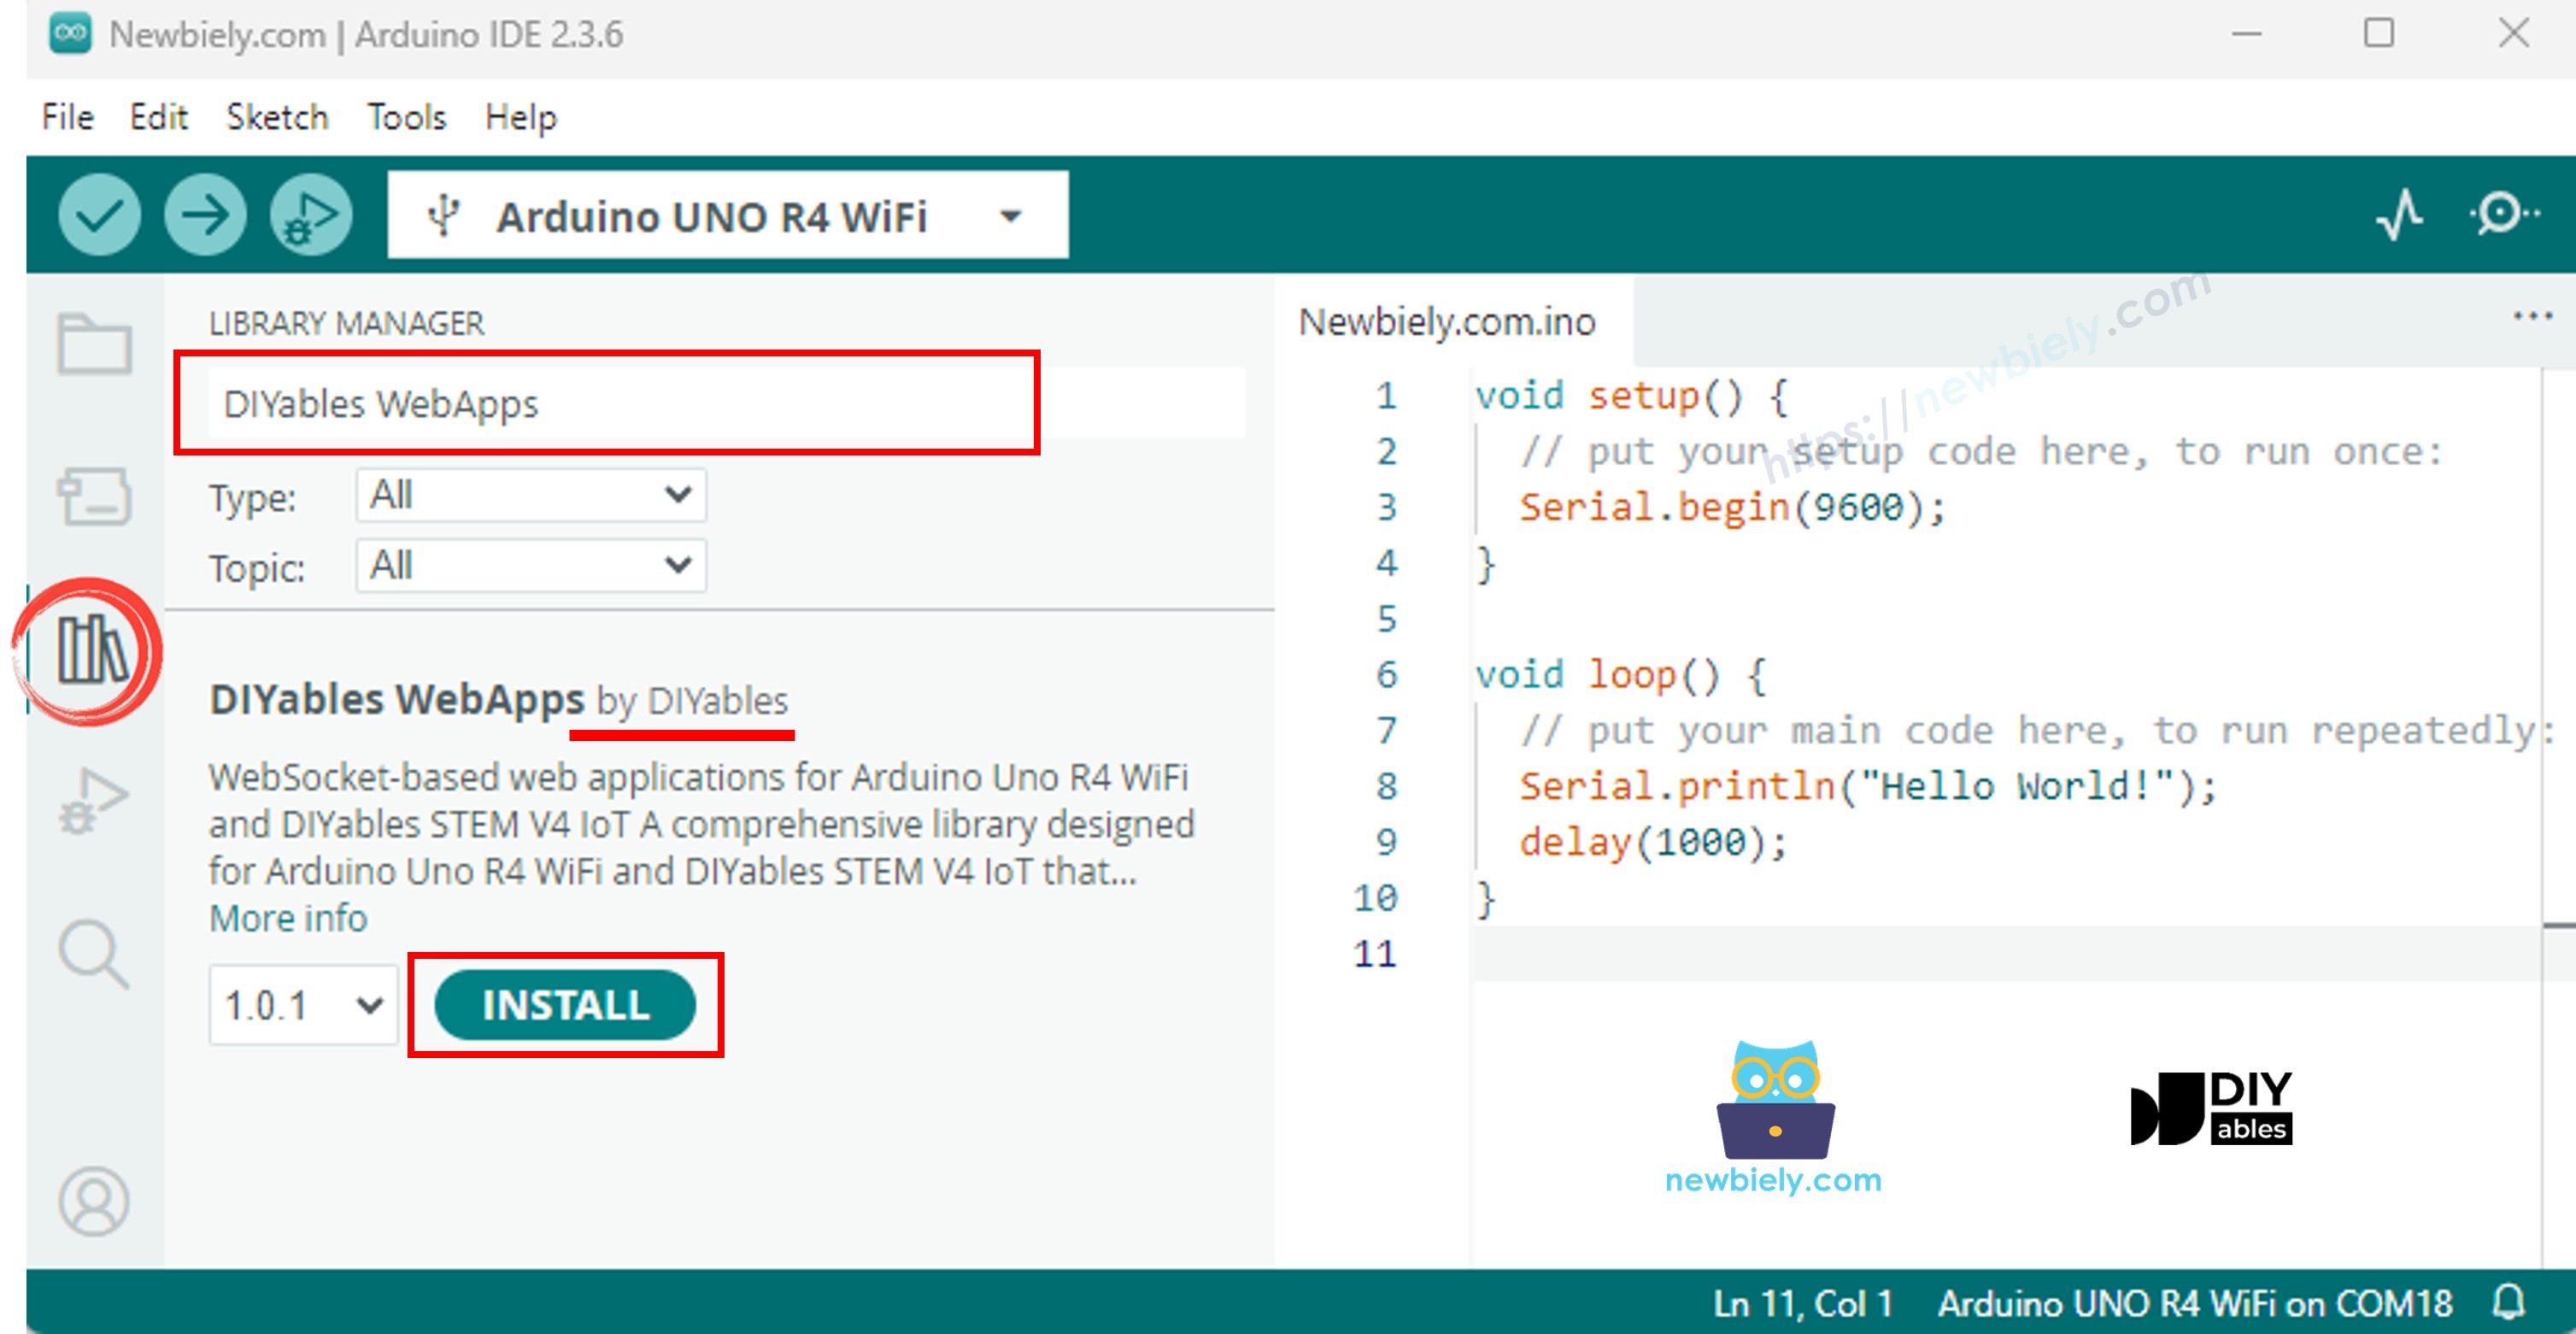
Điều hướng đến biểu tượng Libraries trên thanh bên trái của Arduino IDE.
Tìm kiếm "DIYables WebApps", sau đó tìm thư viện DIYables WebApps của DIYables
Nhấp nút Install để cài đặt thư viện.
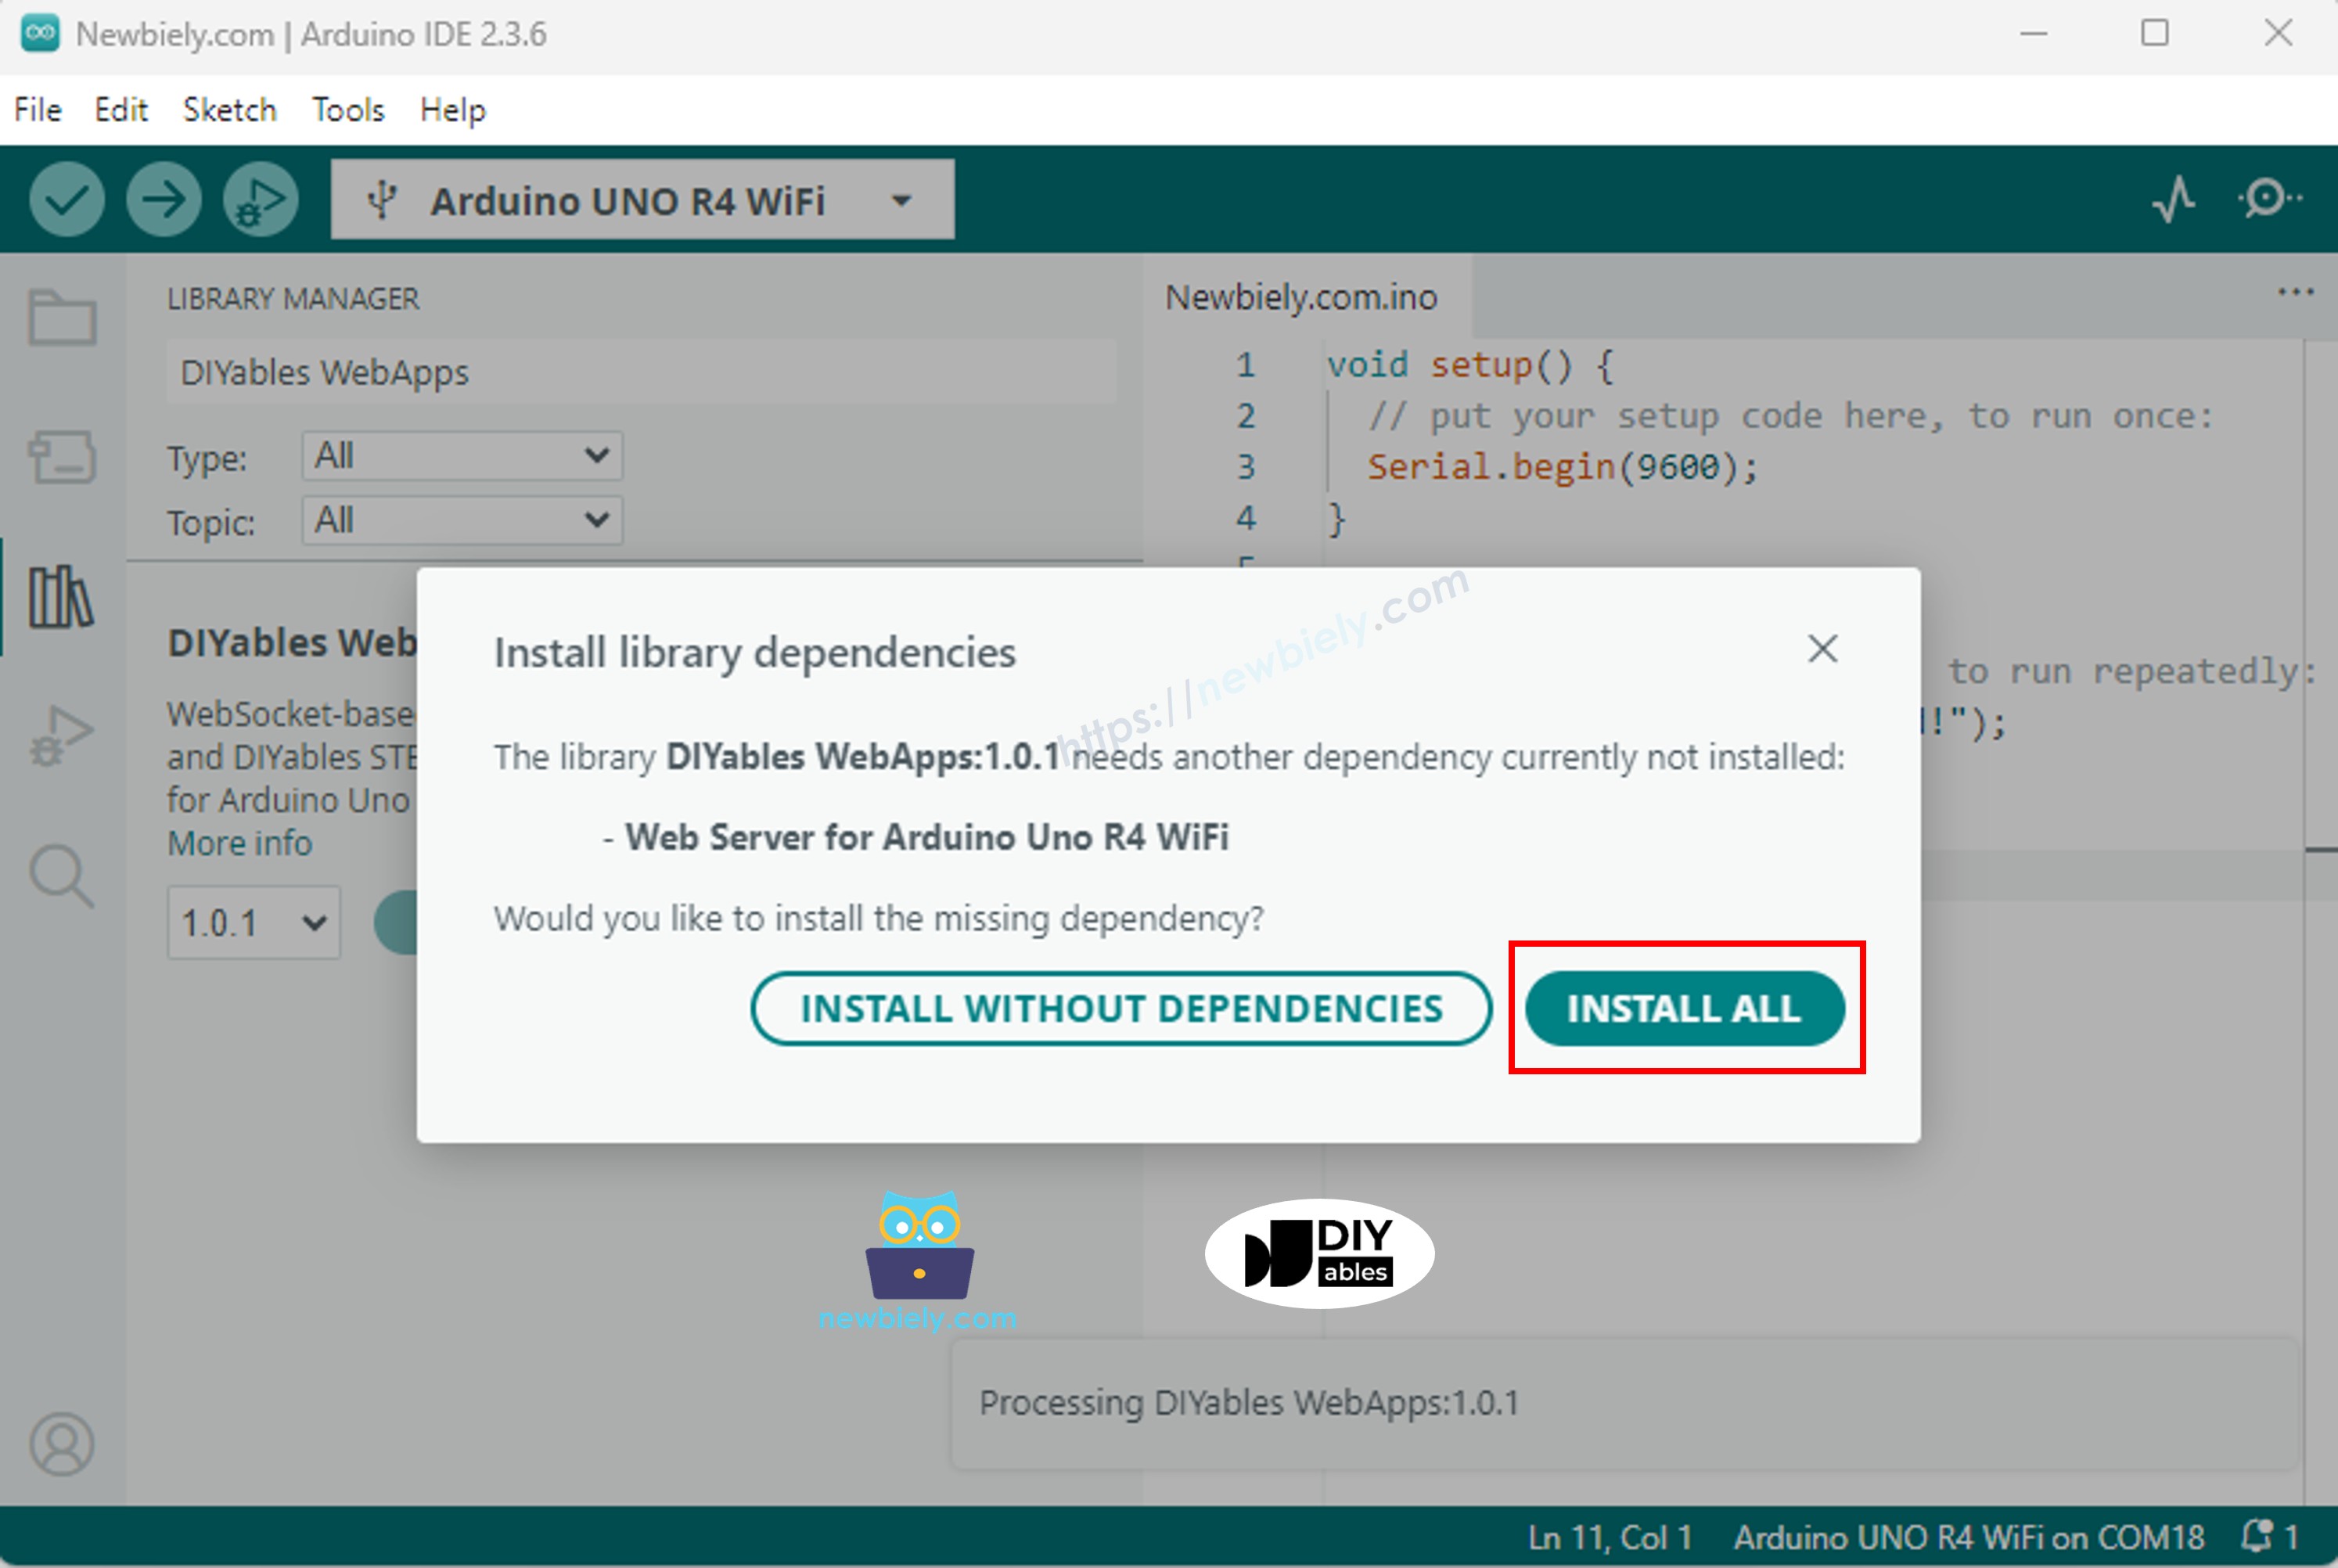
Bạn sẽ được yêu cầu cài đặt một số thư viện phụ thuộc khác
Nhấp nút Install All để cài đặt tất cả thư viện phụ thuộc.
Trên Arduino IDE, đi đến File Examples DIYables WebApps MultipleWebApps example, hoặc copy code phía trên và dán vào editor của Arduino IDE
/* * DIYables WebApp Library - Multiple WebApps Example * * This example demonstrates multiple web apps of the DIYables WebApp library: * - Home page with links to multiple web apps * - Web Monitor: Real-time serial monitoring via WebSocket * - Web Slider: Dual slider control * - Web Joystick: Interactive joystick control * - Web Rotator: Interactive rotatable disc control * - Web Analog Gauge: Professional circular gauge for sensor monitoring * - Web Table: Two-column data table with real-time updates * - Web Plotter: See WebPlotter example for real-time data visualization * * Features: * - Simplified callback system - no manual command parsing needed * - Automatic state synchronization and JSON handling * - All protocol details handled by the library * - Template for hardware control * * Hardware: Arduino Uno R4 WiFi or DIYables STEM V4 IoT * * Setup: * 1. Update WiFi credentials below * 2. Upload the sketch to your Arduino * 3. Open Serial Monitor to see the IP address * 4. Navigate to the IP address in your web browser */#include <DIYablesWebApps.h>// WiFi credentials - UPDATE THESE WITH YOUR NETWORKconstchar WIFI_SSID[] = "YOUR_WIFI_SSID";constchar WIFI_PASSWORD[] = "YOUR_WIFI_PASSWORD";// Create WebApp server and page instancesUnoR4ServerFactory factory;DIYablesWebAppServerwebAppsServer(factory, 80, 81);DIYablesHomePage homePage;DIYablesWebMonitorPage webMonitorPage;DIYablesWebSliderPage webSliderPage;DIYablesWebJoystickPage webJoystickPage(false, 5); // autoReturn=false, sensitivity=5DIYablesWebRotatorPage webRotatorPage(ROTATOR_MODE_CONTINUOUS); // Continuous rotation mode (0-360°)DIYablesWebAnalogGaugePage webAnalogGaugePage(0.0, 100.0, "%"); // Range: 0-100%, units: %DIYablesWebTablePage webTablePage;// Variables to track statesint currentSlider1 = 64; // Slider 1 value (0-255)int currentSlider2 = 128; // Slider 2 value (0-255)int currentJoystickX = 0; // Current joystick X value (-100 to 100)int currentJoystickY = 0; // Current joystick Y value (-100 to 100)int currentRotatorAngle = 0; // Current rotator angle (0-360°)float currentGaugeValue = 50.0; // Current gauge value (0.0-100.0)voidsetup() {Serial.begin(9600);delay(1000);// TODO: Initialize your hardware pins hereSerial.println("DIYables WebApp - Multiple Apps Example");// Add all web applications to the serverwebAppsServer.addApp(&homePage);webAppsServer.addApp(&webMonitorPage);webAppsServer.addApp(&webSliderPage);webAppsServer.addApp(&webJoystickPage);webAppsServer.addApp(&webRotatorPage);webAppsServer.addApp(&webAnalogGaugePage);webAppsServer.addApp(&webTablePage);// Add more web apps here (e.g., WebPlotter)// Set 404 Not Found page (optional - for better user experience)webAppsServer.setNotFoundPage(DIYablesNotFoundPage());// Configure table structure (only attribute names, values will be updated dynamically) webTablePage.addRow("Arduino Status"); webTablePage.addRow("WiFi Connected"); webTablePage.addRow("Uptime"); webTablePage.addRow("Slider 1"); webTablePage.addRow("Slider 2"); webTablePage.addRow("Joystick X"); webTablePage.addRow("Joystick Y"); webTablePage.addRow("Rotator Angle"); webTablePage.addRow("Gauge Value");// Start the WebApp serverif (!webAppsServer.begin(WIFI_SSID, WIFI_PASSWORD)) {while (1) {Serial.println("Failed to start WebApp server!");delay(1000); } } setupCallbacks();}void setupCallbacks() {// Web Monitor callback - echo messages back webMonitorPage.onWebMonitorMessage([](const String& message) {Serial.println("Web Monitor: " + message); webMonitorPage.sendToWebMonitor("Arduino received: " + message); });// Web Slider callback - handle slider values webSliderPage.onSliderValueFromWeb([](int slider1, int slider2) {// Store the received values currentSlider1 = slider1; currentSlider2 = slider2;// Print slider values (0-255) without String concatenationSerial.print("Slider 1: ");Serial.print(slider1);Serial.print(", Slider 2: ");Serial.println(slider2);// Update table with new slider values using String() conversion webTablePage.sendValueUpdate("Slider 1", String(slider1)); webTablePage.sendValueUpdate("Slider 2", String(slider2));// TODO: Add your control logic here based on slider values// Examples:// - Control PWM: analogWrite(LED_PIN, slider1);// - Control servos: servo.write(map(slider1, 0, 255, 0, 180));// - Control motor speed: analogWrite(MOTOR_PIN, slider2);// Update gauge based on slider1 value (map 0-255 to 0-100) currentGaugeValue = map(slider1, 0, 255, 0, 100); webAnalogGaugePage.sendToWebAnalogGauge(currentGaugeValue);char gaugeStr[16]; snprintf(gaugeStr, sizeof(gaugeStr), "%.1f%%", currentGaugeValue); webTablePage.sendValueUpdate("Gauge Value", String(gaugeStr)); });// Handle slider value requests webSliderPage.onSliderValueToWeb([]() { webSliderPage.sendToWebSlider(currentSlider1, currentSlider2); });// Web Joystick callback - handle joystick movement webJoystickPage.onJoystickValueFromWeb([](int x, int y) {// Store the received values currentJoystickX = x; currentJoystickY = y;// Print joystick position values (-100 to +100)Serial.print("Joystick - X: ");Serial.print(x);Serial.print(", Y: ");Serial.println(y);Serial.print(x);Serial.print(", Y: ");Serial.println(y);// Update table with new joystick values webTablePage.sendValueUpdate("Joystick X", String(x)); webTablePage.sendValueUpdate("Joystick Y", String(y));// TODO: Add your control logic here based on joystick position// Examples:// - Control motors: if (x > 50) { /* move right */ }// - Control servos: servo.write(map(y, -100, 100, 0, 180));// - Control LEDs: analogWrite(LED_PIN, map(abs(x), 0, 100, 0, 255)); });// Handle joystick values requests (when web page loads/reconnects) webJoystickPage.onJoystickValueToWeb([]() { webJoystickPage.sendToWebJoystick(currentJoystickX, currentJoystickY); });// Web Rotator callback - handle rotation angle changes webRotatorPage.onRotatorAngleFromWeb([](float angle) {// Store the received angle currentRotatorAngle = (int)angle;// Print rotator angle (0-360°)Serial.println("Rotator angle: " + String(angle) + "°");// Update table with new rotator angle webTablePage.sendValueUpdate("Rotator Angle", String(angle, 0) + "°");// TODO: Add your control logic here based on rotator angle// Examples:// - Control servo: servo.write(map(angle, 0, 360, 0, 180));// - Control stepper motor: stepper.moveTo(angle);// - Control directional LED strip: setLEDDirection(angle); });// Handle analog gauge value requests (when web page loads/reconnects) webAnalogGaugePage.onGaugeValueRequest([]() { webAnalogGaugePage.sendToWebAnalogGauge(currentGaugeValue); });// Handle table data requests (when web page loads/reconnects) webTablePage.onTableValueRequest([]() {// Send initial values to the table webTablePage.sendValueUpdate("Arduino Status", "Running"); webTablePage.sendValueUpdate("WiFi Connected", "Yes"); webTablePage.sendValueUpdate("Uptime", "0 seconds"); webTablePage.sendValueUpdate("Slider 1", String(currentSlider1)); webTablePage.sendValueUpdate("Slider 2", String(currentSlider2)); webTablePage.sendValueUpdate("Joystick X", String(currentJoystickX)); webTablePage.sendValueUpdate("Joystick Y", String(currentJoystickY)); webTablePage.sendValueUpdate("Rotator Angle", String(currentRotatorAngle) + "°"); webTablePage.sendValueUpdate("Gauge Value", String(currentGaugeValue, 1) + "%"); });}voidloop() {// Handle WebApp server communicationswebAppsServer.loop();// Update table with current uptime every 5 secondsstaticunsignedlong lastUptimeUpdate = 0;if (millis() - lastUptimeUpdate > 5000) { lastUptimeUpdate = millis();unsignedlong uptimeSeconds = millis() / 1000;String uptimeStr = String(uptimeSeconds) + " seconds";if (uptimeSeconds >= 60) { uptimeStr = String(uptimeSeconds / 60) + "m " + String(uptimeSeconds % 60) + "s"; } webTablePage.sendValueUpdate("Uptime", uptimeStr); }// Simulate sensor data updates every 3 secondsstaticunsignedlong lastSensorUpdate = 0;if (millis() - lastSensorUpdate > 3000) { lastSensorUpdate = millis();// Simulate a sensor reading that varies over timefloat sensorValue = 50.0 + 30.0 * sin(millis() / 10000.0); // Oscillates between 20-80 currentGaugeValue = sensorValue;// Update gauge and table webAnalogGaugePage.sendToWebAnalogGauge(currentGaugeValue); webTablePage.sendValueUpdate("Gauge Value", String(currentGaugeValue, 1) + "%"); }// TODO: Add your main application code heredelay(10);}
Cấu hình thông tin WiFi trong code bằng cách cập nhật những dòng này:
Nhấp nút Upload trên Arduino IDE để upload code lên Arduino UNO R4/DIYables STEM V4 IoT
Mở Serial Monitor
Kiểm tra kết quả trên Serial Monitor. Nó sẽ hiển thị như sau
Newbiely | Arduino IDE 2.3.8
──
☐
✕
File
Edit
Sketch
Tools
Help
Arduino Uno R4 WiFi
Newbiely.ino
···
8Serial.println("Hello World!");
Output
Serial Monitor
Message (Enter to send message to 'Arduino Uno R4 WiFi' on 'COM15')
New Line
9600 baud
DIYables WebApp - Multiple Apps Example
INFO: Added app /
INFO: Added app /web-monitor
INFO: Added app /web-slider
INFO: Added app /web-joystick
INFO: Added app /web-rotator
INFO: Added app /web-gauge
INFO: Added app /web-table
DIYables WebApp Library
Platform: Arduino Uno R4 WiFi
Network connected!
IP address: 192.168.0.2
HTTP server started on port 80
Configuring WebSocket server callbacks...
WebSocket server started on port 81
WebSocket URL: ws://192.168.0.2:81
WebSocket server started on port 81
==========================================
DIYables WebApp Ready!
==========================================
📱 Web Interface: http://192.168.0.2
🔗 WebSocket: ws://192.168.0.2:81
📋 Available Applications:
🏠 Home Page: http://192.168.0.2/
📊 Web Monitor: http://192.168.0.2/web-monitor
🎚️ Web Slider: http://192.168.0.2/web-slider
🕹️ Web Joystick: http://192.168.0.2/web-joystick
🔄 Web Rotator: http://192.168.0.2/web-rotator
⏲️ Web Analog Gauge: http://192.168.0.2/web-gauge
📊 Web Table: http://192.168.0.2/web-table
==========================================
Ln 11, Col 1
Arduino Uno R4 WiFi on COM15
2
Nếu bạn không thấy gì, hãy khởi động lại bo Arduino.
Ghi nhớ địa chỉ IP hiển thị và nhập địa chỉ này vào thanh địa chỉ của trình duyệt web trên smartphone hoặc PC.
Ví dụ: http://192.168.0.2
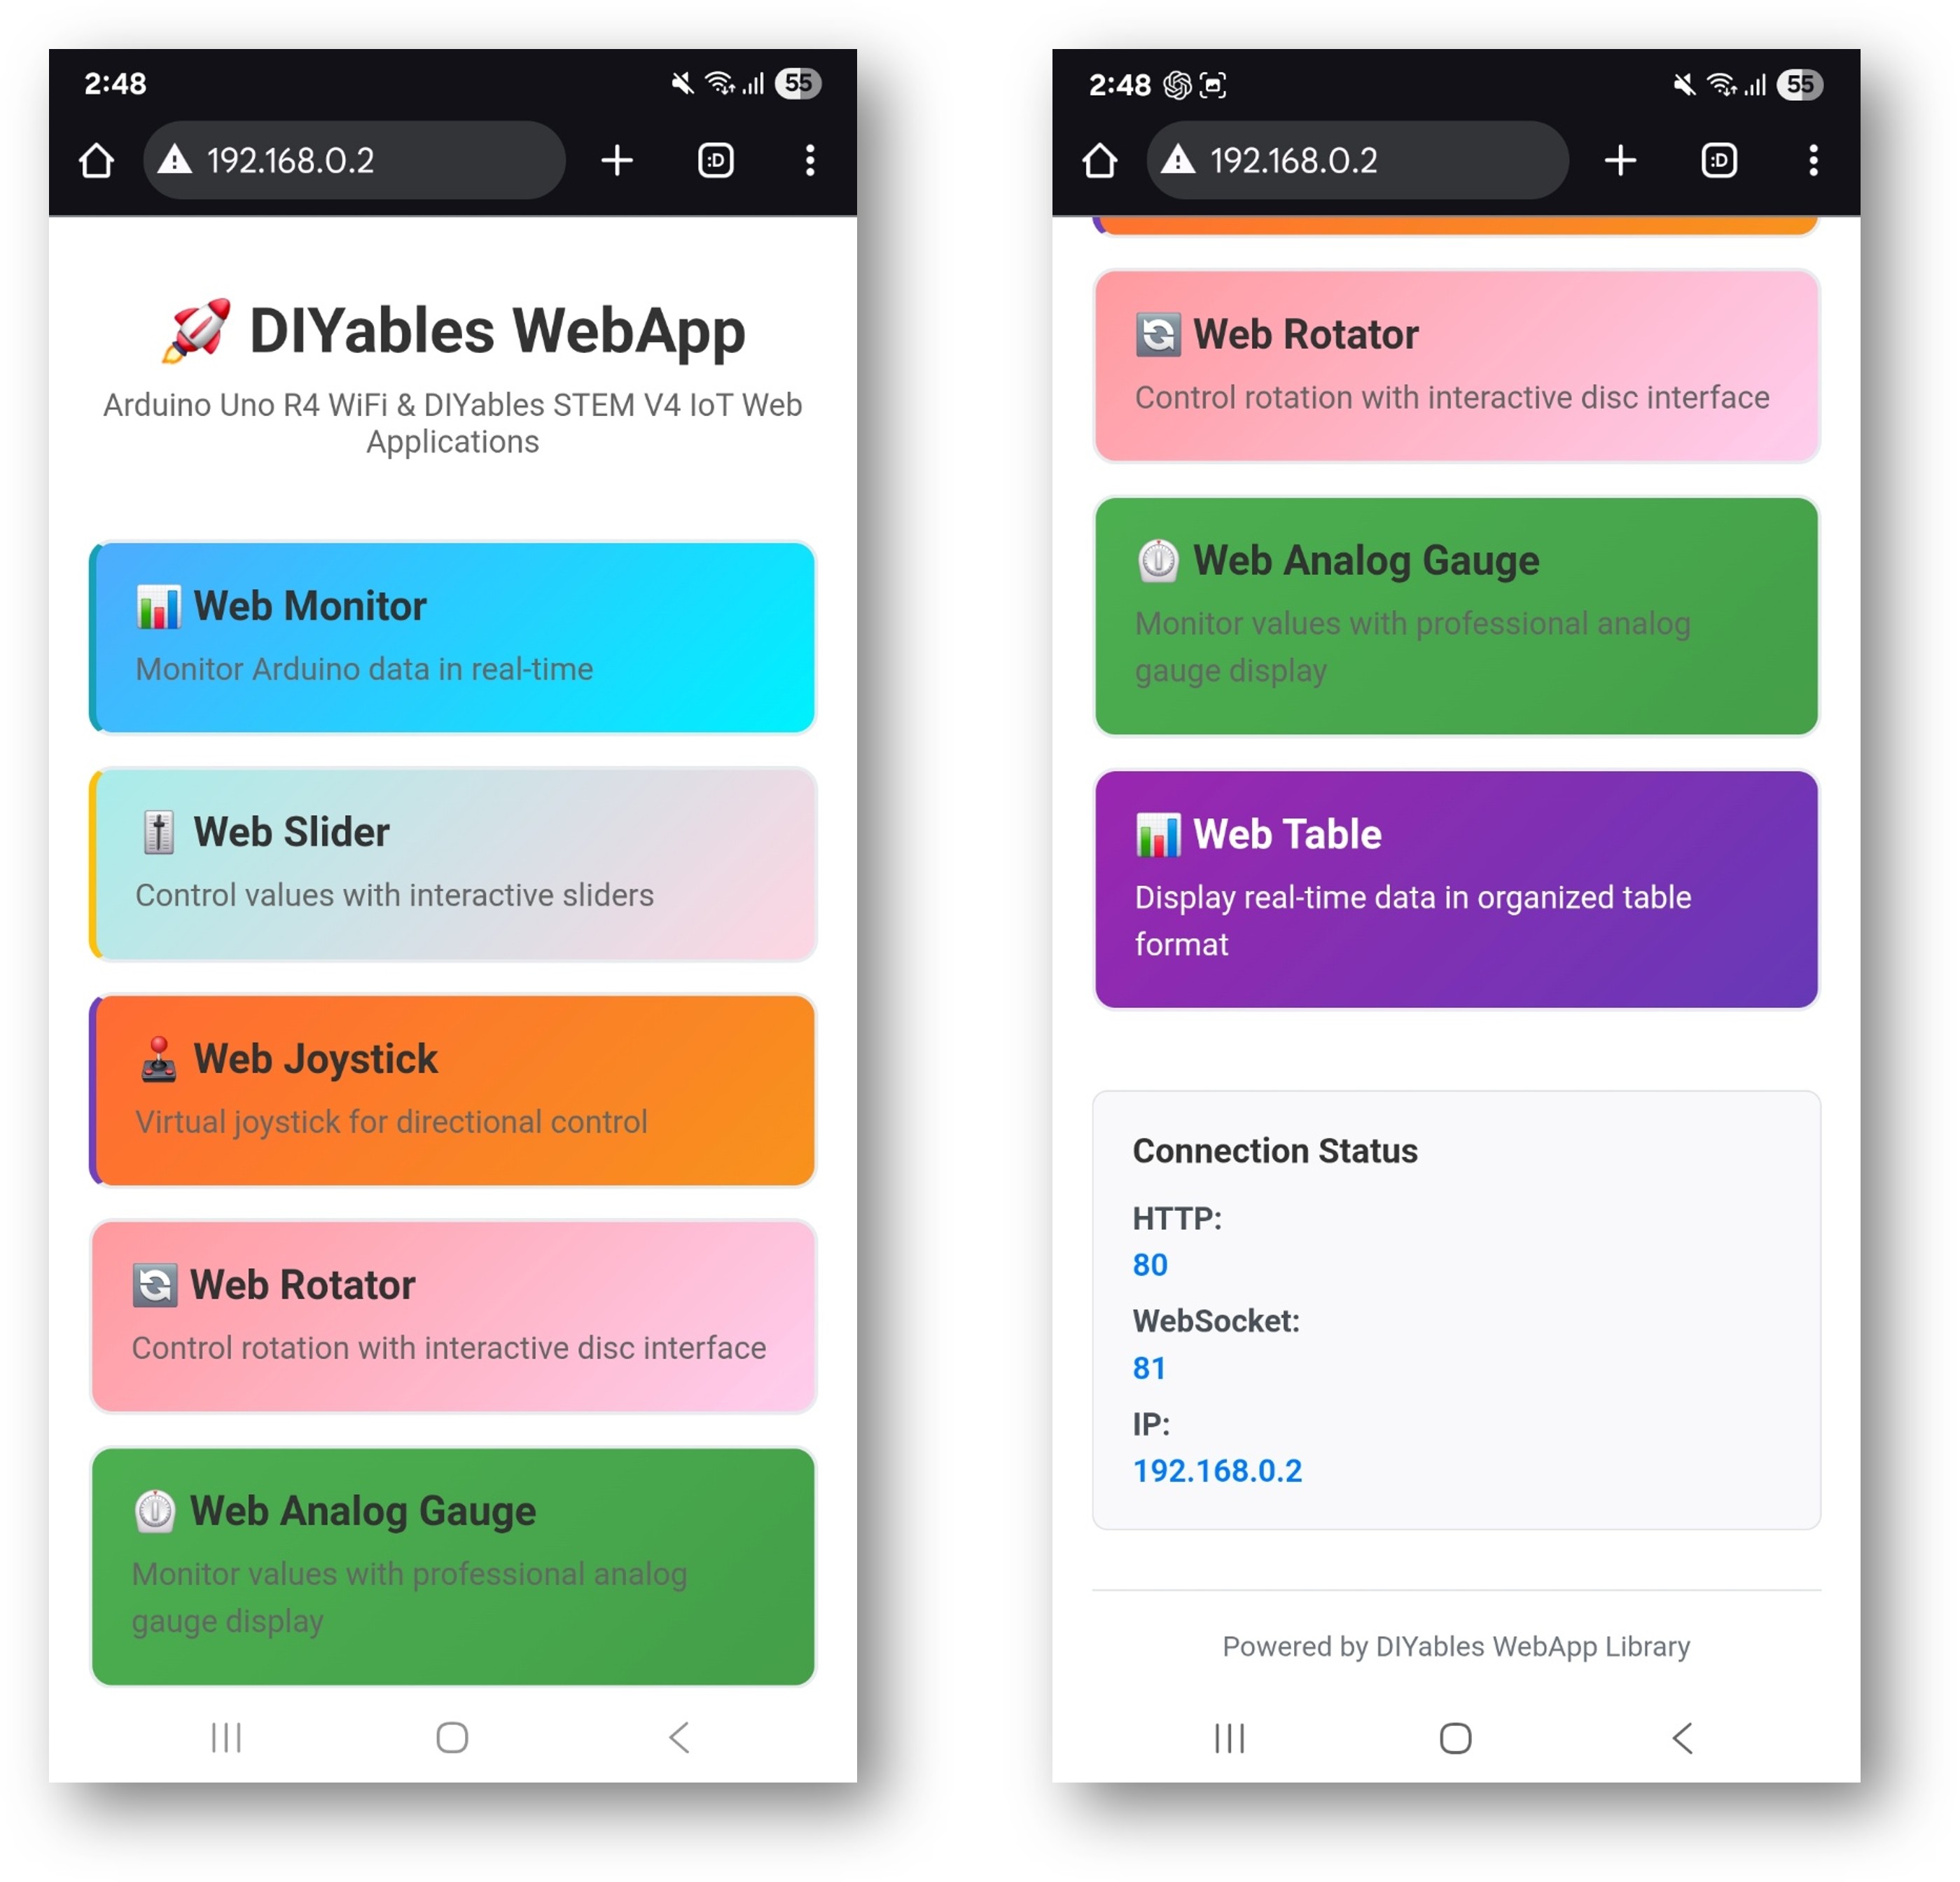
Bạn sẽ thấy trang chủ với tất cả ứng dụng web như hình dưới đây:
Nhấp vào bất kỳ liên kết ứng dụng web nào (Chat, Web Monitor, Web Digital Pins, Web Slider, Web Joystick, v.v.), bạn sẽ thấy giao diện của ứng dụng web tương ứng.
Hoặc bạn cũng có thể truy cập trực tiếp từng trang bằng địa chỉ IP theo sau là đường dẫn ứng dụng. Ví dụ: http://192.168.0.2/chat, http://192.168.0.2/web-monitor, v.v.
Khám phá tất cả ứng dụng web: thử chat với Arduino, giám sát serial output, điều khiển digital pin, điều chỉnh slider và sử dụng joystick ảo để trải nghiệm đầy đủ khả năng của giao diện web tích hợp.
Điều Hướng Giao Diện Web
Bảng Điều Khiển Trang Chủ
Trang chủ đóng vai trò là trung tâm điều khiển với liên kết đến tất cả ứng dụng:
Web Monitor: /webmonitor - Giao diện giao tiếp serial
Chat: /chat - Giao tiếp tương tác với Arduino
Digital Pins: /digital-pins - Điều khiển và giám sát pin
Web Slider: /webslider - Hai slider điều khiển analog
Web Joystick: /webjoystick - Giao diện điều khiển vị trí 2D
URL Ứng Dụng
Truy cập trực tiếp từng giao diện:
http://[ARDUINO_IP]/ # Trang chủ
http://[ARDUINO_IP]/webmonitor # Giao diện serial monitor
http://[ARDUINO_IP]/chat # Giao diện chat
http://[ARDUINO_IP]/digital-pins # Điều khiển pin
http://[ARDUINO_IP]/webslider # Điều khiển slider
http://[ARDUINO_IP]/webjoystick # Điều khiển joystick
Tùy Chỉnh Sáng Tạo - Giải Phóng Sức Sáng Tạo
Ví dụ toàn diện này cung cấp nền tảng cho các dự án sáng tạo của bạn. Chỉnh sửa và điều chỉnh các cấu hình dưới đây để xây dựng các ứng dụng IoT tuyệt vời phù hợp với tầm nhìn độc đáo của bạn.
Cấu Hình Digital Pin
Ví dụ cấu hình sẵn các pin cụ thể cho các mục đích khác nhau:
Output Pin (Có thể điều khiển qua Web)
webDigitalPinsPage.enablePin(2, WEB_PIN_OUTPUT); // Output đa năngwebDigitalPinsPage.enablePin(3, WEB_PIN_OUTPUT); // Output đa năngwebDigitalPinsPage.enablePin(4, WEB_PIN_OUTPUT); // Output đa năngwebDigitalPinsPage.enablePin(13, WEB_PIN_OUTPUT); // LED tích hợp
// Tạo joystick với cài đặt tùy chỉnh// autoReturn=false: Joystick duy trì ở vị trí cuối khi thả// sensitivity=5: Chỉ gửi cập nhật khi di chuyển > 5%DIYablesWebJoystickPage webJoystickPage(false, 5);
Biến Trạng Thái
Ví dụ duy trì trạng thái đồng bộ trên tất cả giao diện:
int pinStates[16] = { LOW }; // Theo dõi trạng thái pin (pin 0-13)int currentSlider1 = 64; // Giá trị Slider 1 (0-255) - 25%int currentSlider2 = 128; // Giá trị Slider 2 (0-255) - 50%int currentJoystickX = 0; // Giá trị Joystick X (-100 đến 100)int currentJoystickY = 0; // Giá trị Joystick Y (-100 đến 100)
Lệnh Chat Tích Hợp
Giao diện chat bao gồm một số lệnh được lập trình sẵn:
Lệnh Cơ Bản
hello - Phản hồi chào hỏi thân thiện
time - Hiển thị thời gian hoạt động của Arduino tính bằng giây
status - Báo cáo trạng thái Arduino và trạng thái LED
help - Liệt kê các lệnh có sẵn
Lệnh Điều Khiển
led on - Bật LED tích hợp
led off - Tắt LED tích hợp
Ví Dụ Phiên Chat
User: hello
Arduino: Hello! I'm your Arduino. How can I help you?
User: led on
Arduino: Built-in LED is now ON!
User: time
Arduino: I've been running for 1245 seconds.
User: status
Arduino: Status: Running smoothly! LED is ON
Ví Dụ Tích Hợp Lập Trình
Hệ Thống Điều Khiển Robot Hoàn Chỉnh
#include <Servo.h>// Định nghĩa phần cứngconstint MOTOR_LEFT_PWM = 9;constint MOTOR_RIGHT_PWM = 10;constint SERVO_PAN = 11;constint SERVO_TILT = 12;constint LED_STRIP_PIN = 6;Servo panServo, tiltServo;voidsetup() {// Khởi tạo phần cứng panServo.attach(SERVO_PAN); tiltServo.attach(SERVO_TILT);pinMode(MOTOR_LEFT_PWM, OUTPUT);pinMode(MOTOR_RIGHT_PWM, OUTPUT);// ... Mã thiết lập WebApp ... setupRobotCallbacks();}void setupRobotCallbacks() {// Sử dụng joystick để di chuyển robot webJoystickPage.onJoystickValueFromWeb([](int x, int y) {// Chuyển đổi joystick thành tank driveint leftSpeed = y + (x / 2);int rightSpeed = y - (x / 2); leftSpeed = constrain(leftSpeed, -100, 100); rightSpeed = constrain(rightSpeed, -100, 100);// Áp dụng giới hạn tốc độ từ slider leftSpeed = map(leftSpeed, -100, 100, -currentSlider1, currentSlider1); rightSpeed = map(rightSpeed, -100, 100, -currentSlider1, currentSlider1);// Điều khiển motoranalogWrite(MOTOR_LEFT_PWM, abs(leftSpeed));analogWrite(MOTOR_RIGHT_PWM, abs(rightSpeed));Serial.println("Robot - Trái: " + String(leftSpeed) + ", Phải: " + String(rightSpeed)); });// Sử dụng slider để điều khiển camera pan/tilt webSliderPage.onSliderValueFromWeb([](int slider1, int slider2) {// Slider 1 điều khiển tốc độ tối đa, Slider 2 điều khiển nghiêng cameraint panAngle = map(currentJoystickX, -100, 100, 0, 180);int tiltAngle = map(slider2, 0, 255, 0, 180); panServo.write(panAngle); tiltServo.write(tiltAngle);Serial.println("Camera - Pan: " + String(panAngle) + "°, Tilt: " + String(tiltAngle) + "°"); });// Sử dụng digital pin cho các chức năng đặc biệt webDigitalPinsPage.onPinWrite([](int pin, int state) {switch (pin) {case 2: // Đèn phadigitalWrite(pin, state);Serial.println("Đèn pha " + String(state ? "BẬT" : "TẮT"));break;case 3: // Còi/Buzzerif (state) {// Kích hoạt chuỗi buzzerdigitalWrite(pin, HIGH);delay(200);digitalWrite(pin, LOW); }break;case 4: // Dừng khẩn cấpif (state) {analogWrite(MOTOR_LEFT_PWM, 0);analogWrite(MOTOR_RIGHT_PWM, 0);Serial.println("KÍCH HOẠT DỪNG KHẨN CẤP"); }break; } });// Lệnh chat nâng cao cho điều khiển robot chatPage.onChatMessage([](constString& message) {String msg = message; msg.toLowerCase();if (msg.indexOf("stop") >= 0) {analogWrite(MOTOR_LEFT_PWM, 0);analogWrite(MOTOR_RIGHT_PWM, 0); chatPage.sendToChat("Robot đã dừng!");return; }if (msg.indexOf("center camera") >= 0) { panServo.write(90); tiltServo.write(90); chatPage.sendToChat("Camera đã được căn giữa!");return; }if (msg.indexOf("speed") >= 0) {String response = "Tốc độ tối đa hiện tại: " + String(map(currentSlider1, 0, 255, 0, 100)) + "%"; chatPage.sendToChat(response);return; }// Phản hồi mặc định cho lệnh không xác định chatPage.sendToChat("Lệnh robot: stop, center camera, speed"); });}
Hệ Thống Điều Khiển Nhà Thông Minh
// Gán pin tự động hóa gia đìnhconstint LIVING_ROOM_LIGHTS = 2;constint BEDROOM_LIGHTS = 3;constint KITCHEN_LIGHTS = 4;constint FAN_CONTROL = 9;constint AC_CONTROL = 10;constint MOTION_SENSOR = 8;constint DOOR_SENSOR = 9;void setupHomeAutomation() {// Cấu hình pin tự động hóa gia đìnhpinMode(LIVING_ROOM_LIGHTS, OUTPUT);pinMode(BEDROOM_LIGHTS, OUTPUT);pinMode(KITCHEN_LIGHTS, OUTPUT);pinMode(FAN_CONTROL, OUTPUT);pinMode(AC_CONTROL, OUTPUT);pinMode(MOTION_SENSOR, INPUT);pinMode(DOOR_SENSOR, INPUT_PULLUP);// Digital pin cho điều khiển đèn phòng webDigitalPinsPage.onPinWrite([](int pin, int state) {digitalWrite(pin, state);String room;switch (pin) {case 2: room = "Phòng Khách"; break;case 3: room = "Phòng Ngủ"; break;case 4: room = "Nhà Bếp"; break;default: room = "Pin " + String(pin); break; }Serial.println("Đèn " + room + " " + String(state ? "BẬT" : "TẮT"));// Gửi thông báo đến chatString message = "Đèn " + room + " đã " + String(state ? "BẬT" : "TẮT"); chatPage.sendToChat(message); });// Slider cho điều khiển quạt và AC webSliderPage.onSliderValueFromWeb([](int slider1, int slider2) {// Slider 1 điều khiển tốc độ quạt (0-255)analogWrite(FAN_CONTROL, slider1);// Slider 2 điều khiển cường độ AC (0-255)analogWrite(AC_CONTROL, slider2);Serial.println("Quạt: " + String(map(slider1, 0, 255, 0, 100)) + "%, " +"AC: " + String(map(slider2, 0, 255, 0, 100)) + "%"); });// Lệnh chat nâng cao cho điều khiển nhà chatPage.onChatMessage([](constString& message) {String msg = message; msg.toLowerCase();if (msg.indexOf("all lights on") >= 0) {digitalWrite(LIVING_ROOM_LIGHTS, HIGH);digitalWrite(BEDROOM_LIGHTS, HIGH);digitalWrite(KITCHEN_LIGHTS, HIGH); chatPage.sendToChat("Tất cả đèn đã BẬT!");return; }if (msg.indexOf("all lights off") >= 0) {digitalWrite(LIVING_ROOM_LIGHTS, LOW);digitalWrite(BEDROOM_LIGHTS, LOW);digitalWrite(KITCHEN_LIGHTS, LOW); chatPage.sendToChat("Tất cả đèn đã TẮT!");return; }if (msg.indexOf("temperature") >= 0) {String response = "Quạt: " + String(map(currentSlider1, 0, 255, 0, 100)) + "%, " +"AC: " + String(map(currentSlider2, 0, 255, 0, 100)) + "%"; chatPage.sendToChat(response);return; }if (msg.indexOf("security") >= 0) {bool motion = digitalRead(MOTION_SENSOR);bool door = digitalRead(DOOR_SENSOR);Stringstatus = "Cảm biến chuyển động: " + String(motion ? "PHÁT HIỆN" : "BÌNH THƯỜNG") +", Cửa: " + String(door ? "ĐÓNG" : "MỞ"); chatPage.sendToChat(status);return; }// Hướng dẫn tự động hóa gia đình mặc định chatPage.sendToChat("Lệnh nhà: all lights on/off, temperature, security"); });}voidloop() { server.loop();// Giám sát cảm biến an ninh nhàstaticbool lastMotion = false;staticbool lastDoor = false;bool currentMotion = digitalRead(MOTION_SENSOR);bool currentDoor = digitalRead(DOOR_SENSOR);// Gửi cảnh báo cho sự kiện an ninhif (currentMotion != lastMotion) {if (currentMotion) { chatPage.sendToChat("🚨 PHÁT HIỆN CHUYỂN ĐỘNG!"); webMonitorPage.sendToWebMonitor("Cảnh báo An ninh: Phát hiện chuyển động"); } lastMotion = currentMotion; }if (currentDoor != lastDoor) {Stringstatus = currentDoor ? "ĐÓNG" : "MỞ"; chatPage.sendToChat("🚪 Cửa " + status); webMonitorPage.sendToWebMonitor("An ninh: Cửa " + status); lastDoor = currentDoor; }delay(10);}

 English for KidsHọc tiếng Anh vui nhộn cho trẻ nhỏ.Tải về trênGoogle PlayTải về trênApp Store
 Bubble NoteGhi chú tự xóa — viết như nhắn tin.Tải về trênGoogle PlayTải về trênApp Store
 Tôi Không MuaĐánh bại mua sắm bốc đồng, tiết kiệm hơn.Tải về trênGoogle PlayTải về trênApp Store
 Con Đường Tri ThứcBài thi thử để học mọi thứ.Tải về trênGoogle PlayTải về trênApp Store