Arduino UNO R4 WiFi Bluetooth Ứng Dụng Đa Chức Năng Hướng Dẫn BLE Tất-Cả-Trong-Một

Tổng Quan

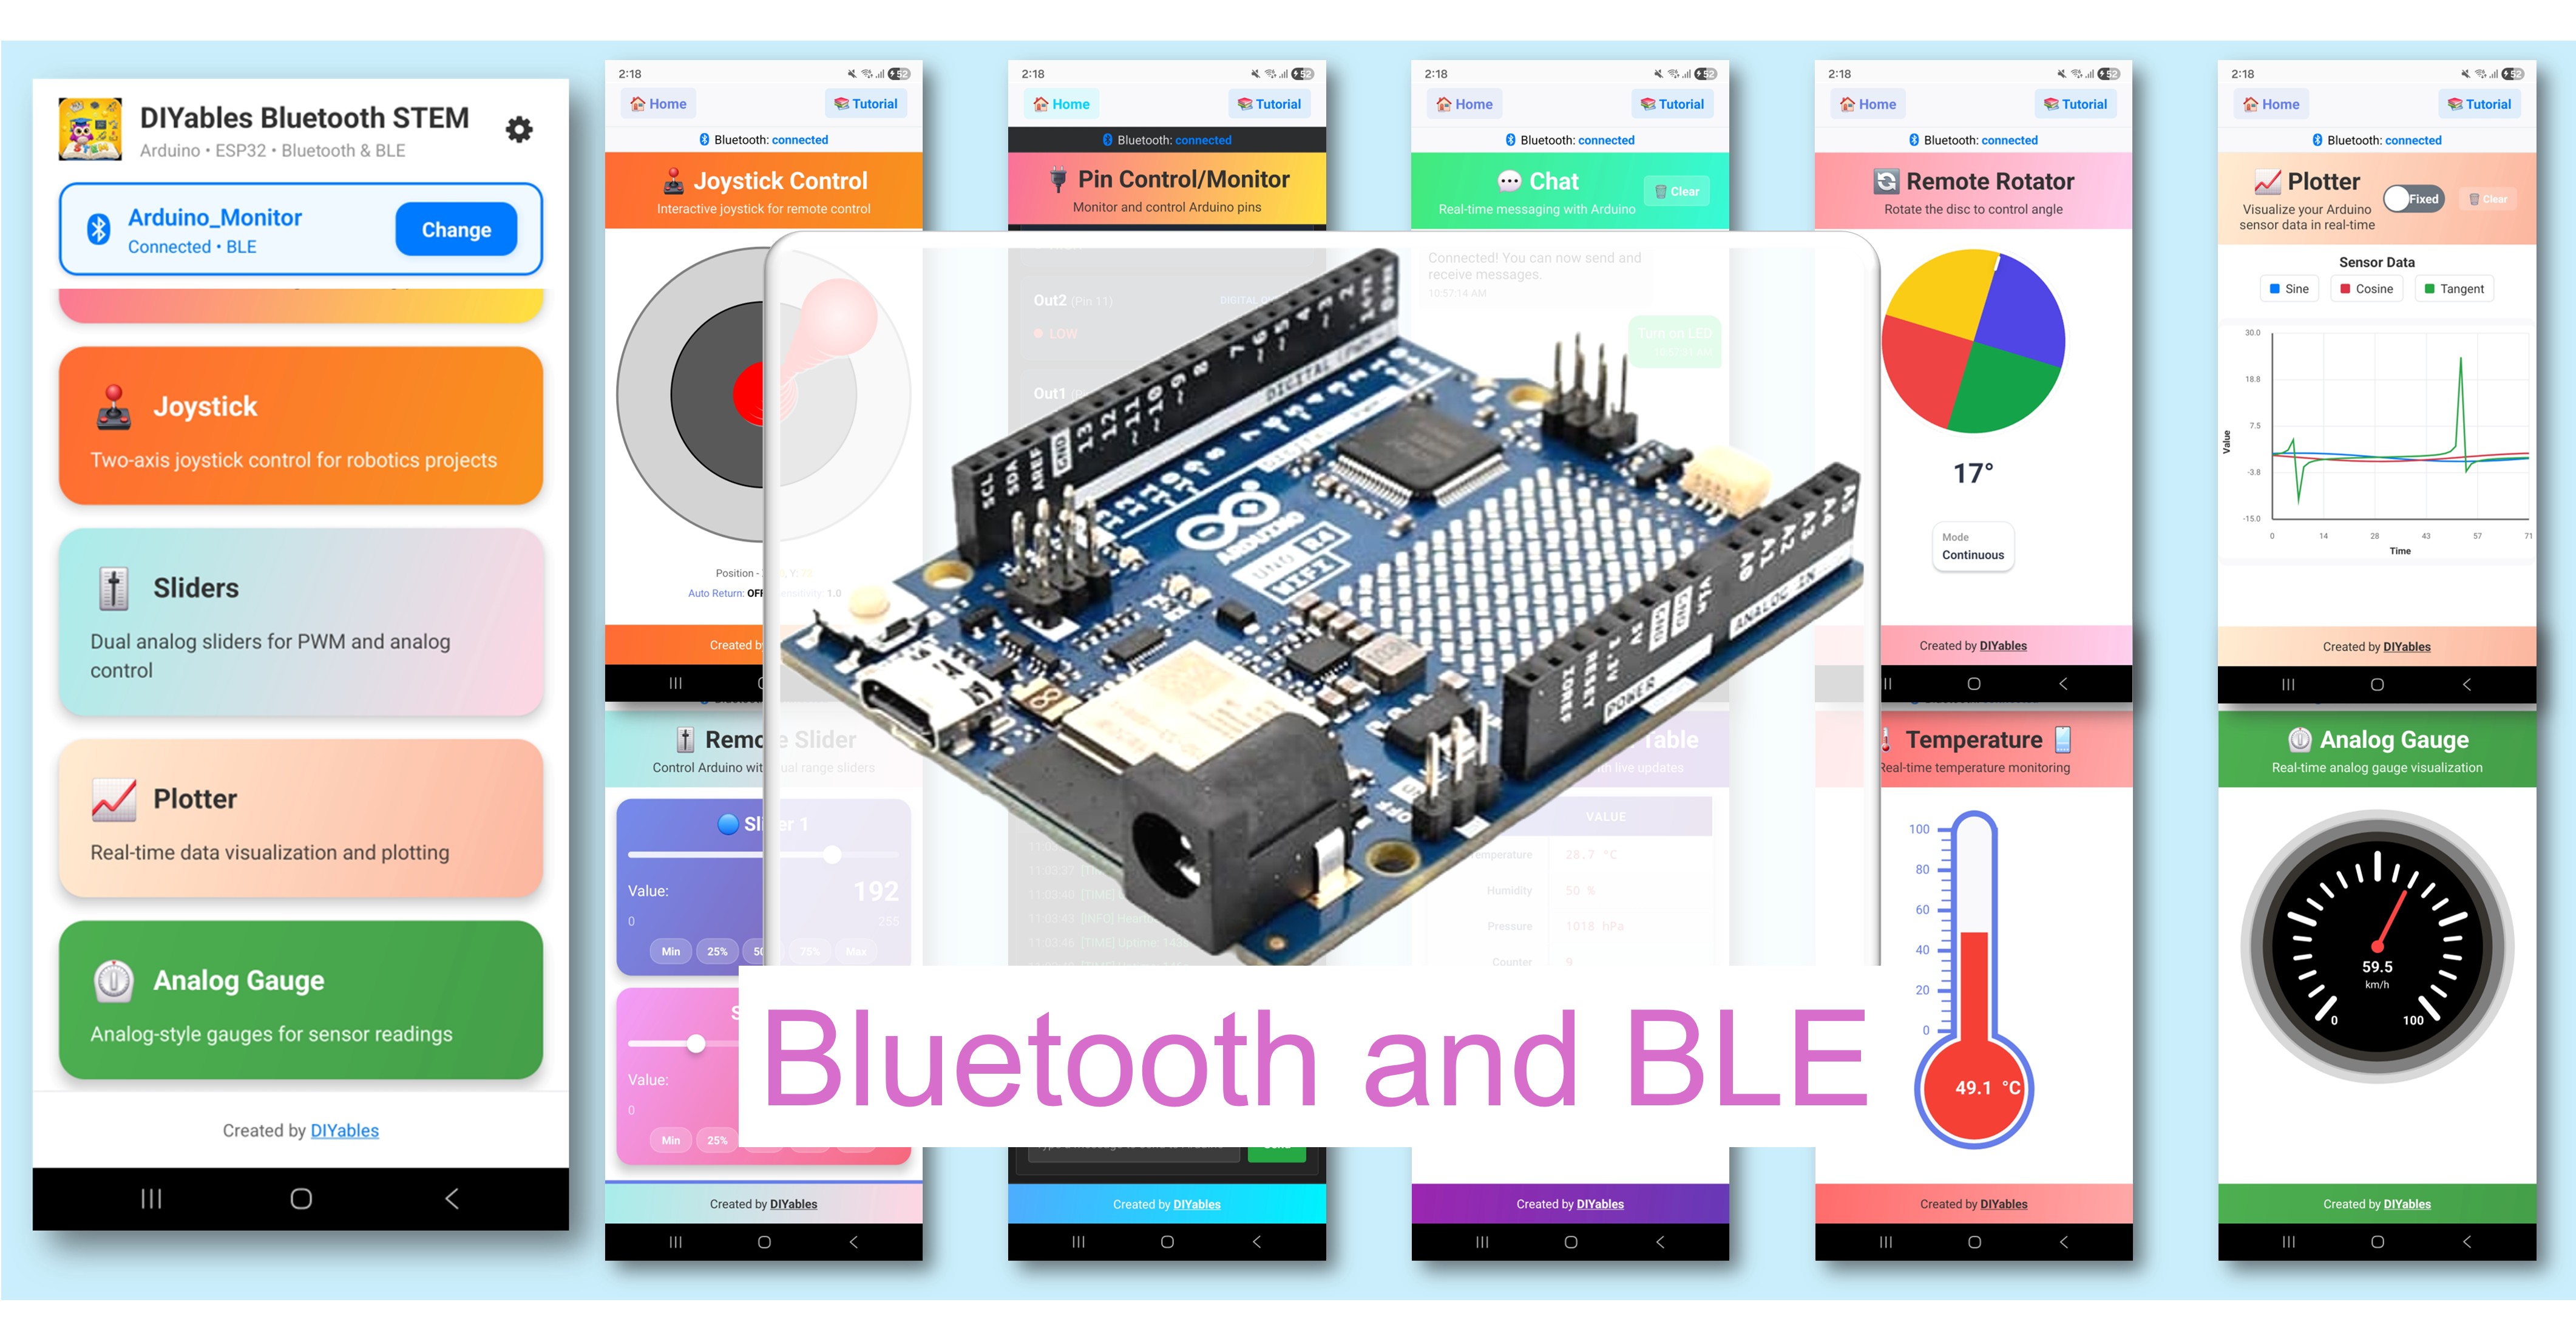
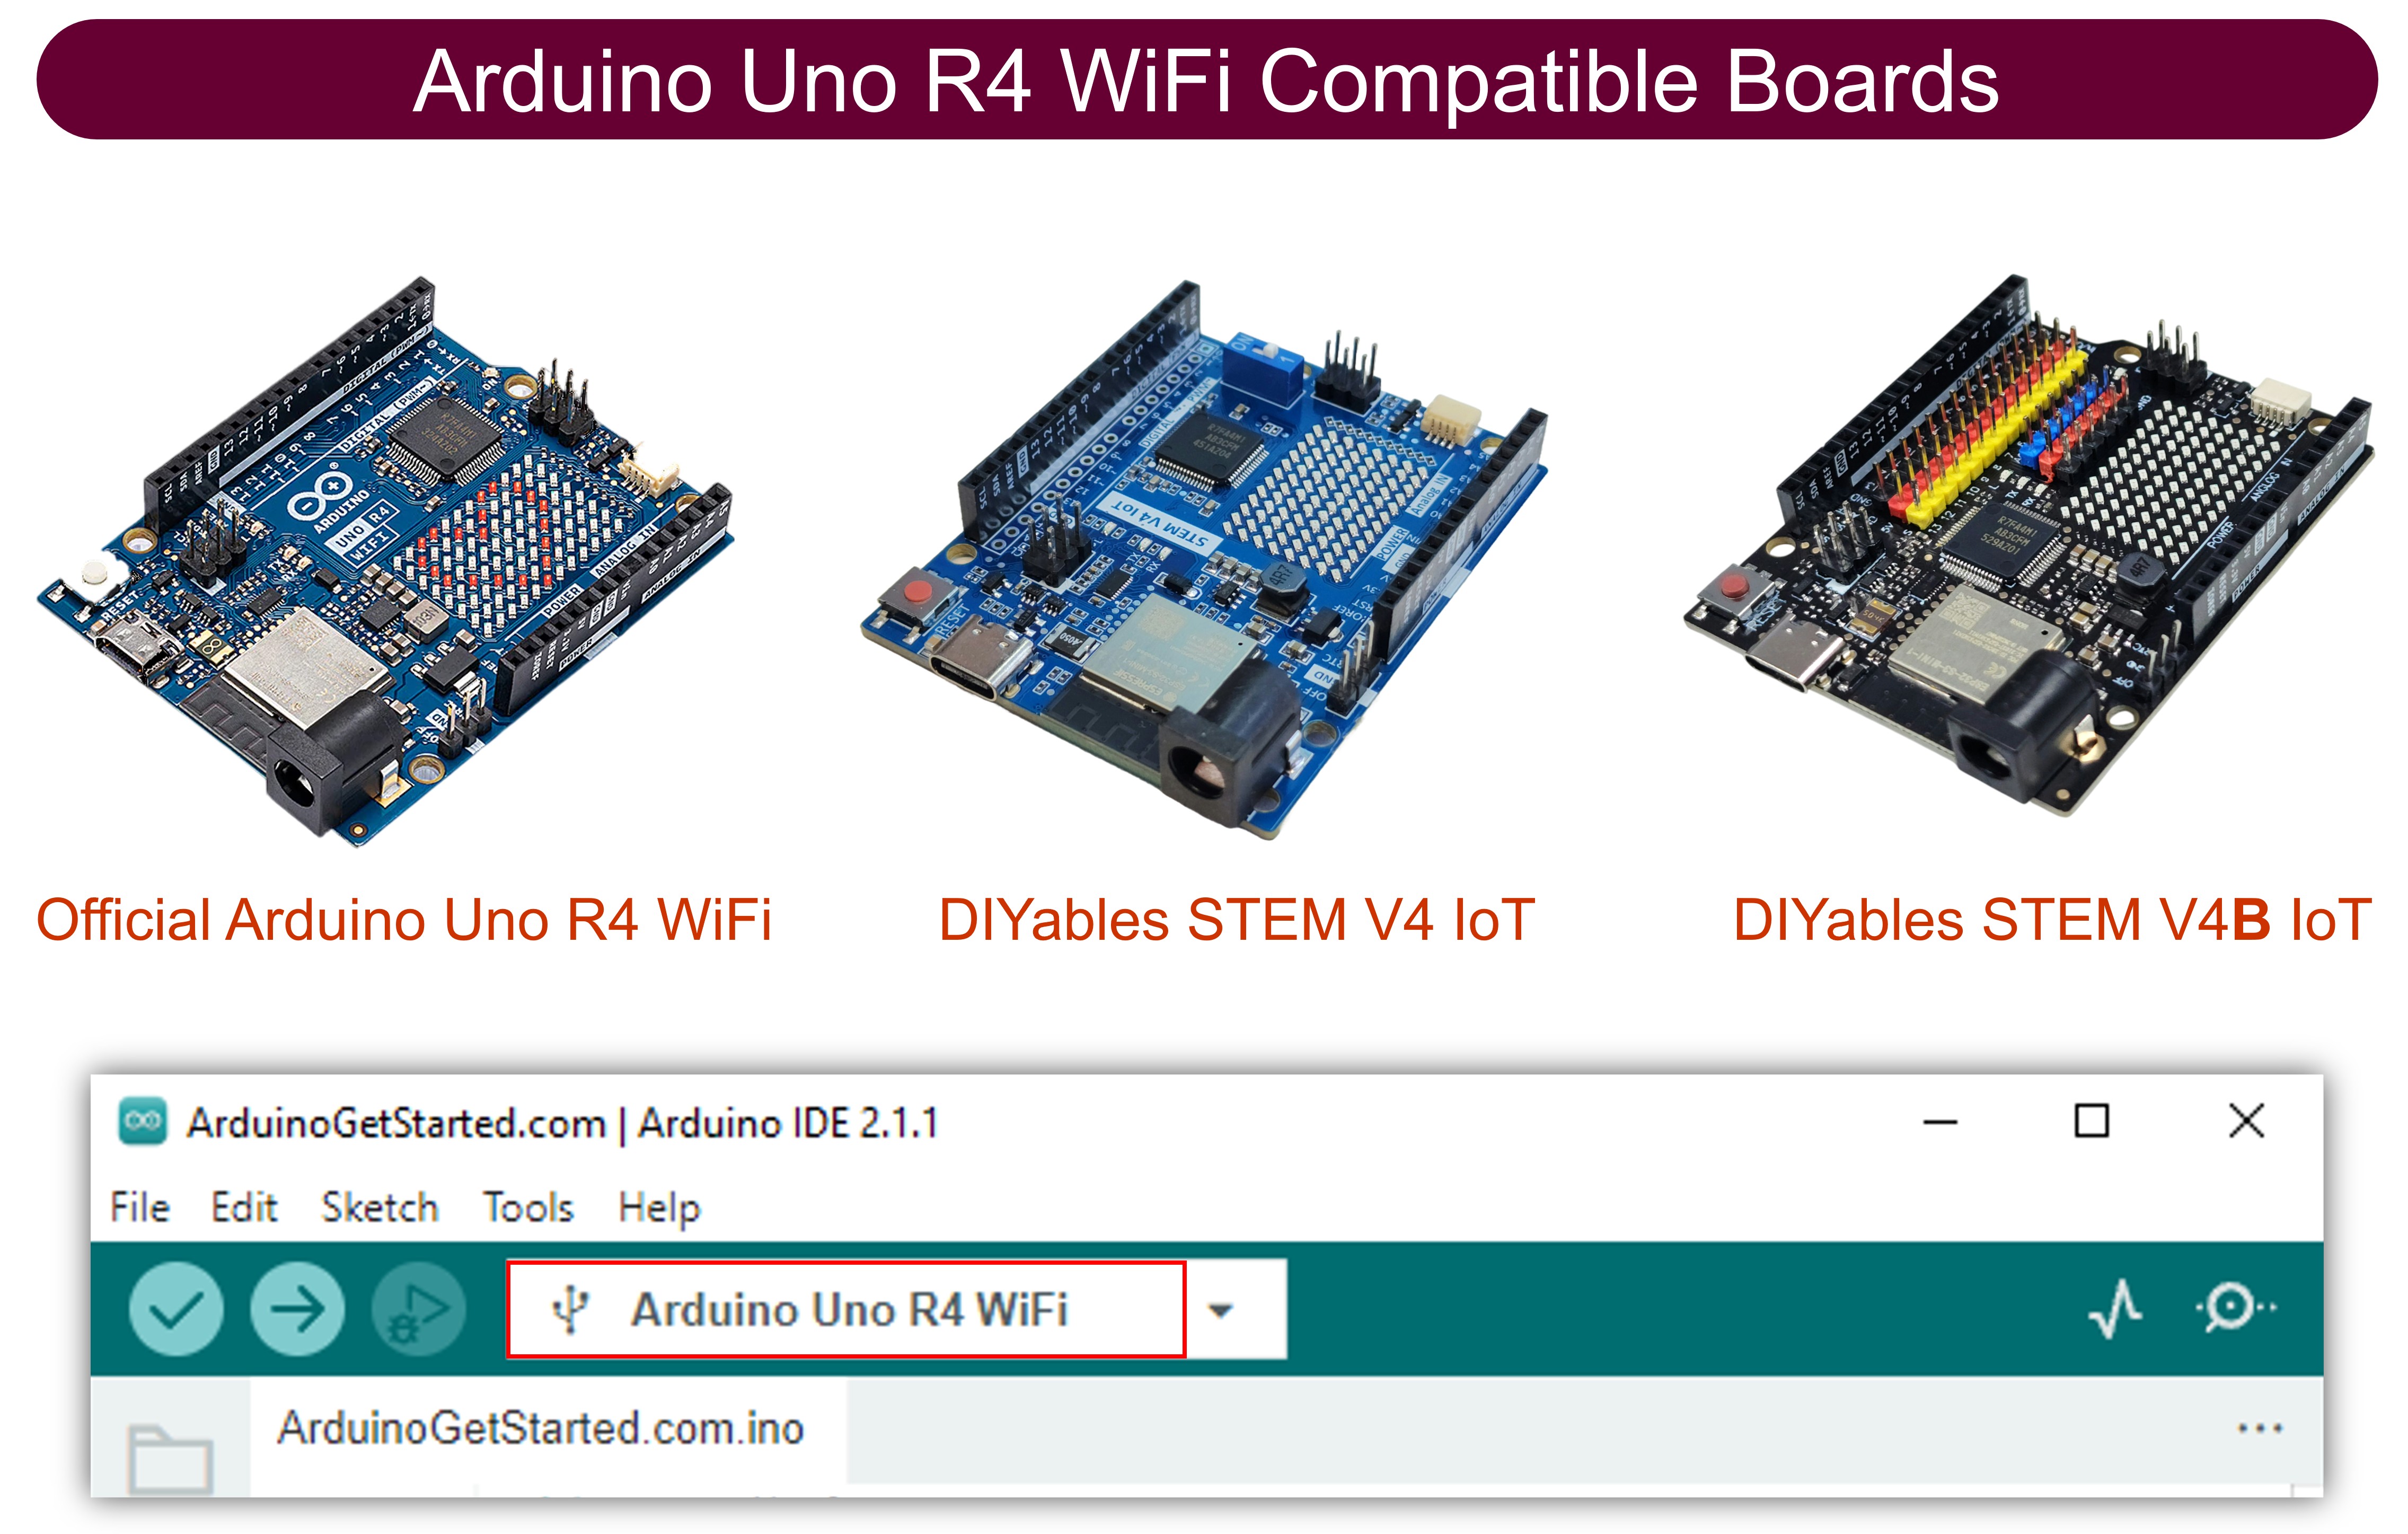
Ví dụ Bluetooth Ứng Dụng Đa Chức Năng minh họa việc chạy đồng thời 9 ứng dụng Bluetooth trên một Arduino UNO R4 WiFi sử dụng BLE. Được thiết kế cho Arduino UNO R4 WiFi sử dụng BLE (Bluetooth Low Energy) để kết hợp Monitor, Chat, Slider, Joystick, Temperature, Plotter, Table, Analog Gauge, và Rotator thành một sketch mạnh mẽ. Tất cả ứng dụng chia sẻ một kết nối BLE duy nhất và có thể tương tác với nhau. Hoàn hảo cho dashboard toàn diện, dự án IoT phức tạp, và học nhiều loại ứng dụng cùng lúc.

Lưu ý: Arduino UNO R4 WiFi chỉ hỗ trợ BLE (Bluetooth Low Energy). Nó không hỗ trợ Classic Bluetooth. Ứng dụng DIYables Bluetooth hỗ trợ cả BLE và Classic Bluetooth trên Android, và BLE trên iOS. Vì bo mạch này sử dụng BLE, ứng dụng hoạt động trên cả Android và iOS.

Arduino UNO R4 WiFi Bluetooth Ứng dụng Đa chức năng - hướng dẫn ble tất-cả-trong-một

Tính Năng

  • 9 Ứng Dụng Trong Một: Monitor, Chat, Slider, Joystick, Temperature, Plotter, Table, Analog Gauge, Rotator
  • Tương Tác Giữa Các Ứng Dụng: Giá trị slider cập nhật gauge và table, joystick cập nhật table, v.v.
  • Kết Nối BLE Duy Nhất: Tất cả ứng dụng chia sẻ một kết nối một cách hiệu quả
  • Cập Nhật Thời Gian Thực: Mỗi ứng dụng cập nhật theo khoảng thời gian riêng
  • Dashboard Toàn Diện: Xem tất cả dữ liệu từ một thiết bị
  • Hoạt Động Trên Android & iOS: BLE được hỗ trợ trên cả hai nền tảng
  • Không Cần Ghép Đôi: BLE tự động kết nối mà không cần ghép đôi thủ công

Ứng Dụng Bao Gồm

Ứng DụngMô TảKhoảng Thời Gian Cập Nhật
MonitorHiển thị trạng thái dạng text5 giây
ChatNhắn tin hai chiềuTheo yêu cầu
SliderĐiều khiển giá trị (0-255)Khi thay đổi
JoystickĐiều khiển vị trí 2DKhi thay đổi
TemperatureĐo nhiệt độ (-10 đến 50°C)2 giây
PlotterBiểu đồ dữ liệu thời gian thực100ms
TableDữ liệu có cấu trúc (10 hàng)5 giây
Analog GaugeĐồng hồ đo dạng kim (0-100%)3 giây
RotatorĐiều khiển góc (liên tục)Khi thay đổi

Phần Cứng Cần Thiết

1×Arduino UNO R4 WiFi
1×Alternatively, DIYables STEM V4 IoT
1×(Tùy chọn) DIYables STEM V4 IoT
1×USB Cable Type-A to Type-C (for USB-A PC)
1×USB Cable Type-C to Type-C (for USB-C PC)
1×(Khuyến nghị) Screw Terminal Block Shield for Arduino UNO R4
1×(Khuyến nghị) Breadboard Shield for Arduino UNO R4
1×(Khuyến nghị) Enclosure for Arduino UNO R4
1×(Khuyến nghị) Power Splitter for Arduino UNO R4
1×(Khuyến nghị) Prototyping Base Plate & Breadboard Kit for Arduino UNO

Or you can buy the following kits:

1×DIYables STEM V4 IoT Starter Kit (Arduino included)
1×DIYables Sensor Kit (30 sensors/displays)
1×DIYables Sensor Kit (18 sensors/displays)

Code Arduino UNO R4 WiFi

Các Bước Nhanh

Thực hiện theo các hướng dẫn sau từng bước:

  • Nếu đây là lần đầu tiên bạn sử dụng Arduino UNO R4 WiFi, hãy tham khảo Arduino UNO R4 - Cài Đặt Phần Mềm.
  • Kết nối bo mạch Arduino UNO R4 WiFi với máy tính của bạn bằng cáp USB.
  • Khởi động Arduino IDE trên máy tính của bạn.
  • Chọn bo mạch Arduino UNO R4 WiFi và cổng COM phù hợp.
  • Điều hướng đến biểu tượng Libraries trên thanh bên trái của Arduino IDE.
  • Tìm kiếm "DIYables Bluetooth", sau đó tìm thư viện DIYables Bluetooth của DIYables
  • Nhấp nút Install để cài đặt thư viện.
Arduino UNO R4 diyables Bluetooth thư viện
  • Bạn sẽ được yêu cầu cài đặt một số thư viện phụ thuộc khác
  • Nhấp nút Install All để cài đặt tất cả các thư viện phụ thuộc.
Arduino UNO R4 diyables Bluetooth dependency

Code BLE

  • Trên Arduino IDE, đi đến File Examples DIYables Bluetooth ArduinoBLE_MultipleApps example, hoặc copy code trên và paste vào editor của Arduino IDE
/* * DIYables Bluetooth Library - Multiple Apps Example (ArduinoBLE) * Works with DIYables Bluetooth STEM app on Android and iOS * * This example demonstrates how to use multiple Bluetooth apps simultaneously: * - Monitor: Real-time serial monitoring and logging * - Chat: Bi-directional text messaging * - Slider: Dual slider control (0-255 range) * - Joystick: Interactive joystick control (X, Y coordinates) * - Temperature: Temperature monitoring and display * - Plotter: Real-time data plotting (3 channels) * - Table: Two-column data table with real-time updates * - Analog Gauge: Circular gauge for sensor monitoring * - Rotator: Rotatable disc/knob control * - Pin Control: Digital pin control and monitoring * * Features: * - All apps run simultaneously on a single BLE connection * - Automatic message routing to appropriate app handlers * - Simplified callback system - no manual parsing needed * - All BLE protocol details handled by the library * - Compatible with DIYables Bluetooth Mobile App * * Compatible Boards: * - Arduino UNO R4 WiFi * - Arduino Nano 33 BLE / BLE Sense * - Arduino Nano 33 IoT * - Arduino MKR WiFi 1010 * - Arduino Nano RP2040 Connect * - Any board supporting the ArduinoBLE library * * Setup: * 1. Upload the sketch to your Arduino * 2. Open Serial Monitor (9600 baud) * 3. Open DIYables Bluetooth App on your phone * 4. Connect to "DIYables Multi-App" * 5. Navigate to different screens to test each app * * Tutorial: https://diyables.io/bluetooth-app * Author: DIYables */ #include <DIYables_BluetoothServer.h> #include <DIYables_BluetoothMonitor.h> #include <DIYables_BluetoothChat.h> #include <DIYables_BluetoothSlider.h> #include <DIYables_BluetoothJoystick.h> #include <DIYables_BluetoothTemperature.h> #include <DIYables_BluetoothPlotter.h> #include <DIYables_BluetoothTable.h> #include <DIYables_BluetoothAnalogGauge.h> #include <DIYables_BluetoothRotator.h> #include <platforms/DIYables_ArduinoBLE.h> // BLE Configuration const char* DEVICE_NAME = "DIYables Multi-App"; const char* SERVICE_UUID = "19B10000-E8F2-537E-4F6C-D104768A1214"; const char* TX_UUID = "19B10001-E8F2-537E-4F6C-D104768A1214"; const char* RX_UUID = "19B10002-E8F2-537E-4F6C-D104768A1214"; // Create Bluetooth instances DIYables_ArduinoBLE bluetooth(DEVICE_NAME, SERVICE_UUID, TX_UUID, RX_UUID); DIYables_BluetoothServer bluetoothServer(bluetooth); // Create app instances DIYables_BluetoothMonitor bluetoothMonitor; DIYables_BluetoothChat bluetoothChat; DIYables_BluetoothSlider bluetoothSlider(0, 255, 1); DIYables_BluetoothJoystick bluetoothJoystick(false, 5); DIYables_BluetoothTemperature bluetoothTemperature(-10.0, 50.0, "°C"); DIYables_BluetoothPlotter bluetoothPlotter; DIYables_BluetoothTable bluetoothTable; DIYables_BluetoothAnalogGauge bluetoothGauge(0.0, 100.0, "%"); DIYables_BluetoothRotator bluetoothRotator(ROTATOR_MODE_CONTINUOUS); // State variables int currentSlider1 = 128; int currentSlider2 = 64; int currentJoystickX = 0; int currentJoystickY = 0; float currentTemperature = 25.0; float currentGaugeValue = 50.0; float currentRotatorAngle = 0.0; int messageCount = 0; // Timing variables unsigned long lastMonitorUpdate = 0; unsigned long lastTempUpdate = 0; unsigned long lastPlotUpdate = 0; unsigned long lastTableUpdate = 0; unsigned long lastGaugeUpdate = 0; float plotPhase = 0; void setup() { Serial.begin(9600); delay(1000); Serial.println("DIYables Bluetooth - Multiple Apps Example"); // Initialize built-in LED pinMode(LED_BUILTIN, OUTPUT); digitalWrite(LED_BUILTIN, LOW); // Initialize Bluetooth server bluetoothServer.begin(); // Register all apps with the server bluetoothServer.addApp(&bluetoothMonitor); bluetoothServer.addApp(&bluetoothChat); bluetoothServer.addApp(&bluetoothSlider); bluetoothServer.addApp(&bluetoothJoystick); bluetoothServer.addApp(&bluetoothTemperature); bluetoothServer.addApp(&bluetoothPlotter); bluetoothServer.addApp(&bluetoothTable); bluetoothServer.addApp(&bluetoothGauge); bluetoothServer.addApp(&bluetoothRotator); Serial.print("Registered apps: "); Serial.println(bluetoothServer.getAppCount()); // Configure Plotter bluetoothPlotter.setPlotTitle("Sensor Data"); bluetoothPlotter.setAxisLabels("Time", "Value"); bluetoothPlotter.setYAxisRange(-1.5, 1.5); bluetoothPlotter.setMaxSamples(100); bluetoothPlotter.setLegendLabels("Sine", "Cosine", "Random"); // Configure Table rows bluetoothTable.addRow("Status"); bluetoothTable.addRow("Uptime"); bluetoothTable.addRow("Slider 1"); bluetoothTable.addRow("Slider 2"); bluetoothTable.addRow("Joystick X"); bluetoothTable.addRow("Joystick Y"); bluetoothTable.addRow("Temperature"); bluetoothTable.addRow("Gauge Value"); bluetoothTable.addRow("Rotator Angle"); bluetoothTable.addRow("Messages"); // Set up all callbacks setupCallbacks(); Serial.println("Waiting for Bluetooth connection..."); } void setupCallbacks() { // ---- Connection events ---- bluetoothServer.setOnConnected([]() { Serial.println("Bluetooth connected!"); digitalWrite(LED_BUILTIN, HIGH); bluetoothMonitor.send("=== DIYables Multi-App Connected ==="); bluetoothMonitor.send("All apps are ready!"); bluetoothChat.send("Hello! Arduino Multi-App is connected."); }); bluetoothServer.setOnDisconnected([]() { Serial.println("Bluetooth disconnected!"); digitalWrite(LED_BUILTIN, LOW); }); // ---- Monitor callbacks ---- bluetoothMonitor.onMonitorMessage([](const String& message) { Serial.println("Monitor cmd: " + message); if (message == "HELP") { bluetoothMonitor.send("Commands: STATUS, HELP, LED_ON, LED_OFF"); } else if (message == "STATUS") { bluetoothMonitor.send("Slider1=" + String(currentSlider1) + " Slider2=" + String(currentSlider2)); bluetoothMonitor.send("Joystick X=" + String(currentJoystickX) + " Y=" + String(currentJoystickY)); bluetoothMonitor.send("Temp=" + String(currentTemperature, 1) + "°C"); bluetoothMonitor.send("Gauge=" + String(currentGaugeValue, 1) + "%"); bluetoothMonitor.send("Rotator=" + String(currentRotatorAngle, 0) + "°"); } else if (message == "LED_ON") { digitalWrite(LED_BUILTIN, HIGH); bluetoothMonitor.send("LED turned ON"); } else if (message == "LED_OFF") { digitalWrite(LED_BUILTIN, LOW); bluetoothMonitor.send("LED turned OFF"); } else { bluetoothMonitor.send("Unknown: " + message + " (type HELP)"); } }); // ---- Chat callbacks ---- bluetoothChat.onChatMessage([](const String& message) { Serial.println("Chat: " + message); bluetoothChat.send("Echo: " + message); if (message.equalsIgnoreCase("ping")) { bluetoothChat.send("pong!"); } else if (message.equalsIgnoreCase("status")) { bluetoothChat.send("Uptime: " + String(millis() / 1000) + "s, Apps: " + String(bluetoothServer.getAppCount())); } }); // ---- Slider callbacks ---- bluetoothSlider.onSliderValue([](int slider1, int slider2) { currentSlider1 = slider1; currentSlider2 = slider2; Serial.print("Slider 1: "); Serial.print(slider1); Serial.print(", Slider 2: "); Serial.println(slider2); // Update gauge based on slider 1 currentGaugeValue = map(slider1, 0, 255, 0, 100); bluetoothGauge.send(currentGaugeValue); // Update table bluetoothTable.sendValueUpdate("Slider 1", String(slider1)); bluetoothTable.sendValueUpdate("Slider 2", String(slider2)); bluetoothTable.sendValueUpdate("Gauge Value", String(currentGaugeValue, 1) + "%"); }); bluetoothSlider.onGetConfig([]() { bluetoothSlider.send(currentSlider1, currentSlider2); }); // ---- Joystick callbacks ---- bluetoothJoystick.onJoystickValue([](int x, int y) { currentJoystickX = x; currentJoystickY = y; Serial.print("Joystick X: "); Serial.print(x); Serial.print(", Y: "); Serial.println(y); // Update table bluetoothTable.sendValueUpdate("Joystick X", String(x)); bluetoothTable.sendValueUpdate("Joystick Y", String(y)); }); bluetoothJoystick.onGetConfig([]() { bluetoothJoystick.send(currentJoystickX, currentJoystickY); }); // ---- Temperature callbacks ---- bluetoothTemperature.onTemperatureRequest([]() { bluetoothTemperature.send(currentTemperature); }); // ---- Plotter callbacks ---- bluetoothPlotter.onDataRequest([]() { Serial.println("Plotter data requested"); }); // ---- Table callbacks ---- bluetoothTable.onDataRequest([]() { Serial.println("Table data requested"); bluetoothTable.sendTableStructure(); updateAllTableValues(); }); // ---- Gauge callbacks ---- bluetoothGauge.onValueRequest([]() { bluetoothGauge.send(currentGaugeValue); }); // ---- Rotator callbacks ---- bluetoothRotator.onRotatorAngle([](float angle) { currentRotatorAngle = angle; Serial.print("Rotator: "); Serial.print(angle); Serial.println("°"); bluetoothTable.sendValueUpdate("Rotator Angle", String(angle, 0) + "°"); }); } void updateAllTableValues() { bluetoothTable.sendValueUpdate("Status", "Running"); unsigned long uptime = millis() / 1000; String uptimeStr; if (uptime >= 60) { uptimeStr = String(uptime / 60) + "m " + String(uptime % 60) + "s"; } else { uptimeStr = String(uptime) + "s"; } bluetoothTable.sendValueUpdate("Uptime", uptimeStr); bluetoothTable.sendValueUpdate("Slider 1", String(currentSlider1)); bluetoothTable.sendValueUpdate("Slider 2", String(currentSlider2)); bluetoothTable.sendValueUpdate("Joystick X", String(currentJoystickX)); bluetoothTable.sendValueUpdate("Joystick Y", String(currentJoystickY)); bluetoothTable.sendValueUpdate("Temperature", String(currentTemperature, 1) + " °C"); bluetoothTable.sendValueUpdate("Gauge Value", String(currentGaugeValue, 1) + "%"); bluetoothTable.sendValueUpdate("Rotator Angle", String(currentRotatorAngle, 0) + "°"); bluetoothTable.sendValueUpdate("Messages", String(messageCount)); } void loop() { bluetoothServer.loop(); if (!bluetooth.isConnected()) { delay(10); return; } // ---- Monitor: periodic status every 5 seconds ---- if (millis() - lastMonitorUpdate >= 5000) { lastMonitorUpdate = millis(); messageCount++; bluetoothMonitor.send("[INFO] Heartbeat #" + String(messageCount) + " - Uptime: " + String(millis() / 1000) + "s"); } // ---- Temperature: update every 2 seconds ---- if (millis() - lastTempUpdate >= 2000) { lastTempUpdate = millis(); // Simulate temperature with slight variation static float tempOffset = 0; tempOffset += random(-10, 11) / 10.0; if (tempOffset > 5.0) tempOffset = 5.0; if (tempOffset < -5.0) tempOffset = -5.0; currentTemperature = 25.0 + tempOffset; bluetoothTemperature.send(currentTemperature); bluetoothTable.sendValueUpdate("Temperature", String(currentTemperature, 1) + " °C"); } // ---- Plotter: update every 100ms ---- if (millis() - lastPlotUpdate >= 100) { lastPlotUpdate = millis(); float sine = sin(plotPhase); float cosine = cos(plotPhase); float noise = random(-50, 51) / 100.0; bluetoothPlotter.send(sine, cosine, noise); plotPhase += 0.1; if (plotPhase > 2 * PI) plotPhase = 0; } // ---- Table: update uptime every 5 seconds ---- if (millis() - lastTableUpdate >= 5000) { lastTableUpdate = millis(); unsigned long uptime = millis() / 1000; String uptimeStr; if (uptime >= 60) { uptimeStr = String(uptime / 60) + "m " + String(uptime % 60) + "s"; } else { uptimeStr = String(uptime) + "s"; } bluetoothTable.sendValueUpdate("Uptime", uptimeStr); bluetoothTable.sendValueUpdate("Messages", String(messageCount)); } // ---- Gauge: simulate sensor every 3 seconds ---- if (millis() - lastGaugeUpdate >= 3000) { lastGaugeUpdate = millis(); float sensorValue = 50.0 + 30.0 * sin(millis() / 10000.0); currentGaugeValue = sensorValue; bluetoothGauge.send(currentGaugeValue); bluetoothTable.sendValueUpdate("Gauge Value", String(currentGaugeValue, 1) + "%"); } delay(10); }
  • Nhấp nút Upload trên Arduino IDE để upload code lên Arduino UNO R4 WiFi
  • Mở Serial Monitor
  • Kiểm tra kết quả trên Serial Monitor. Nó sẽ như thế này:
COM6
Send
DIYables Bluetooth - Multiple Apps Example Waiting for Bluetooth connection...
Autoscroll Show timestamp
Clear output
9600 baud  
Newline  

Ứng Dụng Di Động

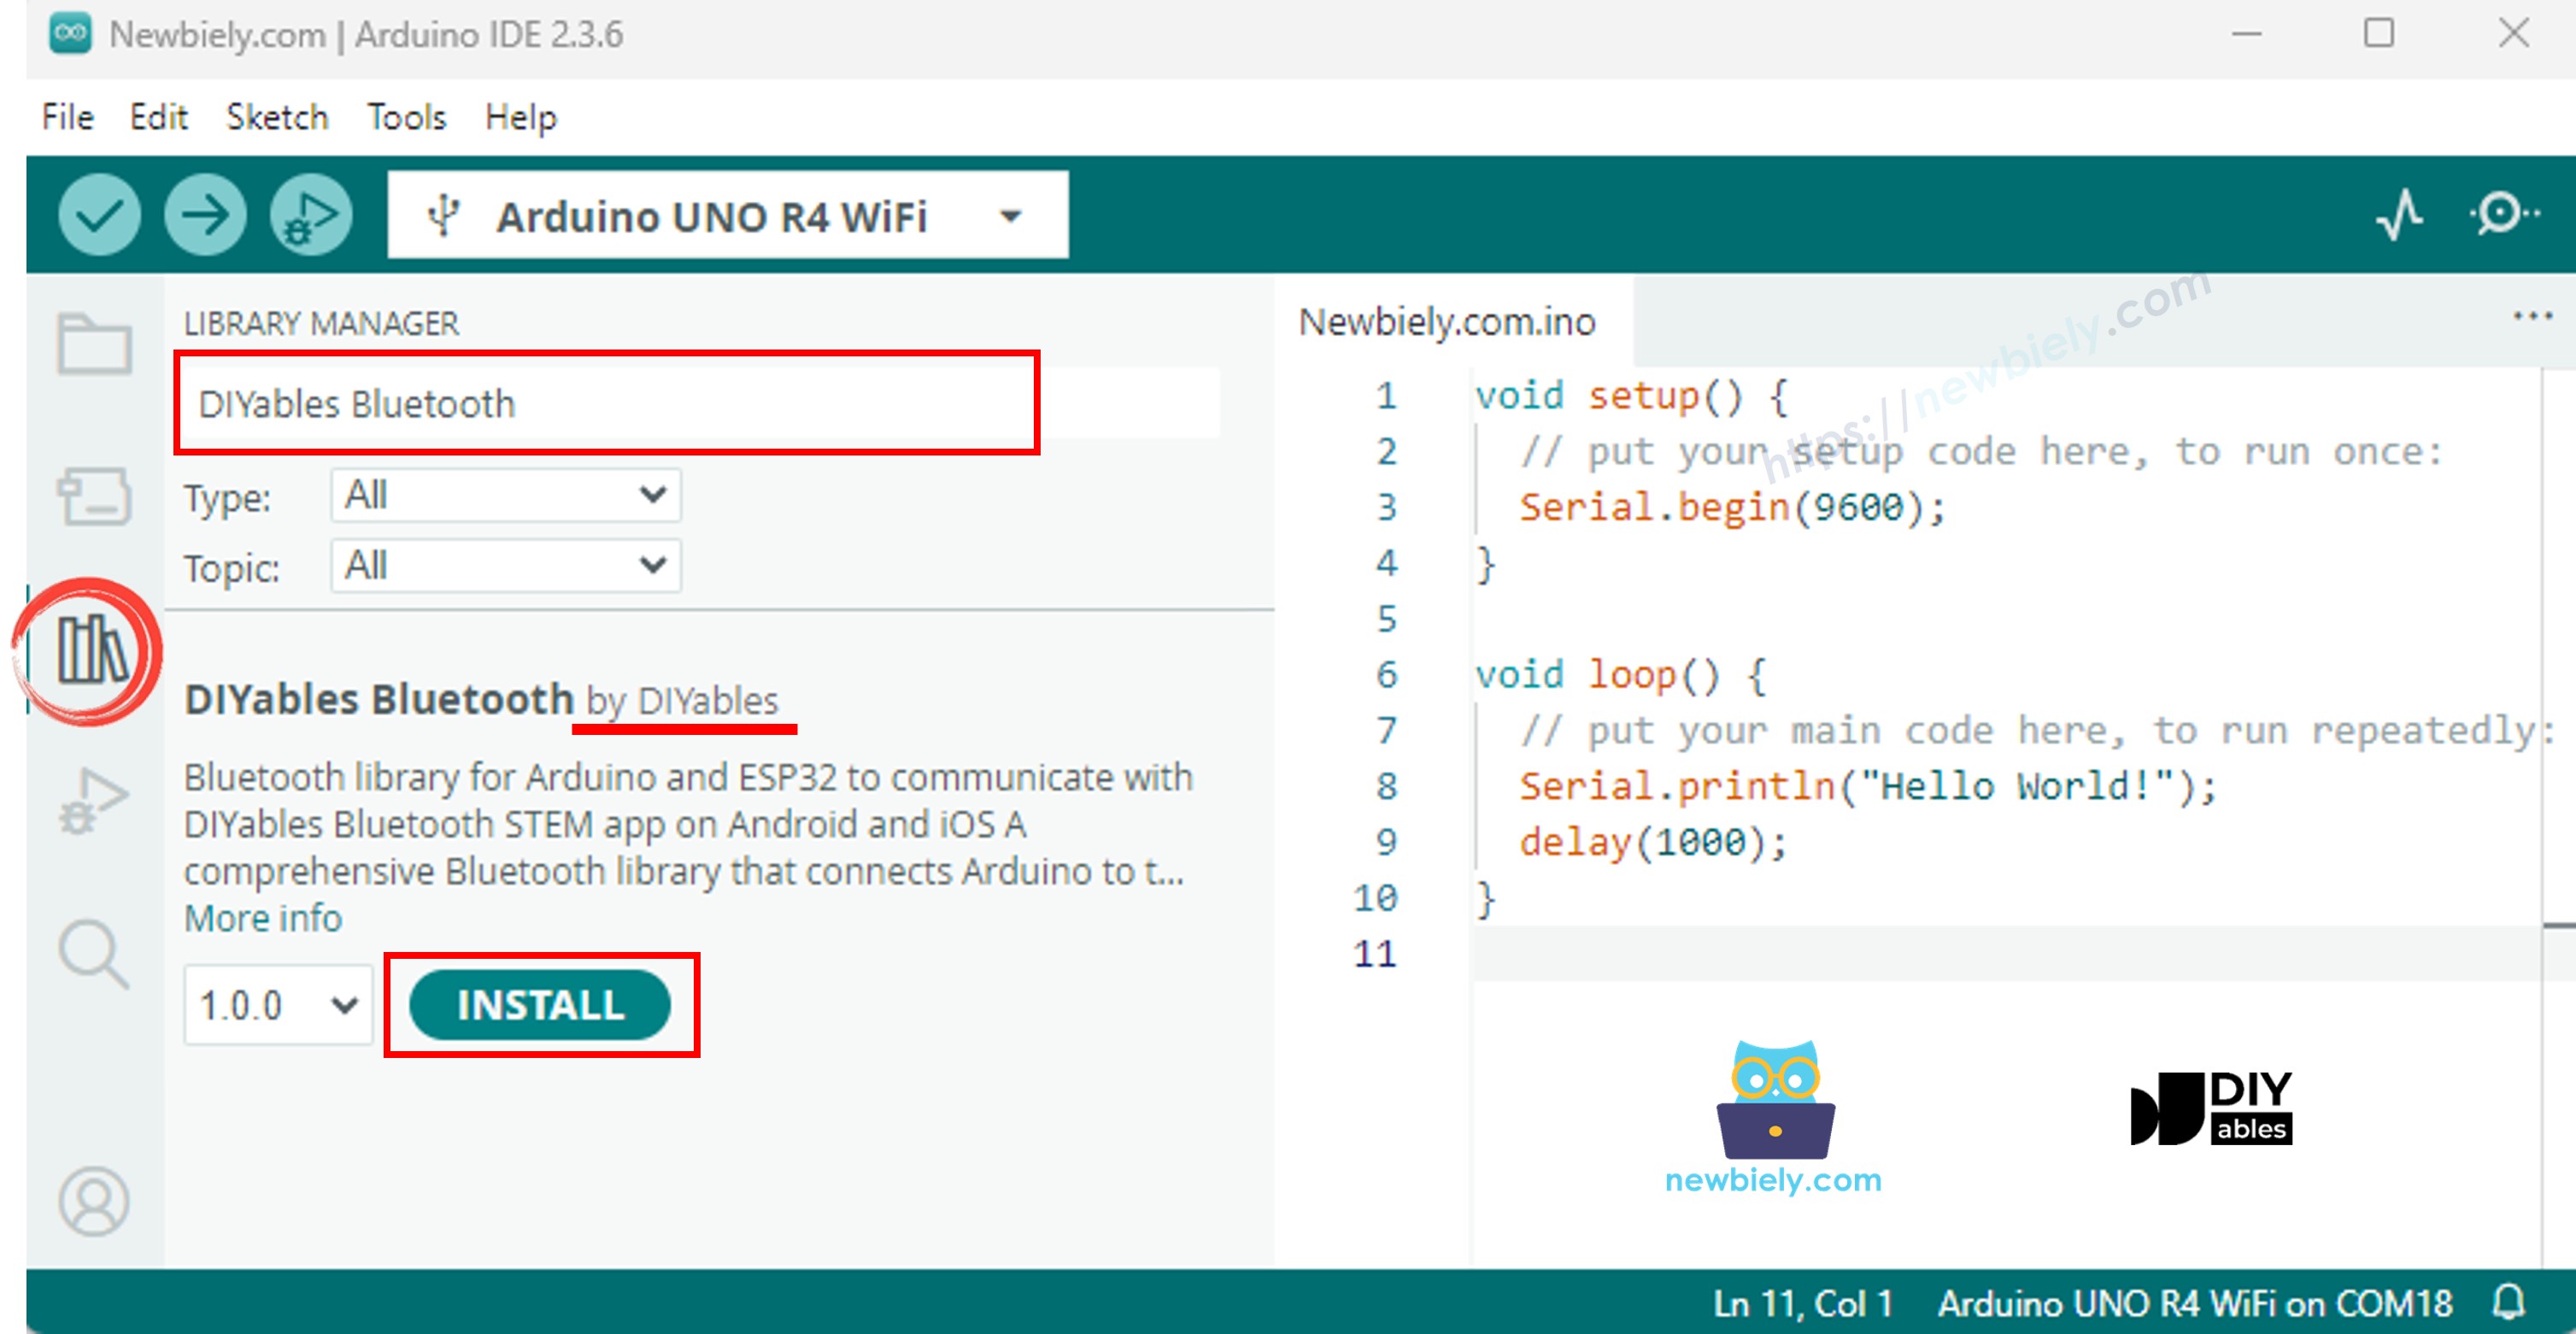
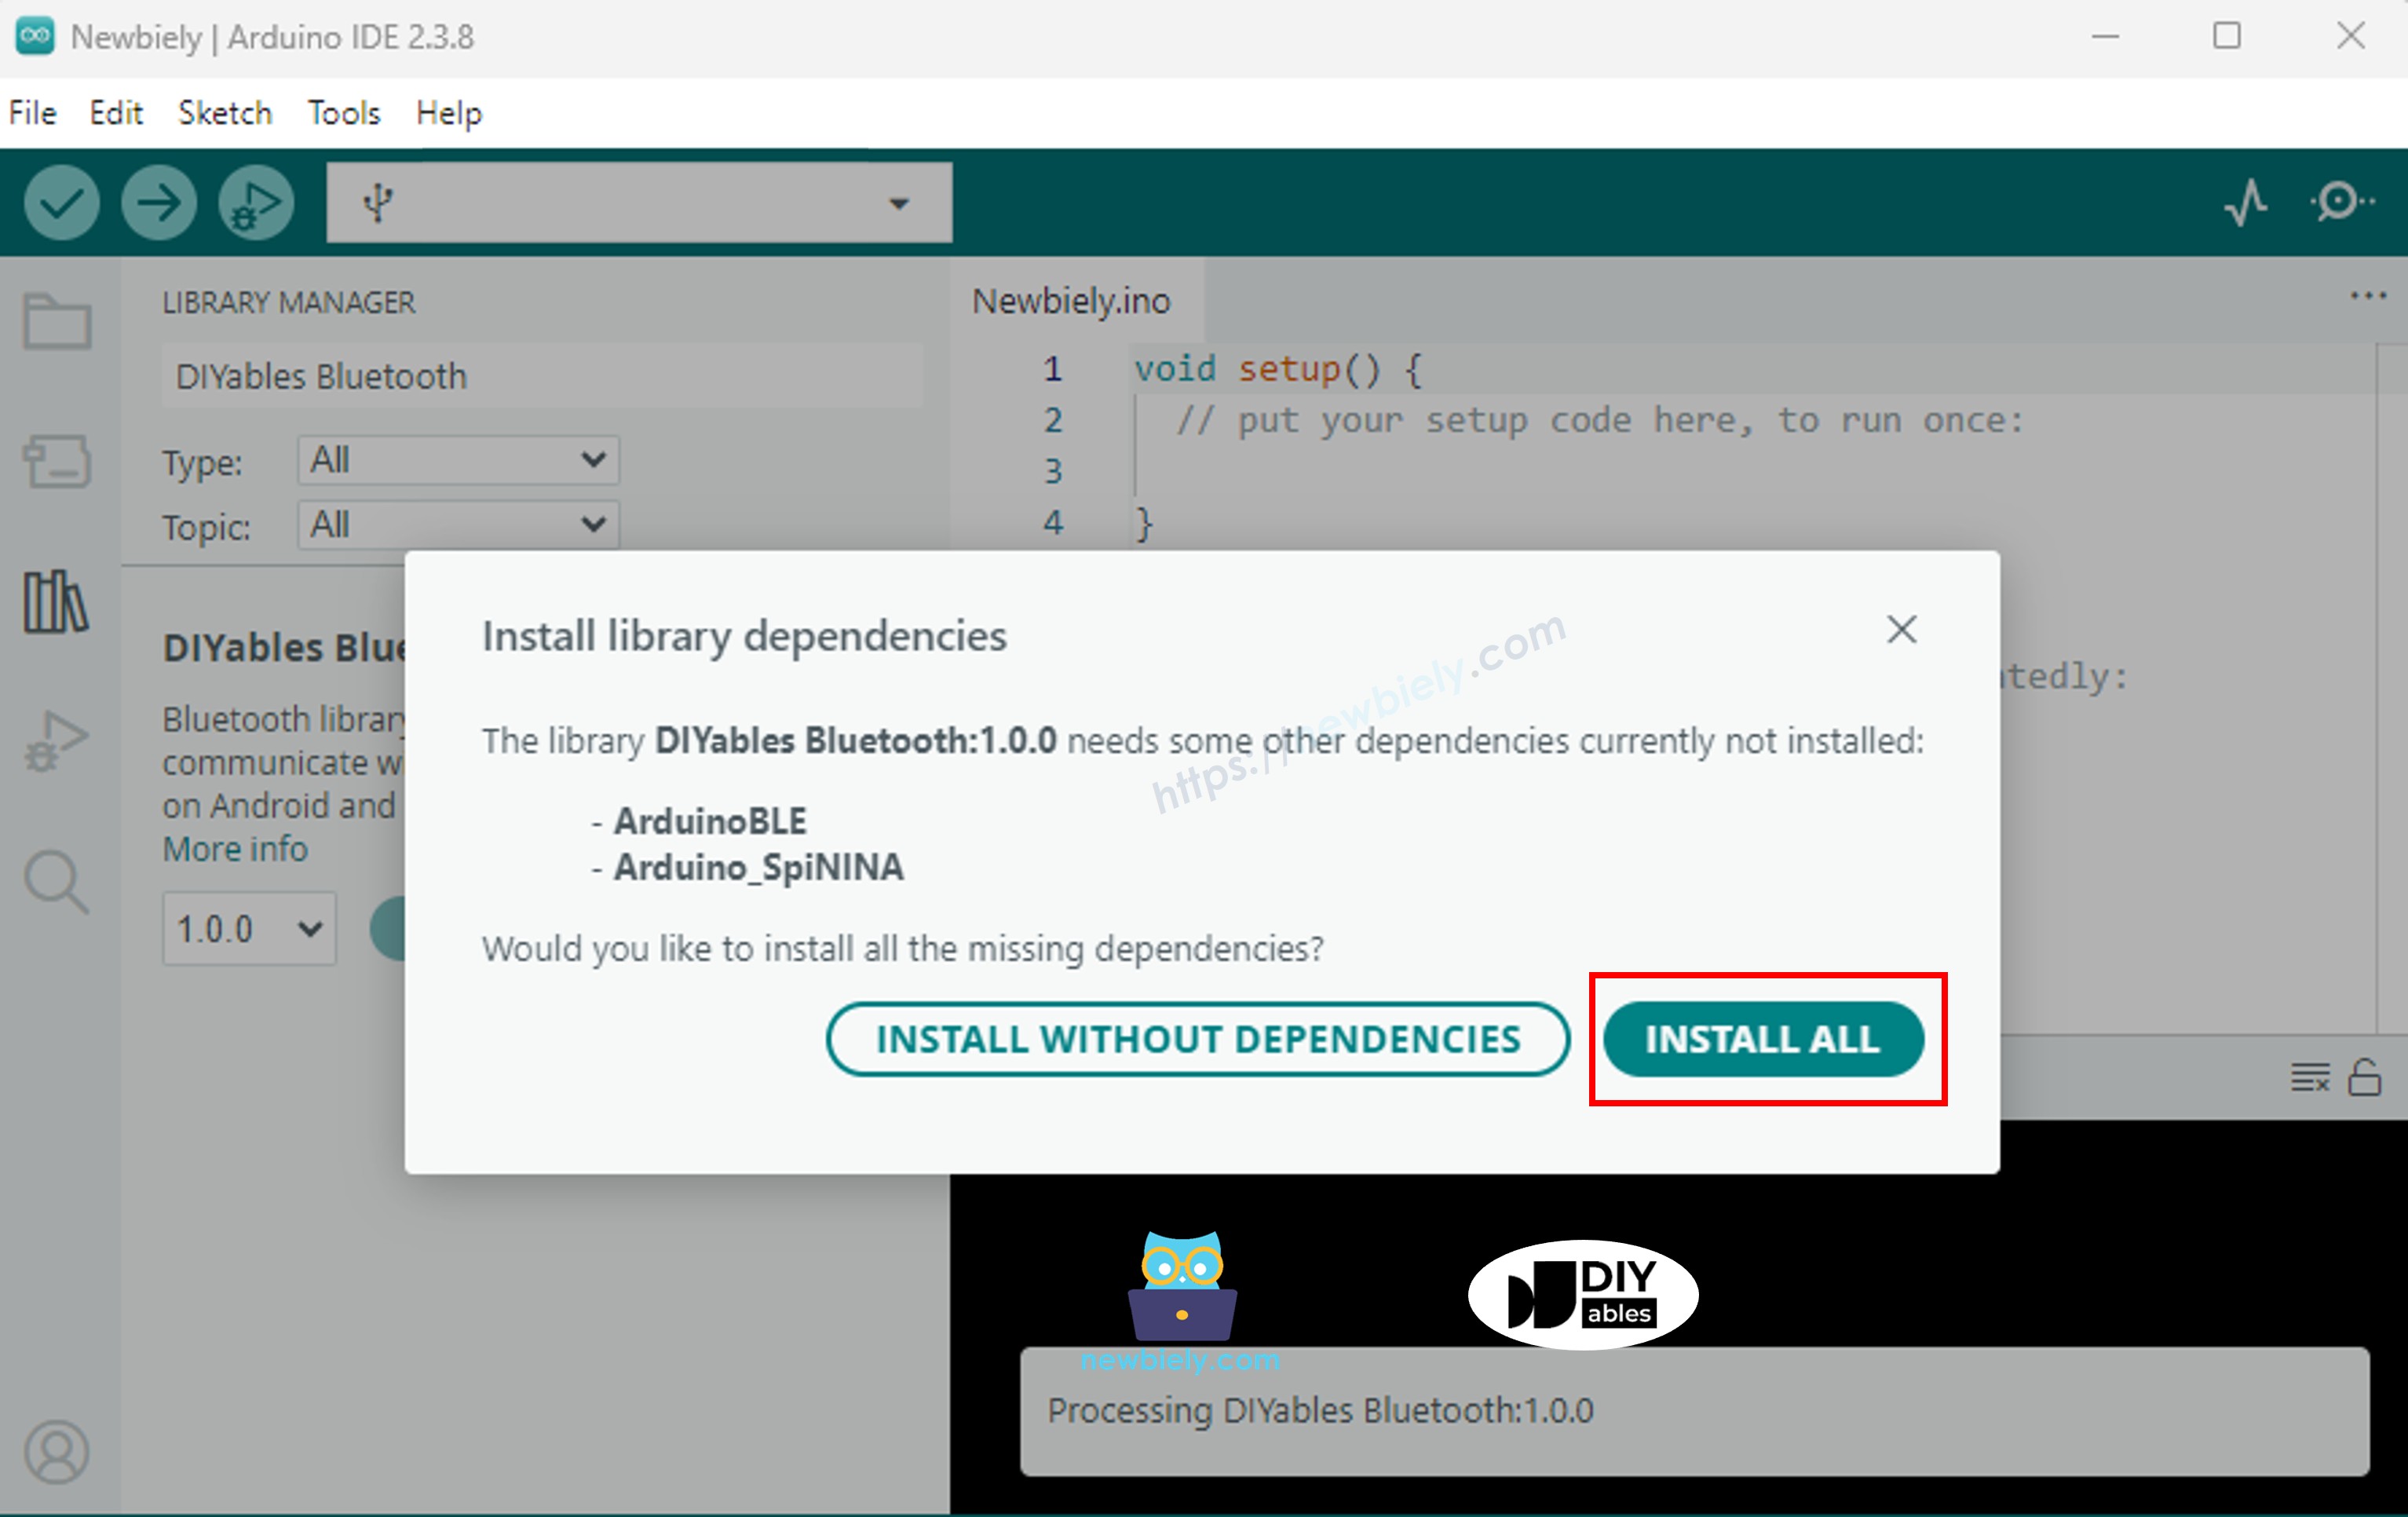
  • Cài đặt ứng dụng DIYables Bluetooth trên smartphone của bạn: Android | iOS

Lưu ý: Ứng dụng DIYables Bluetooth hỗ trợ cả BLE và Classic Bluetooth trên Android, và BLE trên iOS. Vì Arduino UNO R4 WiFi sử dụng BLE, ứng dụng hoạt động trên cả Android và iOS. Không cần ghép đôi thủ công cho BLE — chỉ cần quét và kết nối.

  • Mở ứng dụng DIYables Bluetooth
  • Khi mở ứng dụng lần đầu tiên, nó sẽ yêu cầu quyền. Vui lòng cấp các quyền sau:
    • Quyền Nearby Devices (Android 12+) / quyền Bluetooth (iOS) - cần thiết để quét và kết nối với thiết bị Bluetooth
    • Quyền Location (chỉ Android 11 trở xuống) - cần thiết cho các phiên bản Android cũ để quét thiết bị BLE
  • Đảm bảo Bluetooth đã được bật trên điện thoại của bạn
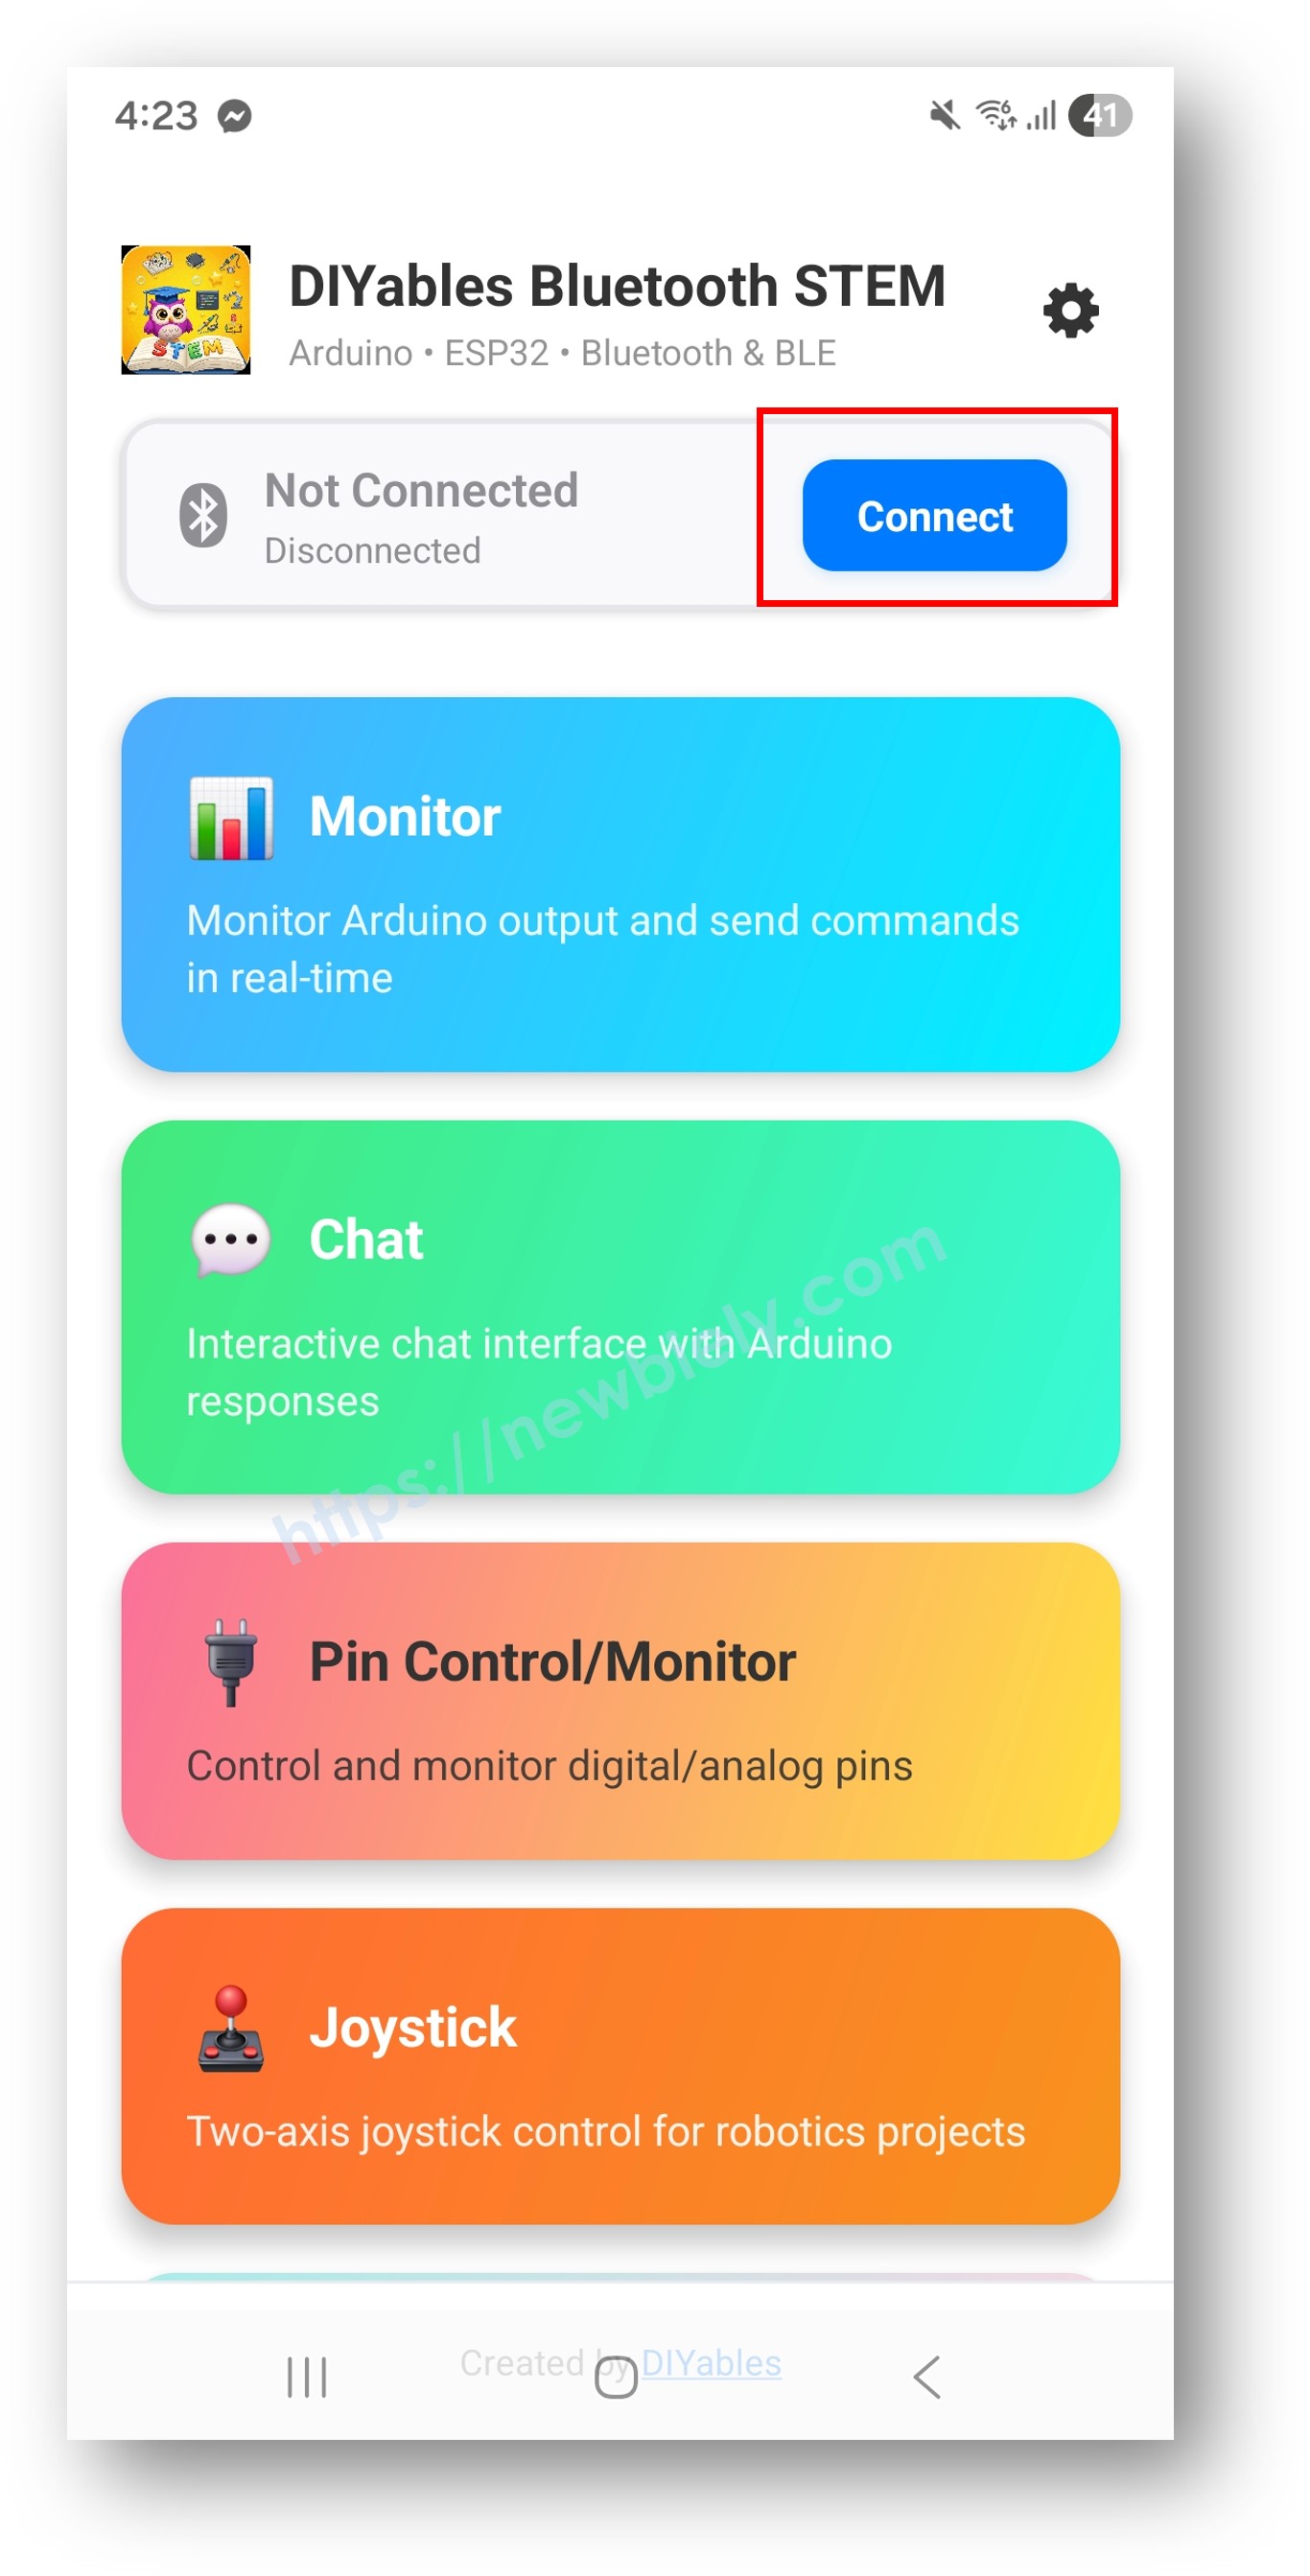
  • Trên màn hình chính, nhấn nút Connect. Ứng dụng sẽ quét các thiết bị BLE.
diyables Bluetooth app - home screen with scan nút nhấn
  • Tìm và nhấn "DIYables Multi-App" trong kết quả quét để kết nối.
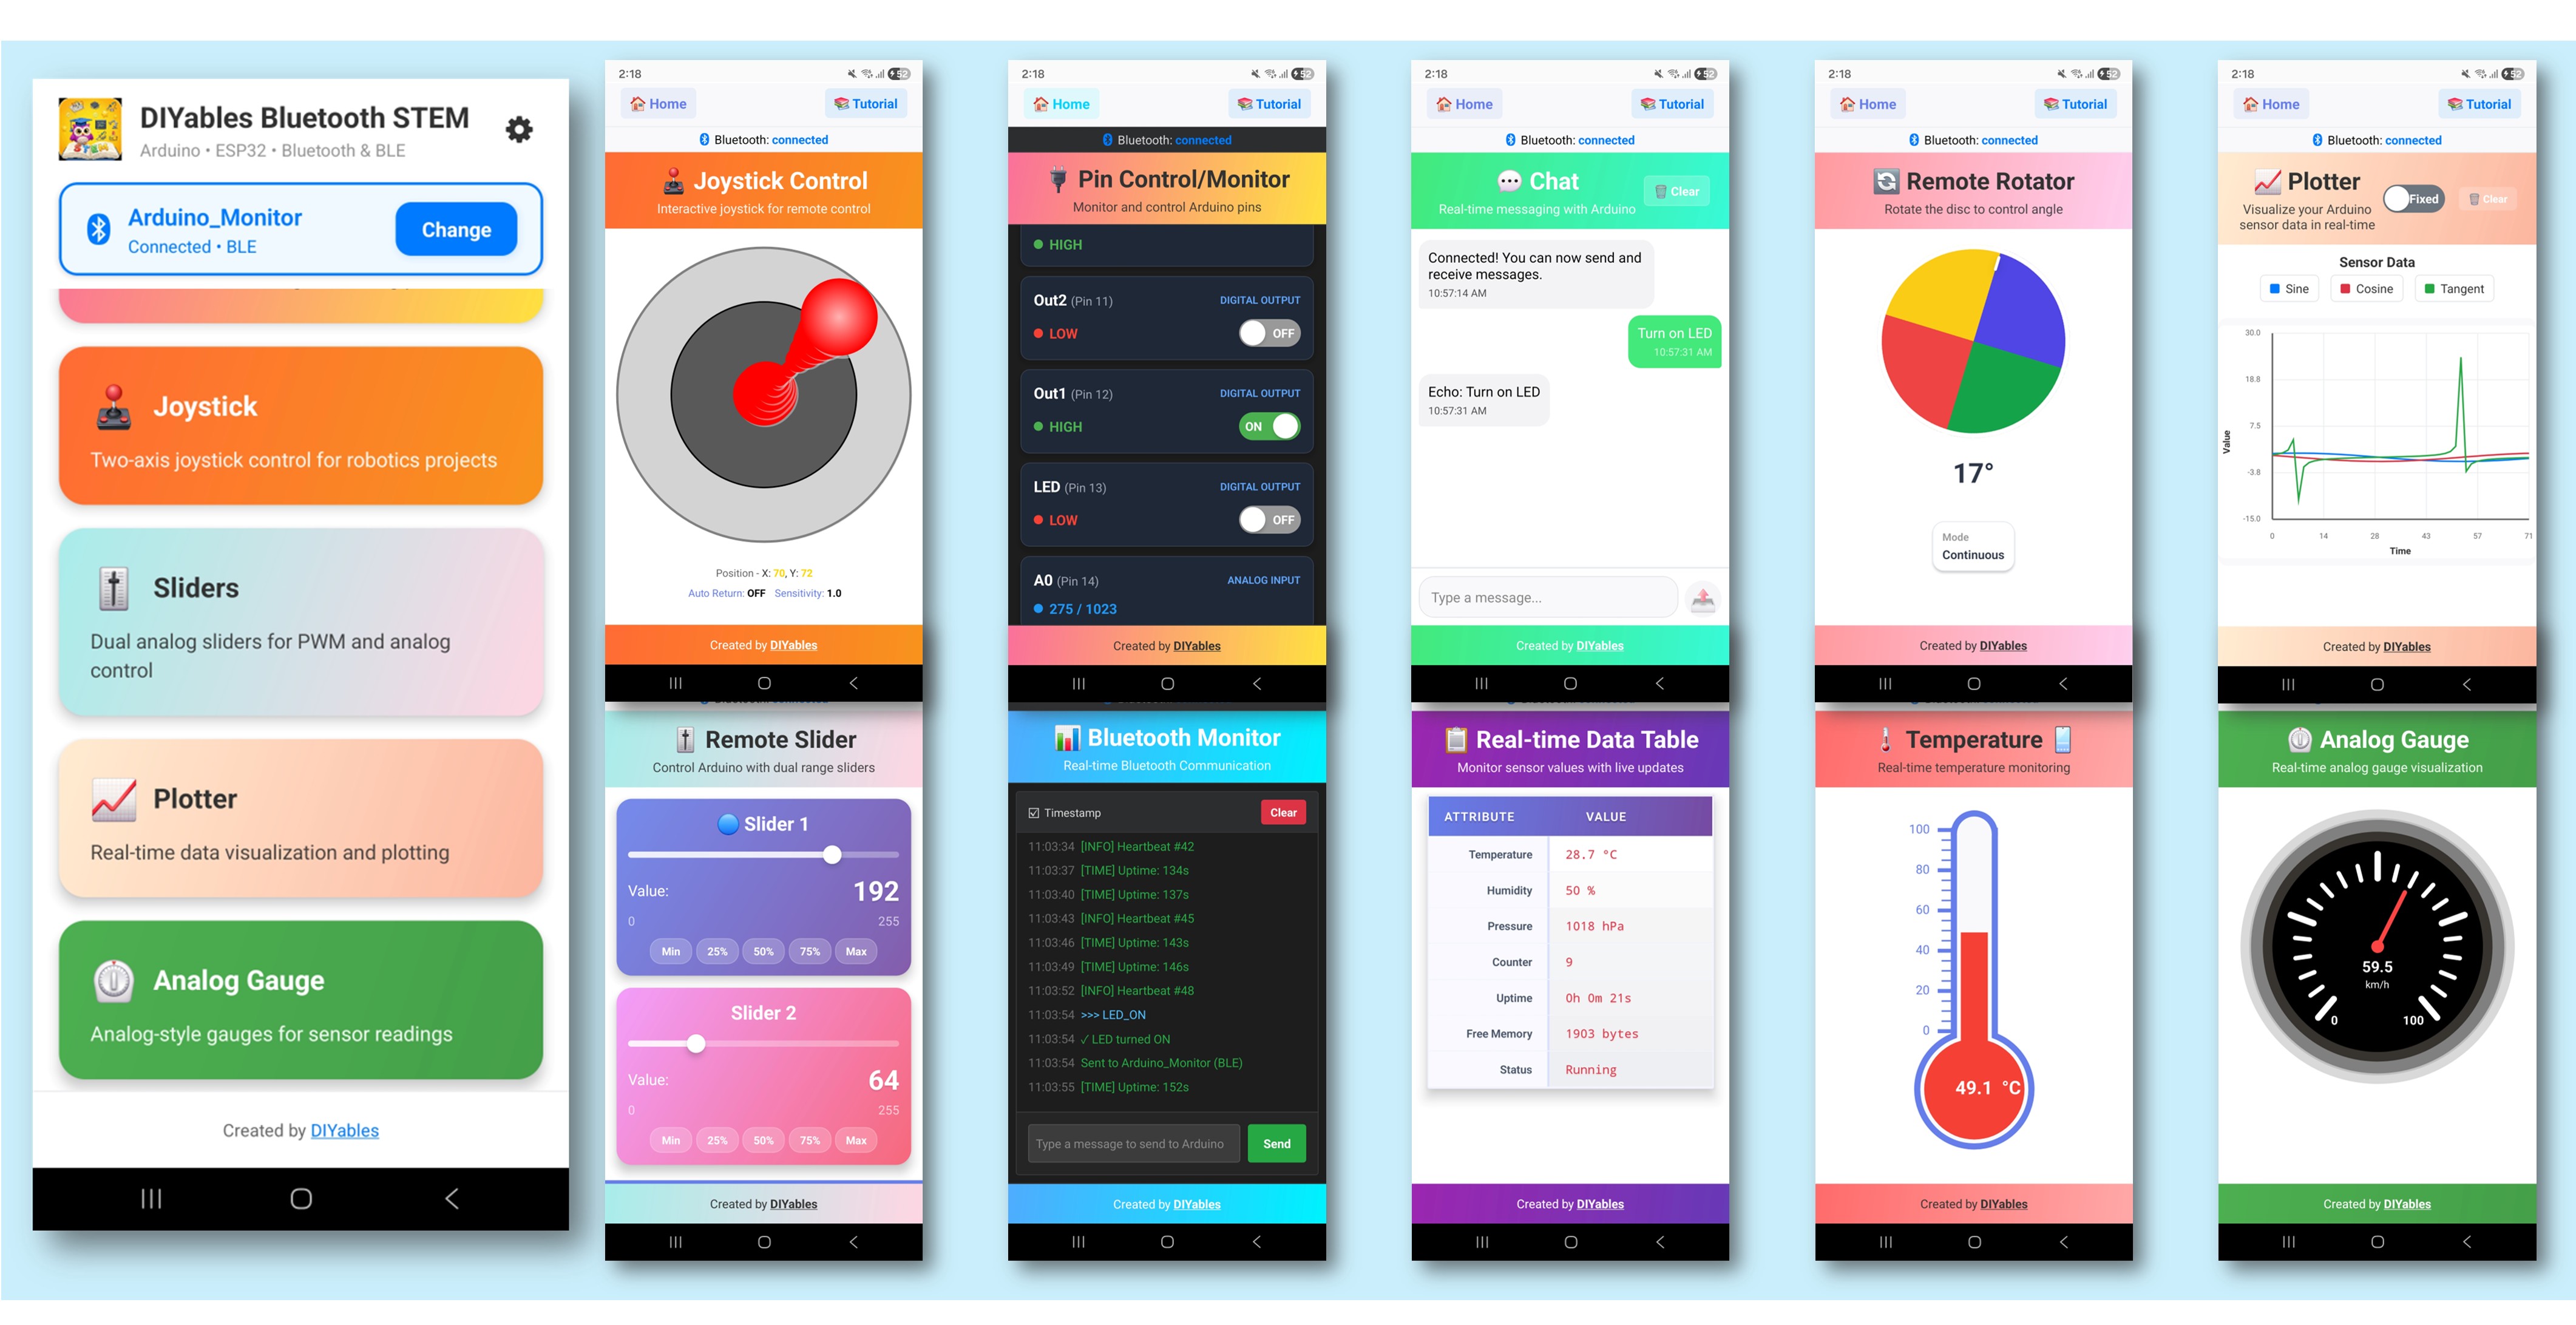
  • Sau khi kết nối, ứng dụng tự động quay lại màn hình chính. Màn hình chính hiển thị tất cả các ứng dụng có sẵn. 9 ứng dụng được khởi tạo trong code Arduino sẽ phản hồi và hoạt động — các ứng dụng khác trên màn hình chính sẽ hiển thị nhưng không hoạt động với sketch này.
diyables Bluetooth app - home screen with multiple apps

Lưu ý: Bạn có thể nhấn biểu tượng cài đặt trên màn hình chính để ẩn/hiện các ứng dụng trên màn hình chính. Để biết thêm chi tiết, xem Hướng Dẫn Sử Dụng Ứng Dụng DIYables Bluetooth.

  • Nhấn một số ứng dụng sau để mở và tương tác với Arduino: Monitor, Chat, Slider, Joystick, Temperature, Plotter, Table, Analog Gauge, Rotator
  • Chuyển đổi giữa các ứng dụng tự do — tất cả đều chia sẻ cùng một kết nối BLE

Bây giờ hãy nhìn lại Serial Monitor trên Arduino IDE. Bạn sẽ thấy:

COM6
Send
Bluetooth connected! Monitor: System running, uptime: 5s Chat message: Hello Slider value: 128 Joystick: X=0.50, Y=-0.30 Temperature: 22.50 °C
Autoscroll Show timestamp
Clear output
9600 baud  
Newline  

Cách Thức Hoạt Động

Khởi Tạo Ứng Dụng

Mỗi ứng dụng được tạo với cấu hình và callback riêng:

// Tất cả ứng dụng chia sẻ cùng một Bluetooth server DIYables_BluetoothServer bluetoothServer(bluetooth); // Tạo các ứng dụng riêng lẻ DIYables_BluetoothMonitor bluetoothMonitor(bluetoothServer); DIYables_BluetoothChat bluetoothChat(bluetoothServer); DIYables_BluetoothSlider bluetoothSlider(bluetoothServer, 0, 255, 1); DIYables_BluetoothJoystick bluetoothJoystick(bluetoothServer, false, 5); DIYables_BluetoothTemperature bluetoothTemp(bluetoothServer, -10.0, 50.0, "°C"); DIYables_BluetoothPlotter bluetoothPlotter(bluetoothServer); DIYables_BluetoothTable bluetoothTable(bluetoothServer); DIYables_BluetoothAnalogGauge bluetoothGauge(bluetoothServer, 0.0, 100.0, "%"); DIYables_BluetoothRotator bluetoothRotator(bluetoothServer, ROTATOR_MODE_CONTINUOUS);

Tương Tác Giữa Các Ứng Dụng

Các ứng dụng có thể tương tác với nhau — khi một ứng dụng nhận được đầu vào, nó có thể cập nhật các ứng dụng khác:

// Slider cập nhật gauge và table bluetoothSlider.onSliderValue([](int value) { float percent = value * 100.0 / 255.0; bluetoothGauge.send(percent); bluetoothTable.sendValueUpdate("Slider 1", String(value)); }); // Joystick cập nhật table bluetoothJoystick.onJoystickValue([](float x, float y) { bluetoothTable.sendValueUpdate("Joystick X", String(x, 2)); bluetoothTable.sendValueUpdate("Joystick Y", String(y, 2)); }); // Rotator cập nhật table bluetoothRotator.onRotatorAngle([](float angle) { bluetoothTable.sendValueUpdate("Rotator Angle", String(angle, 1) + "°"); });

Thời Gian Cập Nhật

Mỗi ứng dụng có khoảng thời gian cập nhật riêng để cân bằng giữa khả năng phản hồi và băng thông:

void loop() { bluetoothServer.loop(); unsigned long now = millis(); // Plotter: cập nhật nhanh nhất (100ms) if (now - lastPlotterTime >= 100) { ... } // Temperature: mỗi 2 giây if (now - lastTempTime >= 2000) { ... } // Gauge: mỗi 3 giây if (now - lastGaugeTime >= 3000) { ... } // Monitor, Table: mỗi 5 giây if (now - lastMonitorTime >= 5000) { ... } if (now - lastTableTime >= 5000) { ... } }

Cấu Trúc Bảng

Ví dụ này tạo một bảng với 10 hàng hiển thị dữ liệu từ tất cả các ứng dụng:

HàngNhãnMô Tả
0StatusTrạng thái kết nối/chạy
1UptimeThời gian từ khi khởi động
2Slider 1Giá trị slider hiện tại
3Slider 2Giá trị slider thứ hai
4Joystick XVị trí X của joystick
5Joystick YVị trí Y của joystick
6TemperatureNhiệt độ hiện tại
7Gauge ValuePhần trăm gauge hiện tại
8Rotator AngleGóc quay hiện tại
9MessagesSố lượng tin nhắn chat

Tùy Chỉnh Sáng Tạo - Điều Chỉnh Code Cho Dự Án Của Bạn

Thêm hoặc Bớt Ứng Dụng

Bạn không cần tất cả 9 ứng dụng. Chỉ cần bao gồm những gì bạn cần:

// Thiết lập tối thiểu: chỉ Monitor và Slider DIYables_BluetoothMonitor bluetoothMonitor(bluetoothServer); DIYables_BluetoothSlider bluetoothSlider(bluetoothServer, 0, 100, 1); // Thế thôi! Ứng dụng sẽ chỉ hiển thị hai ứng dụng này

Logic Tương Tác Tùy Chỉnh

// Ví dụ: Cảnh báo nhiệt độ qua Monitor void checkTemperatureAlarm(float temp) { if (temp > 40.0) { bluetoothMonitor.send("⚠️ CẢNH BÁO NHIỆT ĐỘ CAO: " + String(temp, 1) + "°C"); bluetoothChat.send("Cảnh báo nhiệt độ được kích hoạt!"); } }

Khắc Phục Sự Cố

Các Vấn Đề Thường Gặp

1. Không thể tìm thấy thiết bị trong ứng dụng

  • Đảm bảo Arduino UNO R4 WiFi đã được cấp nguồn và sketch đã được upload
  • Đảm bảo Bluetooth của điện thoại đã được bật
  • Trên Android 11 trở xuống, cũng bật dịch vụ Location

2. Một số ứng dụng không hiển thị trong menu

  • Tất cả ứng dụng được khởi tạo sẽ hiển thị tự động
  • Kiểm tra rằng mỗi đối tượng ứng dụng được tạo đúng cách
  • Ứng dụng khám phá các ứng dụng có sẵn từ Arduino

3. Cập nhật có vẻ chậm

  • Mỗi ứng dụng có khoảng thời gian cập nhật khác nhau — đây là thiết kế có chủ ý
  • BLE có băng thông hạn chế; quá nhiều cập nhật nhanh có thể gây tắc nghẽn
  • Giảm tần suất cập nhật cho các ứng dụng không cần dữ liệu thời gian thực

4. Cập nhật giữa các ứng dụng không hoạt động

  • Xác minh các hàm callback được thiết lập đúng cách
  • Kiểm tra rằng tên hàng trong bảng khớp chính xác (phân biệt chữ hoa chữ thường)
  • Đảm bảo đối tượng ứng dụng đích có thể truy cập trong phạm vi callback

5. Vấn đề bộ nhớ hoặc crash

  • Chạy 9 ứng dụng sử dụng nhiều bộ nhớ
  • Loại bỏ các ứng dụng không sử dụng để giải phóng tài nguyên
  • Giảm số lượng hàng trong bảng nếu cần

6. Upload thất bại hoặc bo mạch không được nhận dạng

  • Cài đặt gói bo mạch Arduino UNO R4 mới nhất qua Board Manager
  • Thử cáp USB hoặc cổng khác

Ý Tưởng Dự Án

  • Dashboard IoT toàn diện
  • Bảng điều khiển robot (joystick + monitor + sliders)
  • Trạm thời tiết (temperature + gauge + plotter + table)
  • Hub tự động hóa nhà (sliders + pins + monitor + chat)
  • Nền tảng học STEM (tất cả ứng dụng để thí nghiệm)

Bước Tiếp Theo

Sau khi thành thạo ví dụ Ứng Dụng Đa Chức Năng, khám phá các hướng dẫn ứng dụng riêng lẻ để hiểu sâu hơn:

  1. Bluetooth Chat - Cho chi tiết về nhắn tin
  2. Bluetooth Slider - Cho chi tiết điều khiển giá trị
  3. Bluetooth Plotter - Cho chi tiết trực quan hóa dữ liệu
  4. Bluetooth RTC - Cho đồng bộ hóa thời gian (sử dụng RTC phần cứng tích hợp)

Hỗ Trợ

Để được trợ giúp thêm: