Cách lấy thời gian và ngày tháng (giây, phút, giờ, ngày trong tuần, ngày trong tháng, tháng và năm) bằng Arduino và module đồng hồ thời gian thực DS1307.
Tiết lộ: Một số liên kết trong bài viết này là liên kết tiếp thị Amazon và có thể nhận hoa hồng theo chính sách của chương trình.
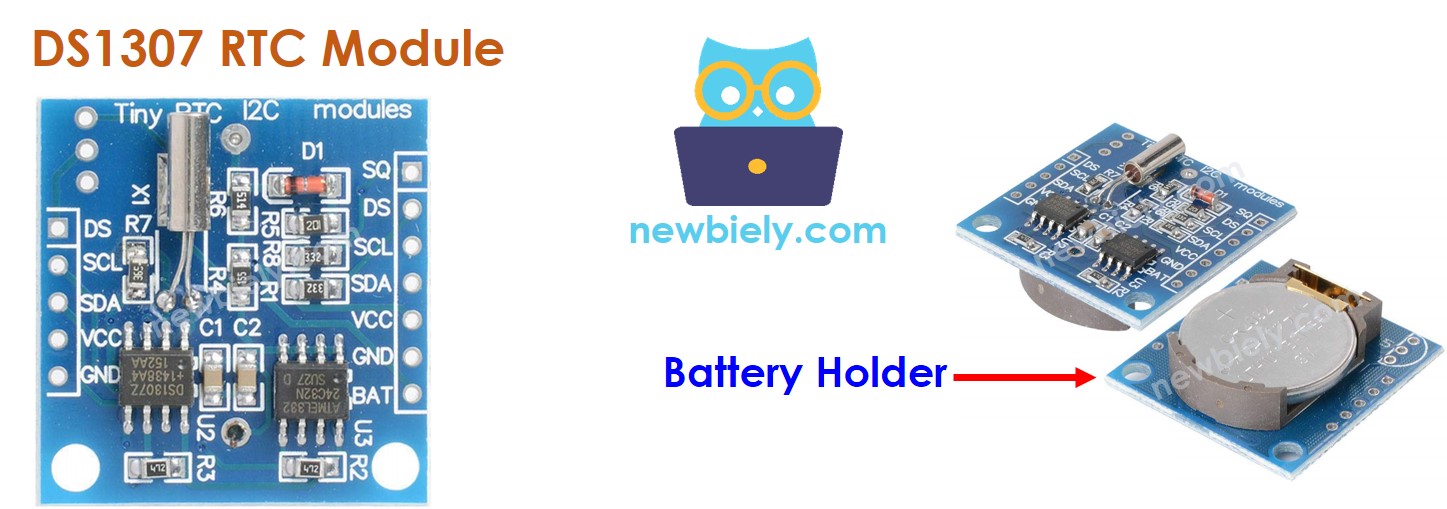
Về Module Đồng hồ thời gian thực DS1307
Arduino có một số hàm liên quan đến thời gian như millis(), micros(). Tuy nhiên, chúng không thể cung cấp ngày giờ (giây, phút, giờ, ngày trong tuần, ngày trong tháng, tháng và năm). Để lấy ngày giờ, ta cần sử dụng một module Đồng hồ thời gian thực (RTC) như DS3231, DS1370. Module DS3231 có độ chính xác cao hơn DS1370. Xem DS3231 so với DS1307
Sơ đồ chân cắm
Mô-đun Đồng hồ thời gian thực DS1307 có 12 chân. Tuy nhiên, để sử dụng bình thường, nó cần dùng 4 chân: VCC, GND, SDA, SCL:
Chân SCL: là chân xung đồng hồ cho giao diện I2C.
Chân SDA: là chân dữ liệu nối tiếp cho giao diện I2C.
Chân VCC: cấp nguồn cho module. Có thể ở bất kỳ mức điện áp từ 3.3V đến 5.5V.
Chân GND: là chân nối đất.
Mô-đun DS1307 cũng có một giá đỡ pin.
Nếu chúng ta lắp pin CR2032, nó sẽ giữ thời gian cho đồng hồ trên module chạy khi nguồn chính bị tắt.
Nếu chúng ta không lắp pin, thời gian sẽ bị mất khi nguồn chính tắt và bạn sẽ phải đặt lại thời gian.
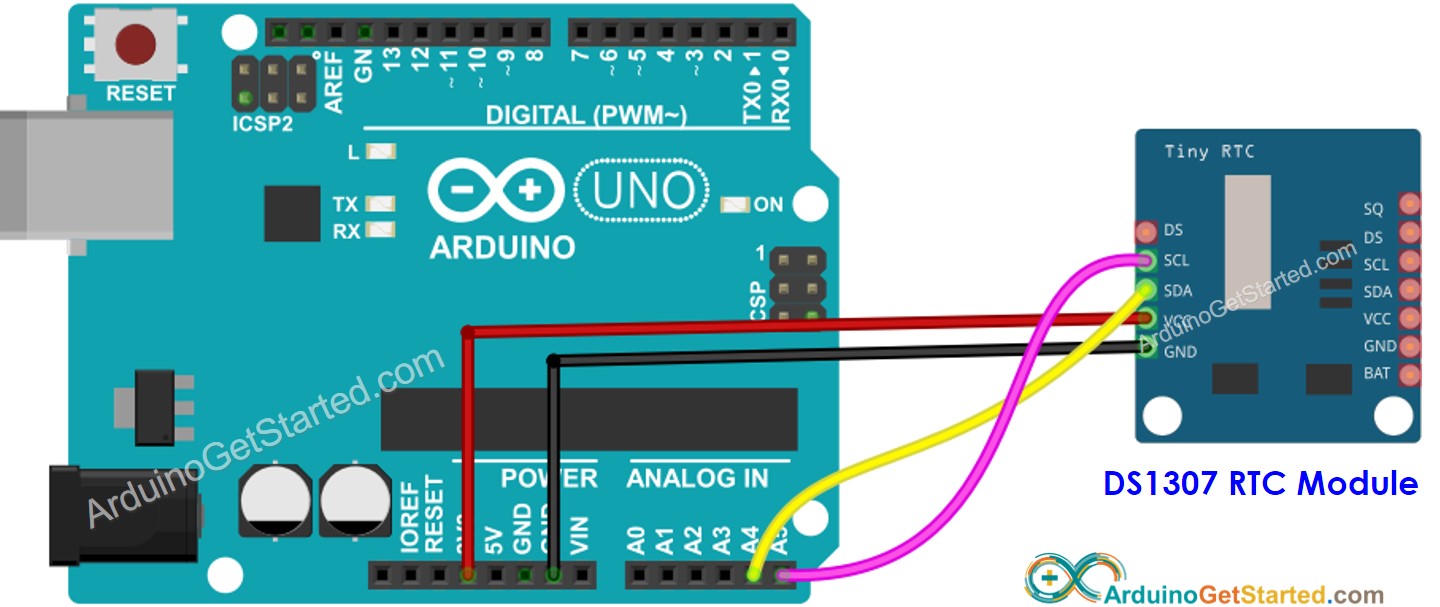
Sơ đồ đấu dây
This image is created using Fritzing. Click to enlarge image
Arduino - Mô-đun RTC DS1307
DS1307 RTC Module
Arduino Uno, Nano
Arduino Mega
Vin
3.3V
3.3V
GND
GND
GND
SDA
A4
20
SCL
A5
21
Cách Lập Trình Cho Mô-đun DS1307 RTC
Bao gồm thư viện:
#include <RTClib.h>
Khai báo một đối tượng RTC:
RTC_DS1307 rtc;
Khởi tạo RTC:
if (! rtc.begin()) {Serial.println("Couldn't find RTC");while (1);}
Lần đầu tiên, thiết lập RTC bằng ngày giờ trên PC nơi bản phác thảo được biên dịch
/* * Mã Arduino này được phát triển bởi newbiely.vn * Mã Arduino này được cung cấp để sử dụng công khai, không có ràng buộc. * Để xem hướng dẫn chi tiết và sơ đồ kết nối, vui lòng truy cập: * https://newbiely.vn/tutorials/arduino/arduino-ds1307-rtc-module */#include <RTClib.h>RTC_DS1307 rtc;char daysOfTheWeek[7][12] = {"Sunday","Monday","Tuesday","Wednesday","Thursday","Friday","Saturday"};voidsetup () {Serial.begin(9600);// SETUP RTC MODULEif (! rtc.begin()) {Serial.println("Couldn't find RTC");Serial.flush();while (1); }// automatically sets the RTC to the date & time on PC this sketch was compiled rtc.adjust(DateTime(F(__DATE__), F(__TIME__)));// manually sets the RTC with an explicit date & time, for example to set// January 21, 2021 at 3am you would call:// rtc.adjust(DateTime(2021, 1, 21, 3, 0, 0));}voidloop () {DateTimenow = rtc.now();Serial.print("Date & Time: ");Serial.print(now.year(), DEC);Serial.print('/');Serial.print(now.month(), DEC);Serial.print('/');Serial.print(now.day(), DEC);Serial.print(" (");Serial.print(daysOfTheWeek[now.dayOfTheWeek()]);Serial.print(") ");Serial.print(now.hour(), DEC);Serial.print(':');Serial.print(now.minute(), DEC);Serial.print(':');Serial.println(now.second(), DEC);delay(1000); // delay 1 seconds}
Hướng dẫn từng bước
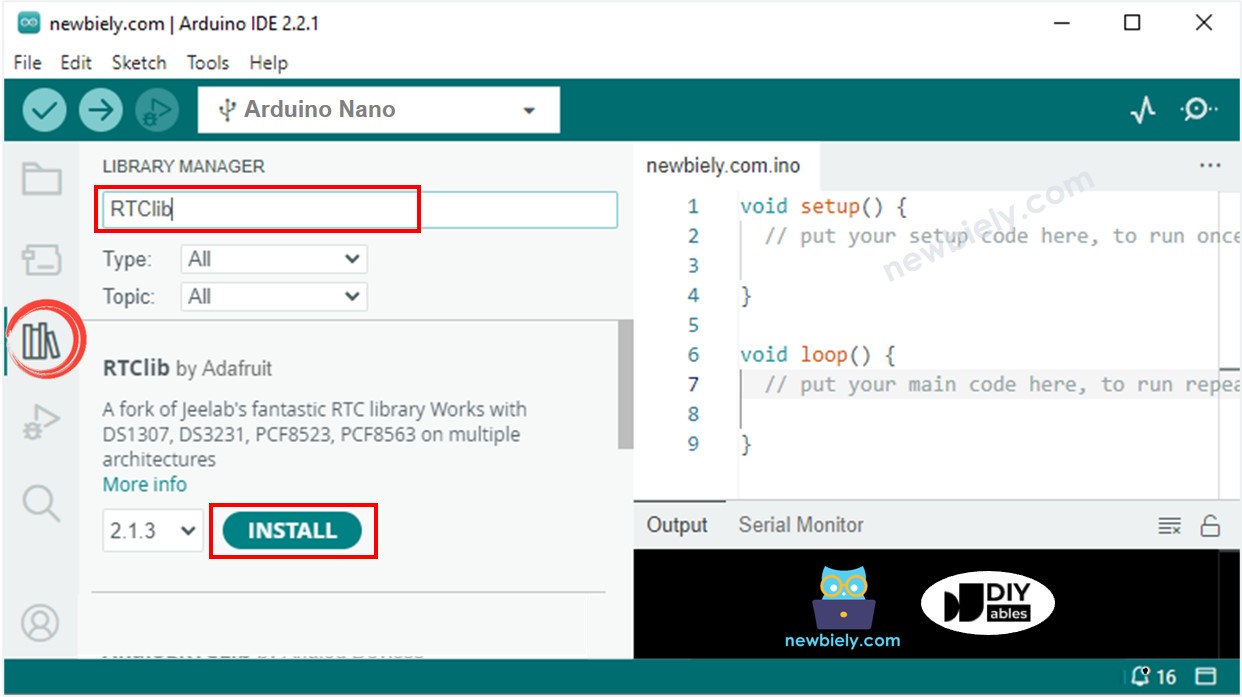
Đi tới biểu tượng Thư viện ở thanh bên trái của Arduino IDE.
Tìm kiếm “RTClib”, sau đó tìm thư viện RTC của Adafruit
Nhấp vào nút Cài đặt để cài đặt thư viện RTC.
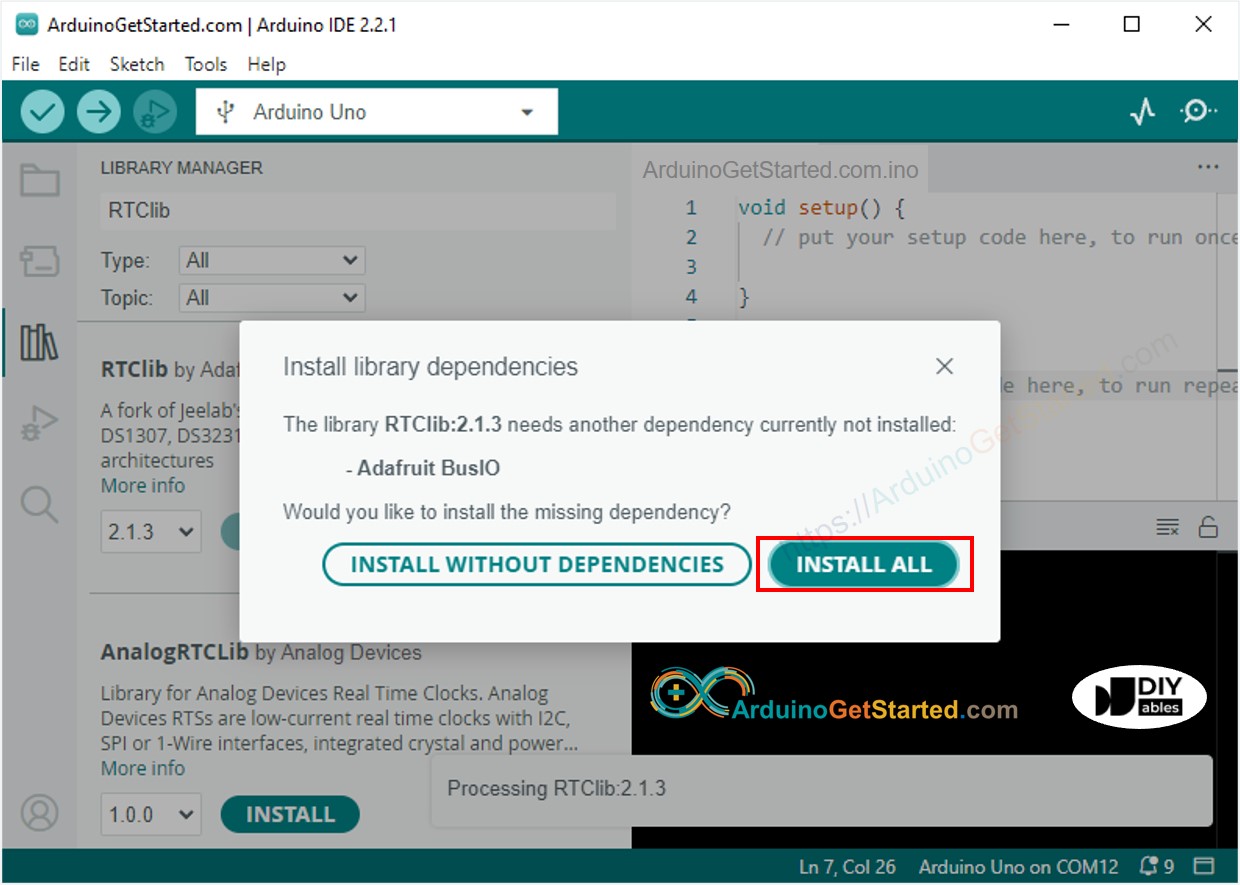
Bạn có thể được yêu cầu cài đặt thêm một số phụ thuộc thư viện khác.
Nhấn nút Cài đặt Tất cả để cài đặt tất cả các phụ thuộc thư viện.
Sao chép mã ở trên và mở bằng Arduino IDE
Nhấn nút Tải lên trên Arduino IDE để tải mã lên Arduino
Mở Serial Monitor
Xem kết quả trên Serial Monitor.
Newbiely | Arduino IDE 2.3.8
──
☐
✕
File
Edit
Sketch
Tools
Help
Arduino Uno
Newbiely.ino
···
8Serial.println("Hello World!");
Output
Serial Monitor
Message (Enter to send message to 'Arduino Uno' on 'COM15')
New Line
9600 baud
Date & Time: 2021/10/6 (Wednesday) 9:9:35
Date & Time: 2021/10/6 (Wednesday) 9:9:36
Date & Time: 2021/10/6 (Wednesday) 9:9:37
Date & Time: 2021/10/6 (Wednesday) 9:9:38
Date & Time: 2021/10/6 (Wednesday) 9:9:39
Date & Time: 2021/10/6 (Wednesday) 9:9:40
Date & Time: 2021/10/6 (Wednesday) 9:9:41
Date & Time: 2021/10/6 (Wednesday) 9:9:42
Date & Time: 2021/10/6 (Wednesday) 9:9:43
Date & Time: 2021/10/6 (Wednesday) 9:9:44
Ln 11, Col 1
Arduino Uno on COM15
2
Mã Arduino – Cách tạo lịch trình hàng ngày với Arduino
/* * Mã Arduino này được phát triển bởi newbiely.vn * Mã Arduino này được cung cấp để sử dụng công khai, không có ràng buộc. * Để xem hướng dẫn chi tiết và sơ đồ kết nối, vui lòng truy cập: * https://newbiely.vn/tutorials/arduino/arduino-ds1307-rtc-module */// Date and time functions using a DS1307 RTC connected via I2C and Wire lib#include <RTClib.h>// event from 13:50 to 14:10uint8_t DAILY_EVENT_START_HH = 13; // event start time: houruint8_t DAILY_EVENT_START_MM = 50; // event start time: minuteuint8_t DAILY_EVENT_END_HH = 14; // event end time: houruint8_t DAILY_EVENT_END_MM = 10; // event end time: minuteRTC_DS1307 rtc;char daysOfTheWeek[7][12] = {"Sunday","Monday","Tuesday","Wednesday","Thursday","Friday","Saturday"};voidsetup () {Serial.begin(9600);// SETUP RTC MODULEif (! rtc.begin()) {Serial.println("Couldn't find RTC");while (1); }// sets the RTC to the date & time on PC this sketch was compiled rtc.adjust(DateTime(F(__DATE__), F(__TIME__)));// sets the RTC with an explicit date & time, for example to set// January 21, 2021 at 3am you would call:// rtc.adjust(DateTime(2021, 1, 21, 3, 0, 0));}voidloop () {DateTimenow = rtc.now();if (now.hour() >= DAILY_EVENT_START_HH &&now.minute() >= DAILY_EVENT_START_MM &&now.hour() < DAILY_EVENT_END_HH &&now.minute() < DAILY_EVENT_END_MM) {Serial.println("It is on scheduled time");// TODO: write your code" } else {Serial.println("It is NOT on scheduled time"); } printTime(now);}void printTime(DateTime time) {Serial.print("TIME: ");Serial.print(time.year(), DEC);Serial.print('/');Serial.print(time.month(), DEC);Serial.print('/');Serial.print(time.day(), DEC);Serial.print(" (");Serial.print(daysOfTheWeek[time.dayOfTheWeek()]);Serial.print(") ");Serial.print(time.hour(), DEC);Serial.print(':');Serial.print(time.minute(), DEC);Serial.print(':');Serial.println(time.second(), DEC);}
Mã Arduino – Cách tạo lịch làm việc hàng tuần bằng Arduino
/* * Mã Arduino này được phát triển bởi newbiely.vn * Mã Arduino này được cung cấp để sử dụng công khai, không có ràng buộc. * Để xem hướng dẫn chi tiết và sơ đồ kết nối, vui lòng truy cập: * https://newbiely.vn/tutorials/arduino/arduino-ds1307-rtc-module */// Date and time functions using a DS1307 RTC connected via I2C and Wire lib#include <RTClib.h>// UNCHANGABLE PARAMATERS#define SUNDAY 0#define MONDAY 1#define TUESDAY 2#define WEDNESDAY 3#define THURSDAY 4#define FRIDAY 5#define SATURDAY 6// event on Monday, from 13:50 to 14:10uint8_t WEEKLY_EVENT_DAY = MONDAY;uint8_t WEEKLY_EVENT_START_HH = 13; // event start time: houruint8_t WEEKLY_EVENT_START_MM = 50; // event start time: minuteuint8_t WEEKLY_EVENT_END_HH = 14; // event end time: houruint8_t WEEKLY_EVENT_END_MM = 10; // event end time: minuteRTC_DS1307 rtc;char daysOfTheWeek[7][12] = {"Sunday","Monday","Tuesday","Wednesday","Thursday","Friday","Saturday"};voidsetup () {Serial.begin(9600);// SETUP RTC MODULEif (! rtc.begin()) {Serial.println("Couldn't find RTC");while (1); }// sets the RTC to the date & time on PC this sketch was compiled rtc.adjust(DateTime(F(__DATE__), F(__TIME__)));// sets the RTC with an explicit date & time, for example to set// January 21, 2021 at 3am you would call:// rtc.adjust(DateTime(2021, 1, 21, 3, 0, 0));}voidloop () {DateTimenow = rtc.now();if (now.dayOfTheWeek() == WEEKLY_EVENT_DAY &&now.hour() >= WEEKLY_EVENT_START_HH &&now.minute() >= WEEKLY_EVENT_START_MM &&now.hour() < WEEKLY_EVENT_END_HH &&now.minute() < WEEKLY_EVENT_END_MM) {Serial.println("It is on scheduled time");// TODO: write your code" } else {Serial.println("It is NOT on scheduled time"); } printTime(now);}void printTime(DateTime time) {Serial.print("TIME: ");Serial.print(time.year(), DEC);Serial.print('/');Serial.print(time.month(), DEC);Serial.print('/');Serial.print(time.day(), DEC);Serial.print(" (");Serial.print(daysOfTheWeek[time.dayOfTheWeek()]);Serial.print(") ");Serial.print(time.hour(), DEC);Serial.print(':');Serial.print(time.minute(), DEC);Serial.print(':');Serial.println(time.second(), DEC);}
Mã Arduino – Cách lên lịch vào ngày cụ thể với Arduino
/* * Mã Arduino này được phát triển bởi newbiely.vn * Mã Arduino này được cung cấp để sử dụng công khai, không có ràng buộc. * Để xem hướng dẫn chi tiết và sơ đồ kết nối, vui lòng truy cập: * https://newbiely.vn/tutorials/arduino/arduino-ds1307-rtc-module */// Date and time functions using a DS1307 RTC connected via I2C and Wire lib#include <RTClib.h>// UNCHANGABLE PARAMATERS#define SUNDAY 0#define MONDAY 1#define TUESDAY 2#define WEDNESDAY 3#define THURSDAY 4#define FRIDAY 5#define SATURDAY 6#define JANUARY 1#define FEBRUARY 2#define MARCH 3#define APRIL 4#define MAY 5#define JUNE 6#define JULY 7#define AUGUST 8#define SEPTEMBER 9#define OCTOBER 10#define NOVEMBER 11#define DECEMBER 12// event from 13:50 August 15, 2021 to 14:10 September 29, 2021DateTime EVENT_START(2021, AUGUST, 15, 13, 50);DateTime EVENT_END(2021, SEPTEMBER, 29, 14, 10);RTC_DS1307 rtc;char daysOfTheWeek[7][12] = {"Sunday","Monday","Tuesday","Wednesday","Thursday","Friday","Saturday"};voidsetup () {Serial.begin(9600);// SETUP RTC MODULEif (! rtc.begin()) {Serial.println("Couldn't find RTC");Serial.flush();while (1); }// sets the RTC to the date & time on PC this sketch was compiled rtc.adjust(DateTime(F(__DATE__), F(__TIME__)));// sets the RTC with an explicit date & time, for example to set// January 21, 2021 at 3am you would call:// rtc.adjust(DateTime(2021, 1, 21, 3, 0, 0));}voidloop () {DateTimenow = rtc.now();if (now.secondstime() >= EVENT_START.secondstime() &&now.secondstime() < EVENT_END.secondstime()) {Serial.println("It is on scheduled time");// TODO: write your code" } else {Serial.println("It is NOT on scheduled time"); } printTime(now);}void printTime(DateTime time) {Serial.print("TIME: ");Serial.print(time.year(), DEC);Serial.print('/');Serial.print(time.month(), DEC);Serial.print('/');Serial.print(time.day(), DEC);Serial.print(" (");Serial.print(daysOfTheWeek[time.dayOfTheWeek()]);Serial.print(") ");Serial.print(time.hour(), DEC);Serial.print(':');Serial.print(time.minute(), DEC);Serial.print(':');Serial.println(time.second(), DEC);}
Video Tutorial
Việc sản xuất video tốn rất nhiều thời gian. Nếu video hướng dẫn hữu ích cho việc học của bạn, hãy đăng ký kênh YouTube để ủng hộ. Nếu nhu cầu đủ cao, chúng tôi sẽ cố gắng làm thêm nhiều video.
 English for KidsHọc tiếng Anh vui nhộn cho trẻ nhỏ.Tải về trênGoogle PlayTải về trênApp Store
 Bubble NoteGhi chú tự xóa — viết như nhắn tin.Tải về trênGoogle PlayTải về trênApp Store
 Tôi Không MuaĐánh bại mua sắm bốc đồng, tiết kiệm hơn.Tải về trênGoogle PlayTải về trênApp Store
 Con Đường Tri ThứcBài thi thử để học mọi thứ.Tải về trênGoogle PlayTải về trênApp Store