Arduino Đèn giao thông

Trong bài hướng dẫn này, chúng ta sẽ học cách sử dụng Arduino để điều khiển mô-đun đèn giao thông. Cụ thể, chúng ta sẽ học:

Phần cứng cần chuẩn bị

1×Arduino Uno R3
1×USB 2.0 cable type A/B (for USB-A PC)
1×USB 2.0 cable type C/B (for USB-C PC)
1×Traffic Light Module
1×dây jumper
1×(Khuyến nghị) Screw Terminal Block Shield for Arduino Uno
1×(Khuyến nghị) Breadboard Shield for Arduino Uno
1×(Khuyến nghị) Enclosure for Arduino Uno
1×(Khuyến nghị) Prototyping Base Plate & Breadboard Kit for Arduino UNO

Or you can buy the following kits:

1×DIYables STEM V3 Starter Kit (Arduino included)
1×DIYables Sensor Kit (30 sensors/displays)
1×DIYables Sensor Kit (18 sensors/displays)

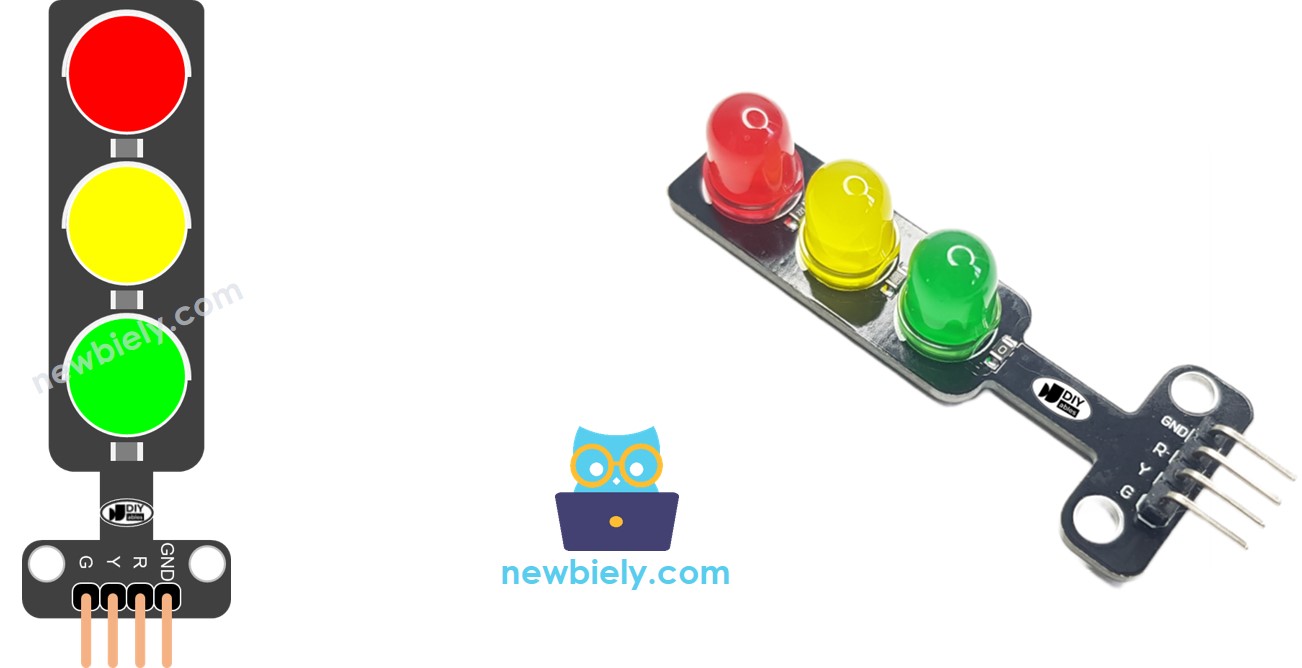
Về Mô-đun Đèn Giao Thông

Sơ đồ các chân

Một mô-đun đèn tín hiệu giao thông gồm 4 chân:

  • Chân GND: Chân nối đất, kết nối chân này với GND của Arduino.
  • Chân R: Chân để điều khiển đèn đỏ, kết nối chân này với một đầu ra số của Arduino.
  • Chân Y: Chân để điều khiển đèn vàng, kết nối chân này với một đầu ra số của Arduino.
  • Chân G: Chân để điều khiển đèn xanh, kết nối chân này với một đầu ra số của Arduino.
sơ đồ chân đèn giao thông

Cách hoạt động

Sơ đồ đấu dây

sơ đồ nối dây đèn giao thông Arduino

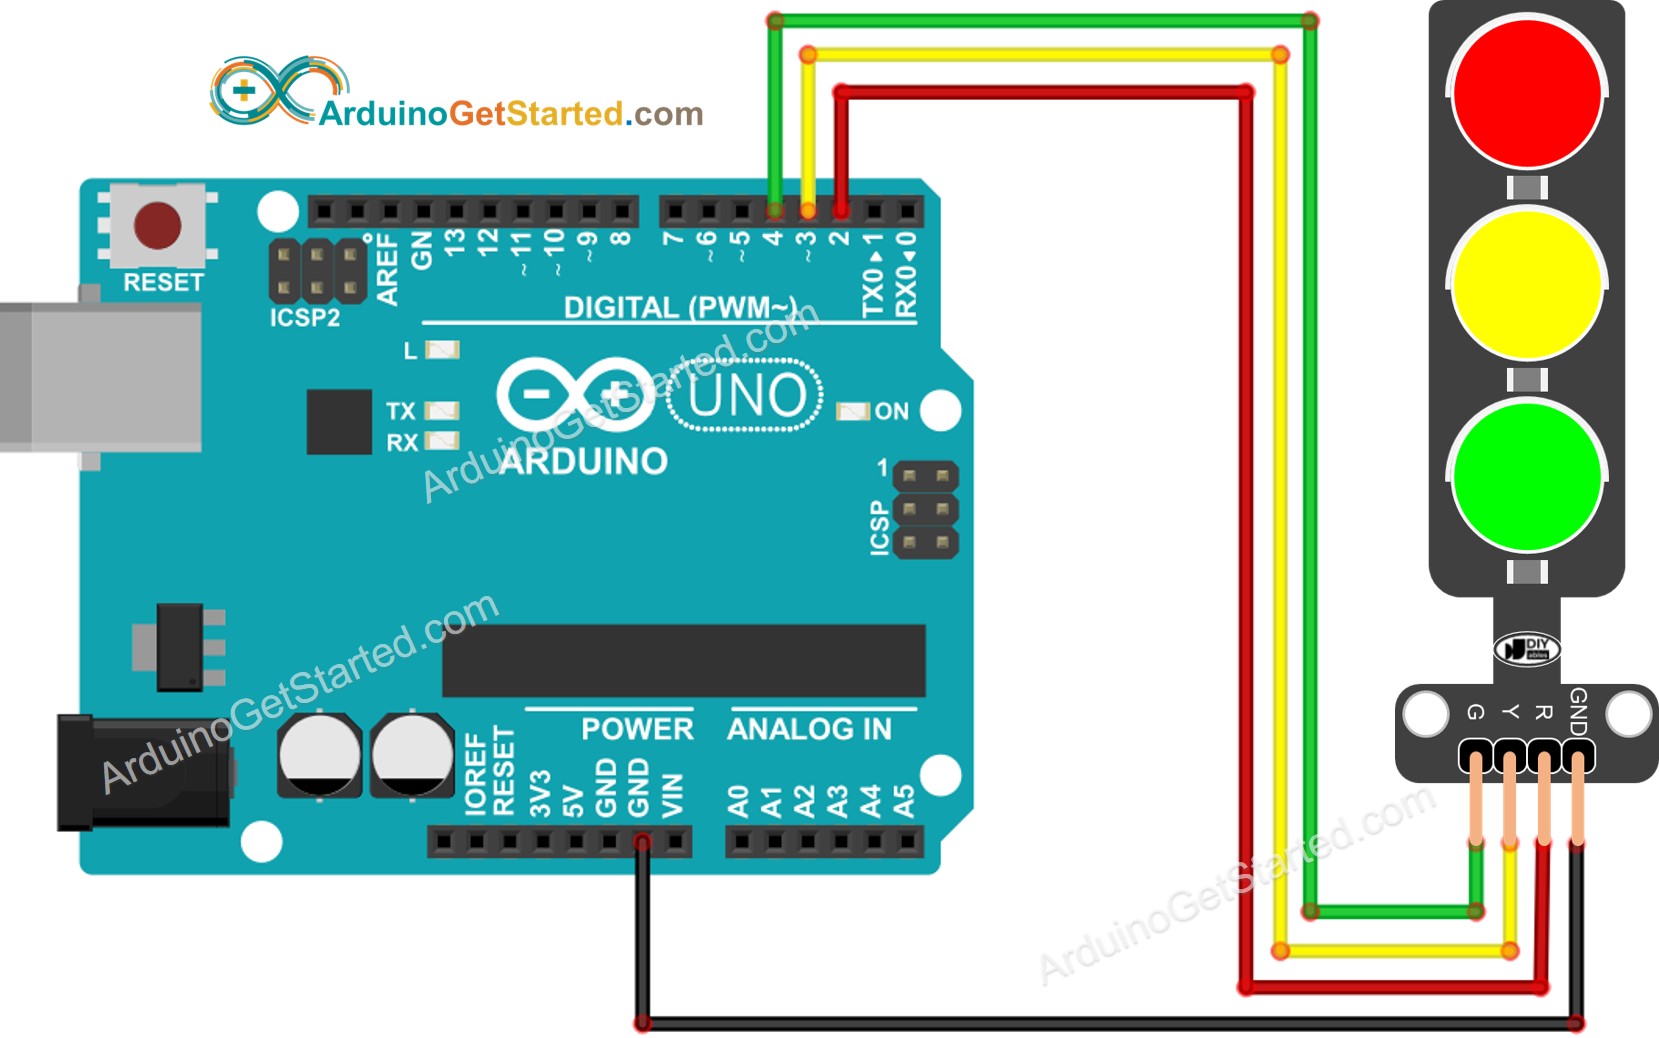
This image is created using Fritzing. Click to enlarge image

Cách Lập Trình cho Mô-đun Đèn Tín Hiệu Giao Thông

  • Cấu hình các chân của Arduino ở chế độ đầu ra kỹ thuật số bằng cách sử dụng hàm pinMode()
pinMode(PIN_RED, OUTPUT); pinMode(PIN_YELLOW, OUTPUT); pinMode(PIN_GREEN, OUTPUT);
  • Chương trình để bật đèn đỏ bằng cách sử dụng hàm digitalWrite():
digitalWrite(PIN_RED, HIGH); // turn on RED digitalWrite(PIN_YELLOW, LOW); // digitalWrite(PIN_GREEN, LOW); delay(RED_TIME); // keep red led on during a period of time

Mã nguồn Arduino

/* * Mã Arduino này được phát triển bởi newbiely.vn * Mã Arduino này được cung cấp để sử dụng công khai, không có ràng buộc. * Để xem hướng dẫn chi tiết và sơ đồ kết nối, vui lòng truy cập: * https://newbiely.vn/tutorials/arduino/arduino-traffic-light */ #define PIN_RED 2 // The Arduino pin connected to R pin of traffic light module #define PIN_YELLOW 3 // The Arduino pin connected to Y pin of traffic light module #define PIN_GREEN 4 // The Arduino pin connected to G pin of traffic light module #define RED_TIME 4000 // RED time in millisecond #define YELLOW_TIME 4000 // YELLOW time in millisecond #define GREEN_TIME 4000 // GREEN time in millisecond void setup() { pinMode(PIN_RED, OUTPUT); pinMode(PIN_YELLOW, OUTPUT); pinMode(PIN_GREEN, OUTPUT); } // the loop function runs over and over again forever void loop() { // red light on digitalWrite(PIN_RED, HIGH); // turn on digitalWrite(PIN_YELLOW, LOW); // turn off digitalWrite(PIN_GREEN, LOW); // turn off delay(RED_TIME); // keep red light on during a period of time // yellow light on digitalWrite(PIN_RED, LOW); // turn off digitalWrite(PIN_YELLOW, HIGH); // turn on digitalWrite(PIN_GREEN, LOW); // turn off delay(YELLOW_TIME); // keep yellow light on during a period of time // green light on digitalWrite(PIN_RED, LOW); // turn off digitalWrite(PIN_YELLOW, LOW); // turn off digitalWrite(PIN_GREEN, HIGH); // turn on delay(GREEN_TIME); // keep green light on during a period of time }

Hướng dẫn từng bước

  • Sao chép mã ở phía trên và mở bằng Arduino IDE
  • Nhấp vào nút Upload trên Arduino IDE để tải mã lên Arduino
  • Xem mô-đun đèn giao thông
mô-đun đèn giao thông Arduino
image source: diyables.io

Cần lưu ý rằng cách hoạt động chính xác của đèn giao thông có thể khác nhau tùy thuộc vào thiết kế và công nghệ cụ thể được sử dụng ở các khu vực và ngã tư khác nhau. Các nguyên tắc được nêu ở trên cung cấp một cái nhìn tổng quan về cách đèn giao thông vận hành để điều tiết giao thông và tăng cường an toàn trên đường.

Đoạn mã ở trên cho thấy việc điều khiển đèn riêng lẻ. Bây giờ, hãy cải thiện mã để tối ưu hóa hiệu quả hơn.

Tối ưu mã nguồn Arduino

  • Hãy cải thiện mã bằng cách triển khai một hàm điều khiển ánh sáng.
/* * Mã Arduino này được phát triển bởi newbiely.vn * Mã Arduino này được cung cấp để sử dụng công khai, không có ràng buộc. * Để xem hướng dẫn chi tiết và sơ đồ kết nối, vui lòng truy cập: * https://newbiely.vn/tutorials/arduino/arduino-traffic-light */ #define PIN_RED 2 // The Arduino pin connected to R pin of traffic light module #define PIN_YELLOW 3 // The Arduino pin connected to Y pin of traffic light module #define PIN_GREEN 4 // The Arduino pin connected to G pin of traffic light module #define RED_TIME 2000 // RED time in millisecond #define YELLOW_TIME 1000 // YELLOW time in millisecond #define GREEN_TIME 2000 // GREEN time in millisecond #define RED 0 // Index in array #define YELLOW 1 // Index in array #define GREEN 2 // Index in array const int pins[] = { PIN_RED, PIN_YELLOW, PIN_GREEN }; const int times[] = { RED_TIME, YELLOW_TIME, GREEN_TIME }; void setup() { pinMode(PIN_RED, OUTPUT); pinMode(PIN_YELLOW, OUTPUT); pinMode(PIN_GREEN, OUTPUT); } // the loop function runs over and over again forever void loop() { // red light on trafic_light_on(RED); delay(times[RED]); // keep red light on during a period of time // yellow light on trafic_light_on(YELLOW); delay(times[YELLOW]); // keep yellow light on during a period of time // green light on trafic_light_on(GREEN); delay(times[GREEN]); // keep green light on during a period of time } void trafic_light_on(int light) { for (int i = RED; i <= GREEN; i++) { if (i == light) digitalWrite(pins[i], HIGH); // turn on else digitalWrite(pins[i], LOW); // turn off } }
  • Hãy cải thiện mã bằng cách sử dụng vòng lặp for.
/* * Mã Arduino này được phát triển bởi newbiely.vn * Mã Arduino này được cung cấp để sử dụng công khai, không có ràng buộc. * Để xem hướng dẫn chi tiết và sơ đồ kết nối, vui lòng truy cập: * https://newbiely.vn/tutorials/arduino/arduino-traffic-light */ #define PIN_RED 2 // The Arduino pin connected to R pin of traffic light module #define PIN_YELLOW 3 // The Arduino pin connected to Y pin of traffic light module #define PIN_GREEN 4 // The Arduino pin connected to G pin of traffic light module #define RED_TIME 2000 // RED time in millisecond #define YELLOW_TIME 1000 // YELLOW time in millisecond #define GREEN_TIME 2000 // GREEN time in millisecond #define RED 0 // Index in array #define YELLOW 1 // Index in array #define GREEN 2 // Index in array const int pins[] = {PIN_RED, PIN_YELLOW, PIN_GREEN}; const int times[] = {RED_TIME, YELLOW_TIME, GREEN_TIME}; void setup() { pinMode(PIN_RED, OUTPUT); pinMode(PIN_YELLOW, OUTPUT); pinMode(PIN_GREEN, OUTPUT); } // the loop function runs over and over again forever void loop() { for (int light = RED; light <= GREEN; light ++) { trafic_light_on(light); delay(times[light]); // keep light on during a period of time } } void trafic_light_on(int light) { for (int i = RED; i <= GREEN; i ++) { if (i == light) digitalWrite(pins[i], HIGH); // turn on else digitalWrite(pins[i], LOW); // turn off } }
  • Hãy cải thiện mã bằng cách sử dụng hàm millis() thay vì delay().
/* * Mã Arduino này được phát triển bởi newbiely.vn * Mã Arduino này được cung cấp để sử dụng công khai, không có ràng buộc. * Để xem hướng dẫn chi tiết và sơ đồ kết nối, vui lòng truy cập: * https://newbiely.vn/tutorials/arduino/arduino-traffic-light */ #define PIN_RED 2 // The Arduino pin connected to R pin of traffic light module #define PIN_YELLOW 3 // The Arduino pin connected to Y pin of traffic light module #define PIN_GREEN 4 // The Arduino pin connected to G pin of traffic light module #define RED_TIME 2000 // RED time in millisecond #define YELLOW_TIME 1000 // YELLOW time in millisecond #define GREEN_TIME 2000 // GREEN time in millisecond #define RED 0 // Index in array #define YELLOW 1 // Index in array #define GREEN 2 // Index in array const int pins[] = { PIN_RED, PIN_YELLOW, PIN_GREEN }; const int times[] = { RED_TIME, YELLOW_TIME, GREEN_TIME }; unsigned long last_time = 0; int light = RED; // start with RED light void setup() { pinMode(PIN_RED, OUTPUT); pinMode(PIN_YELLOW, OUTPUT); pinMode(PIN_GREEN, OUTPUT); trafic_light_on(light); last_time = millis(); } // the loop function runs over and over again forever void loop() { if ((millis() - last_time) > times[light]) { light++; if (light >= 3) light = RED; // new circle trafic_light_on(light); last_time = millis(); } // TO DO: your other code } void trafic_light_on(int light) { for (int i = RED; i <= GREEN; i++) { if (i == light) digitalWrite(pins[i], HIGH); // turn on else digitalWrite(pins[i], LOW); // turn off } }

Video Tutorial

Việc sản xuất video tốn rất nhiều thời gian. Nếu video hướng dẫn hữu ích cho việc học của bạn, hãy đăng ký kênh YouTube để ủng hộ. Nếu nhu cầu đủ cao, chúng tôi sẽ cố gắng làm thêm nhiều video.