ESP32 Đếm Số Lần Nhấn Nút OLED
Trong hướng dẫn này, chúng ta sẽ khám phá ESP32 để đạt được những mục tiêu sau:
- Đếm số lần một nút được nhấn.
- Hiển thị số đếm trên màn hình OLED.
- Thực hiện tự động căn giữa theo chiều dọc và chiều ngang cho số đếm trên màn hình OLED.
Ngoài ra, hướng dẫn này sẽ giải quyết vấn đề debouncing của nút nhấn mà không sử dụng hàm delay(). Để hiểu tại sao debouncing là cần thiết, hãy tham khảo giải thích được cung cấp trong Tại sao chúng ta cần debouncing?.
Hướng dẫn toàn diện này sẽ giúp bạn tích hợp liền mạch chức năng đếm lần nhấn nút, hiển thị OLED, và kỹ thuật debouncing với dự án ESP32 của bạn.
Linh Kiện Cần Thiết
| 1 | × | 38-pin ESP32 ESP-WROOM-32 Dev Module - Narrow | Amazon | |
| 1 | × | Alternatively, 38-pin ESP32 ESP-WROOM-32 Dev Module - Wide | Amazon | |
| 1 | × | Alternatively, 30-pin ESP32 ESP-WROOM-32 Dev Module - Wide | Amazon | |
| 1 | × | Alternatively, ESP32 Uno-form board | Amazon | |
| 1 | × | Alternatively, ESP32 S3 Uno-form board | Amazon | |
| 1 | × | USB Cable Type-A to Type-C (for USB-A PC) | Amazon | |
| 1 | × | USB Cable Type-C to Type-C (for USB-C PC) | Amazon | |
| 1 | × | breadboard-mount Button with Cap | Amazon | |
| 1 | × | breadboard-mount Button Kit | Amazon | |
| 1 | × | Panel-mount Push Button | Amazon | |
| 1 | × | mô-đun nút nhấn | Amazon | |
| 1 | × | SSD1306 I2C OLED Display 128x64 | Amazon | |
| 1 | × | SSD1306 I2C OLED Display 128x32 | Amazon | |
| 1 | × | breadboard | Amazon | |
| 1 | × | dây jumper | Amazon | |
| 1 | × | (Khuyến nghị) Screw Terminal Expansion Board for ESP32 | Amazon | |
| 1 | × | (Khuyến nghị) Breakout Expansion Board for ESP32 | Amazon | |
| 1 | × | (Khuyến nghị) Power Splitter for ESP32 | Amazon |
Or you can buy the following kits:
| 1 | × | DIYables ESP32 Starter Kit (ESP32 included) | Amazon | |
| 1 | × | DIYables Sensor Kit (18 sensors/displays) | Amazon |
Sơ Đồ Đấu Nối
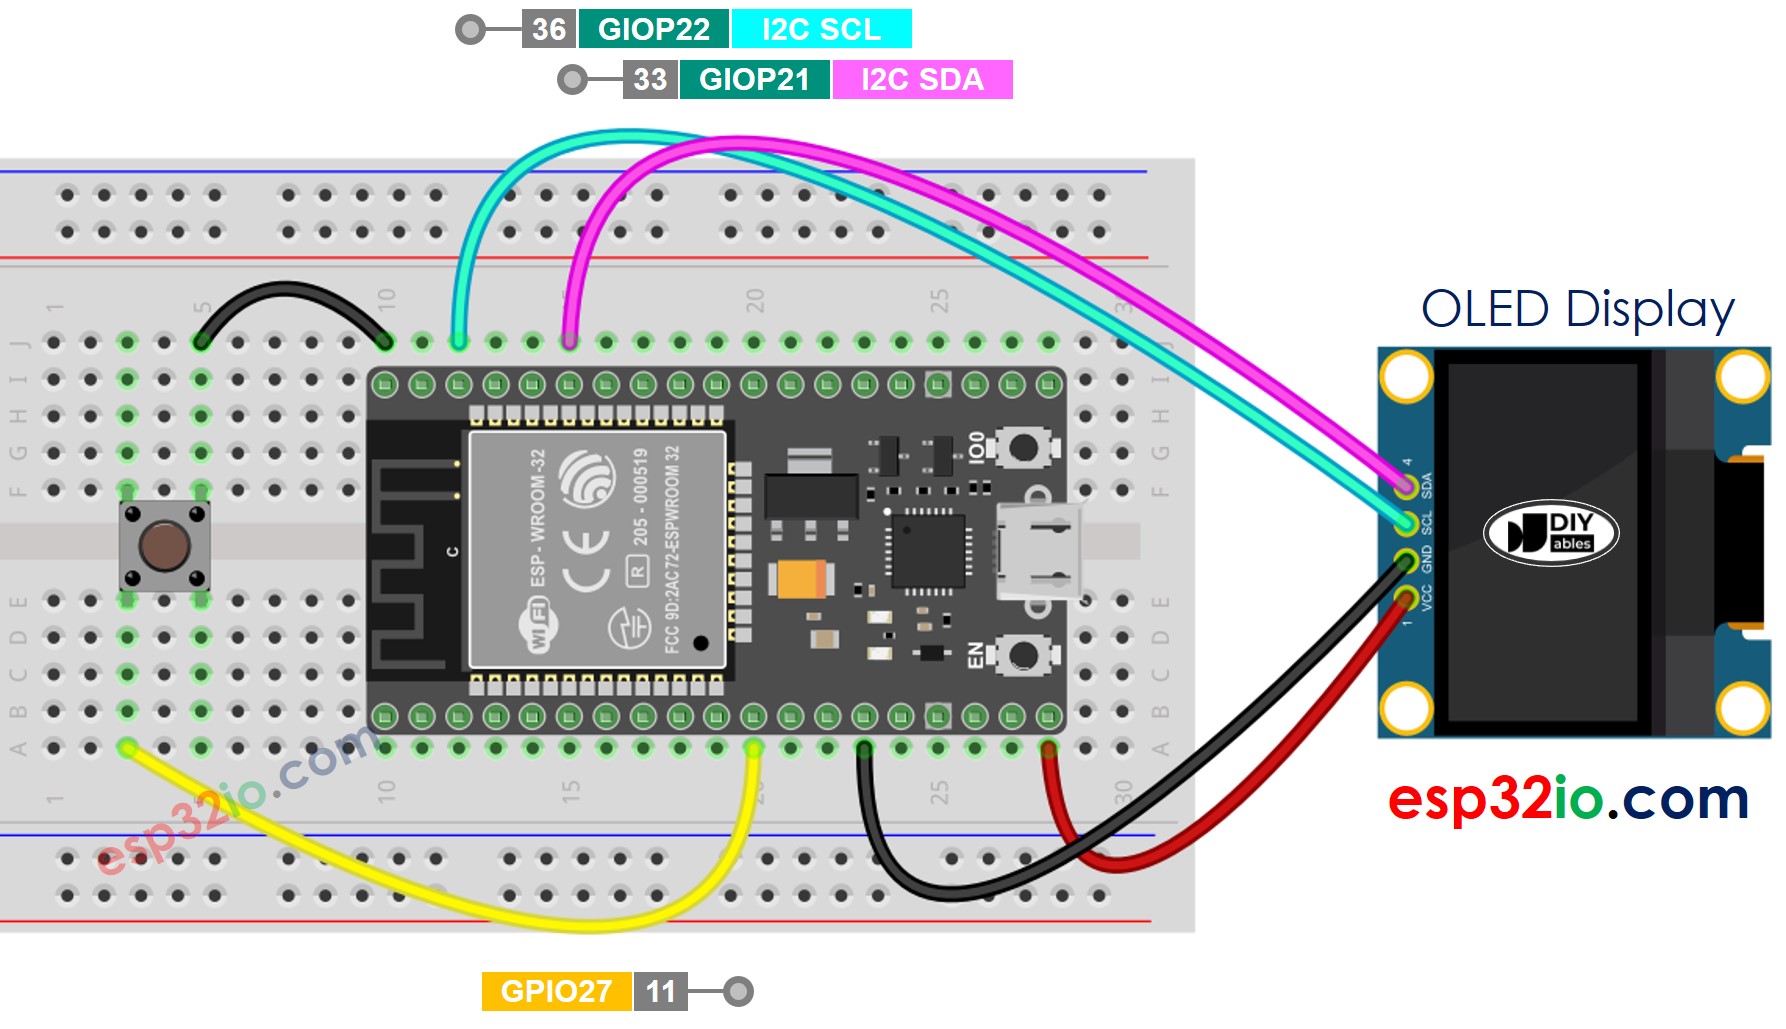
This image is created using Fritzing. Click to enlarge image
Nếu bạn chưa rõ cách cấp nguồn cho ESP32 và các linh kiện khác, xem: Cách Cung Cấp Nguồn Điện Cho ESP32.
Code ESP32 - hiển thị số đếm button trên OLED
Các Bước Nhanh
- Nếu đây là lần đầu tiên bạn sử dụng ESP32, hãy xem ESP32 - Cài Đặt Phần Mềm.
- Thực hiện đấu nối như hình ảnh trên.
- Kết nối bo mạch ESP32 với PC của bạn qua cáp micro USB
- Mở Arduino IDE trên PC của bạn.
- Chọn bo mạch ESP32 phù hợp (ví dụ: ESP32 Dev Module) và cổng COM.
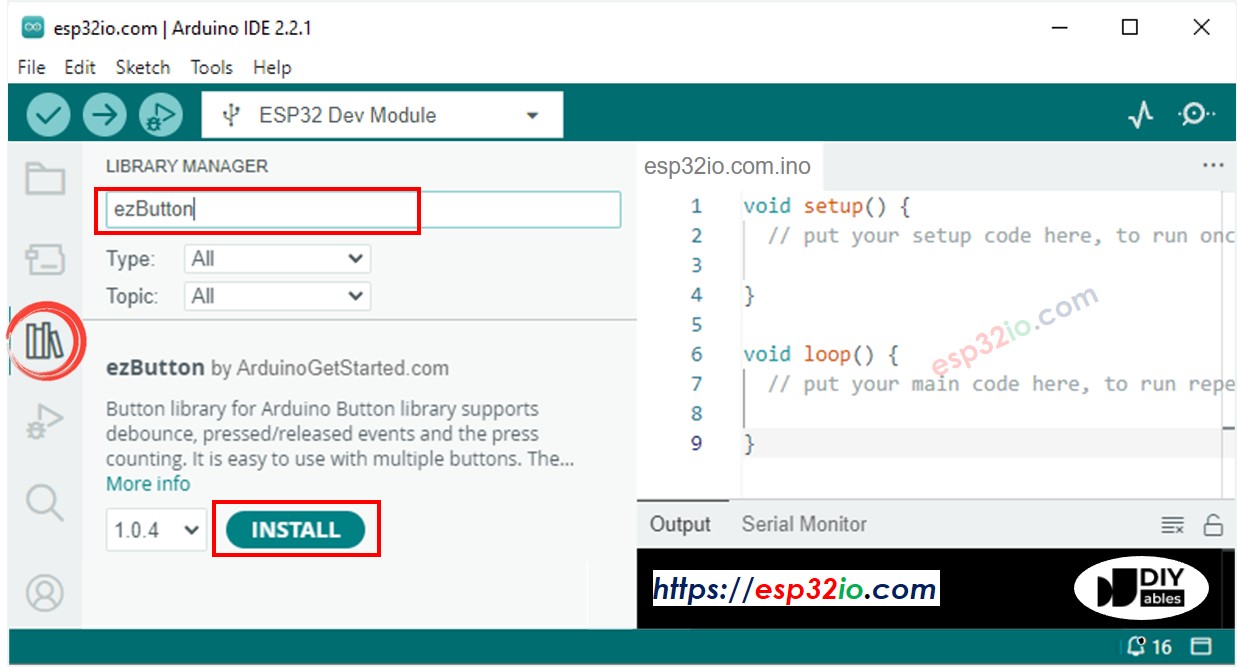
- Nhấp vào biểu tượng Libraries trên thanh bên trái của Arduino IDE.
- Tìm kiếm "ezButton", sau đó tìm thư viện button của ArduinoGetStarted
- Nhấp nút Install để cài đặt thư viện ezButton.
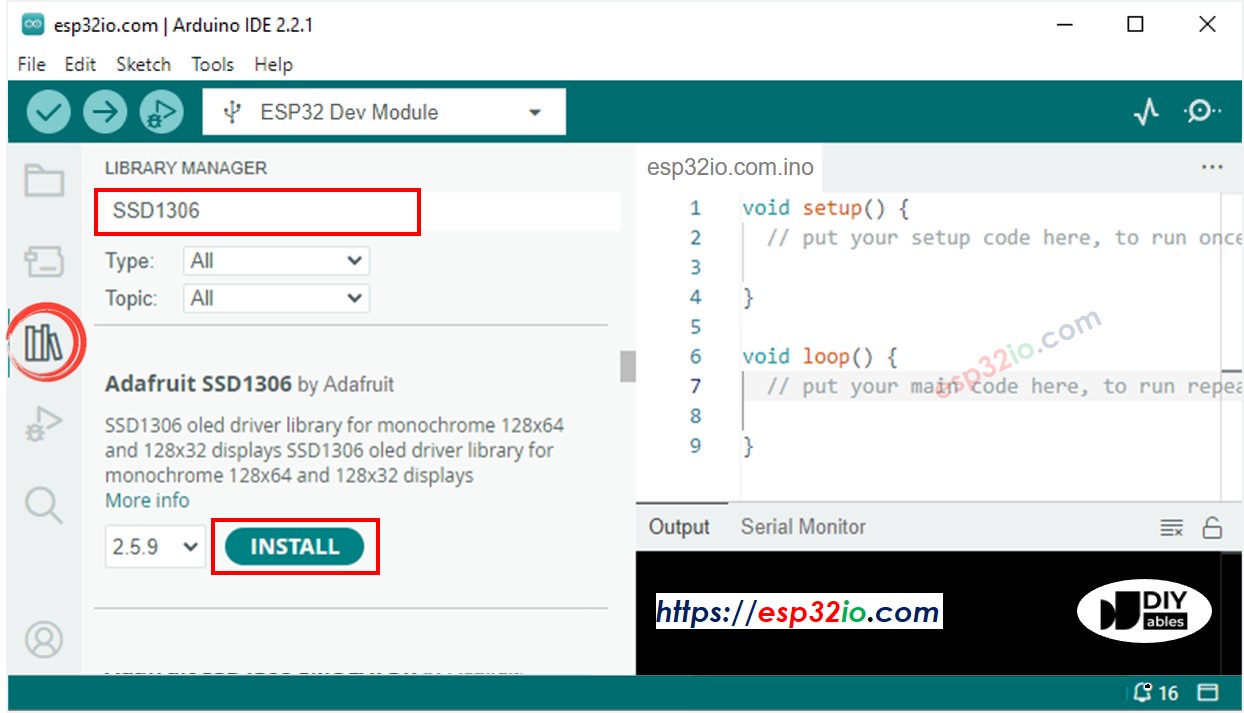
- Tìm kiếm "SSD1306", sau đó tìm thư viện SSD1306 của Adafruit
- Nhấp nút Install để cài đặt thư viện.
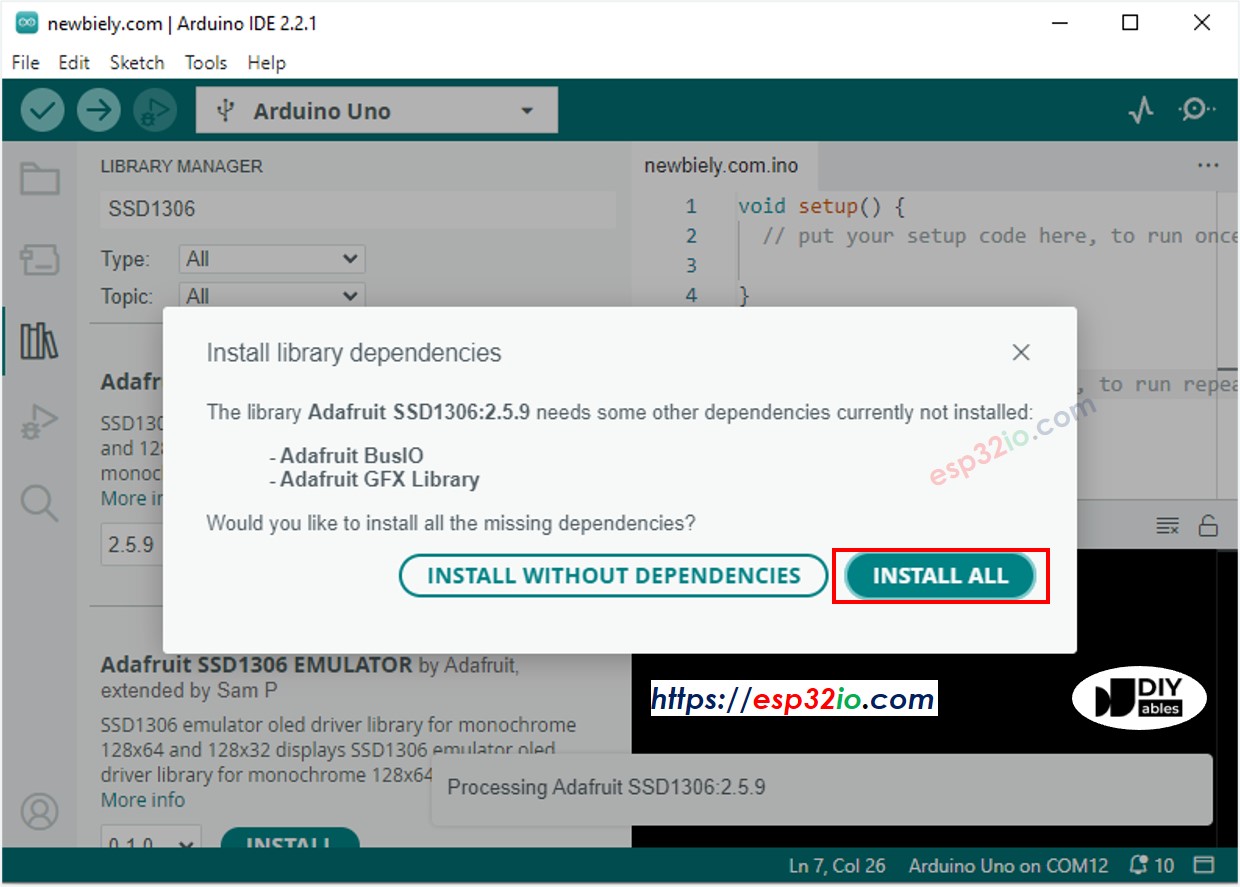
- Bạn sẽ được hỏi về việc cài đặt một số thư viện phụ thuộc khác
- Nhấp nút Install All để cài đặt tất cả các thư viện phụ thuộc.
- Copy code trên và mở bằng Arduino IDE
- Nhấp nút Upload trên Arduino IDE để upload code lên ESP32
- Nhấn nút nhiều lần
- Xem số đếm thay đổi trên OLED
Code trên chỉ hiển thị số đếm lần nhấn nút ở góc trên bên trái. Hãy sửa đổi code để căn giữa nó!
Code ESP32 - Căn Giữa Theo Chiều Dọc và Ngang trên OLED
※ Lưu ý:
Code trên tự động căn giữa theo chiều ngang và chiều dọc cho văn bản trên màn hình OLED. Xem Cách căn giữa theo chiều dọc/ngang trên OLED để biết thêm chi tiết.
Video Tutorial
Việc sản xuất video tốn rất nhiều thời gian. Nếu video hướng dẫn hữu ích cho việc học của bạn, hãy đăng ký kênh YouTube để ủng hộ. Nếu nhu cầu đủ cao, chúng tôi sẽ cố gắng làm thêm nhiều video.
Bình Luận
Bài hướng dẫn liên quan
📱 Ứng dụng đề xuất
 English for KidsHọc tiếng Anh vui nhộn cho trẻ nhỏ.Tải về trênGoogle PlayTải về trênApp Store
 Bubble NoteGhi chú tự xóa — viết như nhắn tin.Tải về trênGoogle PlayTải về trênApp Store
 Tôi Không MuaĐánh bại mua sắm bốc đồng, tiết kiệm hơn.Tải về trênGoogle PlayTải về trênApp Store
 Con Đường Tri ThứcBài thi thử để học mọi thứ.Tải về trênGoogle PlayTải về trênApp Store