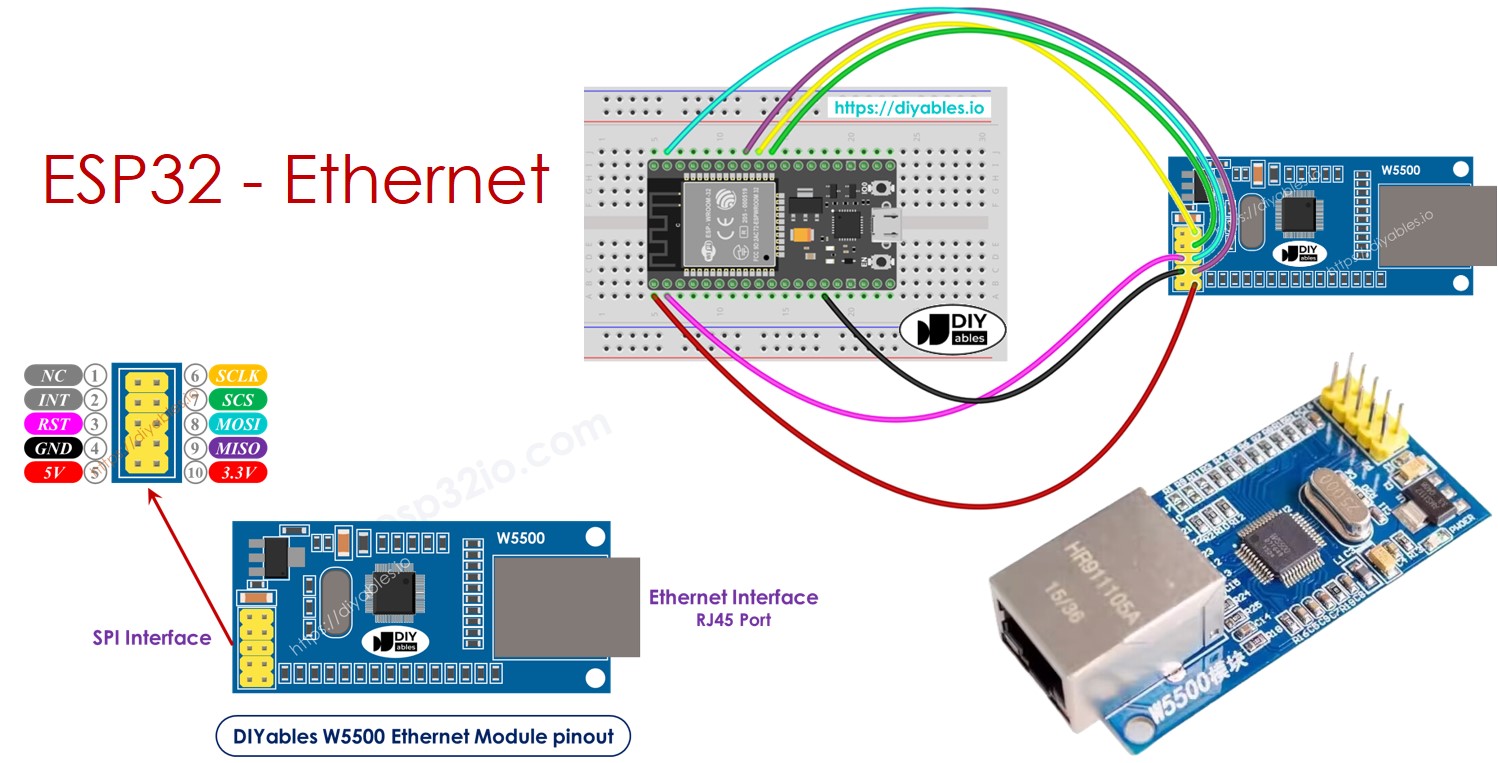
ESP32 Ethernet
Hướng dẫn này sẽ chỉ bạn cách sử dụng module Ethernet W5500 để kết nối ESP32 với Internet hoặc mạng LAN của bạn. Cụ thể, chúng ta sẽ học:
- Cách kết nối ESP32 với module Ethernet W5500
- Cách lập trình ESP32 để gửi HTTP request qua Ethernet
- Cách lập trình ESP32 để tạo web server đơn giản qua Ethernet
Phần Cứng Cần Thiết
| 1 | × | 38-pin ESP32 ESP-WROOM-32 Dev Module - Narrow | Amazon | |
| 1 | × | Alternatively, 38-pin ESP32 ESP-WROOM-32 Dev Module - Wide | Amazon | |
| 1 | × | Alternatively, 30-pin ESP32 ESP-WROOM-32 Dev Module - Wide | Amazon | |
| 1 | × | Alternatively, ESP32 Uno-form board | Amazon | |
| 1 | × | Alternatively, ESP32 S3 Uno-form board | Amazon | |
| 1 | × | Cáp USB Type-C | Amazon | |
| 1 | × | Module Ethernet W5500 | Amazon | |
| 1 | × | Cáp Ethernet | Amazon | |
| 1 | × | Dây Jumper | Amazon | |
| 1 | × | breadboard | Amazon | |
| 1 | × | (Khuyến nghị) Screw Terminal Expansion Board for ESP32 | Amazon | |
| 1 | × | (Khuyến nghị) Breakout Expansion Board for ESP32 | Amazon | |
| 1 | × | (Khuyến nghị) Power Splitter for ESP32 | Amazon |
Or you can buy the following kits:
| 1 | × | DIYables ESP32 Starter Kit (ESP32 included) | Amazon | |
| 1 | × | DIYables Sensor Kit (18 sensors/displays) | Amazon |
Tiết lộ: Một số liên kết trong bài viết này là liên kết tiếp thị Amazon và có thể nhận hoa hồng theo chính sách của chương trình.
Về module Ethernet W5500
Module Ethernet W5500 có hai giao diện:
- Giao diện RJ45: để kết nối với router/switch qua cáp Ethernet
- Giao diện SPI: để kết nối với board ESP32, bao gồm 10 chân:
- Chân NC: để chân này không kết nối.
- Chân INT: để chân này không kết nối.
- Chân RST: chân reset, kết nối chân này với chân EN của ESP32.
- Chân GND: kết nối chân này với chân GND của ESP32.
- Chân 5V: để chân này không kết nối.
- Chân 3.3V: kết nối chân này với chân 3.3V của ESP32.
- Chân MISO: kết nối chân này với chân SPI MISO của ESP32.
- Chân MOSI: kết nối chân này với chân SPI MOSI của ESP32.
- Chân SCS: kết nối chân này với chân SPI CS của ESP32.
- Chân SCLK: kết nối chân này với chân SPI SCK của ESP32.
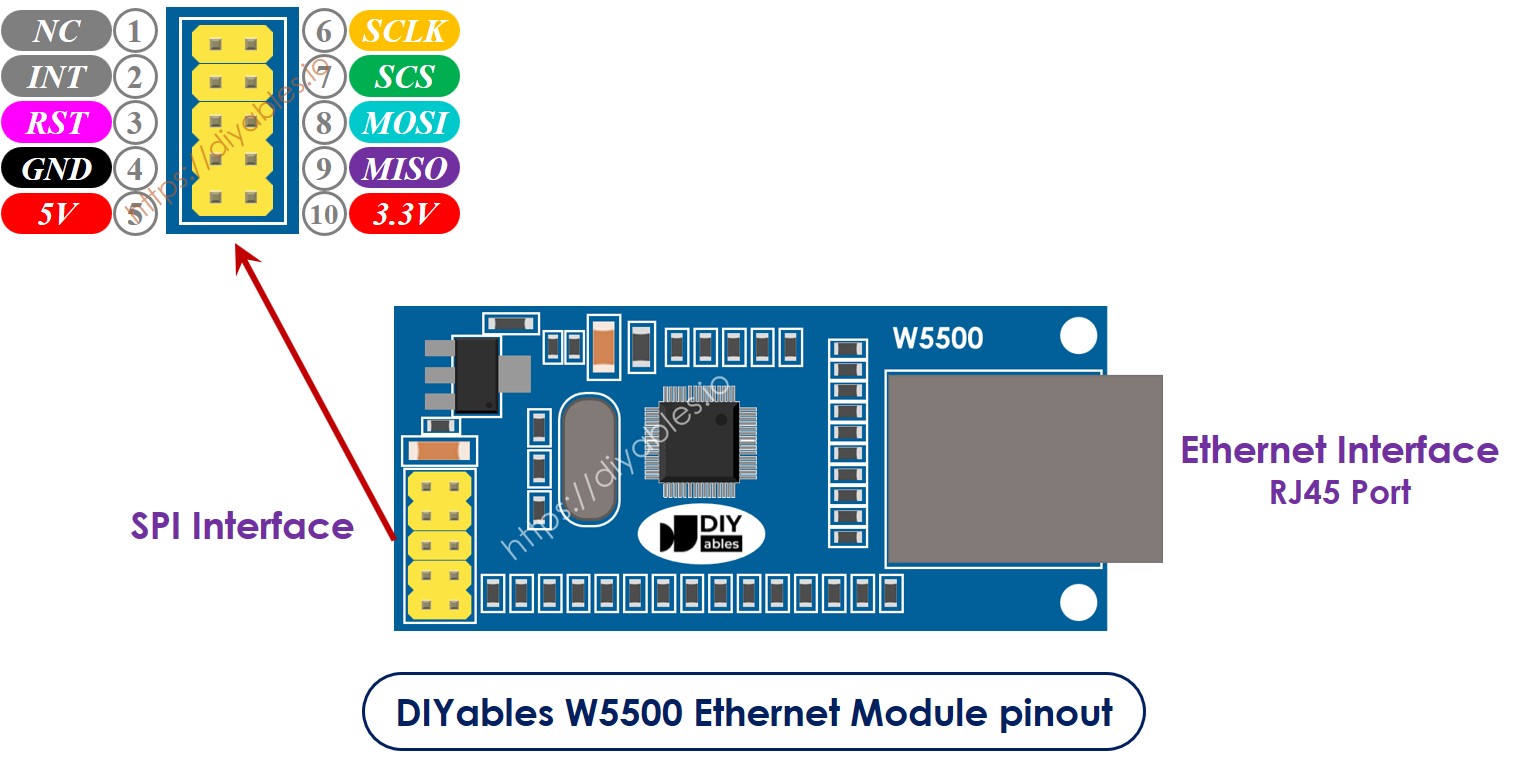
image source: diyables.io
Sơ Đồ Kết Nối giữa ESP32 và Module Ethernet W5500
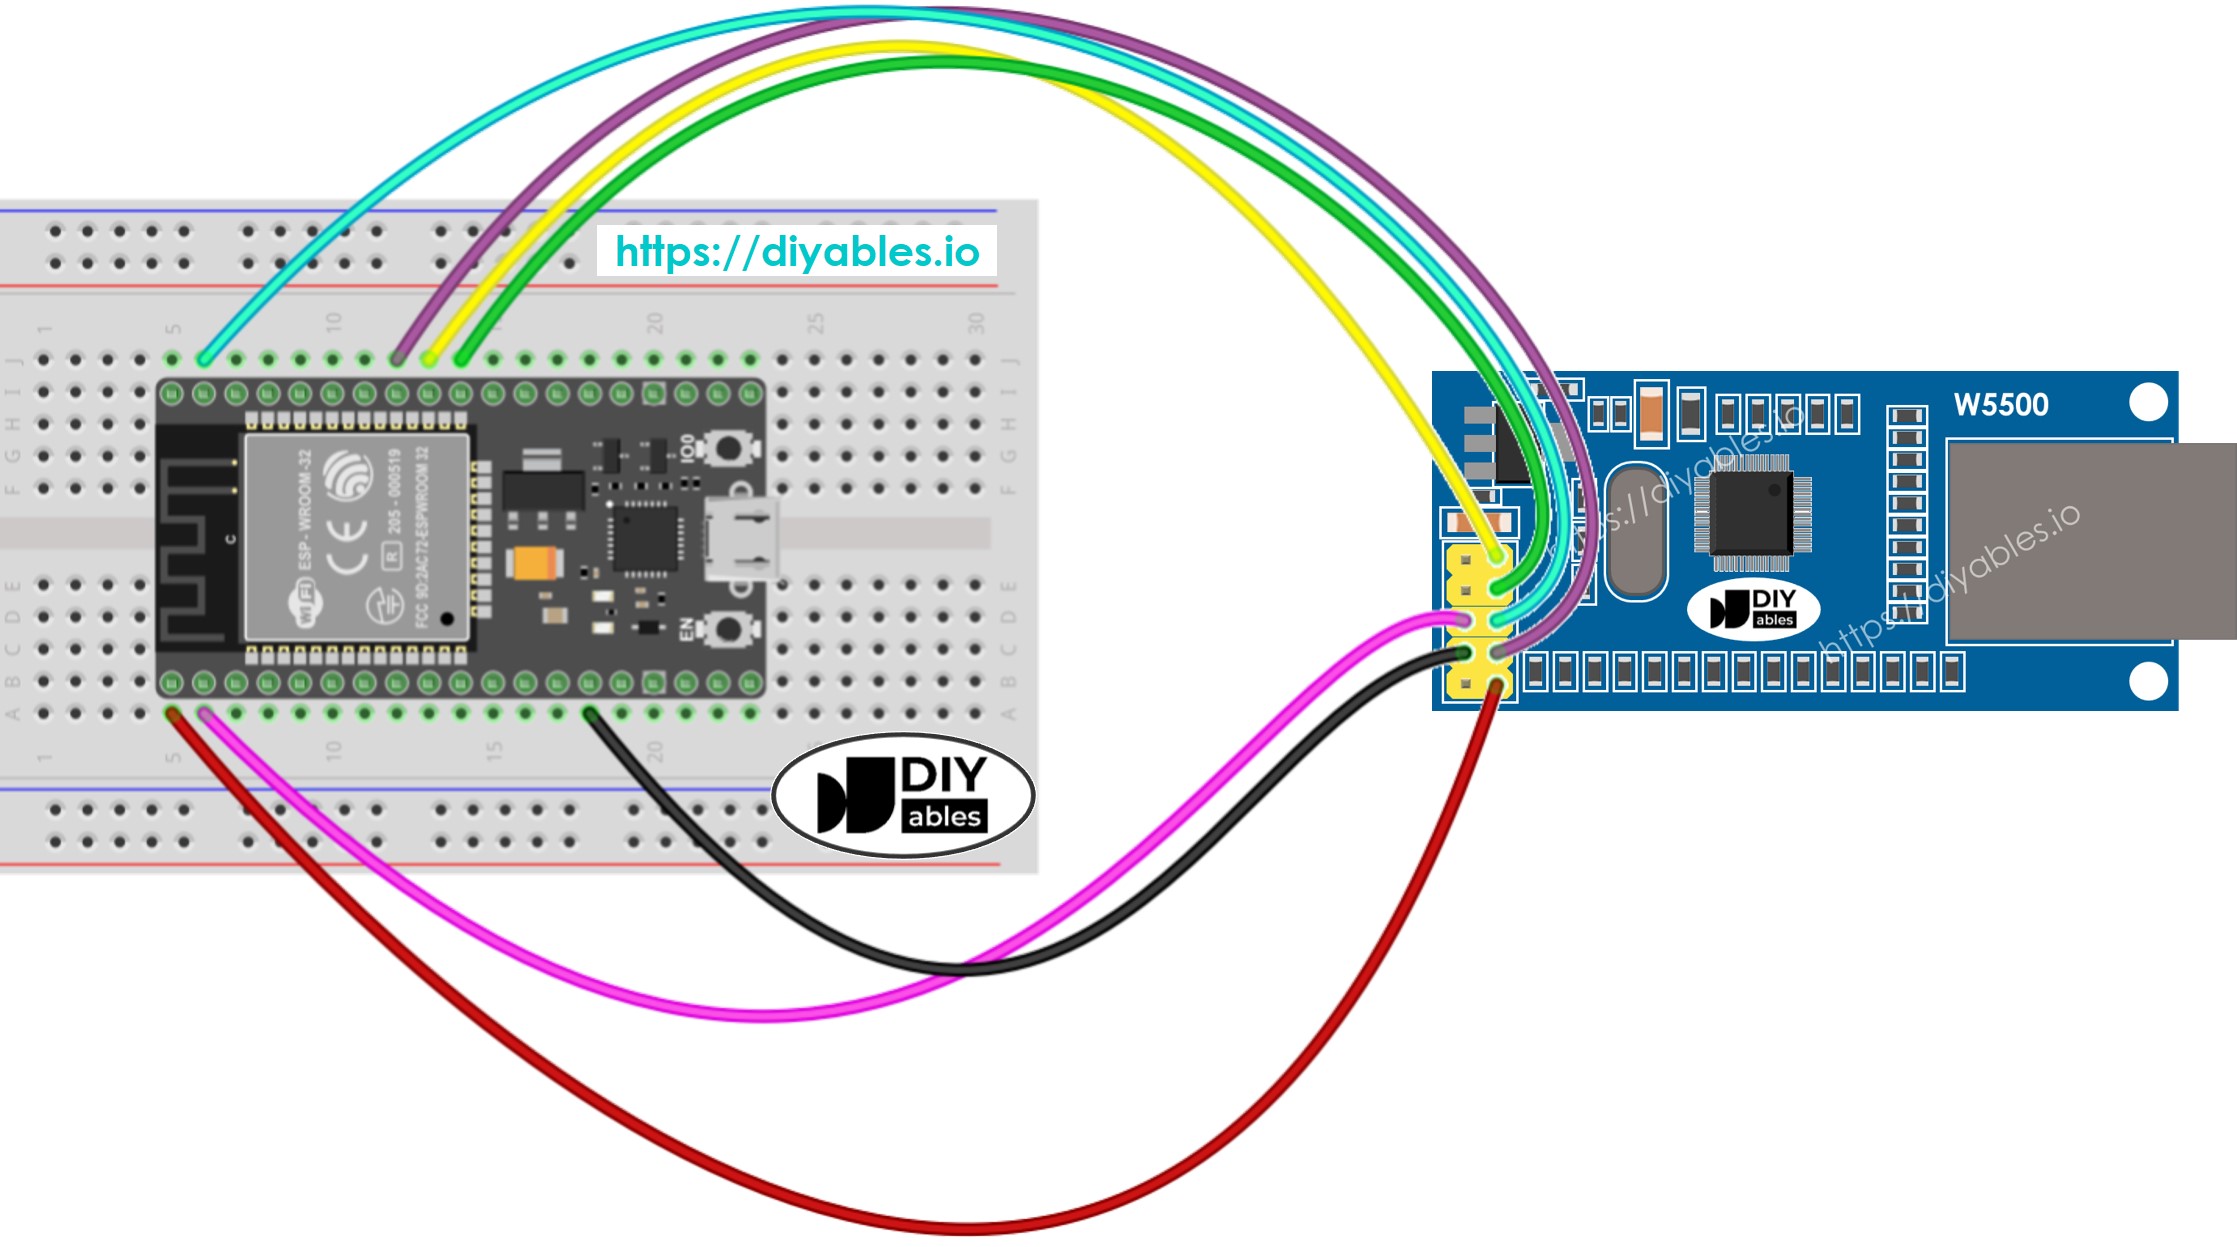
This image is created using Fritzing. Click to enlarge image
Nếu bạn chưa rõ cách cấp nguồn cho ESP32 và các linh kiện khác, xem: Cách Cung Cấp Nguồn Điện Cho ESP32.
image source: diyables.io
Code ESP32 cho Module Ethernet - Gửi HTTP request qua Ethernet
Code sau hoạt động như một web client, gửi HTTP request đến web server tại http://example.com/.
/*
* Mã ESP32 này được phát triển bởi newbiely.vn
* Mã ESP32 này được cung cấp để sử dụng công khai, không có ràng buộc.
* Để xem hướng dẫn chi tiết và sơ đồ kết nối, vui lòng truy cập:
* https://newbiely.vn/tutorials/esp32/esp32-ethernet
*/
#include <SPI.h>
#include <Ethernet.h>
// replace the MAC address below by the MAC address printed on a sticker on the Arduino Shield 2
byte mac[] = { 0xDE, 0xAD, 0xBE, 0xEF, 0xFE, 0xEF };
EthernetClient client;
int HTTP_PORT = 80;
String HTTP_METHOD = "GET"; // or POST
char HOST_NAME[] = "example.com";
String PATH_NAME = "/";
void setup() {
Serial.begin(9600);
delay(1000);
Serial.println("ESP32 - Ethernet Tutorial");
// initialize the Ethernet shield using DHCP:
if (Ethernet.begin(mac) == 0) {
Serial.println("Failed to obtaining an IP address");
// check for Ethernet hardware present
if (Ethernet.hardwareStatus() == EthernetNoHardware)
Serial.println("Ethernet shield was not found");
// check for Ethernet cable
if (Ethernet.linkStatus() == LinkOFF)
Serial.println("Ethernet cable is not connected.");
while (true)
;
}
// connect to web server on port 80:
if (client.connect(HOST_NAME, HTTP_PORT)) {
// if connected:
Serial.println("Connected to server");
// make a HTTP request:
// send HTTP header
client.println(HTTP_METHOD + " " + PATH_NAME + " HTTP/1.1");
client.println("Host: " + String(HOST_NAME));
client.println("Connection: close");
client.println(); // end HTTP header
while (client.connected()) {
if (client.available()) {
// read an incoming byte from the server and print it to serial monitor:
char c = client.read();
Serial.print(c);
}
}
// the server's disconnected, stop the client:
client.stop();
Serial.println();
Serial.println("disconnected");
} else { // if not connected:
Serial.println("connection failed");
}
}
void loop() {
}
Các Bước Thực Hiện
- Nếu đây là lần đầu bạn sử dụng ESP32, hãy xem ESP32 - Cài Đặt Phần Mềm.
- Thực hiện kết nối dây giữa module Ethernet và ESP32 theo sơ đồ kết nối ở trên
- Kết nối ESP32 với PC qua cáp USB
- Kết nối module Ethernet với router/switch của bạn qua cáp Ethernet
- Mở Arduino IDE trên PC của bạn.
- Chọn đúng board ESP32 (ví dụ: ESP32 Dev Module) và COM port.
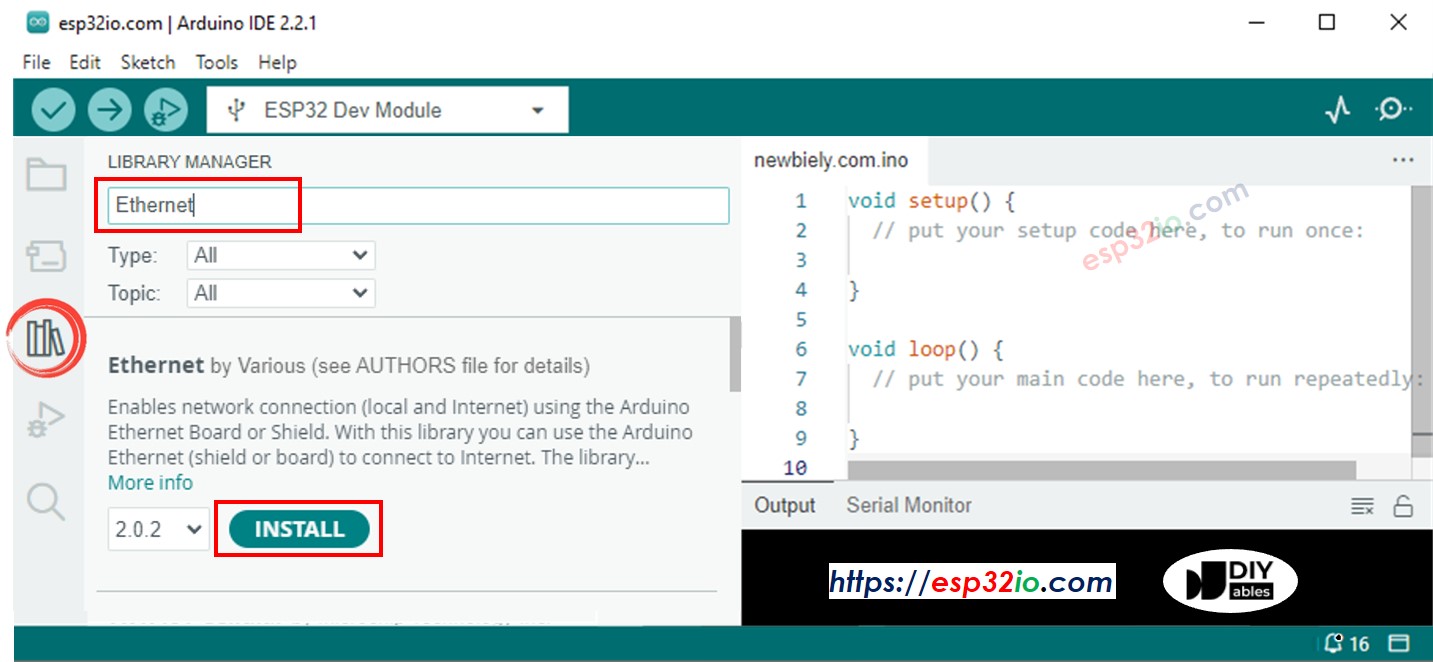
- Click vào biểu tượng Libraries trên thanh bên trái của Arduino IDE.
- Tìm kiếm "Ethernet", sau đó tìm thư viện Ethernet by Various
- Click nút Install để cài đặt thư viện Ethernet.
- Mở Serial Monitor trên Arduino IDE
- Copy code ở trên và paste vào Arduino IDE
- Click nút Upload trên Arduino IDE để upload code lên ESP32
- Kiểm tra kết quả trên Serial Monitor, nó sẽ hiển thị như bên dưới:
8
Serial.println("Hello World!");
Message (Enter to send message to 'ESP32 Dev Module' on 'COM15')
New Line
9600 baud
ESP32 - Ethernet Tutorial
Connected to server
HTTP/1.1 200 OK
Accept-Ranges: bytes
Age: 208425
Cache-Control: max-age=604800
Content-Type: text/html; charset=UTF-8
Date: Fri, 12 Jul 2024 07:08:42 GMT
Etag: "3147526947"
Expires: Fri, 19 Jul 2024 07:08:42 GMT
Last-Modified: Thu, 17 Oct 2019 07:18:26 GMT
Server: ECAcc (lac/55B8)
Vary: Accept-Encoding
X-Cache: HIT
Content-Length: 1256
Connection: close
<!doctype html>
<html>
<head>
<title>Example Domain</title>
<meta charset="utf-8" />
<meta http-equiv="Content-type" content="text/html; charset=utf-8" />
<meta name="viewport" content="width=device-width, initial-scale=1" />
</head>
<body>
<div>
<h1>Example Domain</h1>
<p>This domain is for use in illustrative examples in documents. You may use this
domain in literature without prior coordination or asking for permission.</p>
<p><a href="https://www.iana.org/domains/example">More information...</a></p>
</div>
</body>
</html>
disconnected
※ Lưu ý:
Nếu có thiết bị khác trên cùng mạng cục bộ với cùng địa chỉ MAC, nó có thể không hoạt động.
Code ESP32 cho Module Ethernet - Web Server
Code sau biến ESP32 thành một web server phản hồi các trình duyệt web với một trang web đơn giản.
/*
* Mã ESP32 này được phát triển bởi newbiely.vn
* Mã ESP32 này được cung cấp để sử dụng công khai, không có ràng buộc.
* Để xem hướng dẫn chi tiết và sơ đồ kết nối, vui lòng truy cập:
* https://newbiely.vn/tutorials/esp32/esp32-ethernet
*/
#include <SPI.h>
#include <Ethernet.h>
// replace the MAC address below by the MAC address printed on a sticker on the Arduino Shield 2
byte mac[] = { 0xDE, 0xAD, 0xBE, 0xEF, 0xFE, 0xEF };
EthernetServer server(80);
void setup() {
Serial.begin(9600);
delay(1000);
Serial.println("ESP32 - Ethernet Tutorial");
// initialize the Ethernet shield using DHCP:
if (Ethernet.begin(mac) == 0) {
Serial.println("Failed to obtaining an IP address");
// check for Ethernet hardware present
if (Ethernet.hardwareStatus() == EthernetNoHardware)
Serial.println("Ethernet shield was not found");
// check for Ethernet cable
if (Ethernet.linkStatus() == LinkOFF)
Serial.println("Ethernet cable is not connected.");
while (true)
;
}
server.begin();
Serial.print("ESP32 - Web Server IP Address: ");
Serial.println(Ethernet.localIP());
}
void loop() {
// listen for incoming clients
EthernetClient client = server.available();
if (client) {
Serial.println("new client");
// an HTTP request ends with a blank line
bool currentLineIsBlank = true;
while (client.connected()) {
if (client.available()) {
char c = client.read();
Serial.write(c);
// if you've gotten to the end of the line (received a newline
// character) and the line is blank, the HTTP request has ended,
// so you can send a reply
if (c == '\n' && currentLineIsBlank) {
// send a standard HTTP response header
client.println("HTTP/1.1 200 OK");
client.println("Content-Type: text/html");
client.println("Connection: close"); // the connection will be closed after completion of the response
client.println();
client.println("<!DOCTYPE HTML>");
client.println("<html>");
client.println("<body>");
client.println("<h1>ESP32 Web Server with Ethernet</h1>");
client.println("</body>");
client.println("</html>");
break;
}
if (c == '\n') {
// you're starting a new line
currentLineIsBlank = true;
} else if (c != '\r') {
// you've gotten a character on the current line
currentLineIsBlank = false;
}
}
}
// give the web browser time to receive the data
delay(1);
// close the connection:
client.stop();
Serial.println("client disconnected");
}
}
Các Bước Thực Hiện
- Copy code ở trên và paste vào Arduino IDE
- Click nút Upload trên Arduino IDE để upload code lên ESP32
- Kiểm tra kết quả trên Serial Monitor, nó sẽ hiển thị như bên dưới:
8
Serial.println("Hello World!");
Message (Enter to send message to 'ESP32 Dev Module' on 'COM15')
New Line
9600 baud
ESP32 - Ethernet Tutorial
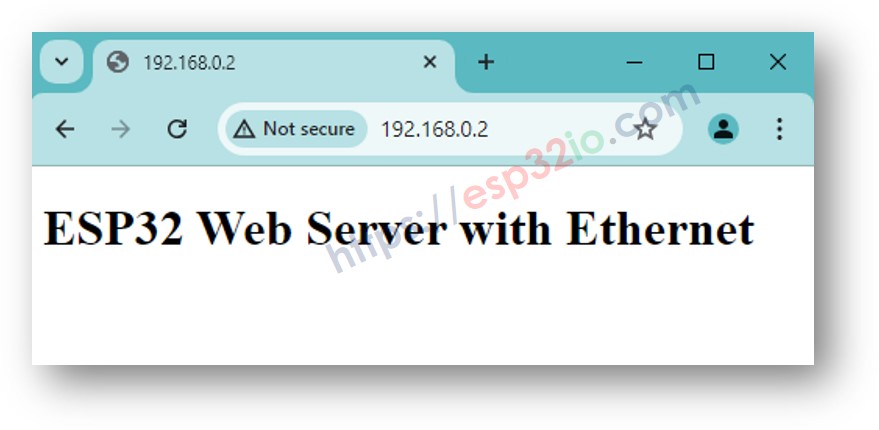
ESP32 - Web Server IP Address: 192.168.0.2
- Copy địa chỉ IP ở trên và paste vào thanh địa chỉ của trình duyệt web, bạn sẽ thấy một trang web đơn giản được phục vụ bởi ESP32 như sau:
Bài hướng dẫn liên quan
📱 Ứng dụng đề xuất
 English for KidsHọc tiếng Anh vui nhộn cho trẻ nhỏ.Tải về trênGoogle PlayTải về trênApp Store
 Bubble NoteGhi chú tự xóa — viết như nhắn tin.Tải về trênGoogle PlayTải về trênApp Store
 Tôi Không MuaĐánh bại mua sắm bốc đồng, tiết kiệm hơn.Tải về trênGoogle PlayTải về trênApp Store
 Con Đường Tri ThứcBài thi thử để học mọi thứ.Tải về trênGoogle PlayTải về trênApp Store