Trong dự án thú vị này, bạn sẽ kết nối cảm biến màu TCS3200D/TCS230 với ESP32 và truyền màu sắc phát hiện được đến trình duyệt web theo thời gian thực. Trang web có nhân vật Minion hoạt hình vui nhộn với màu da cập nhật trực tiếp dựa trên những gì cảm biến nhìn thấy. Để đơn giản hóa việc xây dựng giao diện web và quản lý giao tiếp WebSocket, dự án này sử dụng Ví dụ WebApp tùy chỉnh cho ESP32 - Hướng dẫn giao diện web đơn giản cho người mới bắt đầu.
Dưới đây là tóm tắt những gì sẽ xảy ra:
ESP32 đọc dữ liệu màu RGB từ cảm biến TCS3200D/TCS230
Nó chuyển đổi giá trị RGB thành mã màu HEX (ví dụ: #FF8000)
Mã HEX được truyền đến trình duyệt web qua WebSocket
Nhân vật Minion hoạt hình vui nhộn trên trang web ngay lập tức thay đổi màu cơ thể, tay và mi mắt để phù hợp
Video hướng dẫn từng bước cũng có sẵn ở cuối tutorial này.
Mỗi giây, ESP32 đọc cảm biến màu bằng cách chuyển đổi giữa các bộ lọc đỏ, xanh lá cây và xanh dương bằng các chân điều khiển S2/S3, và đo độ rộng xung tại chân OUT.
Các giá trị RGB được định dạng thành chuỗi màu HEX như #FF8000.
Chuỗi màu này được phát sóng đến tất cả trình duyệt web được kết nối qua WebSocket thông qua thư viện DIYables ESP32 WebApps.
Trên trang web, JavaScript nhận màu và ngay lập tức áp dụng nó cho cơ thể, tay và mi mắt của nhân vật Minion.
Mã ESP32 - Ứng Dụng Web Minion Cảm Biến Màu
Dự án này bao gồm 4 file:
ColorSensorESP32.ino - Sketch chính: khởi tạo cảm biến, đọc màu sắc và gửi chúng đến trang web
CustomWebApp.h - Header file: khai báo class trang ứng dụng web tùy chỉnh
CustomWebApp.cpp - Implementation file: quản lý tin nhắn WebSocket sử dụng định danh "Color sensor:"
custom_page_html.h - Trang web: Minion hoạt hình được xây dựng bằng HTML/CSS/JavaScript phản ứng với màu sắc đến
ColorSensorESP32.ino
/* * Mã ESP32 này được phát triển bởi newbiely.vn * Mã ESP32 này được cung cấp để sử dụng công khai, không có ràng buộc. * Để xem hướng dẫn chi tiết và sơ đồ kết nối, vui lòng truy cập: * https://newbiely.vn/tutorials/esp32/esp32-color-sensor-via-web */#include <DIYables_ESP32_Platform.h>#include <DIYablesWebApps.h>#include"CustomWebApp.h"// CHANGE THESE TO YOUR WIFI DETAILSconstchar WIFI_SSID[] = "YOUR_WIFI_SSID";constchar WIFI_PASSWORD[] = "YOUR_WIFI_PASSWORD";// Configure TCS3200 pins for ESP32constint S0 = 17;constint S1 = 16;constint S2 = 18;constint S3 = 5;constint sensorOut = 19;// Create server and pagesESP32ServerFactory serverFactory;DIYablesWebAppServerwebAppsServer(serverFactory, 80, 81);DIYablesHomePage homePage;CustomWebAppPage customPage;unsignedlong lastColorRead = 0;voidsetup() {Serial.begin(9600);delay(1000);Serial.println("Starting Custom WebApp...");// Initialize TCS3200 pinspinMode(S0, OUTPUT);pinMode(S1, OUTPUT);pinMode(S2, OUTPUT);pinMode(S3, OUTPUT);pinMode(sensorOut, INPUT);// Set frequency scaling to 20%digitalWrite(S0, HIGH);digitalWrite(S1, LOW);// Add pages to serverwebAppsServer.addApp(&homePage);webAppsServer.addApp(&customPage);// Start WiFi and web serverif (!webAppsServer.begin(WIFI_SSID, WIFI_PASSWORD)) {while (1) {Serial.println("Failed to connect to WiFi!");delay(1000); } }Serial.println("Custom WebApp ready!"); customPage.sendToWeb("Arduino is ready!");}voidloop() {// Handle web serverwebAppsServer.loop();// Send sensor data every 1 secondif (millis() - lastColorRead > 1000) {// Read Red colordigitalWrite(S2, LOW);digitalWrite(S3, LOW);int r = map(pulseIn(sensorOut, LOW), 31, 150, 255, 0);// Read Green colordigitalWrite(S2, HIGH);digitalWrite(S3, HIGH);int g = map(pulseIn(sensorOut, LOW), 35, 180, 255, 0);// Read Blue colordigitalWrite(S2, LOW);digitalWrite(S3, HIGH);int b = map(pulseIn(sensorOut, LOW), 30, 150, 255, 0);// Convert to HEX color and send to Webchar hexColor[8]; sprintf(hexColor, "#%02X%02X%02X", constrain(r, 0, 255), constrain(g, 0, 255), constrain(b, 0, 255)); customPage.sendToWeb(String(hexColor));Serial.println("Sent to Minion: " + String(hexColor)); lastColorRead = millis(); }}
CustomWebApp.h
/* * Mã ESP32 này được phát triển bởi newbiely.vn * Mã ESP32 này được cung cấp để sử dụng công khai, không có ràng buộc. * Để xem hướng dẫn chi tiết và sơ đồ kết nối, vui lòng truy cập: * https://newbiely.vn/tutorials/esp32/esp32-color-sensor-via-web */#ifndef CUSTOM_WEBAPP_H#define CUSTOM_WEBAPP_H#include <DIYablesWebApps.h>/** * Simple Custom WebApp Page * * This is a template for creating your own custom web applications. * It provides basic controls like buttons and sliders that communicate * with your Arduino in real-time. */class CustomWebAppPage : public DIYablesWebAppPageBase {private:// WebSocket message identifier for this custom appstaticconstString APP_IDENTIFIER;public: CustomWebAppPage();// ========================================// REQUIRED METHODS - USED BY LIBRARY - DON'T CHANGE THESE!// ========================================void handleHTTPRequest(IWebClient& client) override;void handleWebSocketMessage(IWebSocket& ws, const char* message, uint16_tlength) override;const char* getPageInfo() constoverride;String getNavigationInfo() constoverride;// ========================================// YOUR METHODS - USE THESE IN YOUR CODE!// ========================================void onCustomMessageReceived(void (*callback)(const String& payload));void sendToWeb(const String& message);};#endif
CustomWebApp.cpp
/* * Mã ESP32 này được phát triển bởi newbiely.vn * Mã ESP32 này được cung cấp để sử dụng công khai, không có ràng buộc. * Để xem hướng dẫn chi tiết và sơ đồ kết nối, vui lòng truy cập: * https://newbiely.vn/tutorials/esp32/esp32-color-sensor-via-web */#include"CustomWebApp.h"#include"custom_page_html.h"// Define the static member - WebSocket message identifier for this custom appconstString CustomWebAppPage::APP_IDENTIFIER = "Color sensor:";// Callback function for handling messages from web browservoid (*customMessageCallback)(const String& payload) = nullptr;CustomWebAppPage::CustomWebAppPage() : DIYablesWebAppPageBase("/custom") {}void CustomWebAppPage::handleHTTPRequest(IWebClient& client) {// Send the HTML page to web browser sendHTTPHeader(client); client.print(CUSTOM_PAGE_HTML);}void CustomWebAppPage::handleWebSocketMessage(IWebSocket& ws, const char* message, uint16_tlength) {String messageStr = String(message, length);Serial.print("Color sensor WebApp received: ");Serial.println(messageStr);// Only handle messages that start with our app identifierif (messageStr.startsWith(APP_IDENTIFIER)) {String payload = messageStr.substring(APP_IDENTIFIER.length()); // Remove identifier// Call your callback function with the payloadif (customMessageCallback) { customMessageCallback(payload); } }}void CustomWebAppPage::onCustomMessageReceived(void (*callback)(const String& payload)) { customMessageCallback = callback;}void CustomWebAppPage::sendToWeb(const String& message) {// Send message to web browser with app identifierString fullMessage = APP_IDENTIFIER + message; broadcastToAllClients(fullMessage.c_str());}const char* CustomWebAppPage::getPageInfo() const {return"🔧 Color sensor WebApp";}String CustomWebAppPage::getNavigationInfo() const {String result = "<a href=\""; result += getPagePath(); result += "\" class=\"app-card custom\" style=\"background: linear-gradient(135deg, #007bff 0%, #0056b3 100%);\">"; result += "<h3>🔧 Color sensor WebApp</h3>"; result += "<p>Simple template for your own apps</p>"; result += "</a>";return result;}
Chạy hiệu chuẩn trước bằng ESP32 - Cảm Biến Màu TCS3200D/TCS230. Ghi lại kết quả hiệu chuẩn của bạn (redMin, redMax, greenMin, greenMax, blueMin, blueMax).
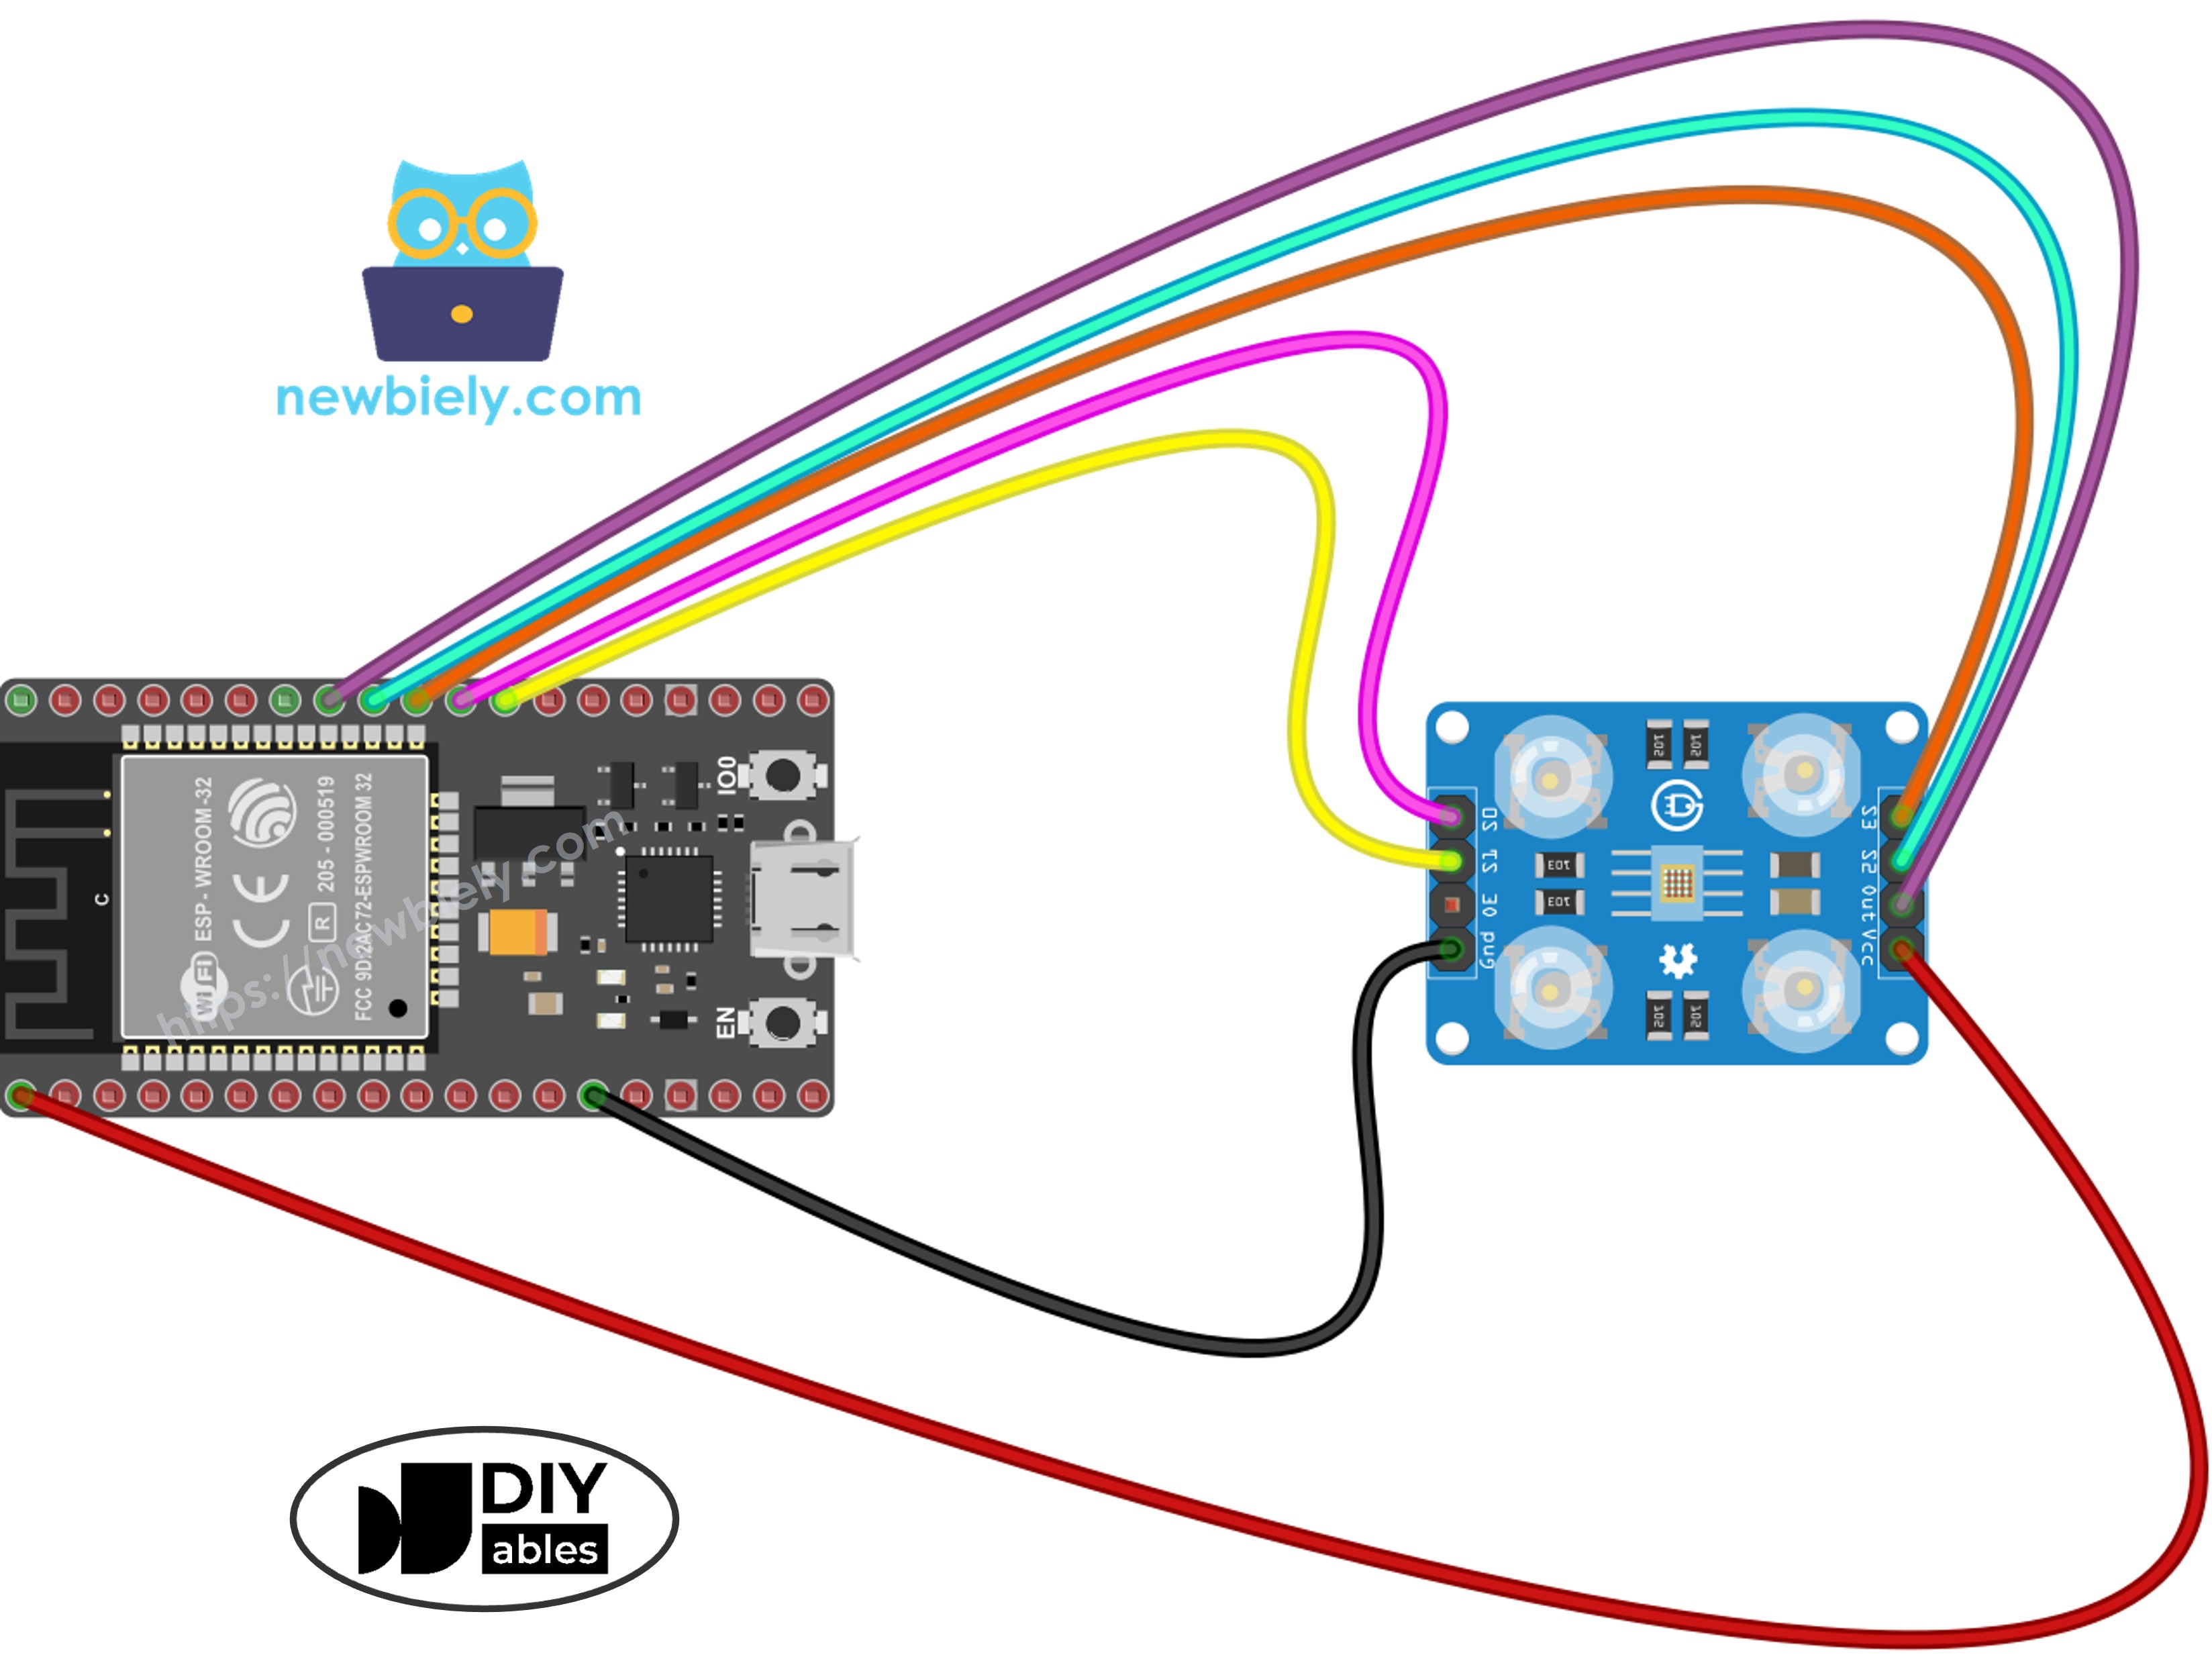
Kết nối phần cứng như trong sơ đồ đấu nối ở trên.
Cắm board ESP32 vào máy tính với cáp USB.
Mở Arduino IDE.
Chọn board ESP32 đúng (ví dụ: ESP32 Dev Module) và COM port đúng.
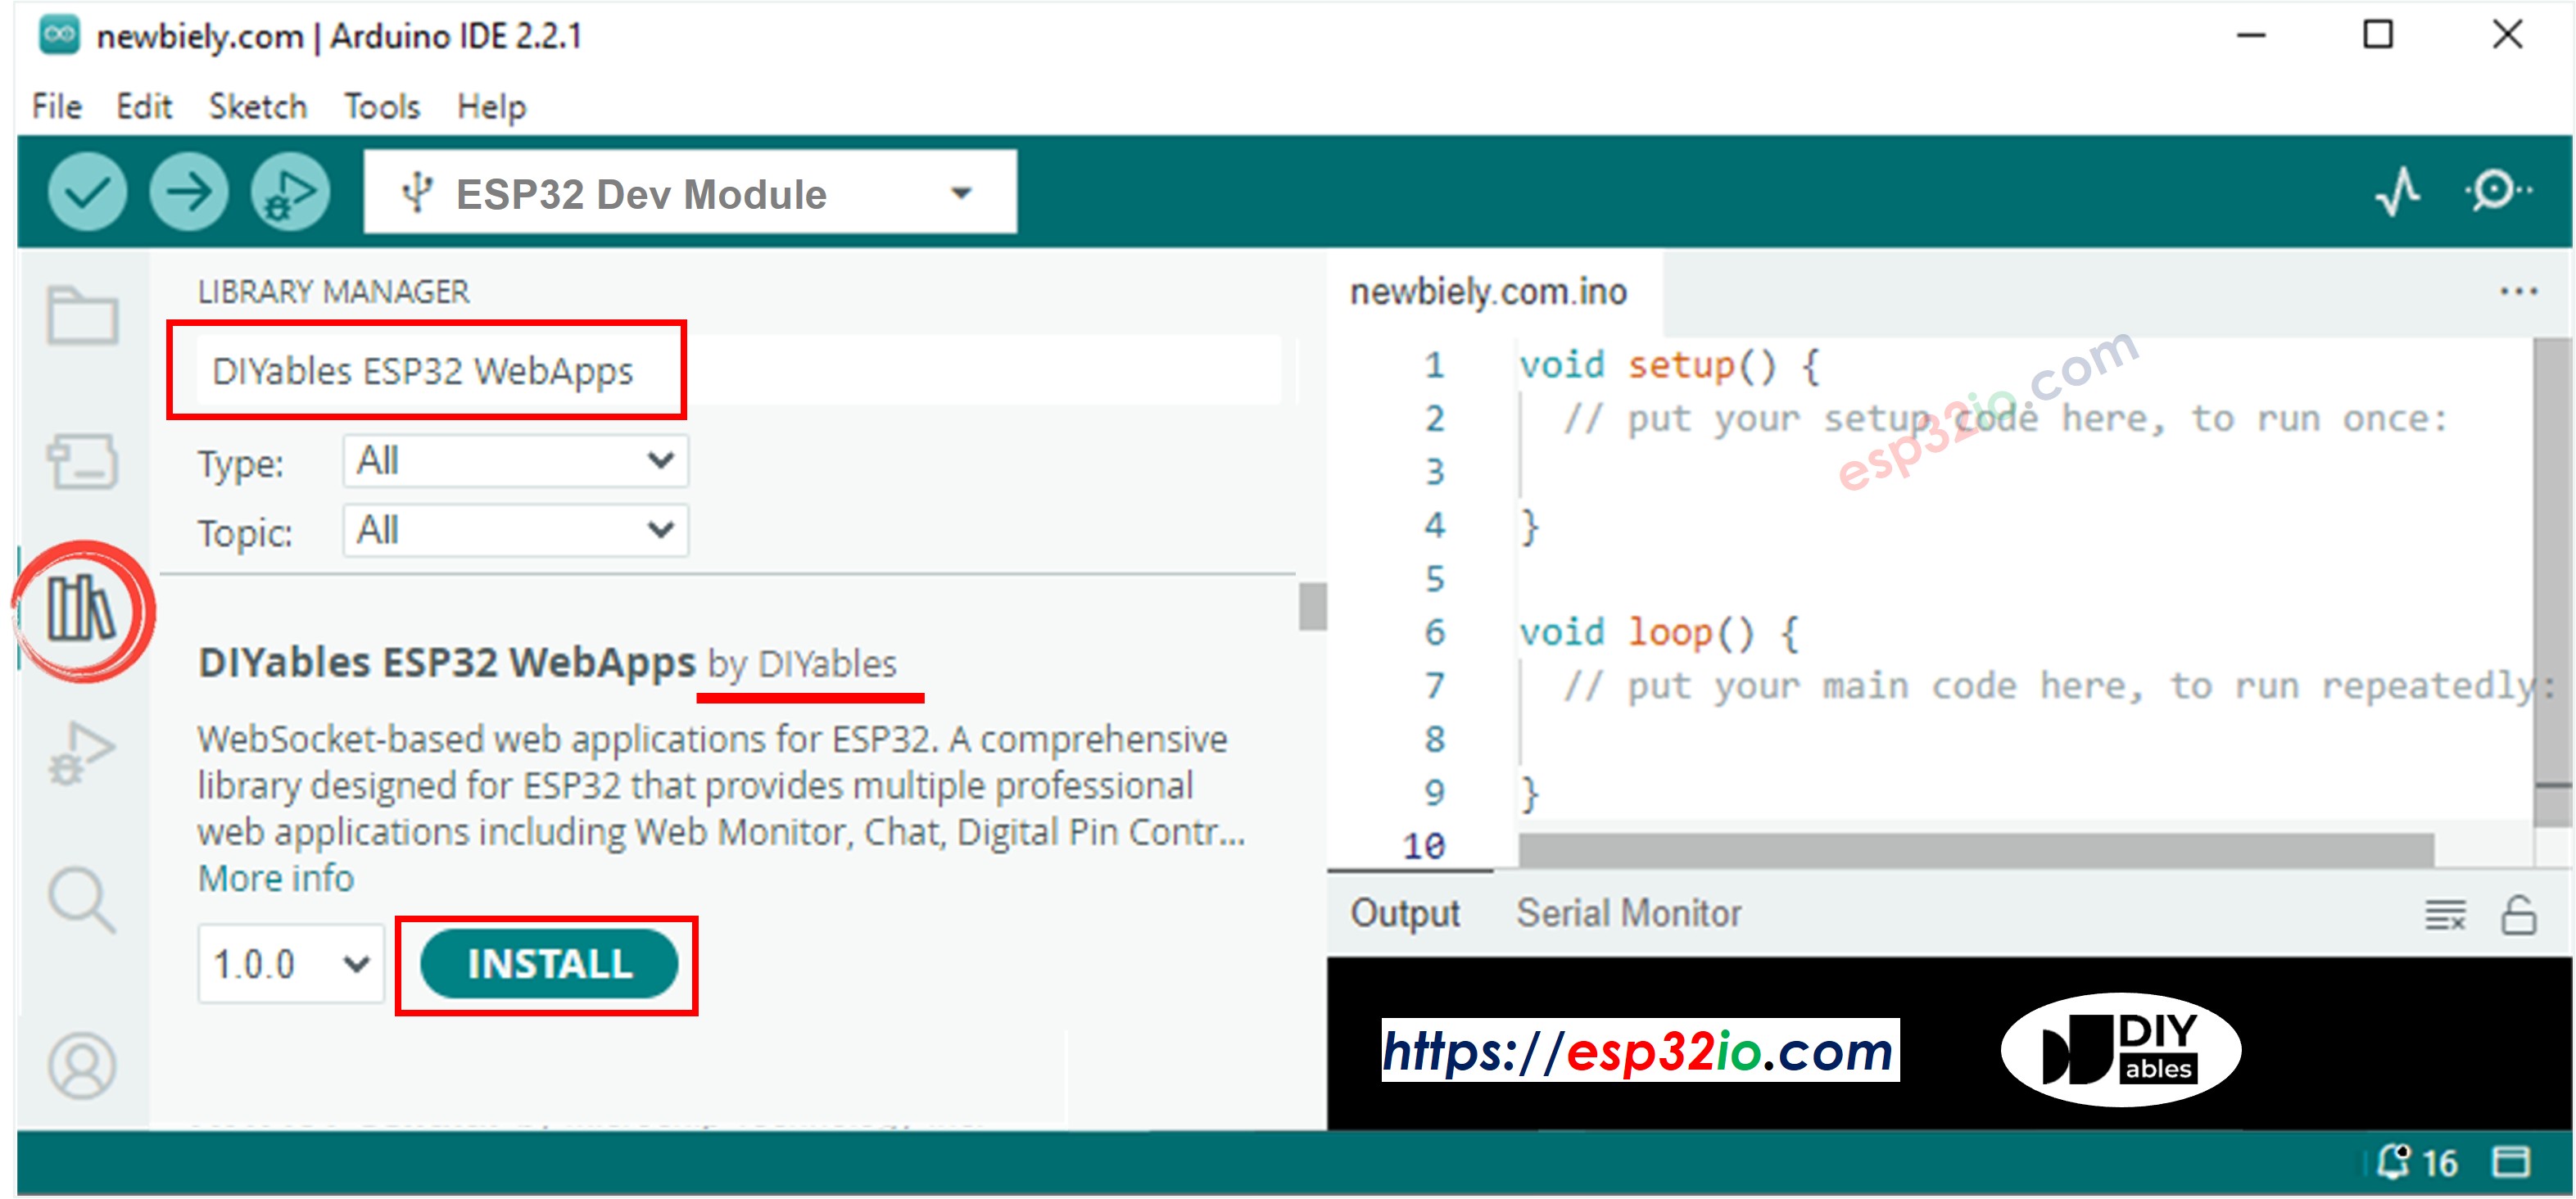
Đi đến biểu tượng Libraries trên thanh bên trái của Arduino IDE.
Tìm kiếm "DIYables ESP32 WebApps" và tìm thư viện của DIYables.
Click Install để cài đặt.
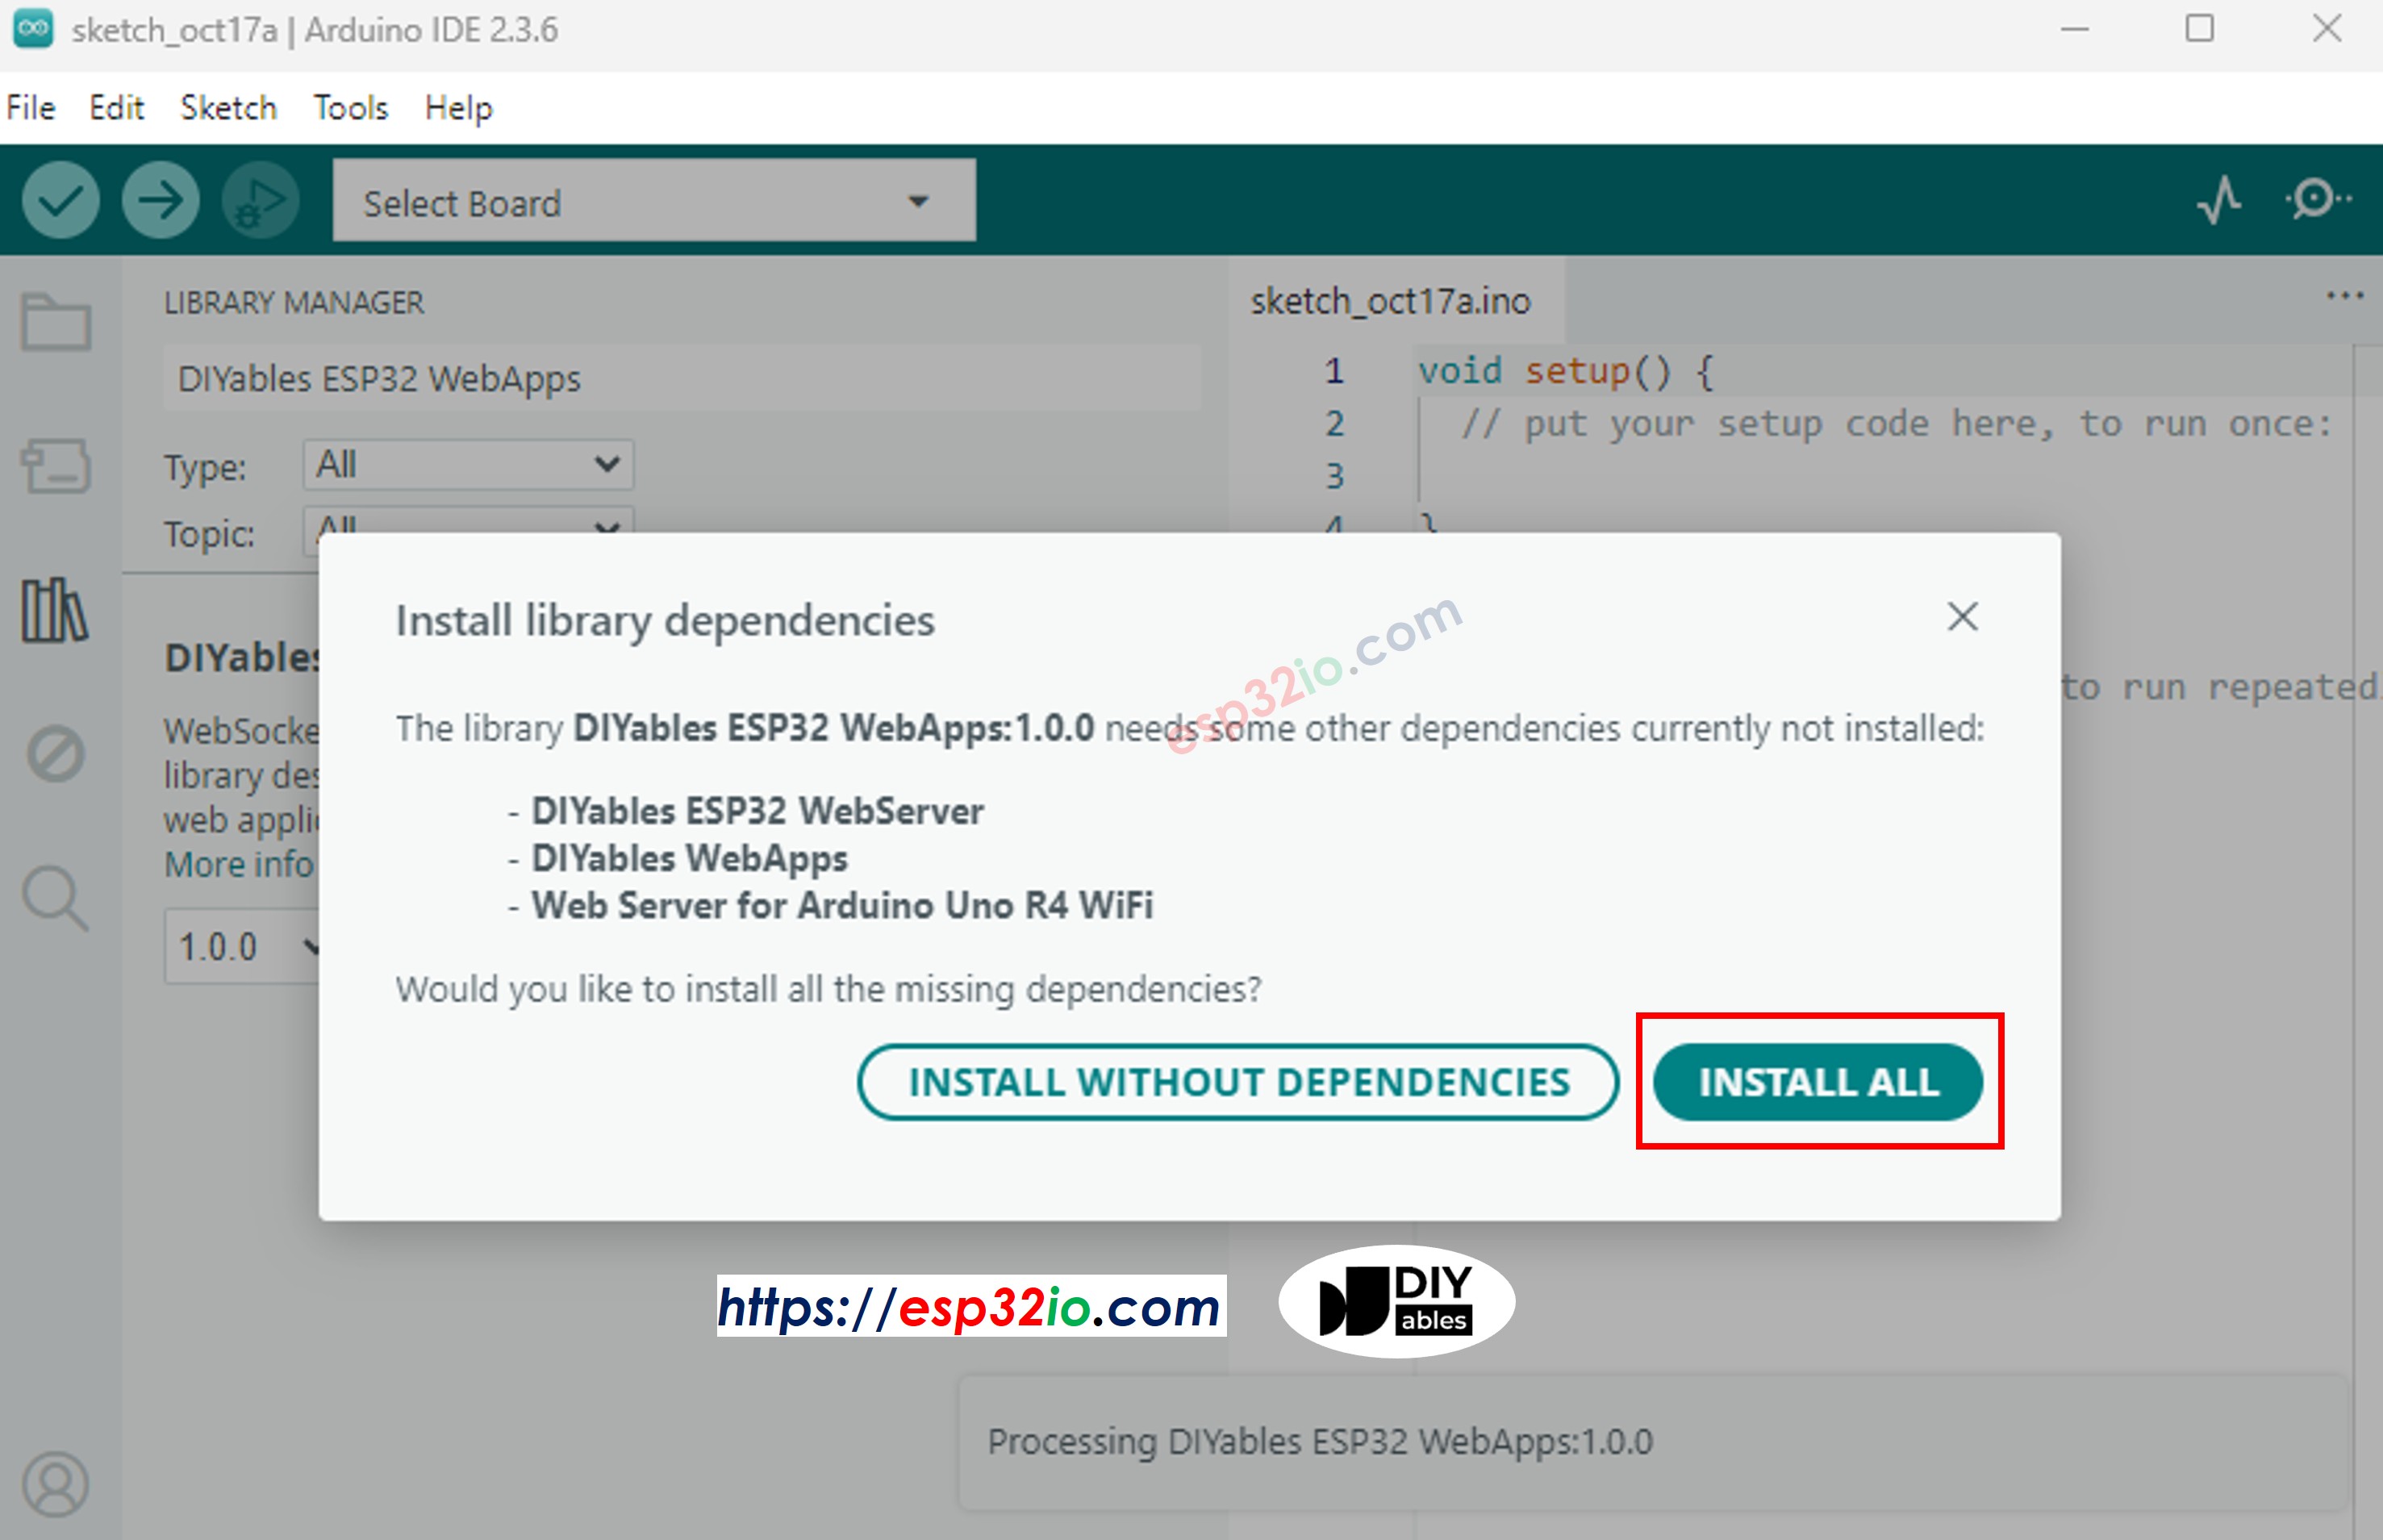
Khi được nhắc về các phụ thuộc bổ sung, click Install All.
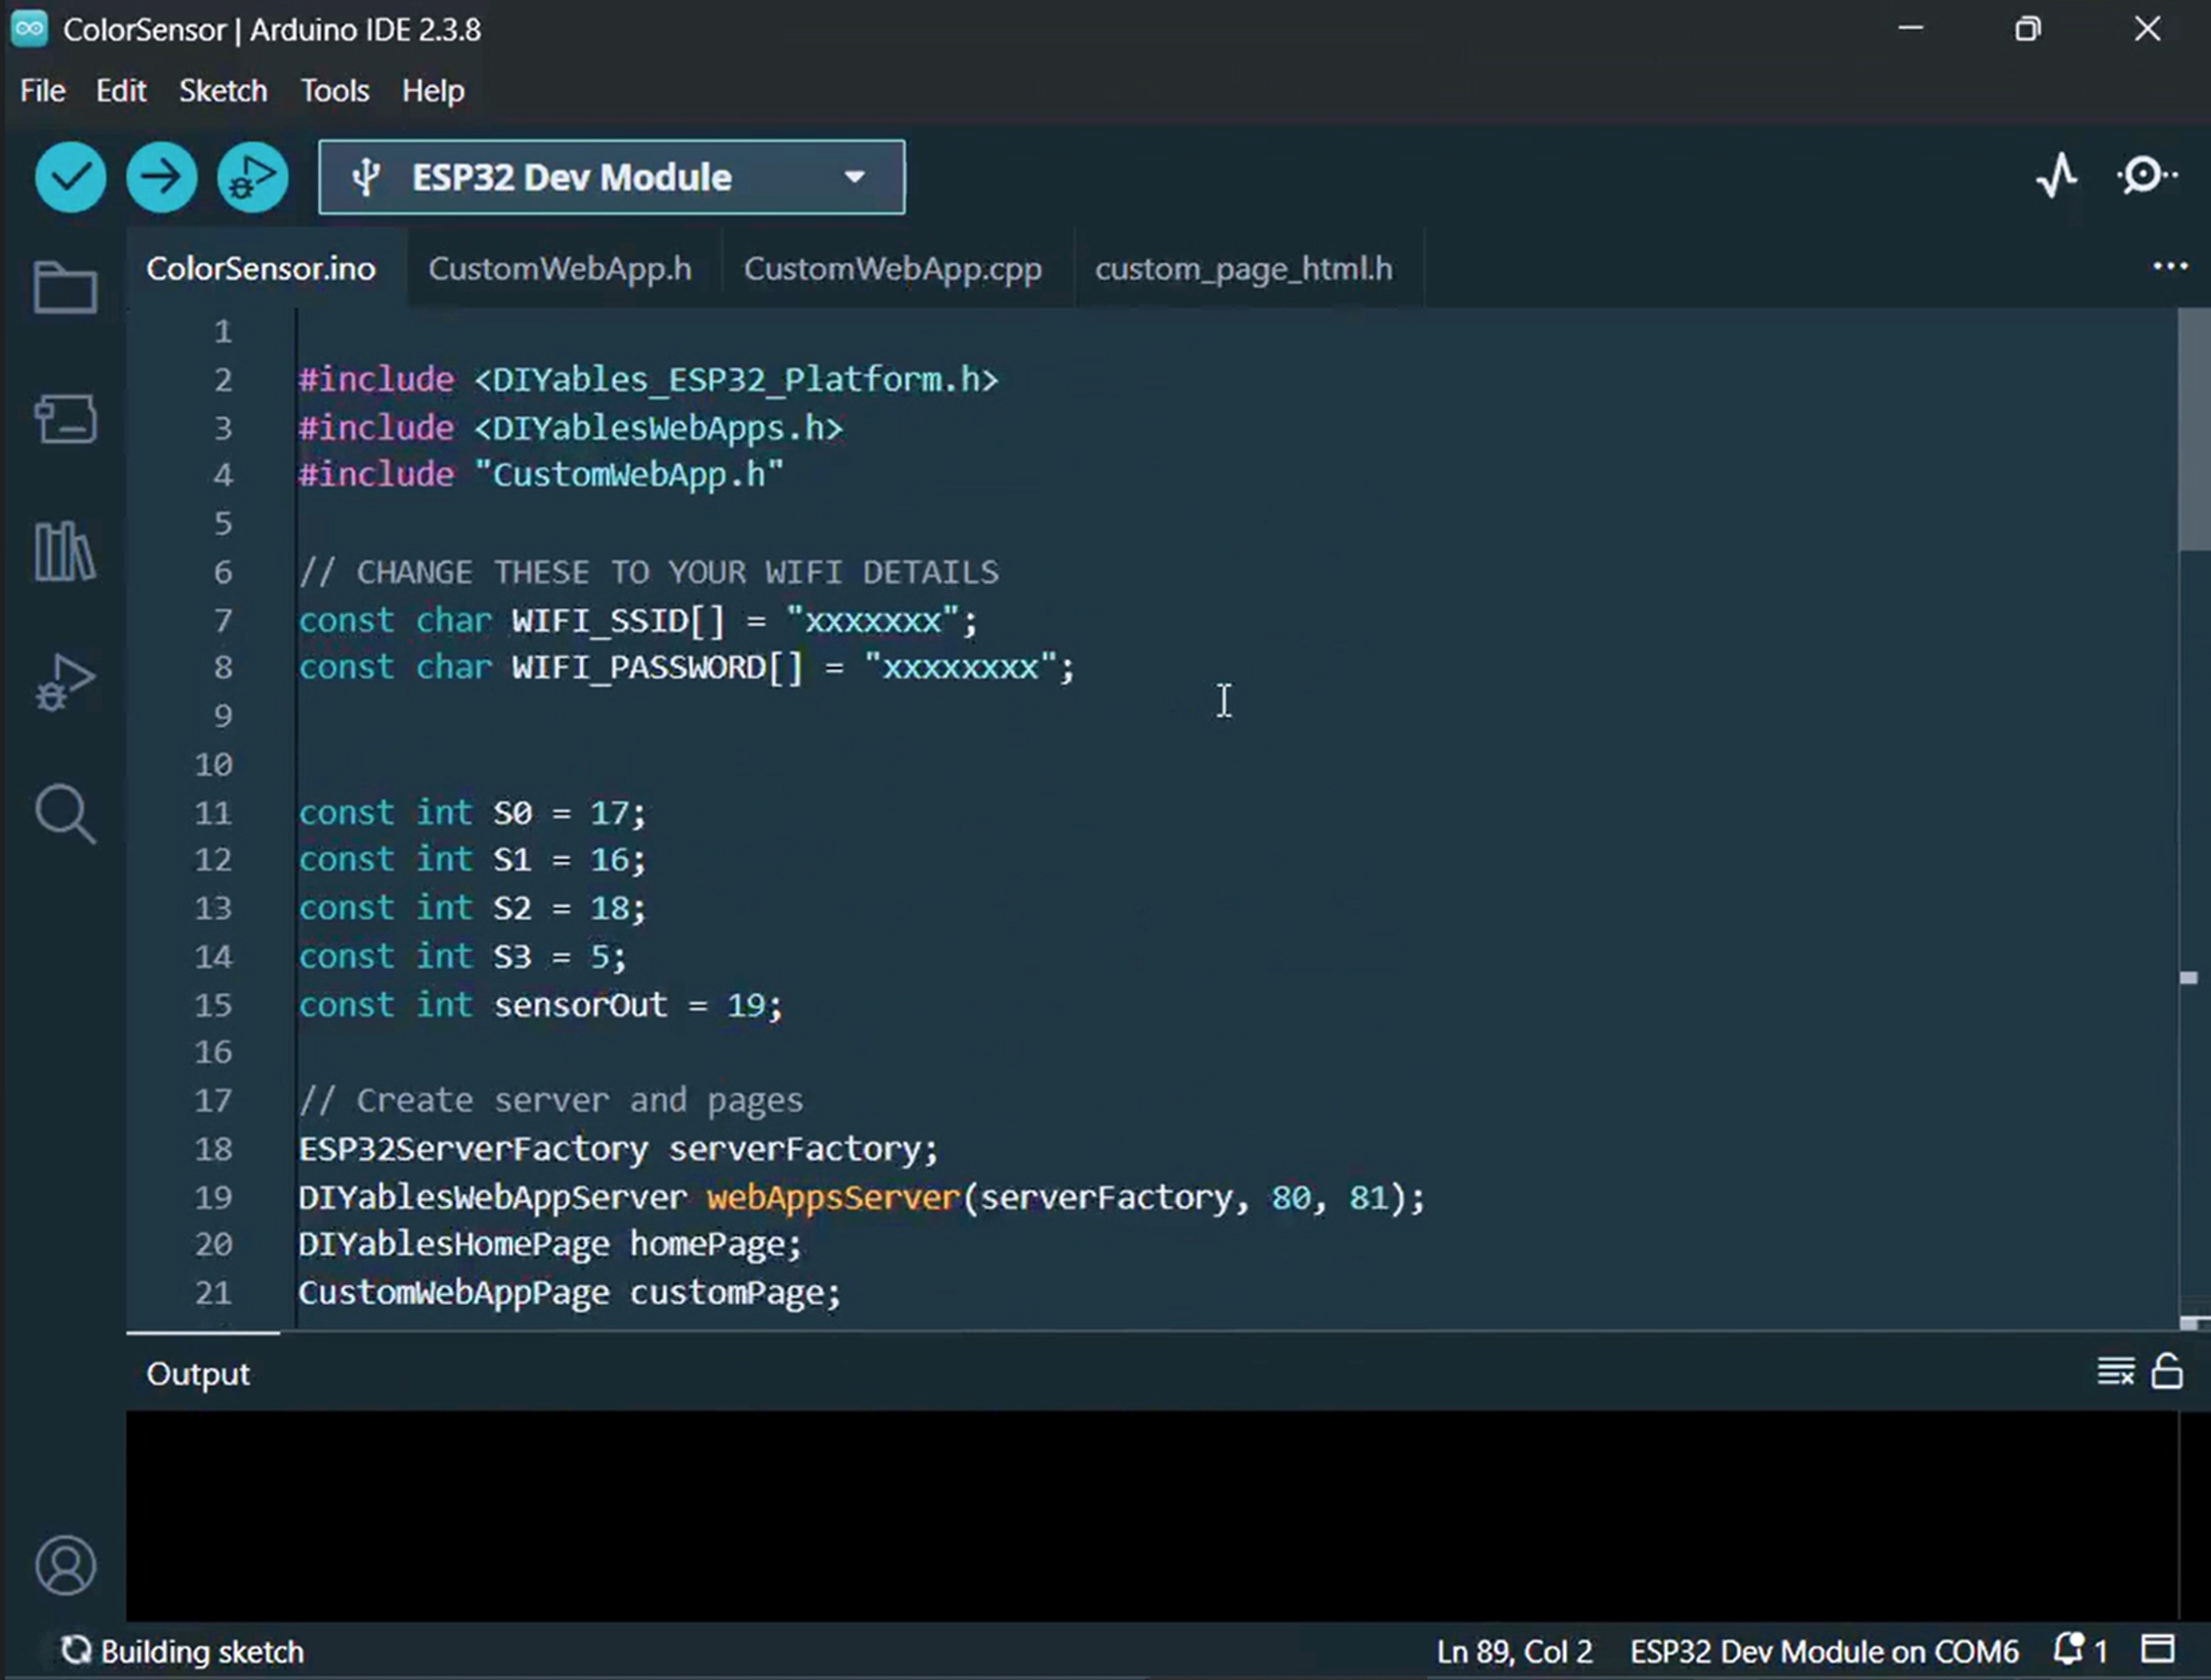
Tạo một sketch mới trong Arduino IDE và đặt tên là ColorSensorESP32.
Copy tất cả 4 file được liệt kê ở trên vào dự án. Arduino IDE của bạn sẽ hiển thị 4 tab như này:
Trong ColorSensorESP32.ino, thay thế thông tin đăng nhập Wi-Fi bằng chi tiết mạng của bạn:
Thay thế các giá trị hiệu chuẩn trong các lệnh gọi map() bên trong loop() bằng các số bạn đã ghi lại trong quá trình hiệu chuẩn. Ví dụ, nếu hiệu chuẩn của bạn tạo ra redMin = 42, redMax = 210, greenMin = 55, greenMax = 185, blueMin = 60, blueMax = 172, cập nhật các dòng thành:
int r = map(pulseIn(sensorOut, LOW), 42, 210, 255, 0);int g = map(pulseIn(sensorOut, LOW), 55, 185, 255, 0);int b = map(pulseIn(sensorOut, LOW), 60, 172, 255, 0);
Click nút Upload để nạp code lên ESP32.
Mở Serial Monitor. Bạn sẽ thấy thứ gì đó như:
Newbiely | Arduino IDE 2.3.8
──
☐
✕
File
Edit
Sketch
Tools
Help
ESP32 Dev Module
Newbiely.ino
···
8Serial.println("Hello World!");
Output
Serial Monitor
Message (Enter to send message to 'ESP32 Dev Module' on 'COM15')
New Line
9600 baud
Starting Custom WebApp...
Custom WebApp ready!
INFO: Added app /
INFO: Added app /custom
DIYables ESP32 WebApp Library
Network connected!
IP address: 192.168.0.5
HTTP server started on port 80
WebSocket server started on port 81
==========================================
DIYables WebApp Ready!
==========================================
📱 Web Interface: http://192.168.0.5
🔗 WebSocket: ws://192.168.0.5:81
📋 Available Applications:
🏠 Home Page: http://192.168.0.5/
🔧 Color sensor WebApp: http://192.168.0.5/custom
==========================================
Sent to Minion: #FFD200
Sent to Minion: #00C832
Sent to Minion: #0028FF
Ln 11, Col 1
ESP32 Dev Module on COM15
2
Nếu không có gì xuất hiện, hãy thử nhấn nút reset trên ESP32.
Copy địa chỉ IP hiển thị trong Serial Monitor và mở nó trong trình duyệt web trên điện thoại hoặc máy tính của bạn.
Ví dụ: http://192.168.0.5
Trên trang chủ, nhấn thẻ Color sensor WebApp để mở trang Minion.
Hoặc, truy cập trực tiếp http://[ĐỊA_CHỈ_IP]/custom.
Bạn sẽ thấy Minion hoạt hình đang cười trên màn hình.
Đưa một vật thể có màu gần cảm biến TCS3200 — màu da của Minion sẽ cập nhật ngay lập tức để phản ánh màu được phát hiện!
Bạn có thể làm theo video hướng dẫn từng bước bên dưới.
Hiểu Về Mã Code
Phía ESP32 (ColorSensorESP32.ino)
Sketch chính thực hiện các tác vụ sau:
Thiết lập cảm biến TCS3200: Cấu hình S0/S1 cho tỷ lệ tần số 20% và chuẩn bị S2/S3 cho việc chọn bộ lọc.
Lấy mẫu màu mỗi giây một lần: Bên trong loop(), ESP32 chu kỳ qua các bộ lọc màu đỏ, xanh lá cây và xanh dương, đo độ rộng xung bằng pulseIn(), và chuyển đổi mỗi lần đọc thành giá trị 0-255 bằng map() với dữ liệu hiệu chuẩn của bạn.
Định dạng thành HEX: Ba giá trị RGB được kết hợp thành chuỗi HEX (ví dụ: #FF8000) bằng sprintf() và constrain().
Phát sóng đến trình duyệt: Màu HEX được truyền đến mọi web client được kết nối thông qua customPage.sendToWeb().
Phía Trang Web (custom_page_html.h)
File HTML chứa:
Minion hoạt hình chỉ bằng CSS: Nhân vật có mắt chớp, miệng cười với lưỡi vẫy, và đồng tử di chuyển ngẫu nhiên — tất cả đều được cung cấp bởi hoạt hình CSS và một JavaScript interval nhỏ.
WebSocket listener: JavaScript mở kết nối bền vững đến WebSocket server của ESP32 trên port 81 và xử lý tin nhắn màu đến.
Ứng dụng màu trực tiếp: Mỗi màu HEX nhận được được áp dụng một cách mượt mà cho cơ thể, tay và mi mắt của Minion bằng transition CSS cho hiệu ứng hình ảnh mượt mà.
Kết nối lại tự động: Nếu WebSocket ngắt kết nối, trang sẽ thử lại kết nối mỗi 2 giây mà không cần can thiệp của người dùng.
Layout responsive: Minion tự động thay đổi kích thước để phù hợp với bất kỳ kích thước màn hình nào, từ điện thoại đến desktop.
Giao Thức Tin Nhắn
Dự án này tuân theo framework ứng dụng tùy chỉnh DIYables ESP32 WebApps. Tin nhắn được gắn thẻ với định danh "Color sensor:":
ESP32 gửi: Color sensor:#FF8000 (tiền tố định danh + giá trị màu HEX)
Trình duyệt nhận: JavaScript loại bỏ tiền tố Color sensor: và áp dụng #FF8000 còn lại cho Minion

 English for KidsHọc tiếng Anh vui nhộn cho trẻ nhỏ.Tải về trênGoogle PlayTải về trênApp Store
 Bubble NoteGhi chú tự xóa — viết như nhắn tin.Tải về trênGoogle PlayTải về trênApp Store
 Tôi Không MuaĐánh bại mua sắm bốc đồng, tiết kiệm hơn.Tải về trênGoogle PlayTải về trênApp Store
 Con Đường Tri ThứcBài thi thử để học mọi thứ.Tải về trênGoogle PlayTải về trênApp Store