ESP32 Máy Phát MP3
Trong hướng dẫn này, chúng ta sẽ khám phá cách tạo máy phát MP3 sử dụng ESP32, module phát MP3, thẻ Micro SD Card và loa. Các file MP3, có thể là nhạc hoặc âm thanh đã ghi, được lưu trữ trên thẻ micro SD Card. ESP32 sẽ được lập trình để gửi lệnh điều khiển module phát MP3 chọn bài nào từ thẻ SD, chuyển đổi thành âm thanh, và sau đó gửi âm thanh đó đến loa. Chúng ta sẽ tìm hiểu các khía cạnh sau:
- Cách hoạt động của máy phát MP3
- Kết nối loa và module phát MP3 với ESP32
- Lập trình ESP32 để phát một bài hát được lưu trữ trên thẻ micro SD Card
- Thêm các nút phát, tạm dừng, tiếp theo và trước đó.
Sau đó, bạn có thể mở rộng code bằng cách kết hợp potentiometer hoặc rotary encoder để điều chỉnh âm lượng.
Linh Kiện Cần Thiết
| 1 | × | 38-pin ESP32 ESP-WROOM-32 Dev Module - Narrow | Amazon | |
| 1 | × | Alternatively, 38-pin ESP32 ESP-WROOM-32 Dev Module - Wide | Amazon | |
| 1 | × | Alternatively, 30-pin ESP32 ESP-WROOM-32 Dev Module - Wide | Amazon | |
| 1 | × | Alternatively, ESP32 Uno-form board | Amazon | |
| 1 | × | Alternatively, ESP32 S3 Uno-form board | Amazon | |
| 1 | × | USB Cable Type-A to Type-C (for USB-A PC) | Amazon | |
| 1 | × | USB Cable Type-C to Type-C (for USB-C PC) | Amazon | |
| 1 | × | Serial MP3 Player Module | Amazon | |
| 1 | × | Micro SD Card | Amazon | |
| 1 | × | 3.5mm Aux Speaker | Amazon | |
| 1 | × | breadboard | Amazon | |
| 1 | × | dây jumper | Amazon | |
| 1 | × | (Khuyến nghị) Screw Terminal Expansion Board for ESP32 | Amazon | |
| 1 | × | (Khuyến nghị) Breakout Expansion Board for ESP32 | Amazon | |
| 1 | × | (Khuyến nghị) Power Splitter for ESP32 | Amazon |
Or you can buy the following kits:
| 1 | × | DIYables ESP32 Starter Kit (ESP32 included) | Amazon | |
| 1 | × | DIYables Sensor Kit (18 sensors/displays) | Amazon |
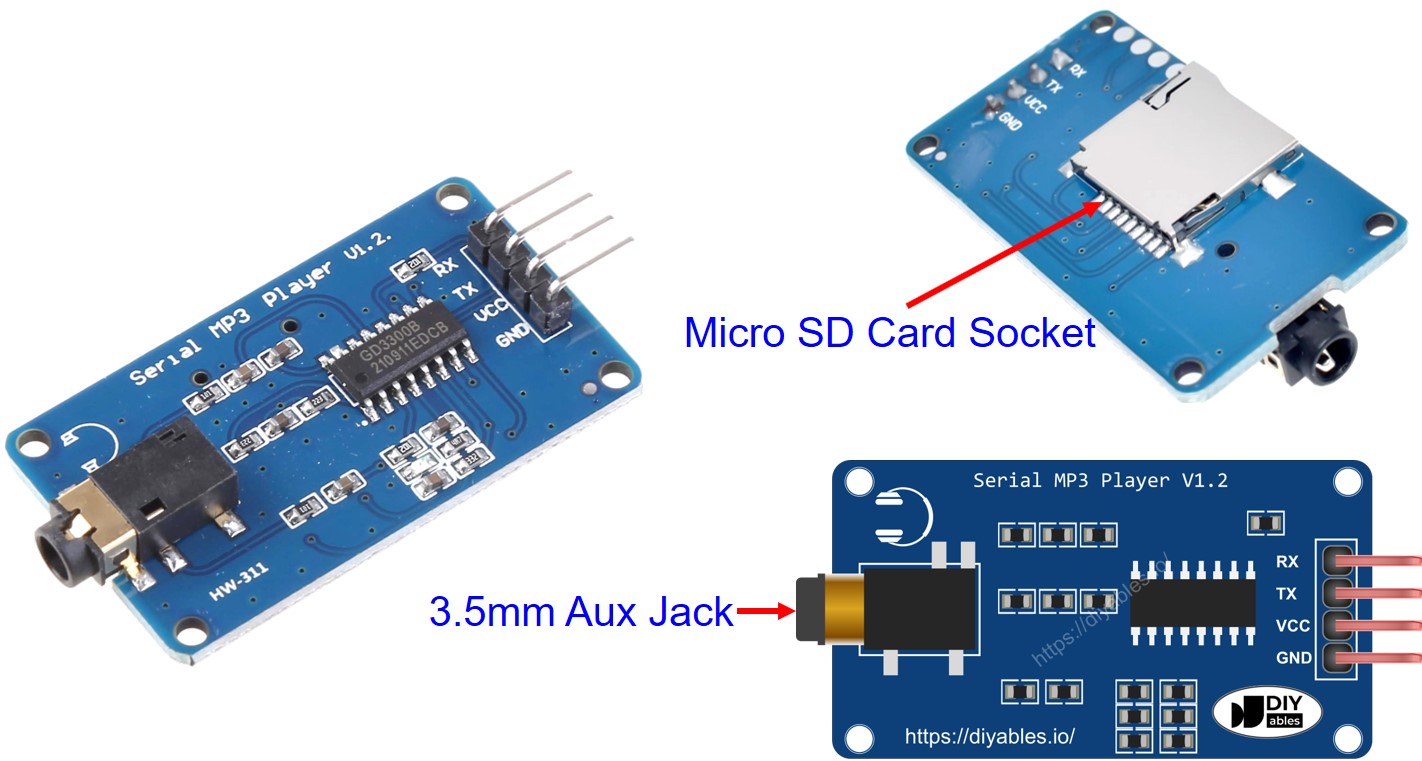
Về Serial MP3 Player Module và Loa
Pinout của Serial MP3 Player Module
Một module phát MP3 nпоследовательный có ba giao diện:
- Giao diện với ESP32 bao gồm 4 chân:
- Chân RX: chân data, cần kết nối với chân TX của ESP32
- Chân TX: chân data, cần kết nối với chân RX của ESP32
- Chân VCC: chân nguồn, cần kết nối với VCC (3.3V hoặc 5V)
- Chân GND: chân nguồn, cần kết nối với GND (0V)
- Giao diện với loa là jack cắm Aux 3.5mm ra.
- Giao diện với thẻ Micro SD Card là Socket thẻ Micro SD Card ở mặt sau của module.
Pinout Loa
Loa thường có hai giao diện:
- Giao diện tín hiệu âm thanh: là connector Aux 3.5mm male kết nối với module phát MP3
- Giao diện nguồn: có thể là USB, adapter nguồn 5V hoặc bất kỳ giao diện nguồn nào khác
Cách Hoạt Động
Để bắt đầu, hãy đảm bảo bạn có những thứ sau:
- Chuẩn bị một bộ sưu tập các bài hát hoặc âm thanh đã ghi mà bạn muốn phát và lưu chúng trên thẻ micro SD Card.
- Đưa thẻ micro SD Card vào module phát MP3.
- Kết nối module phát MP3 với ESP32 và kết nối loa với module phát MP3. Đồng thời, đảm bảo loa được kết nối với nguồn điện.
Mỗi file MP3 trên thẻ micro SD Card sẽ có một ID, bắt đầu từ 0. Sau đó, bạn có thể yêu cầu ESP32 thực hiện nhiều việc khác nhau với module phát MP3, chẳng hạn như:
- Phát: Bắt đầu phát bài hát đã chọn.
- Tạm dừng: Tạm dừng bài hát.
- Phát tiếp theo: Chuyển sang bài hát tiếp theo.
- Phát trước đó: Quay lại bài hát trước đó.
- Thay đổi âm lượng: Điều chỉnh độ to của nhạc.
Khi module phát MP3 nhận được lệnh, nó sẽ đọc file MP3 từ thẻ micro SD Card, chuyển đổi thành tín hiệu âm thanh, và gửi tín hiệu đó đến loa thông qua kết nối Aux 3.5mm.
Sơ Đồ Đấu Nối
- Cách kết nối ESP32 và module phát mp3 sử dụng breadboard
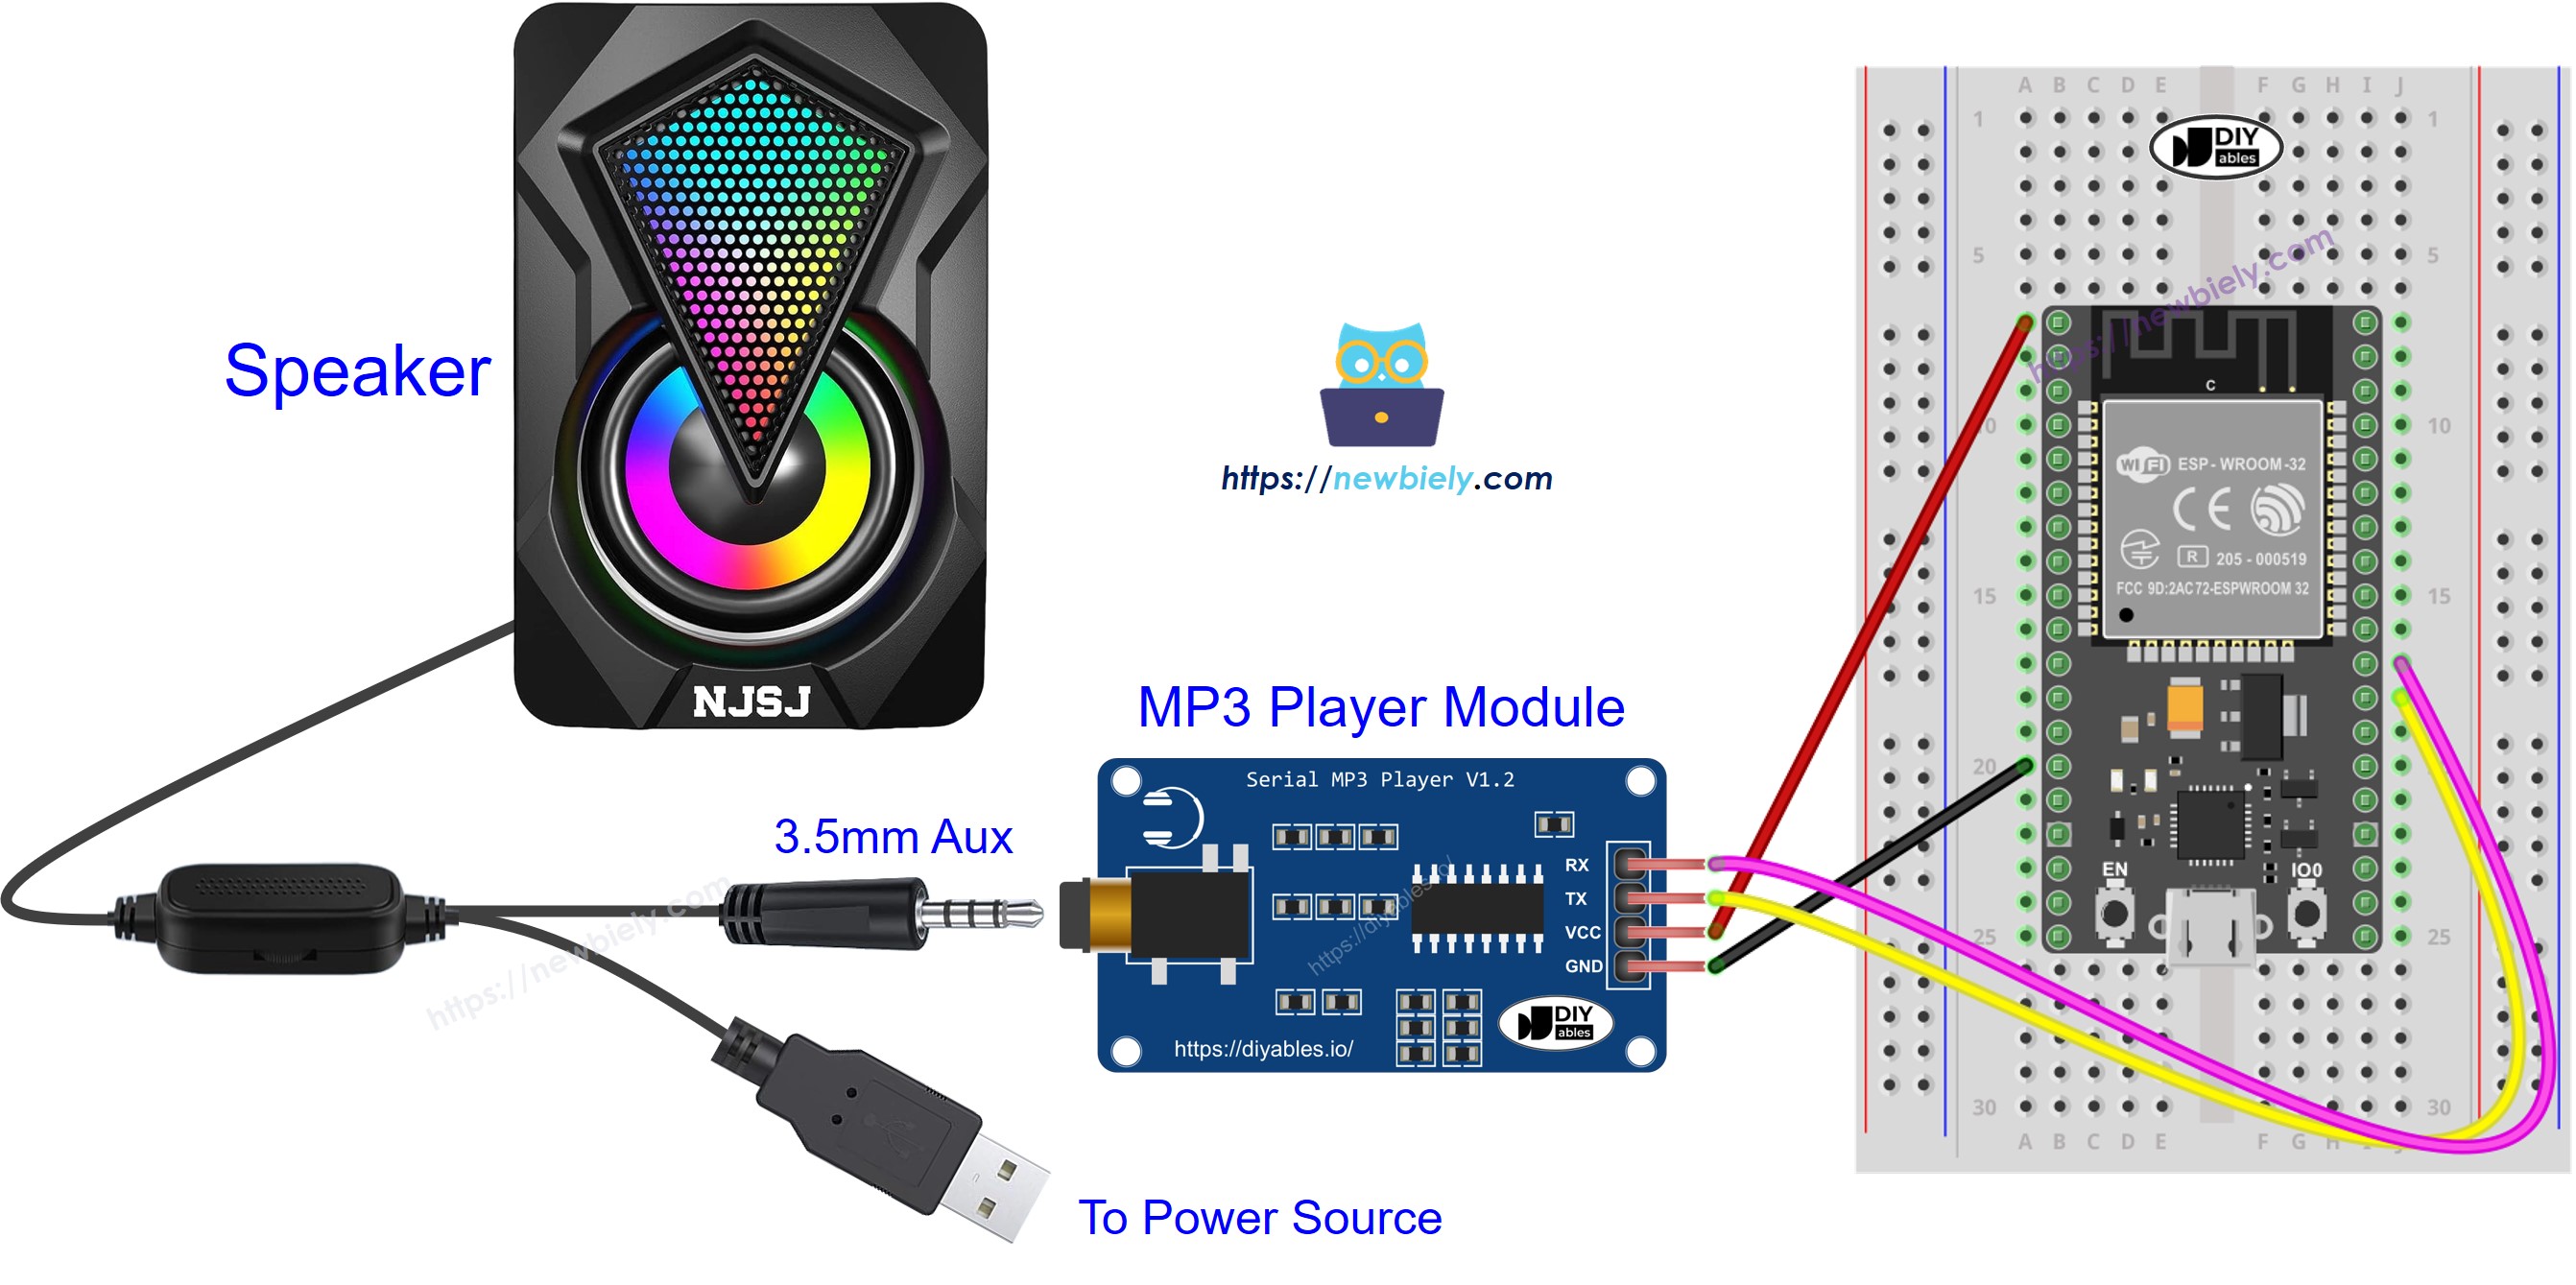
This image is created using Fritzing. Click to enlarge image
Nếu bạn chưa rõ cách cấp nguồn cho ESP32 và các linh kiện khác, xem: Cách Cung Cấp Nguồn Điện Cho ESP32.
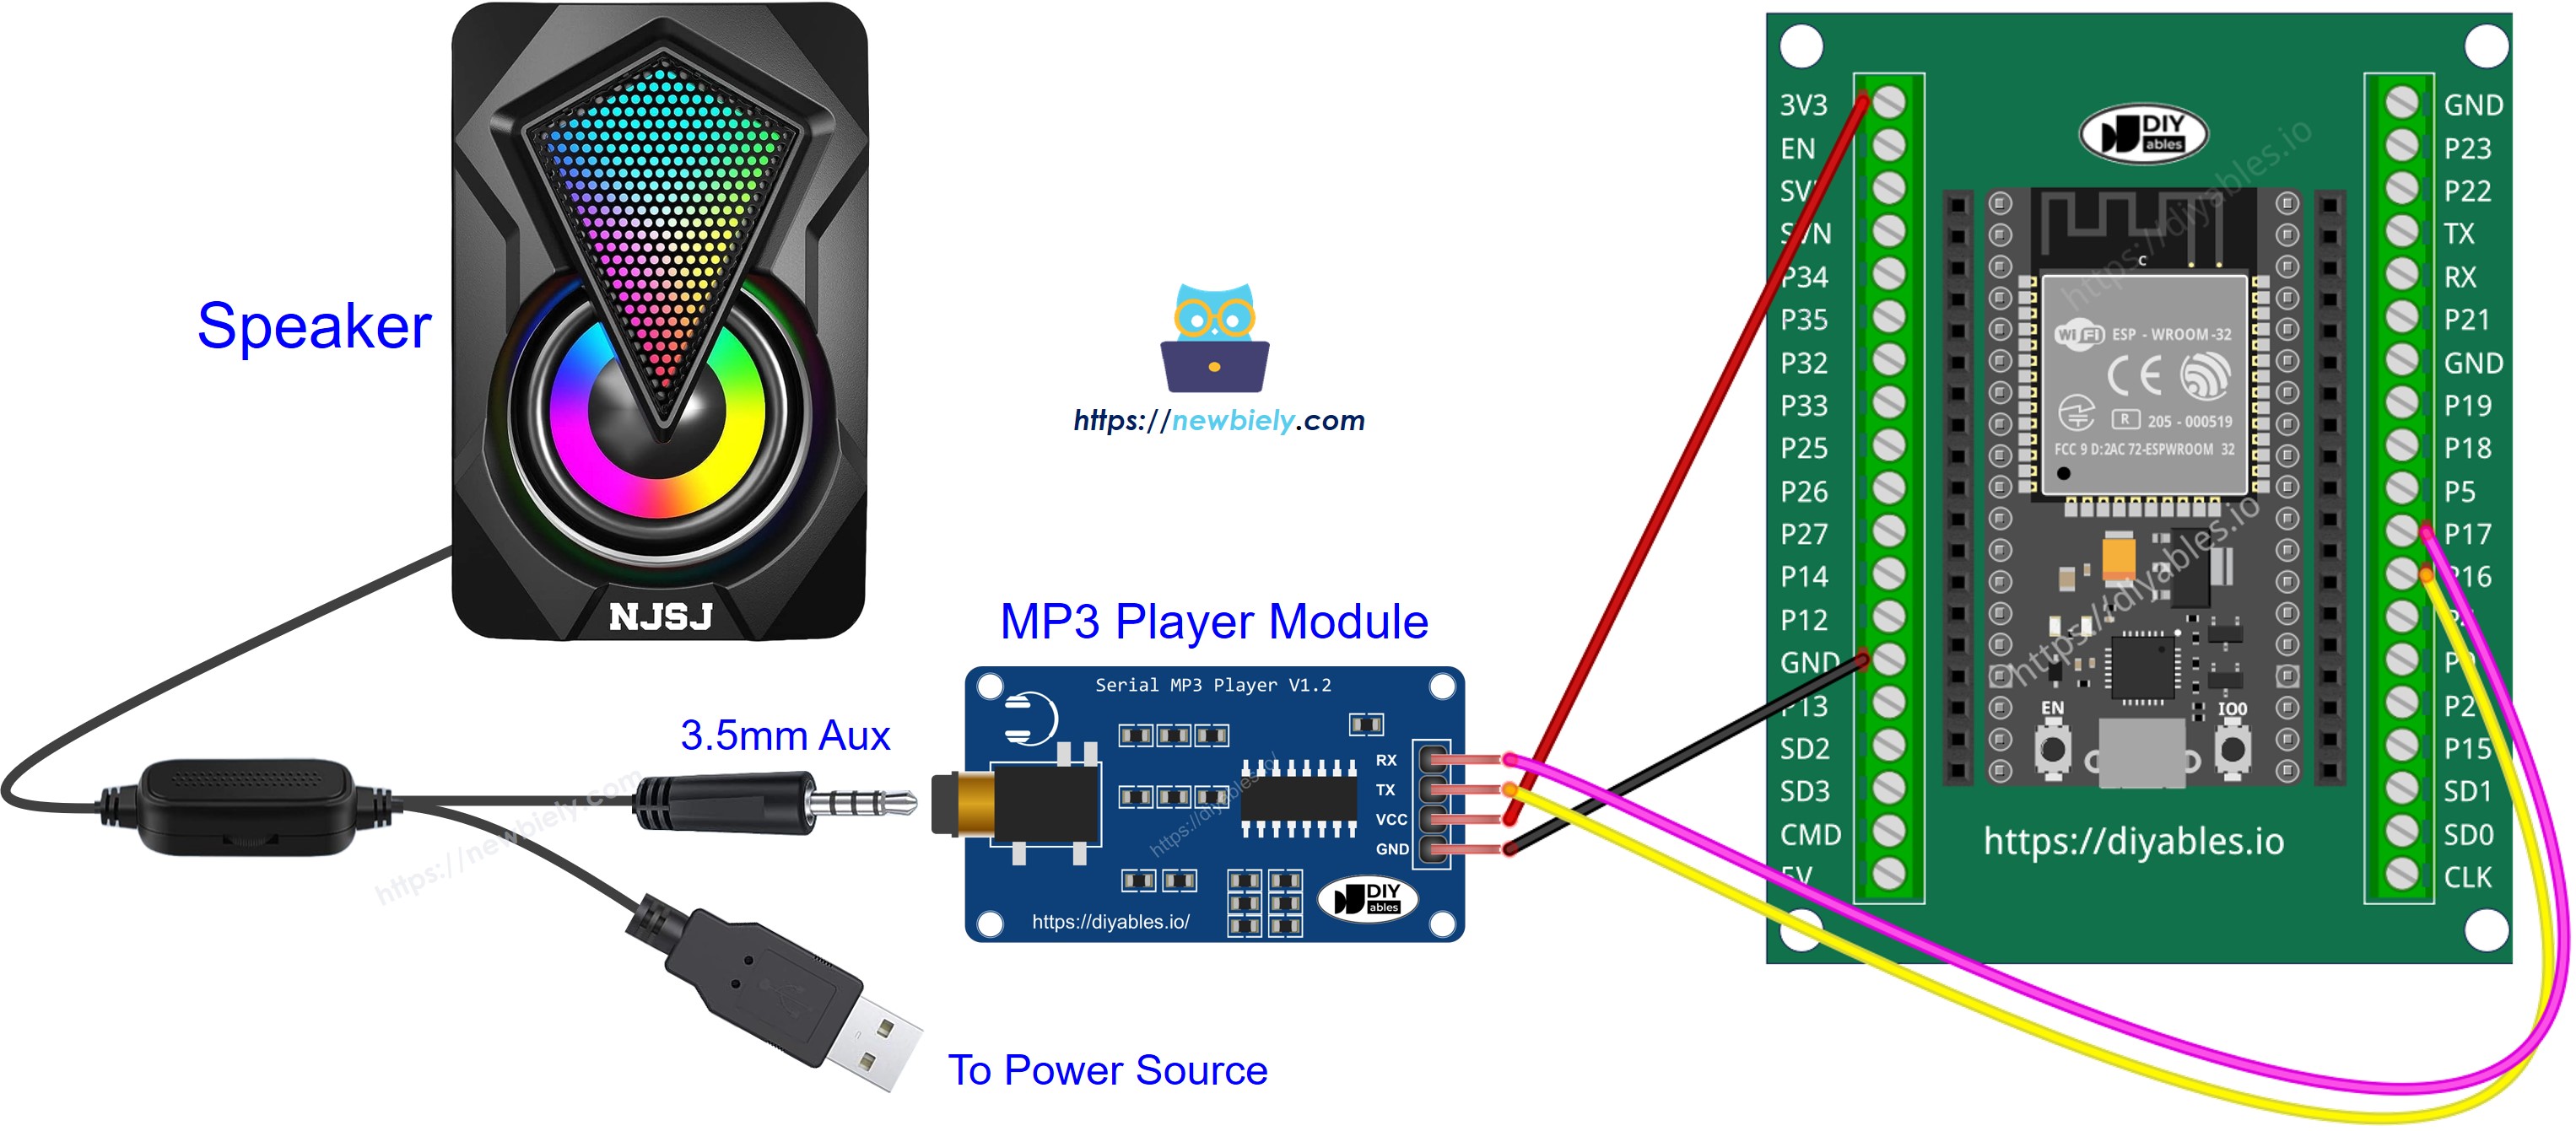
- Cách kết nối ESP32 và module phát mp3 sử dụng screw terminal block breakout board
Code ESP32 - Phát Nhạc
Code dưới đây phát bài hát đầu tiên được lưu trữ trên thẻ Micro SD Card.
Các Bước Thực Hiện
- Nếu đây là lần đầu tiên bạn sử dụng ESP32, hãy xem ESP32 - Cài Đặt Phần Mềm.
- Làm theo hướng dẫn trong phần Cách Hoạt Động
- Sao chép code ở trên và mở bằng Arduino IDE
- Nhấp nút Upload trên Arduino IDE để upload code lên ESP32
- Thưởng thức âm nhạc
Code ESP32 - Phát Nhạc với Nút Điều Khiển
Code dưới đây là phiên bản nâng cấp của code trước đó. Nó thêm bốn nút để cho phép bạn tương tác với máy phát MP3.
Sơ đồ đấu nối cho code ở trên:
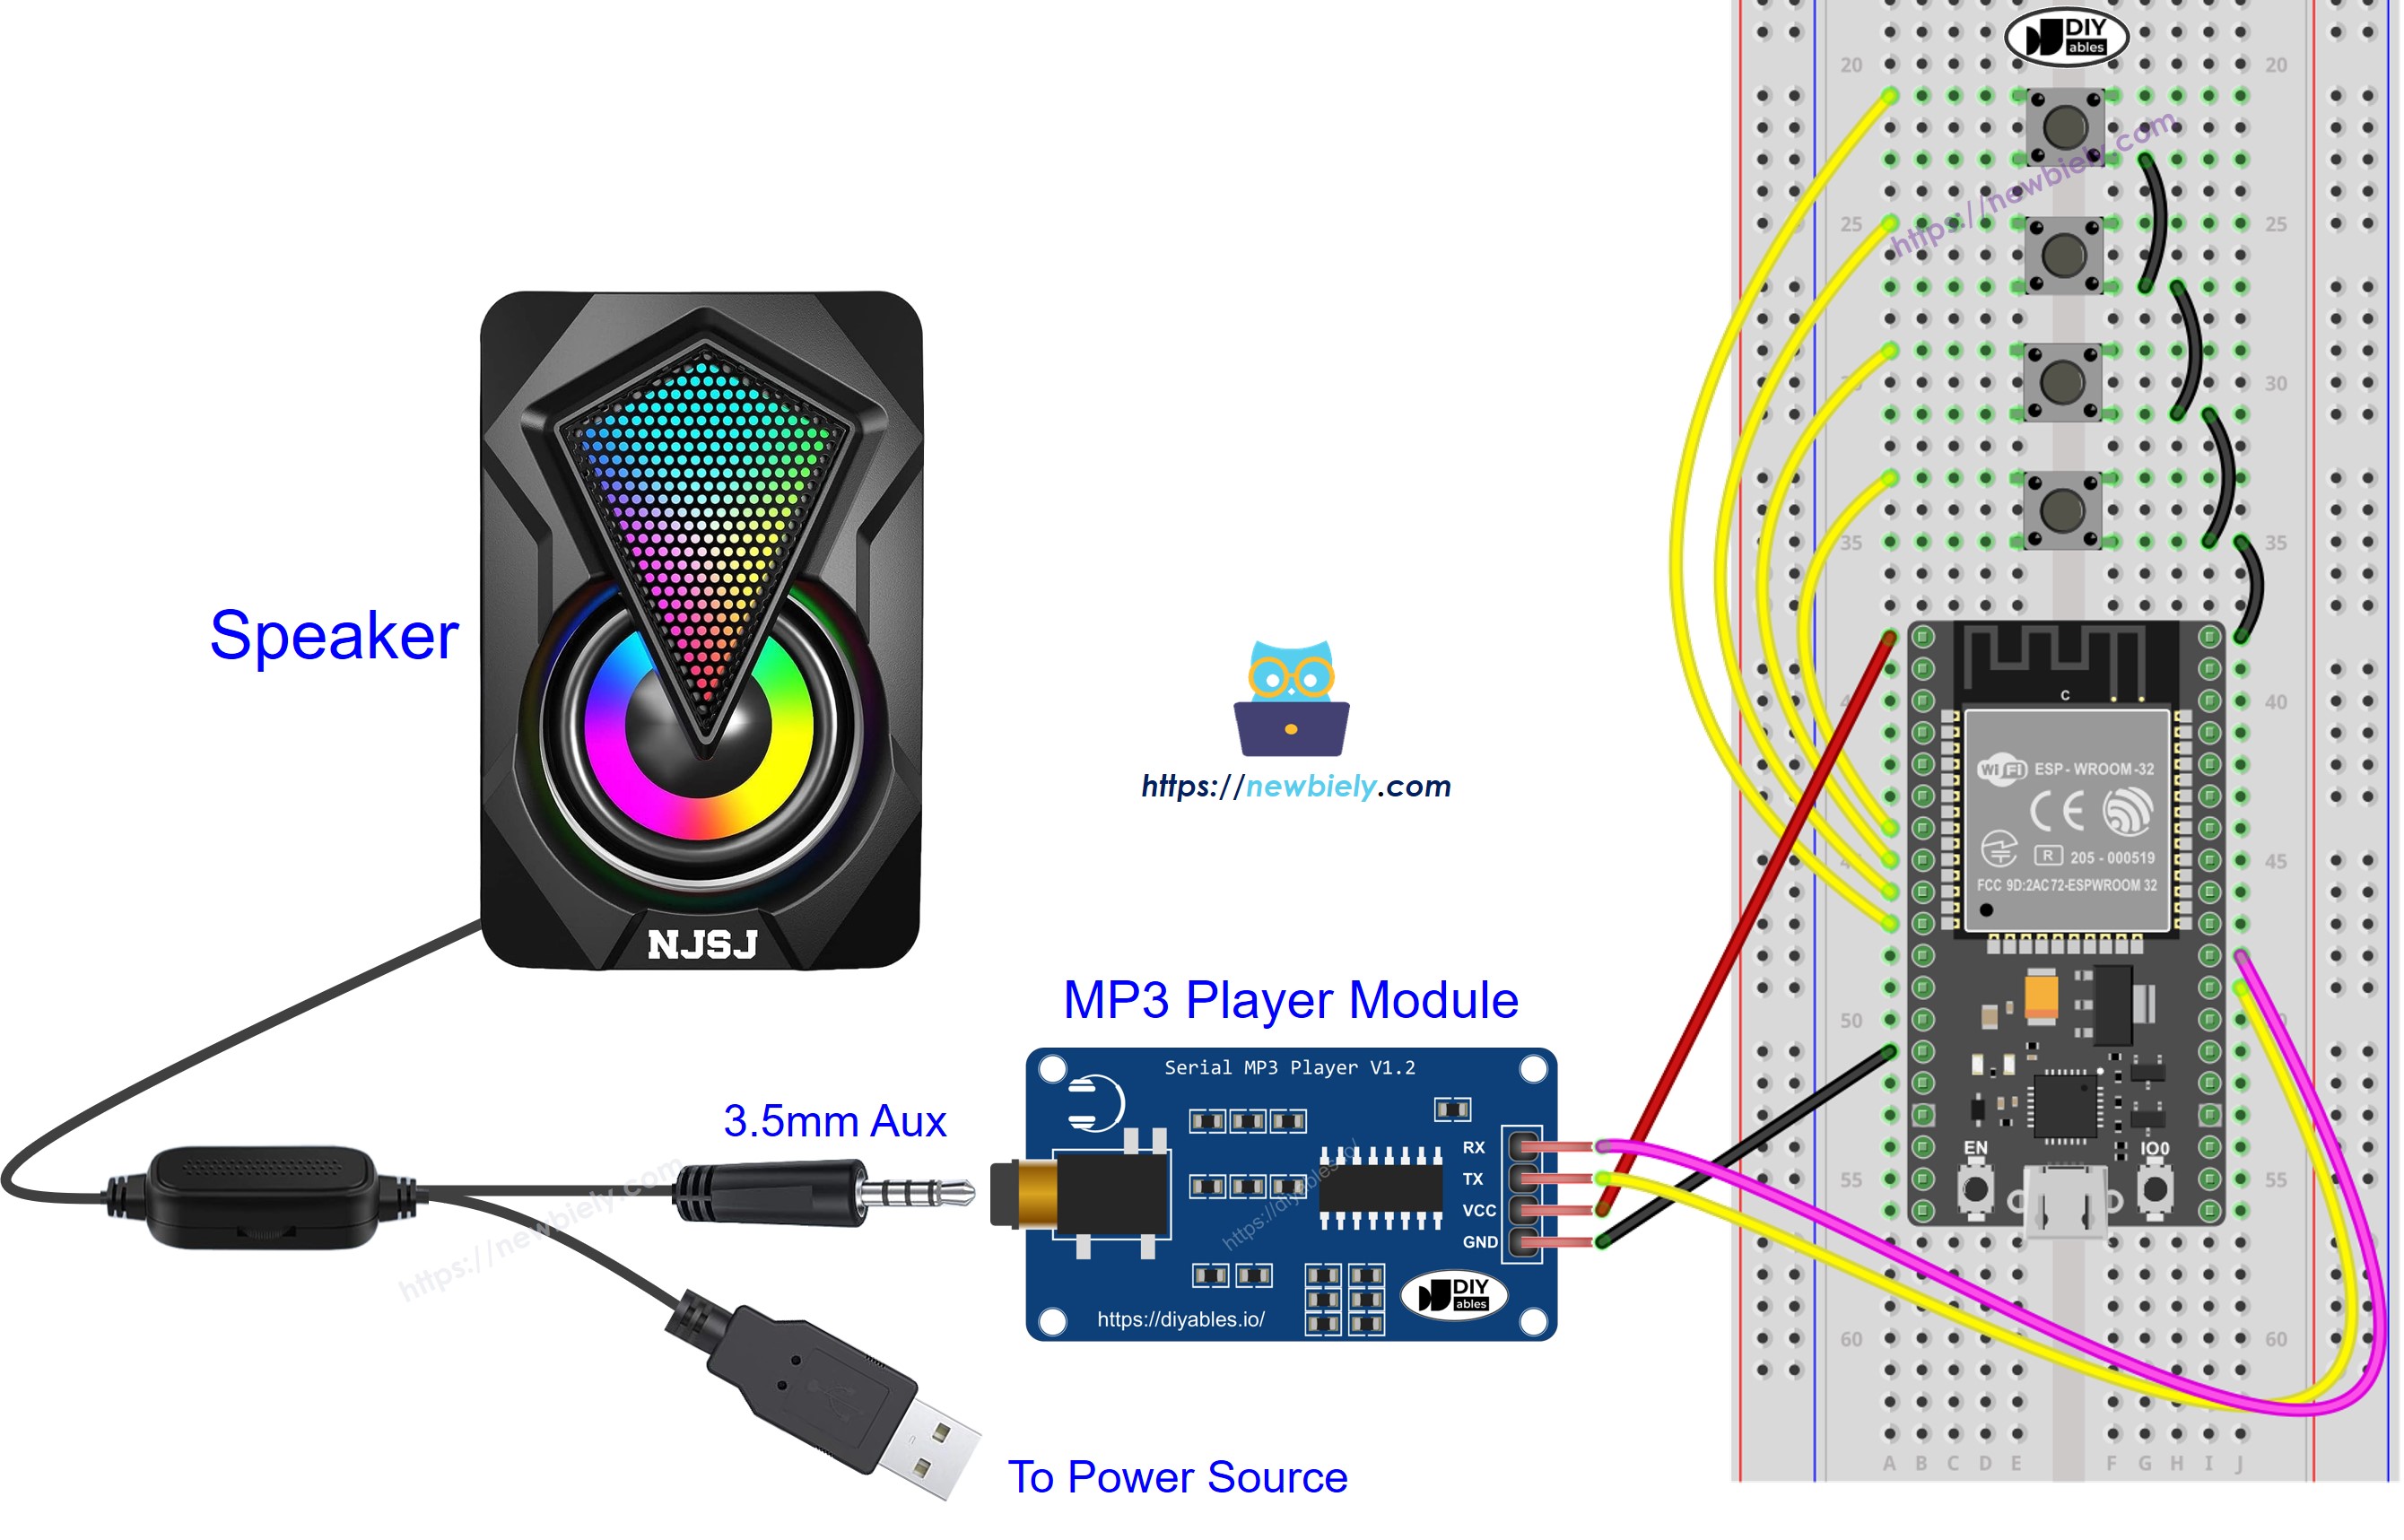
This image is created using Fritzing. Click to enlarge image
Bây giờ, bạn có thể chỉnh sửa dự án để thêm nhiều chức năng hơn, ví dụ:
- Thêm potentiometer để điều khiển âm lượng, xem hướng dẫn ESP32 - Potentiometer (Biến Trở Xoay)
- Thêm điều khiển từ xa IR, xem hướng dẫn ESP32 - Điều Khiển Bằng Remote Hồng Ngoại
- Thêm đầu đọc RFID và thẻ để tạo máy phát MP3 RFID, xem hướng dẫn ESP32 - RFID/NFC
Video Tutorial
Việc sản xuất video tốn rất nhiều thời gian. Nếu video hướng dẫn hữu ích cho việc học của bạn, hãy đăng ký kênh YouTube để ủng hộ. Nếu nhu cầu đủ cao, chúng tôi sẽ cố gắng làm thêm nhiều video.
Tham Khảo Hàm
Bình Luận
Bài hướng dẫn liên quan
📱 Ứng dụng đề xuất
 English for KidsHọc tiếng Anh vui nhộn cho trẻ nhỏ.Tải về trênGoogle PlayTải về trênApp Store
 Bubble NoteGhi chú tự xóa — viết như nhắn tin.Tải về trênGoogle PlayTải về trênApp Store
 Tôi Không MuaĐánh bại mua sắm bốc đồng, tiết kiệm hơn.Tải về trênGoogle PlayTải về trênApp Store
 Con Đường Tri ThứcBài thi thử để học mọi thứ.Tải về trênGoogle PlayTải về trênApp Store