ESP32 Bluetooth Monitor Hướng Dẫn Giao Diện Serial Monitor Thời Gian Thực
Tổng Quan
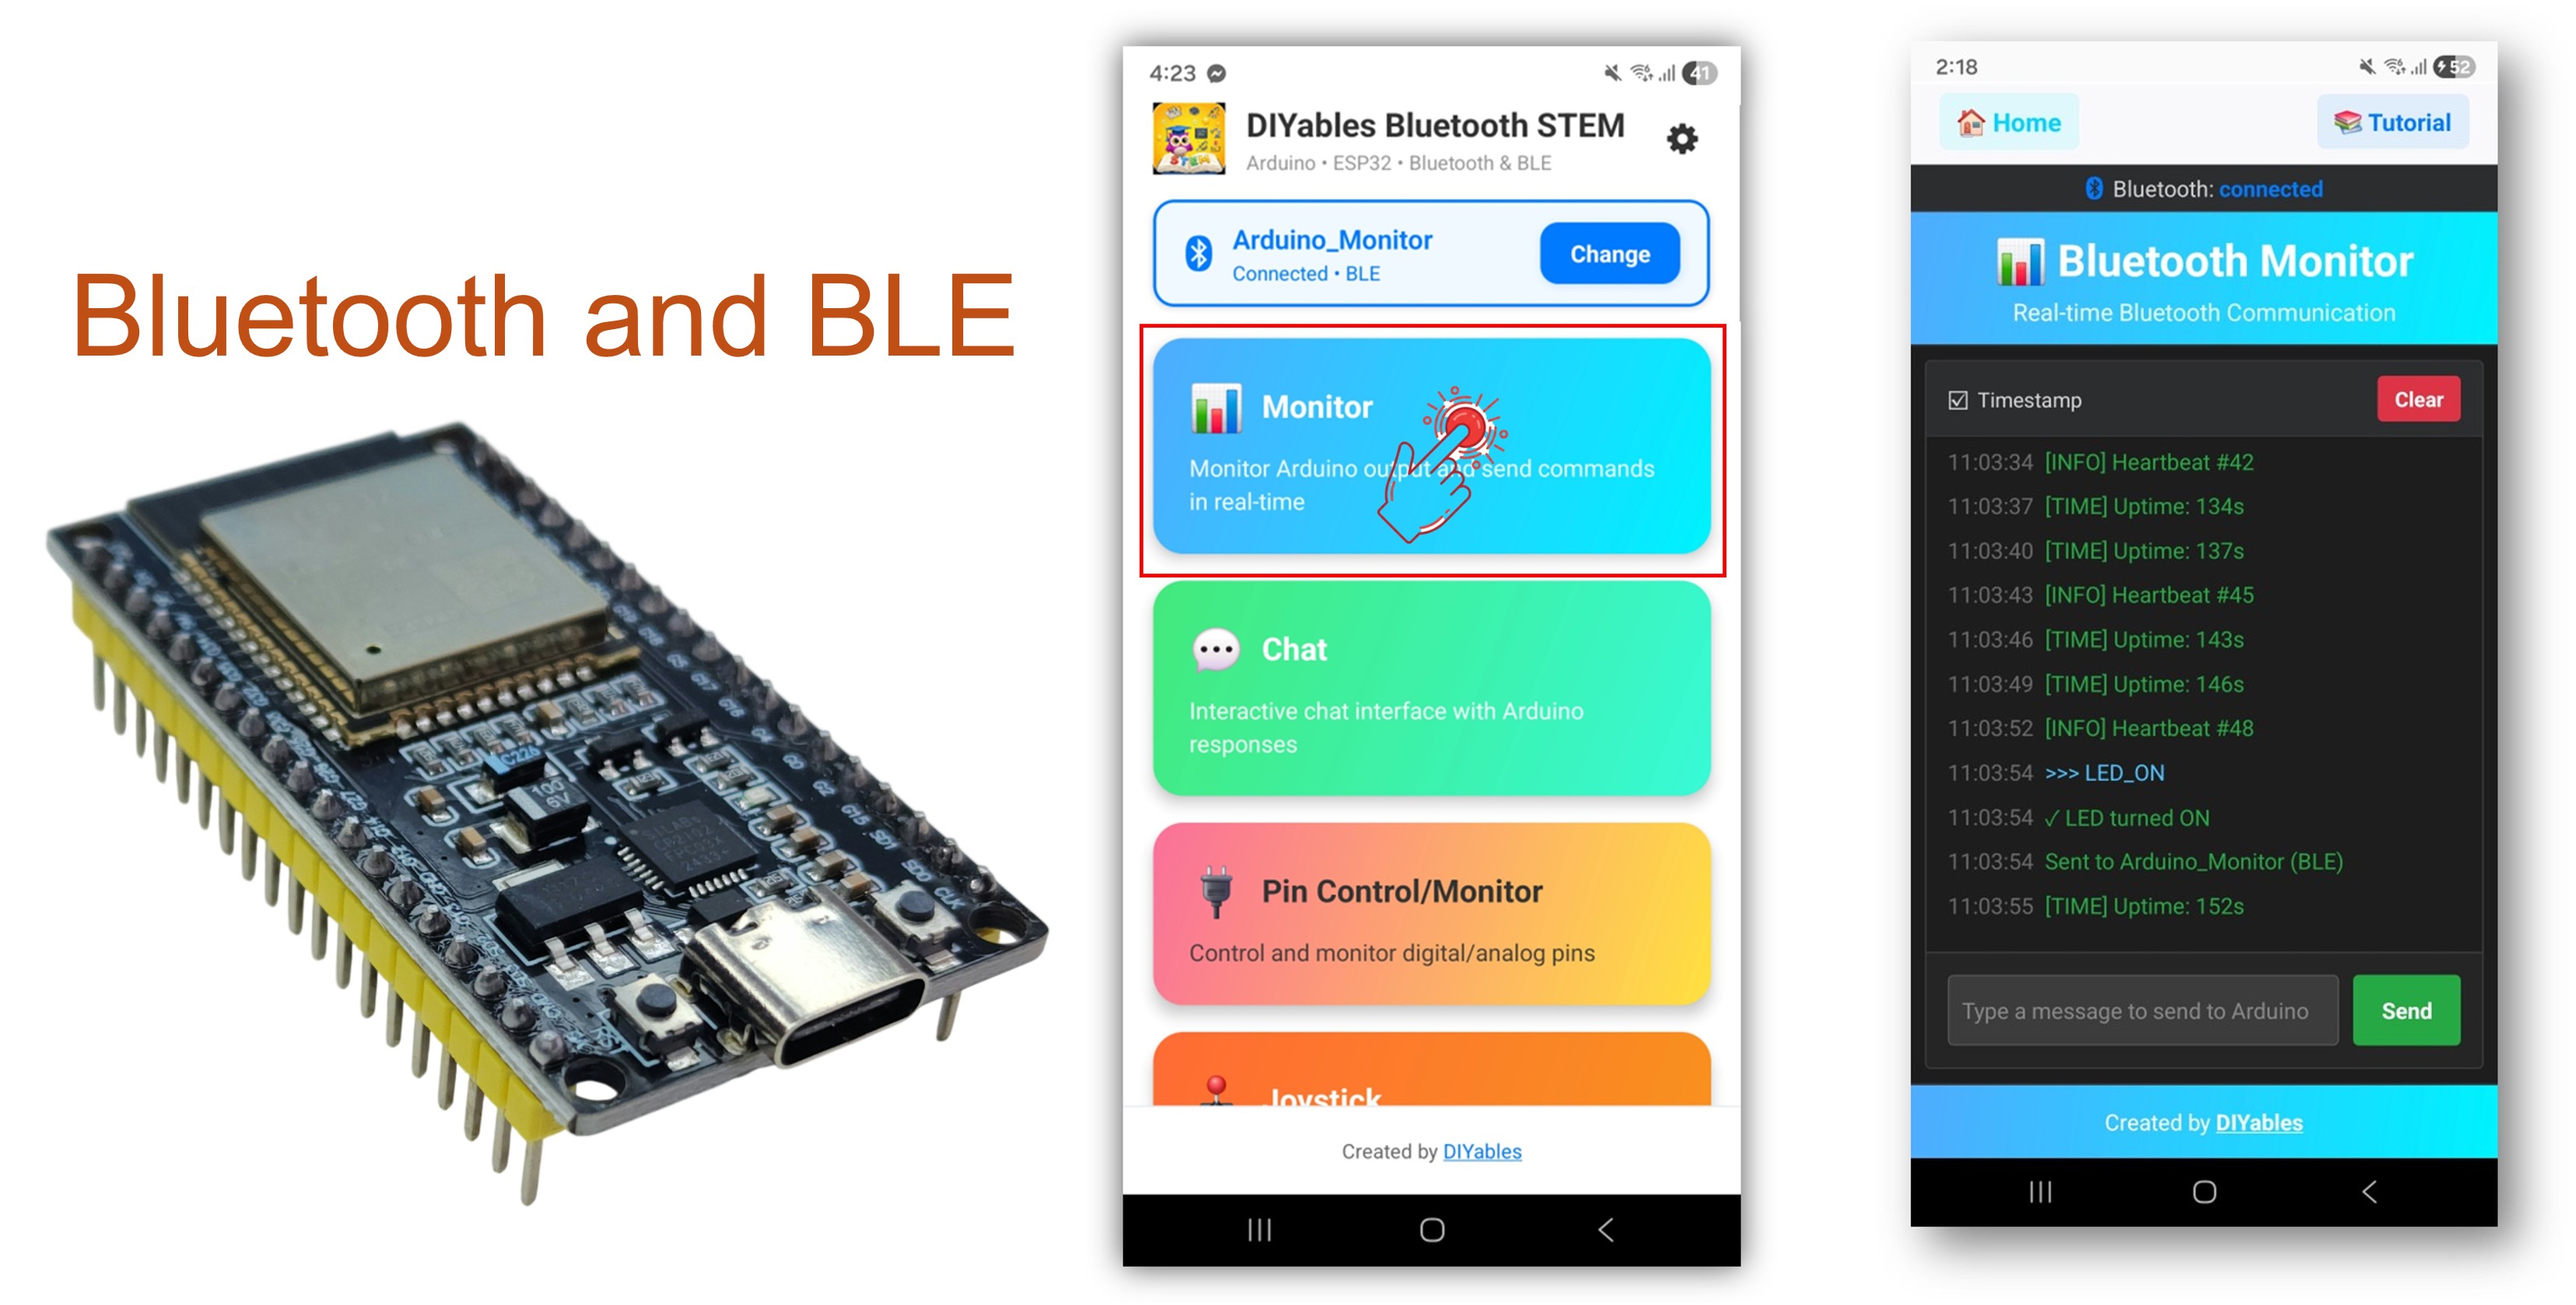
Ví dụ Bluetooth Monitor cung cấp giao diện serial monitor không dây có thể truy cập thông qua ứng dụng DIYables Bluetooth STEM. Được thiết kế cho các board ESP32 với hỗ trợ cả kết nối BLE (Bluetooth Low Energy) và Classic Bluetooth. Truyền tải tin nhắn trạng thái thời gian thực đến ứng dụng, nhận và xử lý các lệnh văn bản, hiển thị thông tin hệ thống, và debug các dự án của bạn một cách không dây — hoàn hảo cho việc giám sát không cần dây, debug từ xa, và hiển thị trạng thái hệ thống.
Ví dụ này hỗ trợ hai chế độ Bluetooth:
ESP32 BLE (Bluetooth Low Energy): Hoạt động trên cả Android và iOS
ESP32 Classic Bluetooth: Chỉ hoạt động trên Android. iOS không hỗ trợ Classic Bluetooth. Sử dụng BLE nếu bạn cần hỗ trợ iOS.
Tính Năng
Truyền Tải Thời Gian Thực: Gửi tin nhắn trạng thái liên tục đến màn hình ứng dụng
Xử Lý Lệnh: Nhận và xử lý các lệnh văn bản từ ứng dụng
Giám Sát Hệ Thống: Hiển thị thời gian hoạt động, bộ nhớ trống, thông tin CPU và nhiều hơn nữa
Điều Khiển LED: Lệnh BẬT/TẮT LED tích hợp để kiểm tra nhanh
Cập Nhật Định Kỳ: Tin nhắn heartbeat và trạng thái tự động với khoảng thời gian có thể cấu hình
BLE & Classic Bluetooth: Chọn chế độ Bluetooth phù hợp với dự án của bạn
Đa Nền Tảng: Chế độ BLE hoạt động trên cả Android và iOS; Classic Bluetooth hoạt động trên Android
Tùy Chọn Tiết Kiệm Điện: Chế độ BLE tiêu thụ ít điện năng hơn Classic Bluetooth
Kết nối board ESP32 với máy tính của bạn bằng cáp USB.
Mở Arduino IDE trên máy tính của bạn.
Chọn board ESP32 và COM port phù hợp.
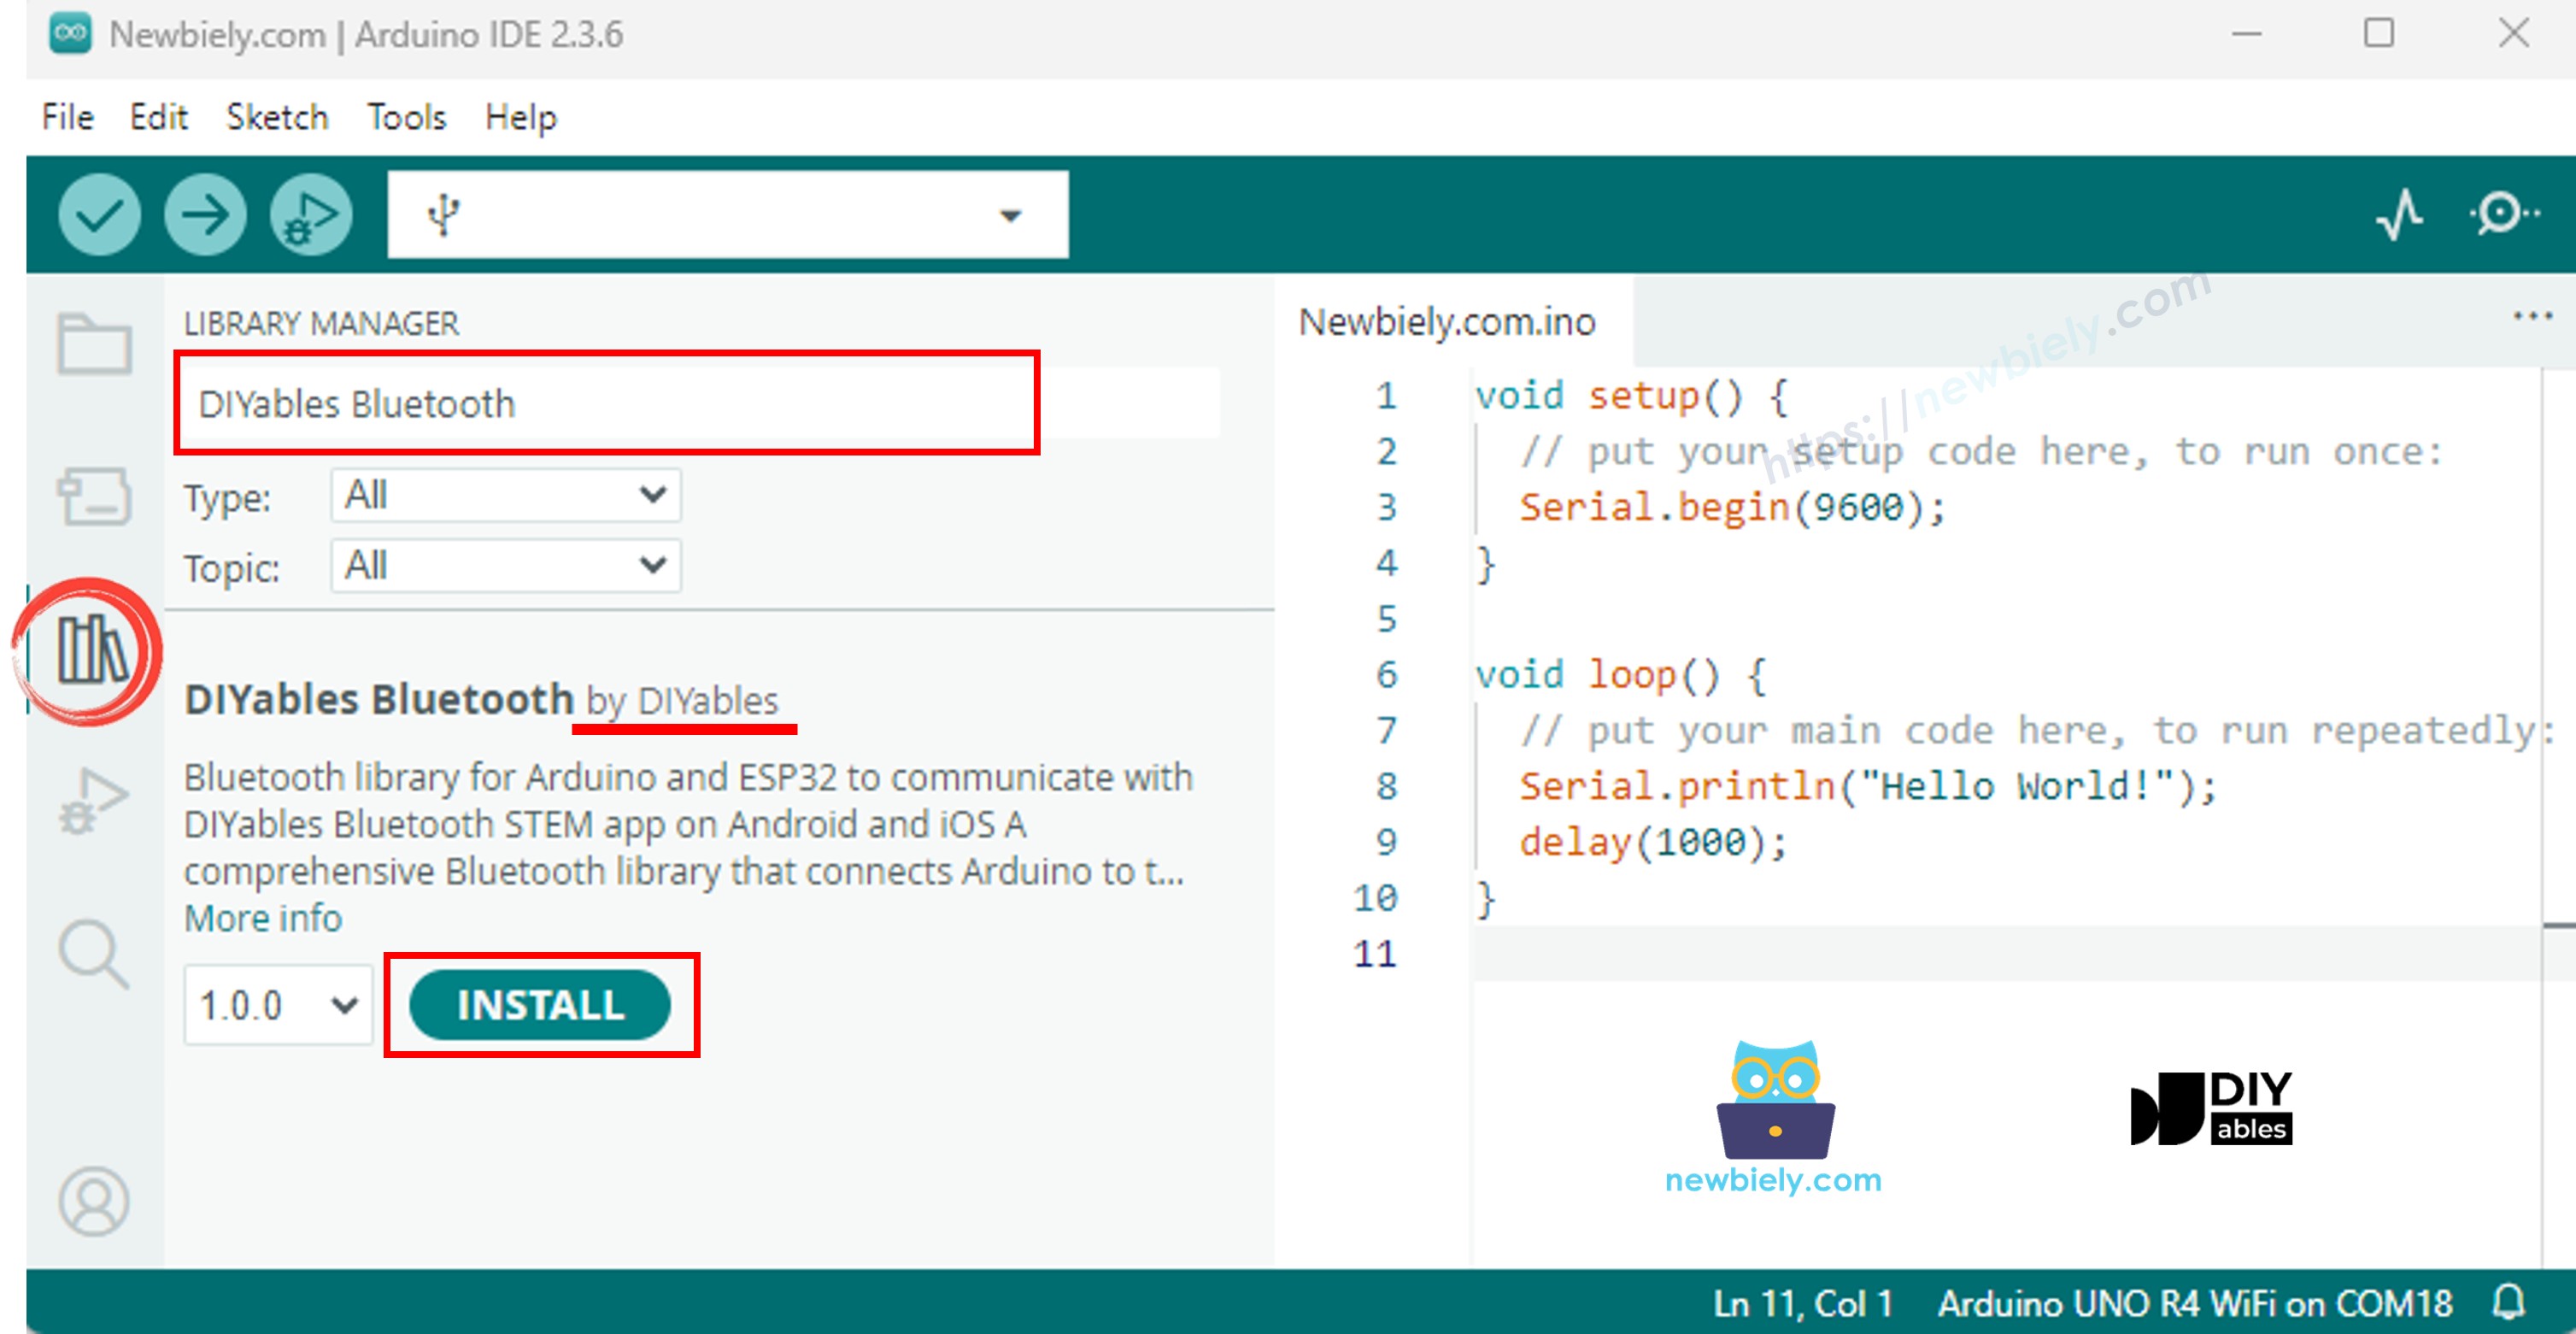
Điều hướng đến biểu tượng Libraries trên thanh bên trái của Arduino IDE.
Tìm kiếm "DIYables Bluetooth", sau đó tìm thư viện DIYables Bluetooth bởi DIYables
Nhấp vào nút Install để cài đặt thư viện.
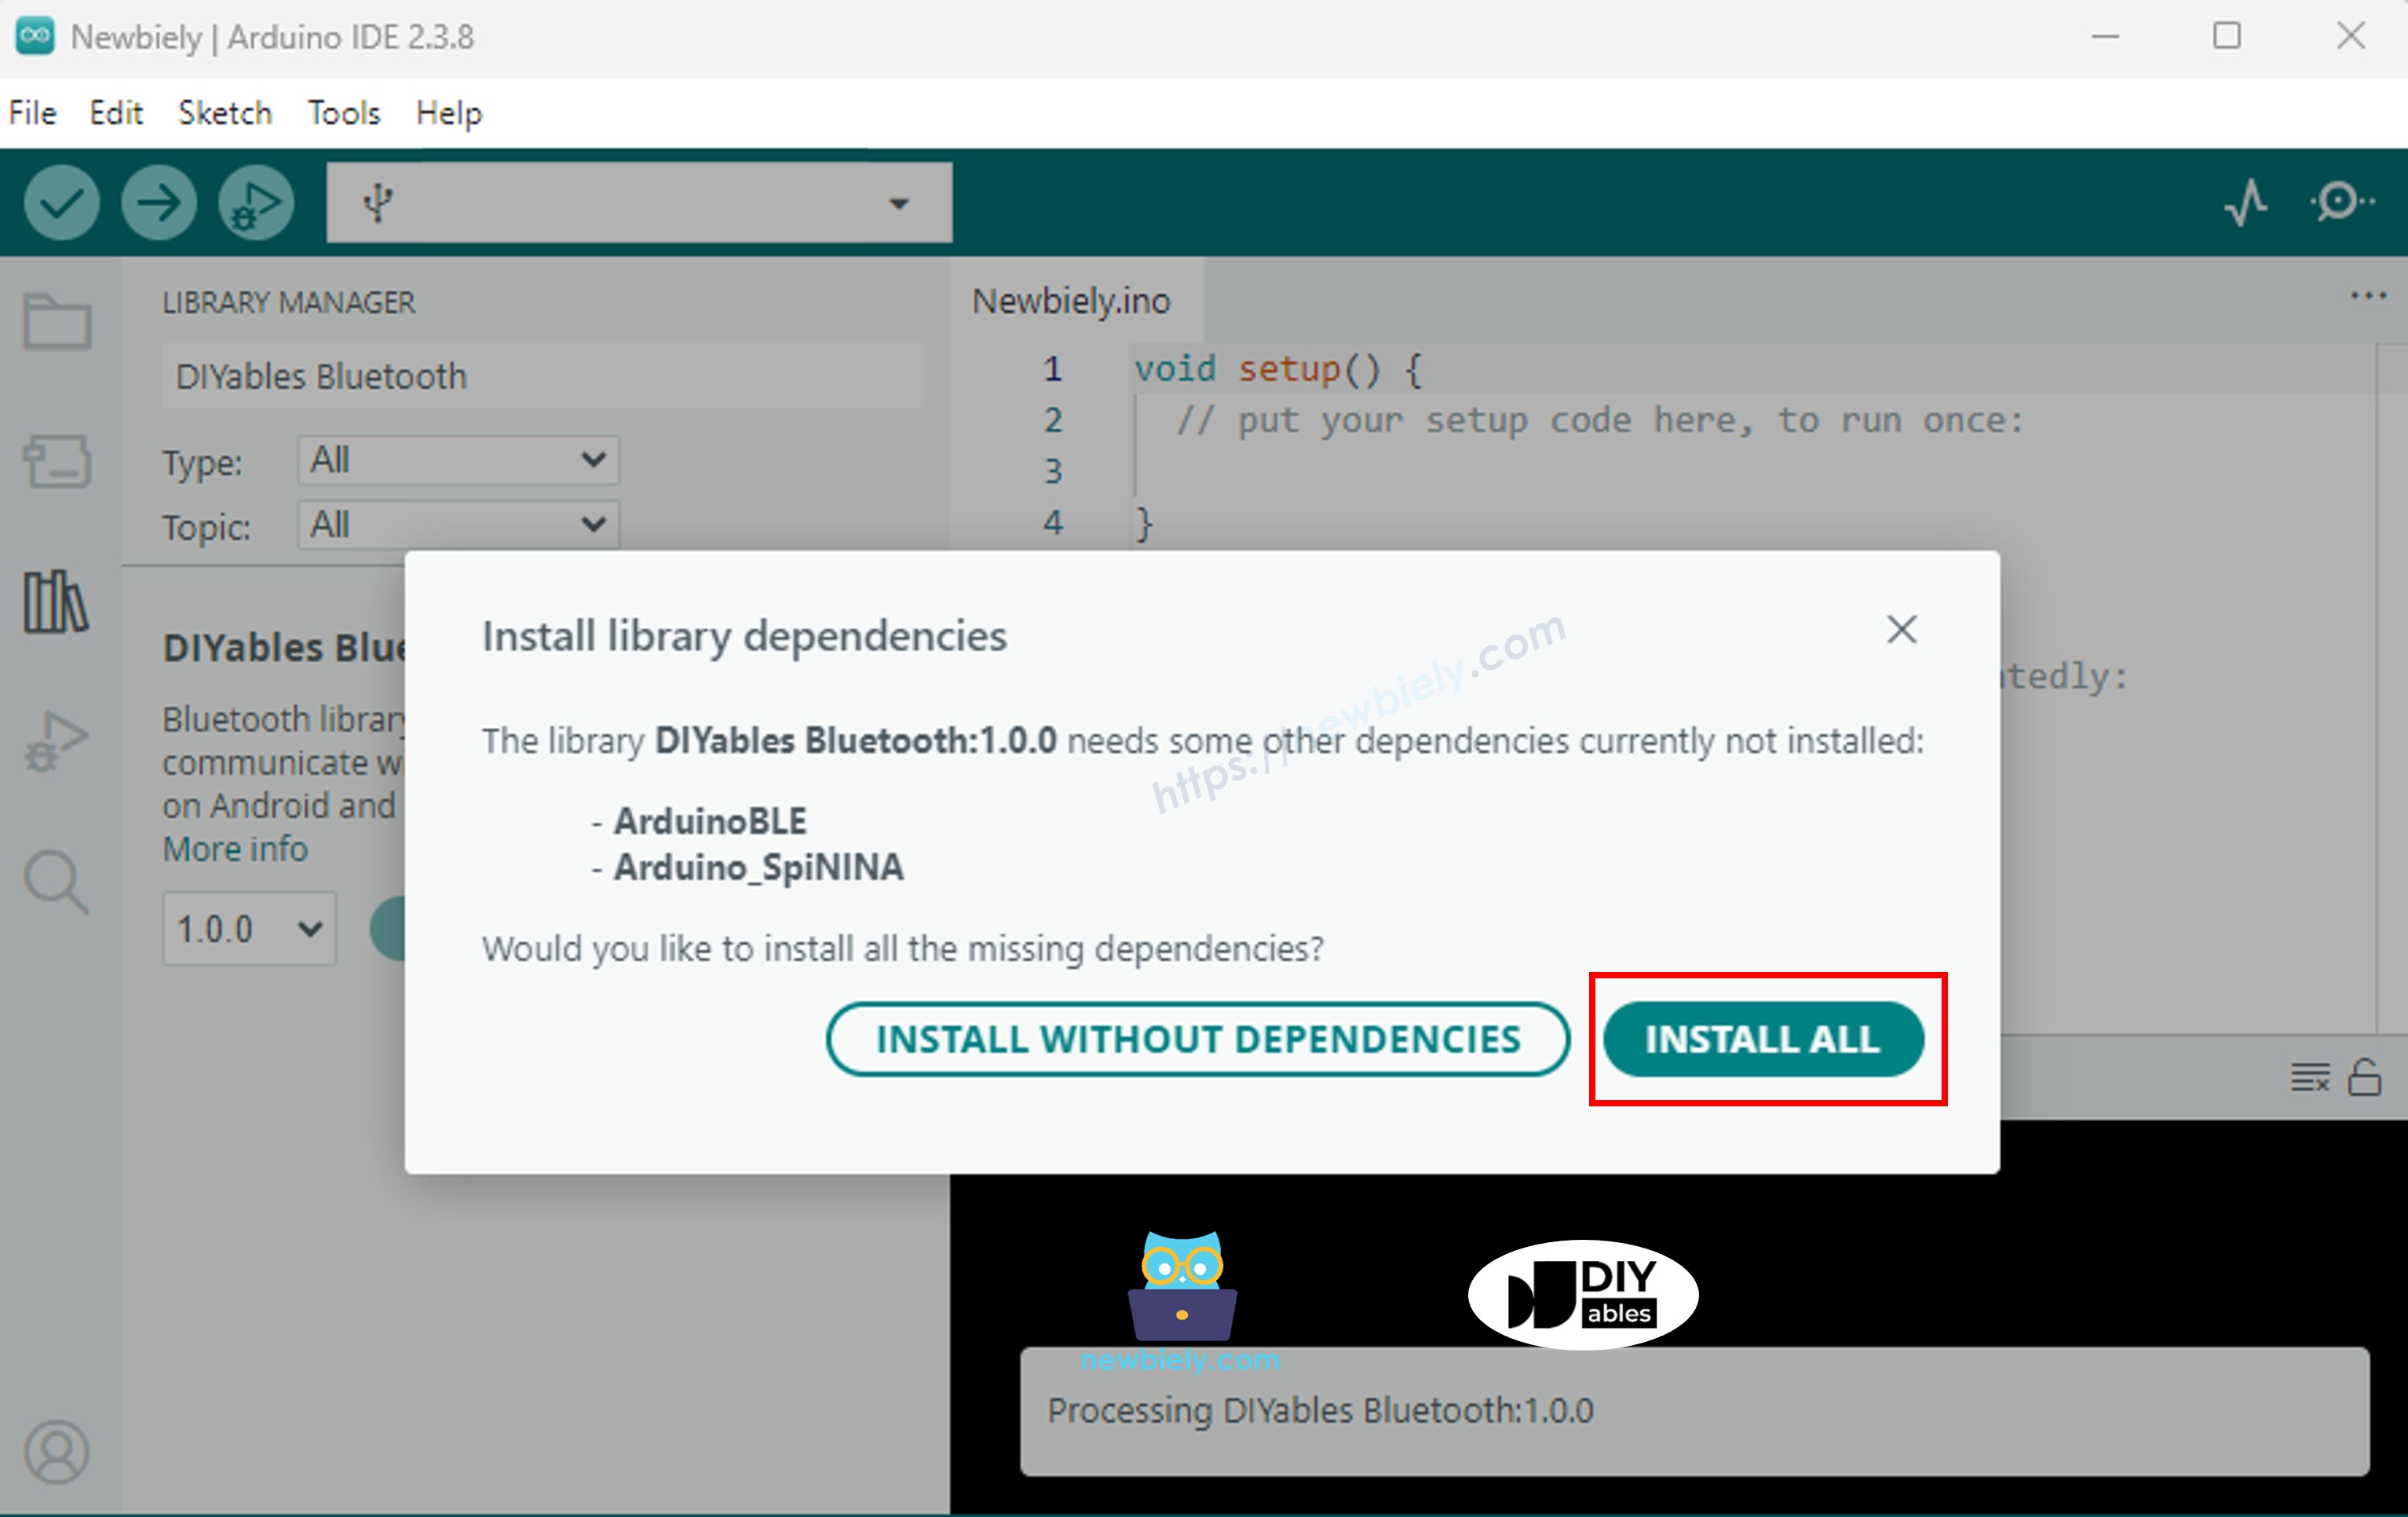
Bạn sẽ được hỏi về việc cài đặt một số thư viện phụ thuộc khác
Nhấp vào nút Install All để cài đặt tất cả các thư viện phụ thuộc.
Chọn một trong hai chế độ Bluetooth dưới đây tùy theo nhu cầu của bạn:
Code ESP32 Classic Bluetooth (chỉ hoạt động với ứng dụng trên Android)
Lưu ý: Classic Bluetooth KHÔNG được hỗ trợ trên iOS. Nếu bạn cần hỗ trợ iOS, hãy sử dụng code BLE bên dưới.
Trên Arduino IDE, đi đến File Examples DIYables Bluetooth Esp32Bluetooth_Monitor example, hoặc copy code trên và paste vào editor của Arduino IDE
/* * DIYables Bluetooth Library - ESP32 Classic Bluetooth Monitor Example * Works with DIYables Bluetooth STEM app on Android * Note: Classic Bluetooth is NOT supported on iOS. Use BLE examples for iOS support. * * This example demonstrates the Bluetooth Monitor feature: * - Send real-time status messages to the mobile app * - Display system information and sensor readings * - Receive and process commands from the app * - Perfect for debugging and system monitoring * * Compatible Boards: * - ESP32 (all variants with Classic Bluetooth) * - ESP32-WROOM-32 * - ESP32-DevKitC * - ESP32-WROVER * * Note: Select "Huge APP (3MB No OTA/1MB SPIFFS)" partition scheme * in Arduino IDE: Tools > Partition Scheme * * Setup: * 1. Upload the sketch to your ESP32 * 2. Open Serial Monitor (115200 baud) to see connection status * 3. Use DIYables Bluetooth App to connect and view monitor output * * Tutorial: https://diyables.io/bluetooth-app * Author: DIYables */#include <DIYables_BluetoothServer.h>#include <DIYables_BluetoothMonitor.h>#include <platforms/DIYables_Esp32Bluetooth.h>// Create Bluetooth instancesDIYables_Esp32Bluetooth bluetooth("ESP32_Monitor");DIYables_BluetoothServer bluetoothServer(bluetooth);// Create Monitor app instanceDIYables_BluetoothMonitor bluetoothMonitor;// Variables for demounsignedlong lastUpdate = 0;constunsignedlong UPDATE_INTERVAL = 3000; // Send update every 3 secondsint messageCount = 0;bool ledState = false;// ESP32 built-in LED (may vary by board)constint LED_PIN = 2;voidsetup() {Serial.begin(115200);delay(1000);Serial.println("DIYables Bluetooth - ESP32 Monitor Example");// Initialize LEDpinMode(LED_PIN, OUTPUT);digitalWrite(LED_PIN, LOW);// Initialize Bluetooth server with platform-specific implementation bluetoothServer.begin();// Add monitor app to server bluetoothServer.addApp(&bluetoothMonitor);// Set up connection event callbacks bluetoothServer.setOnConnected([]() {Serial.println("Bluetooth connected!"); bluetoothMonitor.send("=== ESP32 Monitor Connected ==="); bluetoothMonitor.send("System Ready"); bluetoothMonitor.send("Type HELP for available commands"); bluetoothMonitor.send(""); }); bluetoothServer.setOnDisconnected([]() {Serial.println("Bluetooth disconnected!"); });// Set up message handler for incoming commands bluetoothMonitor.onMonitorMessage([](const String& message) {Serial.print("Received command: ");Serial.println(message); handleCommand(message); });Serial.println("Waiting for Bluetooth connection...");}void handleCommand(const String& cmd) {if (cmd == "HELP") { bluetoothMonitor.send("Available Commands:"); bluetoothMonitor.send(" LED_ON - Turn LED on"); bluetoothMonitor.send(" LED_OFF - Turn LED off"); bluetoothMonitor.send(" STATUS - Show system status"); bluetoothMonitor.send(" HEAP - Show memory info"); bluetoothMonitor.send(" CLEAR - Clear monitor (if supported)"); bluetoothMonitor.send(" HELP - Show this help"); }elseif (cmd == "LED_ON") {digitalWrite(LED_PIN, HIGH); ledState = true; bluetoothMonitor.send("✓ LED turned ON"); }elseif (cmd == "LED_OFF") {digitalWrite(LED_PIN, LOW); ledState = false; bluetoothMonitor.send("✓ LED turned OFF"); }elseif (cmd == "STATUS") { showStatus(); }elseif (cmd == "HEAP") { bluetoothMonitor.send("=== Memory Info ==="); bluetoothMonitor.send("Free Heap: " + String(ESP.getFreeHeap()) + " bytes"); bluetoothMonitor.send("Min Free Heap: " + String(ESP.getMinFreeHeap()) + " bytes"); bluetoothMonitor.send("Heap Size: " + String(ESP.getHeapSize()) + " bytes"); bluetoothMonitor.send("==================="); }elseif (cmd == "CLEAR") { bluetoothMonitor.send(""); }else { bluetoothMonitor.send("✗ Unknown command: " + cmd); bluetoothMonitor.send("Type HELP for available commands"); }}void showStatus() { bluetoothMonitor.send("=== System Status ===");// LED Status bluetoothMonitor.send("LED State: " + String(ledState ? "ON" : "OFF"));// Uptimeunsignedlong uptime = millis() / 1000; bluetoothMonitor.send("Uptime: " + String(uptime / 3600) + "h " + String((uptime % 3600) / 60) + "m " + String(uptime % 60) + "s");// ESP32-specific info bluetoothMonitor.send("Free Heap: " + String(ESP.getFreeHeap()) + " bytes"); bluetoothMonitor.send("CPU Freq: " + String(ESP.getCpuFreqMHz()) + " MHz"); bluetoothMonitor.send("Chip Model: " + String(ESP.getChipModel()));// Messages sent bluetoothMonitor.send("Messages Sent: " + String(messageCount)); bluetoothMonitor.send("====================");}void sendPeriodicUpdate() { messageCount++;// Example of different message typesif (messageCount % 3 == 0) { bluetoothMonitor.send("[INFO] Heartbeat #" + String(messageCount)); } elseif (messageCount % 5 == 0) { bluetoothMonitor.send("[HEAP] Free: " + String(ESP.getFreeHeap()) + " bytes"); }else { bluetoothMonitor.send("[TIME] Uptime: " + String(millis() / 1000) + "s"); }Serial.print("Sent update #");Serial.println(messageCount);}voidloop() {// Handle Bluetooth server communications bluetoothServer.loop();// Send periodic updates (only when connected)if (bluetooth.isConnected() && millis() - lastUpdate >= UPDATE_INTERVAL) { lastUpdate = millis(); sendPeriodicUpdate(); }delay(10);}
Nhấp vào nút Upload trên Arduino IDE để upload code lên ESP32
Mở Serial Monitor
Kiểm tra kết quả trên Serial Monitor. Nó sẽ hiển thị như sau:
Newbiely | Arduino IDE 2.3.8
──
☐
✕
File
Edit
Sketch
Tools
Help
ESP32 Dev Module
Newbiely.ino
···
8Serial.println("Hello World!");
Output
Serial Monitor
Message (Enter to send message to 'ESP32 Dev Module' on 'COM15')
New Line
9600 baud
DIYables Bluetooth - ESP32 Monitor Example
Waiting for Bluetooth connection...
Ln 11, Col 1
ESP32 Dev Module on COM15
2
Code ESP32 BLE (hoạt động với ứng dụng trên cả Android và iOS)
Trên Arduino IDE, đi đến File Examples DIYables Bluetooth Esp32BLE_Monitor example, hoặc copy code trên và paste vào editor của Arduino IDE
/* * DIYables Bluetooth Library - ESP32 BLE Monitor Example * Works with DIYables Bluetooth STEM app on Android and iOS * * This example demonstrates the Bluetooth Monitor feature: * - Send real-time status messages to the mobile app * - Display system information and sensor readings * - Receive and process commands from the app * - Perfect for debugging and system monitoring * * Compatible Boards: * - ESP32-WROOM-32 * - ESP32-DevKitC * - ESP32-WROVER * - ESP32-S3 * - ESP32-C3 * - Any ESP32 board supporting BLE * * Note: Select "Huge APP (3MB No OTA/1MB SPIFFS)" partition scheme * in Arduino IDE: Tools > Partition Scheme * * Setup: * 1. Upload the sketch to your ESP32 * 2. Open Serial Monitor (115200 baud) to see connection status * 3. Use DIYables Bluetooth App to connect and view monitor output * * Tutorial: https://diyables.io/bluetooth-app * Author: DIYables */#include <DIYables_BluetoothServer.h>#include <DIYables_BluetoothMonitor.h>#include <platforms/DIYables_Esp32BLE.h>// BLE Configurationconst char* DEVICE_NAME = "ESP32BLE_Monitor";const char* SERVICE_UUID = "19B10000-E8F2-537E-4F6C-D104768A1214";const char* TX_UUID = "19B10001-E8F2-537E-4F6C-D104768A1214";const char* RX_UUID = "19B10002-E8F2-537E-4F6C-D104768A1214";// Create Bluetooth instancesDIYables_Esp32BLE bluetooth(DEVICE_NAME, SERVICE_UUID, TX_UUID, RX_UUID);DIYables_BluetoothServer bluetoothServer(bluetooth);// Create Monitor app instanceDIYables_BluetoothMonitor bluetoothMonitor;// Variables for demounsignedlong lastUpdate = 0;constunsignedlong UPDATE_INTERVAL = 3000;int messageCount = 0;bool ledState = false;voidsetup() {Serial.begin(115200);delay(1000);Serial.println("DIYables Bluetooth - ESP32 BLE Monitor Example");// Initialize built-in LEDpinMode(2, OUTPUT); // ESP32 built-in LED is usually on GPIO 2digitalWrite(2, LOW);// Initialize Bluetooth server with platform-specific implementation bluetoothServer.begin();// Add monitor app to server bluetoothServer.addApp(&bluetoothMonitor);// Set up connection event callbacks bluetoothServer.setOnConnected([]() {Serial.println("Bluetooth connected!"); bluetoothMonitor.send("=== ESP32 BLE Monitor Connected ==="); bluetoothMonitor.send("System Ready"); bluetoothMonitor.send("Type HELP for available commands"); bluetoothMonitor.send(""); }); bluetoothServer.setOnDisconnected([]() {Serial.println("Bluetooth disconnected!"); });// Set up message handler for incoming commands bluetoothMonitor.onMonitorMessage([](const String& message) {Serial.print("Received command: ");Serial.println(message); handleCommand(message); });Serial.println("Waiting for Bluetooth connection...");}void handleCommand(const String& cmd) {if (cmd == "HELP") { bluetoothMonitor.send("Available Commands:"); bluetoothMonitor.send(" LED_ON - Turn LED on"); bluetoothMonitor.send(" LED_OFF - Turn LED off"); bluetoothMonitor.send(" STATUS - Show system status"); bluetoothMonitor.send(" HEAP - Show free heap memory"); bluetoothMonitor.send(" HELP - Show this help"); }elseif (cmd == "LED_ON") {digitalWrite(2, HIGH); ledState = true; bluetoothMonitor.send("LED turned ON"); }elseif (cmd == "LED_OFF") {digitalWrite(2, LOW); ledState = false; bluetoothMonitor.send("LED turned OFF"); }elseif (cmd == "STATUS") { showStatus(); }elseif (cmd == "HEAP") { bluetoothMonitor.send("Free heap: " + String(ESP.getFreeHeap()) + " bytes"); }else { bluetoothMonitor.send("Unknown command: " + cmd); bluetoothMonitor.send("Type HELP for available commands"); }}void showStatus() { bluetoothMonitor.send("=== System Status ==="); bluetoothMonitor.send("LED State: " + String(ledState ? "ON" : "OFF"));unsignedlong uptime = millis() / 1000; bluetoothMonitor.send("Uptime: " + String(uptime / 3600) + "h " + String((uptime % 3600) / 60) + "m " + String(uptime % 60) + "s"); bluetoothMonitor.send("Free Heap: " + String(ESP.getFreeHeap()) + " bytes"); bluetoothMonitor.send("Messages Sent: " + String(messageCount)); bluetoothMonitor.send("====================");}void sendPeriodicUpdate() { messageCount++;if (messageCount % 3 == 0) { bluetoothMonitor.send("[INFO] Heartbeat #" + String(messageCount)); } elseif (messageCount % 5 == 0) { bluetoothMonitor.send("[HEAP] Free: " + String(ESP.getFreeHeap()) + " bytes"); }else { bluetoothMonitor.send("[TIME] Uptime: " + String(millis() / 1000) + "s"); }Serial.print("Sent update #");Serial.println(messageCount);}voidloop() { bluetoothServer.loop();if (bluetooth.isConnected() && millis() - lastUpdate >= UPDATE_INTERVAL) { lastUpdate = millis(); sendPeriodicUpdate(); }delay(10);}
Nhấp vào nút Upload trên Arduino IDE để upload code lên ESP32
Mở Serial Monitor
Kiểm tra kết quả trên Serial Monitor. Nó sẽ hiển thị như sau:
Newbiely | Arduino IDE 2.3.8
──
☐
✕
File
Edit
Sketch
Tools
Help
ESP32 Dev Module
Newbiely.ino
···
8Serial.println("Hello World!");
Output
Serial Monitor
Message (Enter to send message to 'ESP32 Dev Module' on 'COM15')
New Line
9600 baud
DIYables Bluetooth - ESP32 BLE Monitor Example
Waiting for Bluetooth connection...
Ln 11, Col 1
ESP32 Dev Module on COM15
2
Ứng Dụng Di Động
Cài đặt ứng dụng DIYables Bluetooth trên smartphone của bạn: Android | iOS
Nếu bạn đang sử dụng code ESP32 Classic Bluetooth, bạn cần ghép nối ESP32 với điện thoại Android của mình trước khi mở ứng dụng:
Đi đến Settings > Bluetooth của điện thoại
Đảm bảo Bluetooth đã được bật
Điện thoại của bạn sẽ quét các thiết bị có sẵn
Tìm và chạm vào "ESP32_Monitor" trong danh sách các thiết bị có sẵn
Xác nhận yêu cầu ghép nối (không cần PIN)
Chờ cho đến khi hiển thị "Paired" dưới tên thiết bị
Nếu bạn đang sử dụng code ESP32 BLE, không cần ghép nối. Chỉ cần tiếp tục bước tiếp theo.
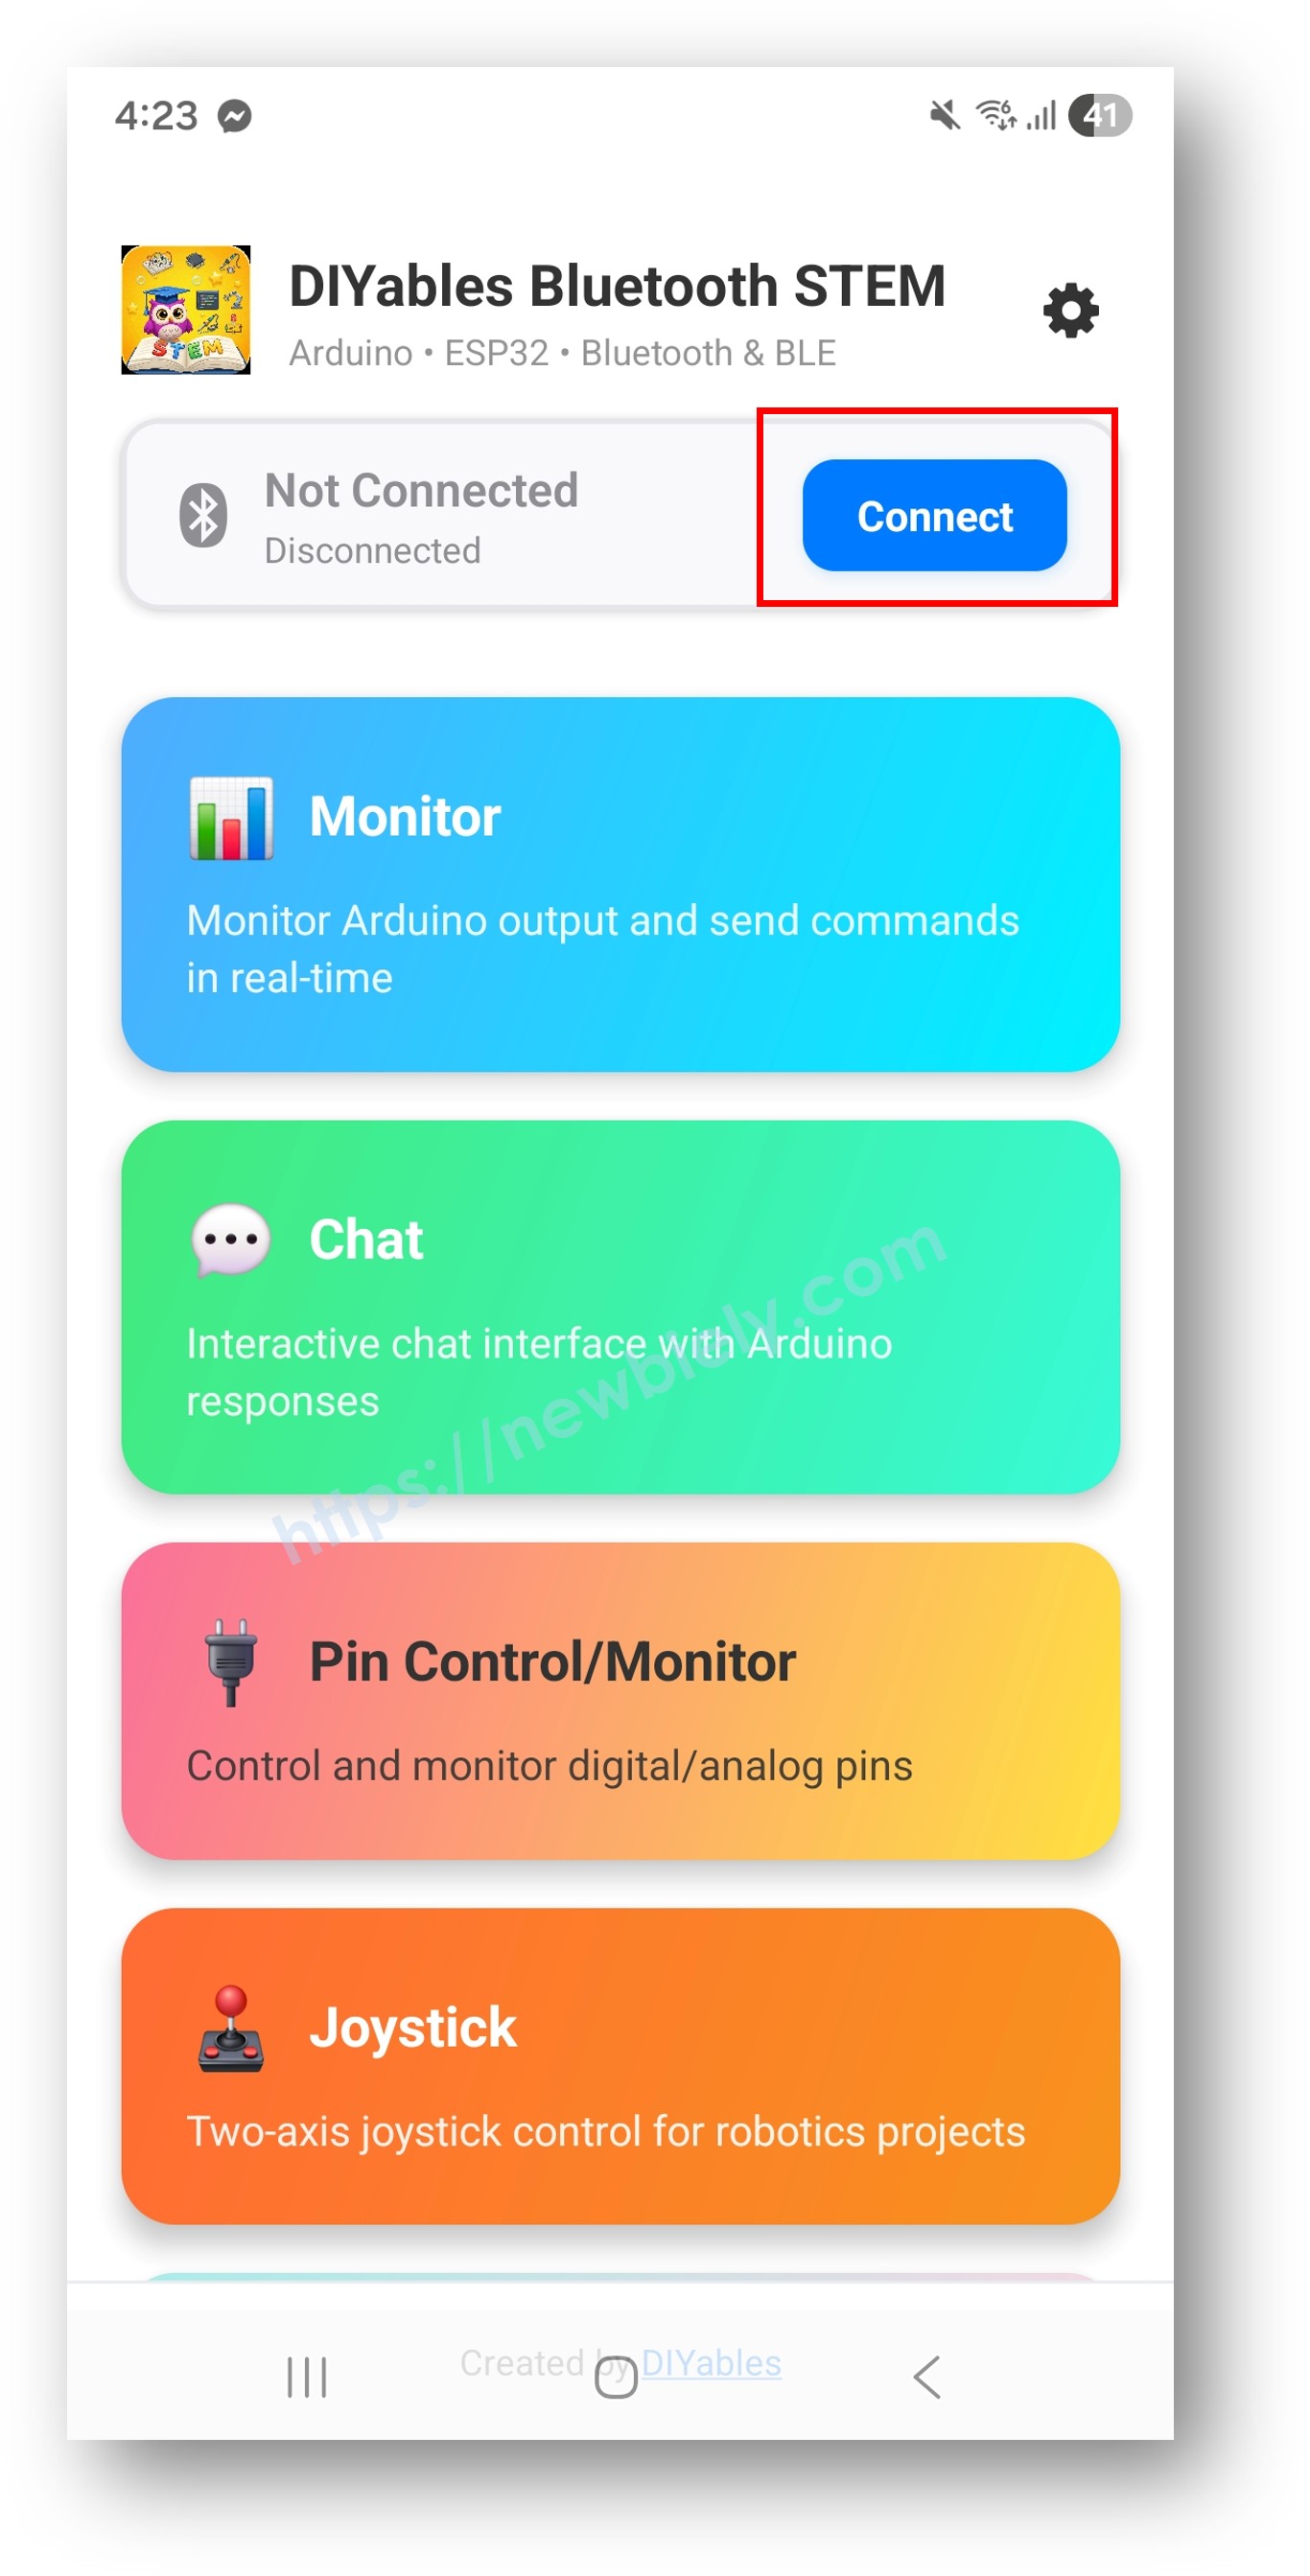
Mở ứng dụng DIYables Bluetooth
Khi mở ứng dụng lần đầu tiên, nó sẽ yêu cầu quyền. Vui lòng cấp các quyền sau:
Quyền Nearby Devices (Android 12+) / quyền Bluetooth (iOS) - cần thiết để quét và kết nối với các thiết bị Bluetooth
Quyền Location (chỉ Android 11 trở xuống) - cần thiết cho các phiên bản Android cũ để quét thiết bị BLE
Đảm bảo Bluetooth đã được bật trên điện thoại của bạn
Trên màn hình chính, chạm vào nút Connect. Ứng dụng sẽ quét cả thiết bị BLE và Classic Bluetooth.
Tìm và chạm vào thiết bị của bạn trong kết quả quét để kết nối:
Đối với Classic Bluetooth: chạm vào "ESP32_Monitor"
Đối với BLE: chạm vào "ESP32BLE_Monitor"
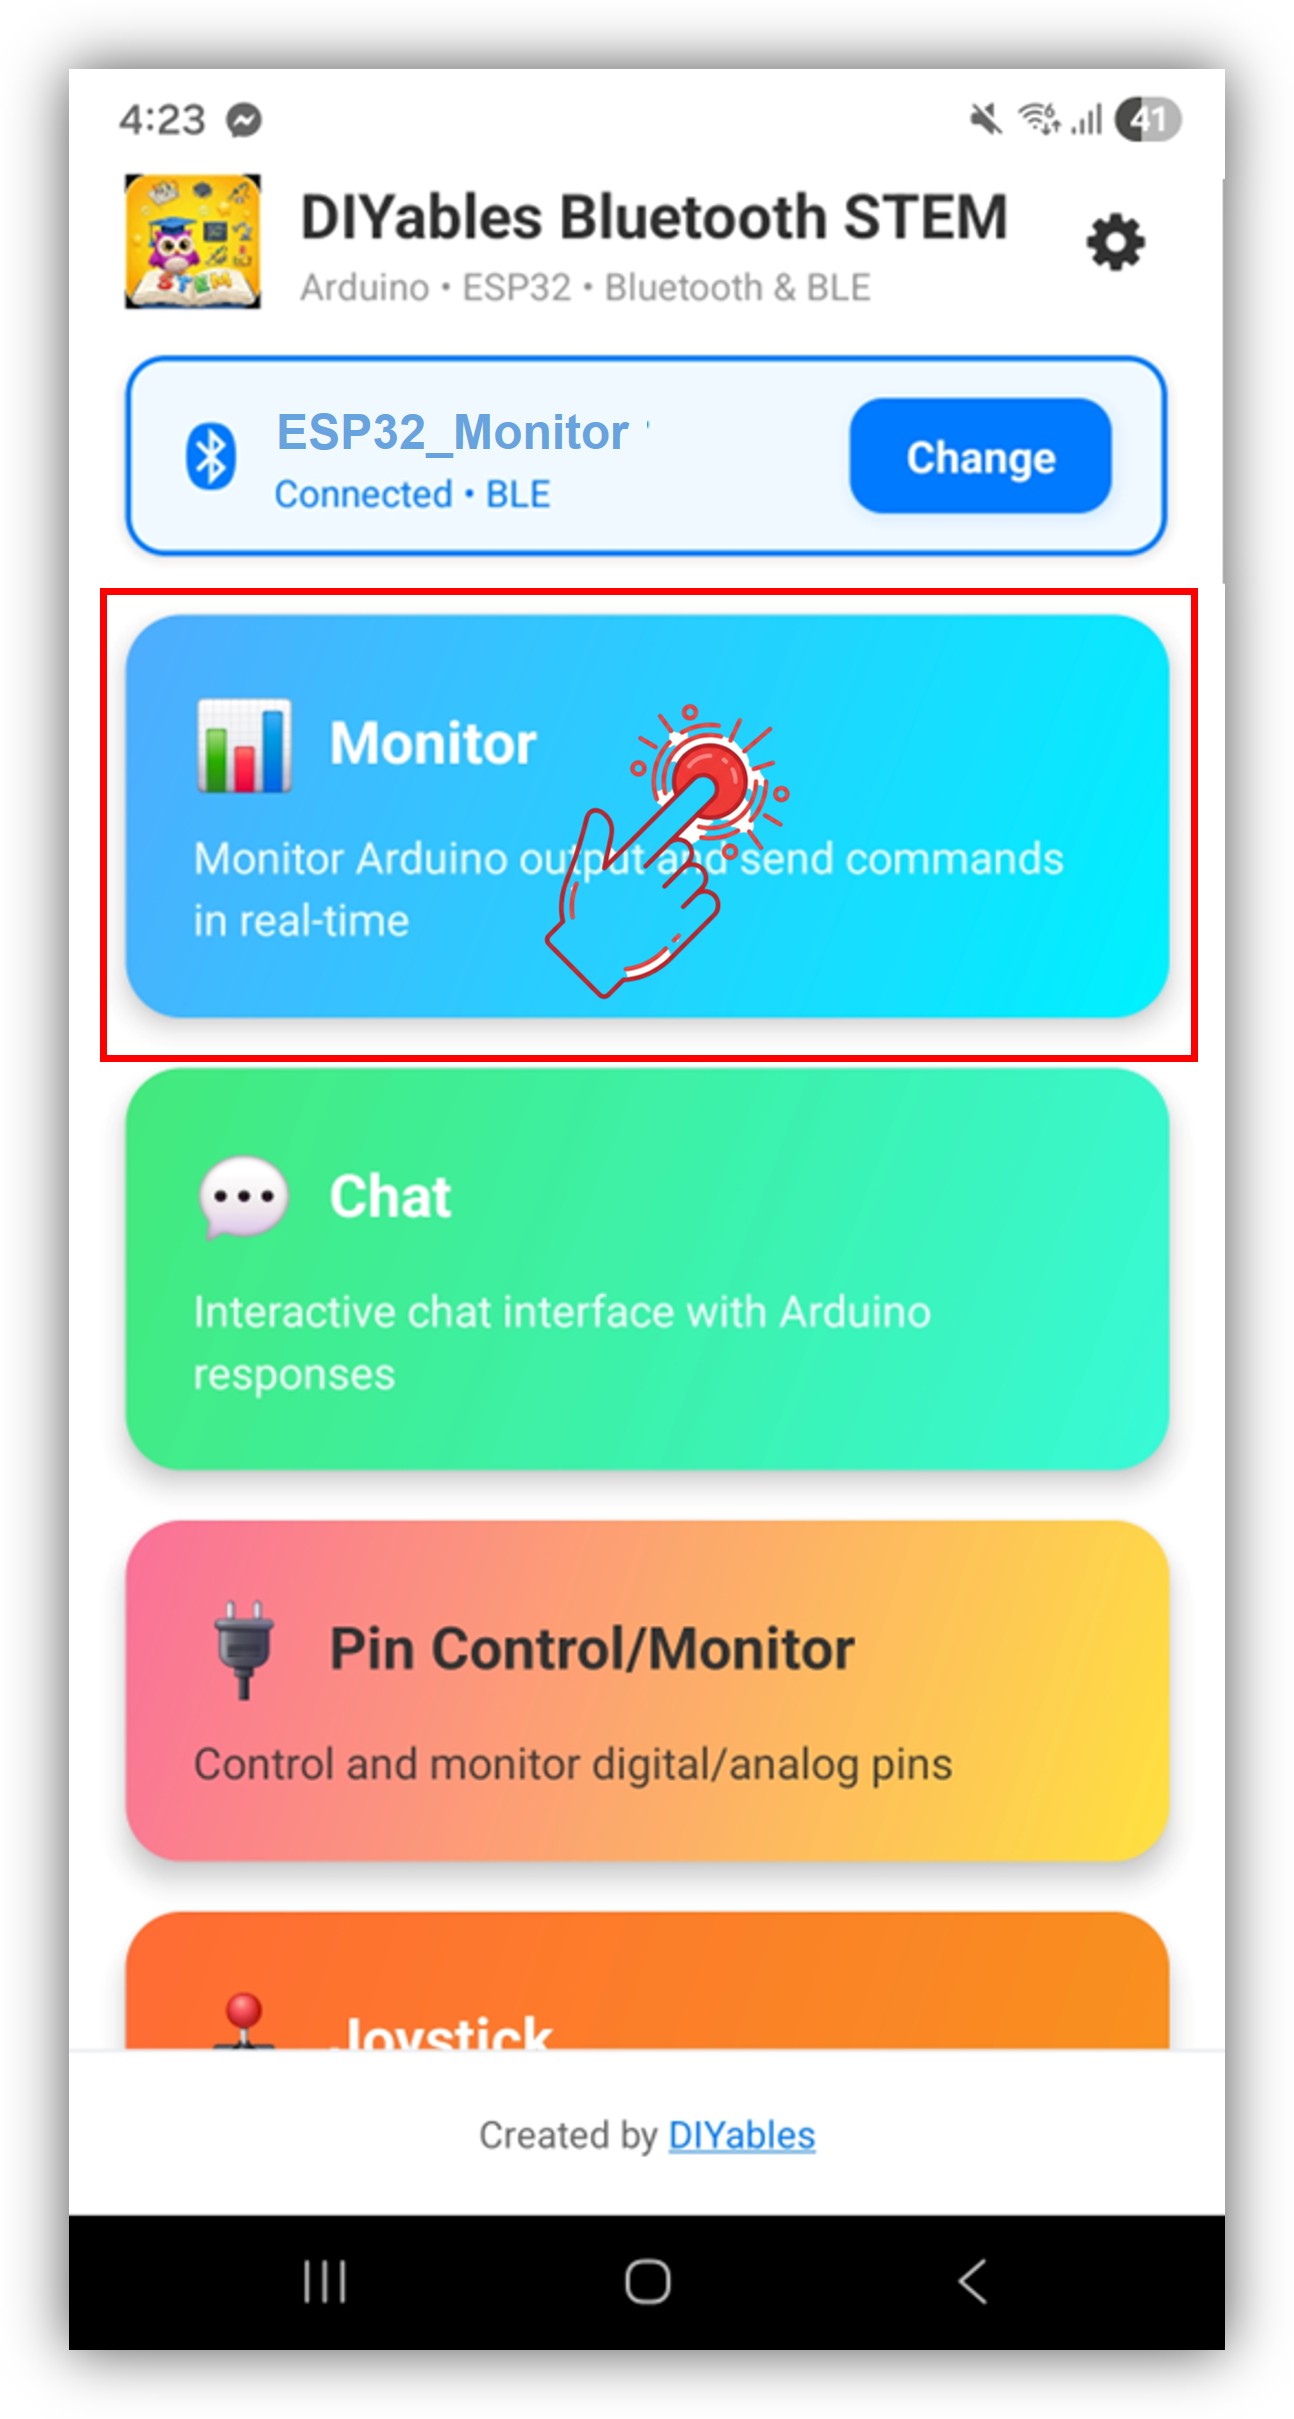
Sau khi kết nối, ứng dụng tự động quay về màn hình chính. Chọn ứng dụng Monitor từ menu ứng dụng.
Lưu ý: Bạn có thể chạm vào biểu tượng cài đặt trên màn hình chính để ẩn/hiện các ứng dụng trên màn hình chính. Để biết thêm chi tiết, xem Hướng Dẫn Sử Dụng DIYables Bluetooth App.
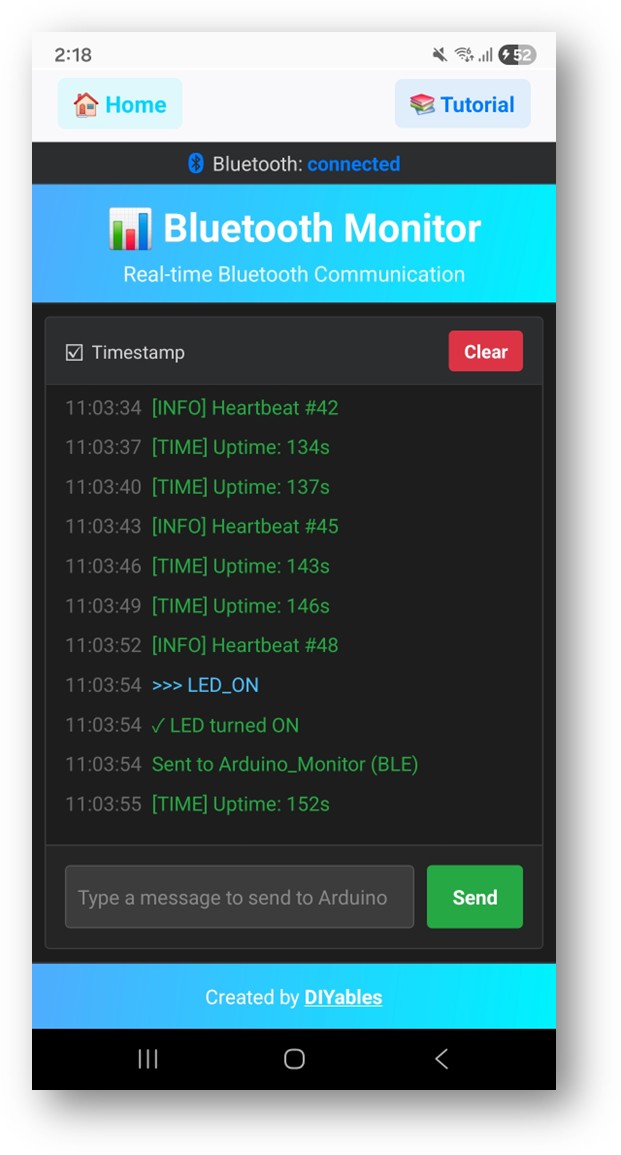
Bạn sẽ thấy các tin nhắn trạng thái đang được truyền tải trên màn hình monitor
Gõ LED_ON vào trường nhập liệu và chạm vào Send — LED tích hợp trên ESP32 sẽ BẬT, và monitor sẽ hiển thị tin nhắn xác nhận
Bây giờ hãy nhìn lại Serial Monitor trên Arduino IDE. Bạn sẽ thấy:
Newbiely | Arduino IDE 2.3.8
──
☐
✕
File
Edit
Sketch
Tools
Help
ESP32 Dev Module
Newbiely.ino
···
8Serial.println("Hello World!");
Output
Serial Monitor
Message (Enter to send message to 'ESP32 Dev Module' on 'COM15')
New Line
9600 baud
Bluetooth connected!
Sent update #1
Sent update #2
Received command: HELP
Received command: STATUS
Ln 11, Col 1
ESP32 Dev Module on COM15
2
Gõ các lệnh trong ứng dụng (HELP, STATUS, LED_ON, LED_OFF, HEAP) và xem các phản hồi
Tùy Chỉnh Sáng Tạo - Điều Chỉnh Code Cho Dự Án Của Bạn
Gửi Tin Nhắn Đến Ứng Dụng
Sử dụng phương thức send() để truyền tải tin nhắn văn bản đến màn hình monitor:
// Gửi tin nhắn đơn giảnbluetoothMonitor.send("System initialized");bluetoothMonitor.send("Sensor reading: 25.3°C");// Gửi dữ liệu có định dạngbluetoothMonitor.send("[INFO] Heartbeat #" + String(count));bluetoothMonitor.send("[WARN] Temperature high: " + String(temp) + "°C");bluetoothMonitor.send("[ERROR] Sensor disconnected");// Gửi thông tin hệ thốngbluetoothMonitor.send("Free Heap: " + String(ESP.getFreeHeap()) + " bytes");bluetoothMonitor.send("Uptime: " + String(millis() / 1000) + " seconds");
Nhận Lệnh Từ Ứng Dụng
Sử dụng callback onMonitorMessage() để nhận các lệnh được gõ trong ứng dụng Monitor và phản ứng với chúng:
Bạn có thể thêm nhiều lệnh tùy chỉnh theo nhu cầu bằng cách thêm nhiều khối elseif hơn. Ví dụ, thêm RELAY_ON / RELAY_OFF để điều khiển relay, hoặc READ để kích hoạt đọc cảm biến — bất kỳ từ nào bạn gõ trong ứng dụng đều có thể trở thành lệnh.
Xử Lý Sự Kiện Kết Nối
Bạn có thể phát hiện khi ứng dụng kết nối hoặc ngắt kết nối với ESP32:
bluetoothServer.setOnConnected([]() {Serial.println("Bluetooth connected!"); bluetoothMonitor.send("=== ESP32 Monitor Connected ==="); bluetoothMonitor.send("System Ready"); bluetoothMonitor.send("Type HELP for available commands");});bluetoothServer.setOnDisconnected([]() {Serial.println("Bluetooth disconnected!");});if (bluetoothServer.isConnected()) { bluetoothMonitor.send("Status update");}
Cách Sử Dụng Monitor
Điều Khiển Giao Diện Ứng Dụng
Giao diện monitor trong ứng dụng DIYables Bluetooth cung cấp:
Hiển Thị Tin Nhắn: Danh sách tin nhắn nhận được có thể cuộn với tính năng tự động cuộn
Nhập Văn Bản: Gõ lệnh ở phía dưới
Nút Send: Chạm để gửi lệnh đã gõ đến ESP32
Lệnh Tích Hợp
Code ví dụ bao gồm các lệnh tích hợp này:
HELP — Hiển thị tất cả các lệnh có sẵn
LED_ON — Bật LED tích hợp
LED_OFF — Tắt LED tích hợp
STATUS — Hiển thị trạng thái hệ thống (trạng thái LED, thời gian hoạt động, heap, tin nhắn đã gửi)
 English for KidsHọc tiếng Anh vui nhộn cho trẻ nhỏ.Tải về trênGoogle PlayTải về trênApp Store
 Bubble NoteGhi chú tự xóa — viết như nhắn tin.Tải về trênGoogle PlayTải về trênApp Store
 Tôi Không MuaĐánh bại mua sắm bốc đồng, tiết kiệm hơn.Tải về trênGoogle PlayTải về trênApp Store
 Con Đường Tri ThứcBài thi thử để học mọi thứ.Tải về trênGoogle PlayTải về trênApp Store